Warm floors make life in an apartment as comfortable as possible. The microclimate in rooms with heated floors is characterized by uniform heating. At the same time, the interior is not spoiled by radiators or cast iron batteries. But in order for heated floors to delight you with their warmth, you need to be sure that you are purchasing a working device.
But how can you check this if the instructions say that the heated floor must not be connected to the electrical network until its installation is completed? Meanwhile, even a floor of good quality purchased in a store can be damaged at all stages of its arrangement. And it will be very disappointing when, having completed all the labor-intensive work, including pouring screed, laying tiles and several days of tedious waiting, it turns out that the floor is cold and is not going to be heated. Therefore, it is necessary to check the performance of heated floors several times before completing their installation.
The article tells you exactly when to start checking a heated floor, how to use a multimeter to test it for a break, and what the absence of resistance indicates. The article will also tell you how to determine the performance of a heated floor without using a multimeter.
Checking the sensor resistance with a multimeter
If the floor is in good working order, but does not function, then the cause of the malfunction lies elsewhere. There is a method for checking a heated floor sensor with a multimeter, since the device is a resistor, which means it has its own resistance.
True, the multimeter readings largely depend on the floor temperature. At a temperature of 5 degrees, it will show 22 kOhm, and at 40C - only 6 kOhm. In general, the resistance of the heated floor sensor should correspond to the factory setting. When it differs from the declared value by more than 5 kOhm or is equal to zero, then the sensor is broken and should be replaced.
Check in store
It is necessary to check the heated floor for the first time at the time of purchase. Moreover, such a right is expressly stated in the Law “On Protection of Consumer Rights”. You can check with a multimeter by checking the actual resistance value with what is indicated in the documents for the heated floor.
To measure, you need to set the resistance mode to a high value on the multimeter. The indicator on the device display should not differ significantly from what is indicated in the documents. Otherwise, you can demand the replacement of a product of inadequate quality with a serviceable one.
How to check the functionality of the thermostat?
Let's look at an example of how you can check whether the thermostat is working using an ordinary light bulb.
Step 1. The thermostat is connected to the network in compliance with all rules. That is, the phase wire is connected to terminal L, and the zero wire is connected to terminal N. A temperature sensor and a regular light bulb screwed into the socket are also connected. It will serve as a load indicator.
The light bulb will serve as a load indicator
Step 2. The thermostat connected to the network is turned on using a toggle switch.
Step 3. The lever responsible for increasing the temperature is set to maximum.
The maximum temperature is set
Step 4. If the thermostat is working properly, the light will light up.
Step 5. Using this circuit, you can also check the temperature sensor. To do this, take it in your hand, and the temperature regulator is set to the average value.
Using this circuit you can also check the temperature sensor
Step 6. The temperature control is turned again to higher values. The light will come on again. But when the sensor heats up to the temperature of the human body, it will go out.
The light came on again
Step 7. After this, the system can be left alone. After some time, the light will light up again when the temperature sensor cools down and sends a signal to the thermostat.
The light came on again
Diagnostics of the thermostat using a light bulb
You can diagnose the operation of the thermostat using a simple light bulb.
To do this, perform the following actions:
- terminal N with the neutral cable of the thermostat is connected to the network, and terminal L to the phase one;
- connect a light bulb to the sensor, which will serve as an indicator;
- Having set the maximum heating, turn on the device. If the light comes on after this, it means the regulator is working properly.
There is another way to check the performance of a heated floor:
- completely turn off the electricity in the room by snapping off the plugs on the panel;
- connect the heating system wires bypassing the thermostat to the electrical panel;
- turn on the power supply, wait 25-30 minutes, see if the floors are heated.
If, with such a direct connection, the floors become warm, then this indicates a malfunction of the thermostat.
To check the serviceability of the heating cable, you need to measure its resistance using a multimeter.
Diagnosis of electric floor faults
Failure of heated floors can lead to complete failure of the equipment or a decrease in its efficiency. In the first case, you can start diagnosing immediately. In the second, you first need to objectively evaluate the operation of the system. The fact is that apartment owners often overestimate the ability of electric heated floors to heat a room. As a result, they feel that the system is not working efficiently enough.
If it doesn't heat at full strength
To objectively evaluate the performance of an electric floor, note the time it takes to heat up and compare it with standard values:
- The comfort of a film floor without a screed and an adhesive layer begins to be felt after 10 minutes of operation of the system;
- Matte floors in the adhesive layer are heated to the temperature set by the thermostat in 6-8 hours;
- Cable heated floors under a thick screed warm up for 24 hours.
If your floors fit within the specified standards, then there are no problems. It may seem that the surface is not warm enough due to the difference in body temperature (36.6 °C) and that set on the thermostat (20-30 °C). The task of the electrical system is to heat the floor and air to a temperature that is comfortable for humans, and its average value is only 21 °C.
If the electric floor takes too long to reach operating temperature or cannot reach it at all, then there is at least one of the reasons:
- The thermal sensor is installed too close to the heating element. When the set temperature is reached, it causes the thermostat to turn off. But since the heat has not yet reached the floor covering, it remains unheated;
- Sensor malfunction. Check the voltage at the heating element terminals and at the power supply without turning off the thermostat. The readings should be the same. Additionally, check the resistance of the sensor, which must match the value specified in the thermostat’s data sheet;
- Low voltage. You can check with a multimeter. The voltage is measured at the terminals marked L and N. Before measuring, you need to remove the thermostat from the socket. If the voltage is less than required. Then the problem has been found;
- Lack of thermal insulation layer. Heat loss can be so great that your floor will never be able to warm up. Remember, when installing the system you used heat-insulating reflective materials. Were the rules for their use followed? This is especially true for owners of apartments on the ground floor;
- Power calculated incorrectly. If the underfloor heating is calculated incorrectly, it will not heat well.
From the list of possible causes of poor floor heating, it is clear that most problems can be avoided at the stage of calculation and installation of the electrical system. Any errors noticed during installation can be more easily corrected before finishing with the finishing coat. And if the screed has already been installed and the tiles have been laid, then repairing the electric heated floor promises to be long and expensive.
If it doesn't heat up at all
If the electric underfloor heating does not heat at all, then you need to carry out diagnostics in the following order:
- Check for voltage. The floor stops heating completely only when it is completely absent. If there is power, then proceed to step 2;
- Check the sensor by measuring its resistance. If it is faulty, it will have to be replaced. Otherwise, go to step 3;
- Check the operation of the temperature controller. Replacing it is the easiest and cheapest way to repair floors. If it is OK, go to step 4
- Check the resistance in the circuits using the same multimeter. If it does not correspond to the values indicated in the passport, then you will have to look for short circuits or cable breaks.
If the sensor and temperature controller are working properly, and there is voltage, but the floor still does not heat, then it will need to be repaired. In order not to dismantle the entire coating, you need a special tool for troubleshooting. This is especially true if the mat or cable is mounted in a screed, the installation of which is a labor-intensive and expensive task.
too much resistance
Posted by shatl, February 28, 2015 in Warm floor (electric)
Create an account
Register in our community. It's very simple!
Already have an account? Sign in.
Or login using one of these services
Google recommends
Our recommendations
What is it for?
Phoenix posted a topic in Tools and Equipment, January 15, topic
I suggest warming up for those who are interested.
Does anyone have any guesses as to what this is for?)
birch suvel
Sano published a blog post in Slab Furniture, January 23, blog post
This is the cut of birch we brought to the workshop, while we are preliminary planning to make a coffee table.
The preparation of such material itself was not the easiest thing, not only was it found in the forest, it was also difficult to remove, then the suvel was cut into pieces, but after that it was cooked using a special technology for a couple of weeks, and then dried for a couple of years.
In general, this is a whole epic, and due to the fact that so much has been done just for the blank and based on the size, the price of such material is already becoming very high. And this is not the table itself.
You need to approach the work thoughtfully and make a smooth tabletop with minimal loss in the thickness of the workpiece.
Ceilings yin and yang
Ramon published a topic in Our works, December 12, 2008, topic
One of our first works supported the oriental theme with a sakura branch
Table made of slabs. Swallows Hoffmann
Sano published a blog post in Slab Furniture, Sunday at 20:28, blog post
I make a table to order, the tabletop is made from slabs of elm or otherwise elm.
In one of the slabs there is a fairly extensive and sometimes through crack. I cleaned it and also filled it with epoxy resin, it will seal the crack and also level the surface of the countertop.
As an additional blocking from the opening of the crack, Hoffman swallows are embedded, which not only enhance, but also create a decorative effect.
Some will say that they spoil the appearance, and they should have been placed on the back side of the countertop. But the fact of the matter is that you can’t put them there because of the features of the countertop.
I personally like these swallows and besides, their presence was approved by the customer of the table.
They were made from scraps of the same tabletop, two dark swallows lay on the light half, and one light one was cut into the dark half of the tabletop.
A short excursion into where this furniture element came from. For me, this Homphan did not invent anything, but simply took what has been used for centuries in carpentry and other art. In fact, this is the same dovetail connection.
Let's leave this to the author's conscience; besides, the name swallow or Hofmann's butterfly stuck to this type of connection, just as, for example, all copying machines are called Xerox.
In 1985, while still a student at Harvard University, Thomas Hoffmann developed a system for joining parts made of wood and chipboard materials (MDF and chipboard), which was named “Hoffmann Swallow” and was soon adopted throughout the woodworking industry.
Checking when a fault occurs
During the operation of the heated floor, deviations from the normal operating mode may occur. Let us consider the main manifestations of system dysfunction.
No heating over the entire floor area
In this case, you need to start checking for a break from the “head”, that is, make sure that power is supplied to the system. If the mains voltage indicator does not light up, you need to check the machine on the panel. After this, you can check whether voltage is supplied to the input of the temperature controller. The presence of voltage at the input and its absence at the output indicates a malfunction in the thermostat itself. The reason may be either in the regulator itself, or in the temperature sensor, which can be checked by measuring its resistance. If you apply voltage to the heated floor directly, without a thermostat, you can test the cable for serviceability.
A situation may arise when the circuit breaker in the panel that supplies the heated floor is turned off by the protection. This indicates a short circuit. To localize the short circuit, we check the resistance between the phase and neutral wires supplying the heated floor. Before ringing the cable, remove the voltage. Disconnect the power wires from the temperature controller. We measure the “phase-zero” resistance in the area from the panel to the thermostat. If the device shows zero resistance, the wiring in this area is damaged; if the resistance is high, we continue the search. Disconnect the underfloor heating cable from the temperature regulator. We take measurements at the regulator input. If a short circuit is detected during the test, then the damage is located inside the thermostat. If not, all that remains is the underfloor heating cable itself. You can check this by measuring the resistance between the cable cores. In this case, you cannot do without opening the floor surface.
What to do when voltage is supplied to the heating elements, but heating does not occur? In this case, the cable must be tested, that is, checked for integrity (or for break, if you like). Having set the multimeter to resistance measurement mode, we take measurements between the cable cores. A resistance value close to infinity indicates a conductor break.
The video below clearly shows how to check an electric heated floor with a multimeter by measuring the resistance of the heating cable:
The heating temperature of the heated floor is not adjustable
If the heating elements over the entire floor area warm up, but the temperature does not change when the setpoint set by the regulator is changed, it is necessary to check the system, determining one of two possible options:
- malfunction in the temperature regulator circuits;
- The temperature sensor is faulty.
In this case, the temperature regulator must be dismantled, disconnecting all wires from it and sent for repair. How to check the temperature controller for a heated floor is shown in the video:
If you suspect a sensor, you should check its resistance. To do this, the sensor wires are disconnected from the regulator and the resistance between them is measured. A conclusion about the serviceability of the heated floor temperature sensor can be made by checking the value of its electrical resistance and comparing it with the passport data. As a last resort, you can do without a multimeter. Since this element cannot be repaired anyway, you can proceed as follows. Buy a known-good sensor, place it on the heated floor, and connect it to the regulator. If you ensure good contact of the sensor with the floor, the system should work if the regulator is working. After this, you can install the new sensor in place. This will require opening up the floor surface.
Checking voltage from circuit breakers to thermostat
It also happens that the heating elements are checked upon purchase, and the consumer is convinced that they are in full working order. But, after connecting to the network, the floor in the apartment remains cold. Before looking for a fault, you need to make sure that the settings on the thermostat are correct and that there are no problems with electricity in the network. If the thermostat indicator is inactive, there is a need to check whether the circuit breakers in the electrical panel are turned on. It is possible that they simply forgot to turn them on after the installation of the floors was completed, or maybe they were knocked out.
If the machines are turned on and there is voltage in the network, you need to make sure that the wiring going to the thermostat is in good condition. To do this, you need to de-energize the network and measure the resistance with a multimeter. If the resistance is zero, then you need to look for damage precisely in this segment. If the multimeter needle or display indicates the presence of resistance in the wire, then it is in order and the problem must be looked for further. And it's worth starting with the thermostat.
Where do leaks come from in the heating system?
The most common cause of leaks in metal pipes is corrosion. Steel, even treated with special coatings, rusts. Only the speed of the process differs. It depends on the operating conditions of each specific system.
Heating pipe rupture
Metal is affected by temperature changes, moisture, and water hammer. Impurities in the coolant may contain aggressive chemicals and abrasives that accelerate corrosion. The places where system elements rust most quickly begin to leak. As a rule, these are connections, joints, seams.
Polymer materials do not rust, but this does not mean that they do not leak. Sooner or later, metal-plastic pipes may leak. Most often this happens if they are chosen incorrectly. Some home owners save money and buy cold water pipes. This is a big mistake, because... leads to deformations and breakthroughs in the system.
Homeowners who choose low-quality products for heating often suffer. Cheap polymer pipes swell, burst, and leak. If this happens, you have to replace the damaged sections. Imaginary savings result in additional costs of money, effort and nerves.
Metal-plastic pipes, which are specially designed for heating systems, are least at risk of leaks. They are designed to withstand high coolant temperatures, do not deform and can last for several decades.
Metal-plastic pipe repair
Determine the side with a cliff
Using an ohmmeter, determine which side (towards the thermostat or towards the end of the mat) the break is relative to your cut. Twist the black and white wires together on the thermostat using a jumper clamp (do not connect the ground wire). Check the resistance from the cut to the thermostat. The readings should appear (a fraction of the factory value, since not the entire cable is measured), and there should be no ground fault. If this is not the case, then the tear is on that side and the OTDR should be reused as described above to determine the distance of the tear from the cut site. If the original drawing and estimate were done correctly, you should be quite close and the distance reading in meters should be small.
If everything is fine with this chain, go to the other side of the cut and use an ohmmeter to measure towards the end of the mat. If the readings obtained do not correspond to the complete circuit, reuse the OTDR as described above to get closer to the break location.
Functionality check upon purchase and after installation
The first check is carried out when purchasing the system. You need to ask the seller to demonstrate the operation of the device. If the attached documentation indicates the resistance values of the mats, it is advisable to check their actual values with a multimeter or tester. You can also check the insulation resistance. This can be done using a multimeter in high resistance mode, or a megohmmeter.
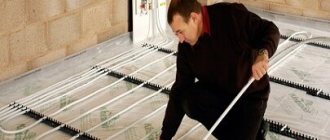
After installing the heating elements, before laying the tiles and before pouring the screed, you need to connect the electric heated floor to the power supply and observe its operation for a while in different modes. You should make sure that the thermostat, temperature sensor are working properly and that the heating cable is intact. With a working system, all sections of the cable should be heated evenly, the temperature of the heating elements should change in accordance with the setting of the thermostat.
If there is such a possibility, it is most convenient to check the uniformity of heating of the elements with a thermal imager, on the screen of which you can see whether each section of the floor is working or not. This device produces an image that is created by infrared rays, as shown in the photo below:
At this stage, if any malfunction is detected during testing, it is better not to look for the cause and not try to eliminate it. You need to take advantage of the warranty and replace the system.
Answers from experts
Sergey Popov:
In no case. The foreman is clearly scamming you. The heated floor heats up immediately. If the floor is electric, then the circuit break or the regulator does not work.
Agonda:
Warm floors come in different varieties. The electric one immediately starts to heat up. Water longer. In our large area (the entire first floor, approximately 100 sq. m.), the water heated floor was turned on for the first time and heated up for 24 hours. And that's a lot. Is your foreman a fraud or an incompetent. Most likely he screwed up, now he’s thinking about how to get rid of it and leave. I don’t want to fix it at my own expense...
Evolutionary:
Well, he turned it down about moisture. What kind of flooring do you have (cable or mat)? If the cable is in a tie, it can really take a long time to heat up. And check: you can disconnect the wires of the floor itself from the thermostat and measure the resistance with a tester or by email. to the counter. Turn off all email. appliances, and then turn on the electric floor. The counter should start spinning.
Andrey:
The foreman claims that to check the correctness of the work you need to wait a month, he says that there is still moisture under the tiles and it interferes with heating... you need to trust people, we don’t live in the forest, support this holy man and tell him what’s stopping you from not only heating, but also paying for all his work, he himself suggested waiting a month, so meet this absolutely honest man halfway... .
Winds:
I support Andrey. Offer to either fix the problem or get money when the floor works.
Any electrical appliance generates heat if it works, regardless of humidity. And if the foreman himself said that he laid the cable on a damp base or laminate on a wet base, demand money from him for damaged materials - a violation of technology
Dmitry Ostankov:
You need to check two indicators: 1) the resistance of the heating core of the mat (using a multimeter). It must correspond to what is specified in the product passport. permissible deviations: +10% / -5% from the specified indicator. The multimeter terminals are connected to the heating core terminals at both ends. 2) insulation resistance (using a megohmmeter). Between the heating leads at both ends of the mat, the megohmmeter should show “0”, i.e. K/Z. , since these wires are closed. Between any of the cores and the screen, the device should show “infinity” - “8” on the side. This is the main indicator. It indicates the integrity of the mat's insulation. This indicator is especially important after filling. And don’t believe electricians who only checked the resistance with a Chinese tester and say that everything is fine.
Andrey Volkov:
They check it in the store in front of you when you buy it. - They look at the resistance with a device. And it’s better to roll it up in a screed
And glue the tiles on a flat surface - under the comb, so that there are no voids under it
Alexander Bakushev:
You can turn it on for a few seconds, if it gets warmer, it means it’s working!
Stas Shabanov:
Check with a tester, it should show 60-70 Ohms..
How to check the temperature sensor
Checking the temperature sensor is also not difficult when repairing an electric heated floor. To do this, you again need to test the device yourself with a multimeter to make sure that the nominal and actual resistance corresponds. If the temperature sensor breaks, it must be replaced with a new one. If you followed the recommendations for laying heated floors under the tiles and placed the temperature sensor in the corrugation, it will not be difficult to remove it from under the screed. Otherwise, if the sensor gets stuck under the floor, it is better not to touch it, but to solve the problem in a simpler way - by installing an air temperature sensor. This device will give a signal to turn the thermostat on/off based on the temperature in the room, and not under the screed, as was previously the case.
You can also avoid repairs by purchasing a thermostat with a timer, which will turn the system on/off according to a set point. In addition, there are IR temperature sensors that analyze the heating of an electric heated floor using infrared radiation.
Check the readings with an ohmmeter or multimeter:
- Between black and white wires: see factory settings. Typically, when selecting a 200 ohm scale, the reading should be between 20 and 200 ohms. If there are no readings, this confirms a cable break. Before jumping to conclusions, double check the batteries on your meter and take the measurement again. Use a digital ohmmeter (with a digital display) rather than an analog one (with a dial indicator).
- Between black wire and ground: No reading should be displayed. If there is a reading, then there is a “ground fault”, that is, a “short circuit”. The OTDR should show the distance to the fault on that wire and indicate "Short".
- Between white wire and ground: No reading should be displayed. If there is a reading, then there is a “ground fault”, that is, a “short circuit”. The OTDR should show the distance to the fault on that wire and indicate "Short".
Detecting a heated floor malfunction using an example
Since a heated floor must be connected through a thermostat with a remote temperature sensor, we will consider the connection diagram using the example of a thermostat for a heated floor RTC 85.26.
- We disconnect the voltage supplied to the thermostat from the network.
- We gain access to the rear panel of the thermostat.
We already know that the heating cable (cable floor) or heating film (infrared film floor) is a load and is connected to contacts No. 3 (N-zero) and No. 4 (L-phase load). – we measure the resistance, it must correspond to that stated in the passport *.
* If you have lost your passport, then you can calculate the resistance value using the formula R=U/P, knowing the voltage value is 220 Volts and the power, for example it is 1.2 kW, we find the resistance R=U*U/P=220*220/1200 =40.3 Ohm.
If you do not know the power of a heated floor, you can calculate its approximate value. Room area (m2) multiplied by 150W/m2).
For example: toilet room 6 m2 *150 W/m2 =900 W. Hence the resistance is 220/900 = 53.7 Ohms
In the case of using infrared film heated floors, you can check the resistance of each individual heating element. To do this, disconnect the wires (see connection diagram) and take resistance measurements. Compare the readings with the calculated values.
Note
- if the instrument reading is zero, this means that a short circuit has occurred in the system, more often it is a short circuit of the wires due to overheating (the cross-section is incorrectly calculated).
- if the instrument reading is infinity, then this means that a break (burnout) of the heating element has occurred in the system, most often in the coupling.
If the resistance measurements correspond to the data specified in the passport, then you can breathe a sigh of relief - the heating elements of the heated floor are in good working order!
This means the reason is in the thermostat, you will agree that checking and replacing it is much easier and cheaper, but this is discussed in a separate article, checking the functionality of the thermostat.
** heated floor, no matter what it is, cable, film, Chinese or according to the passport “made in Denmark”, but in fact in China - is a load
The second way to check the performance of a heated floor
If you are far from electricians (i.e. you are strong in the field of philology or other sciences no less valuable to humanity) and did not understand anything from what you read, then you can check the serviceability of heated floors in a simple old-fashioned way: checking the functionality of a heated floor by connecting a heating element directly to the 220V voltage, bypassing the thermostat.
- Turn off the electricity (turn off the machine on the distribution panel)
- We connect the electric wire coming to contact No. 1 with the wire connected to contact No. 3, and the electric wire coming to contact No. 2 with the wire connected to contact No. 4. This means that we connected the heated floor directly to the panel, bypassing the thermostat.
We turn on the machine on the control panel for 30-40 minutes and wait for the floor to heat up. If the floor becomes warm, that's good. The heated floor works. This means the thermostat is faulty, but if even when connecting the heated floor directly, bypassing the thermostat, it does not heat up, then you need to look for the place where the wire burned out.
Attention. If you connected the heated floor directly and when you turn on the electricity, the machine knocks out, then there may be a short circuit or a malfunction of the machine, check the resistance of the heated floor, it should not go to zero
Did you manage? FINE! you can go and receive a reward from your beloved.
If you can’t cope and have questions, it’s also not a problem, look at the QUESTION-ANSWER section or call the numbers listed on the website, we’ll figure it out together.
How cozy and comfortable a home is depends largely on the temperature and the air in the room. But with centralized heating, it is impossible to control the temperature yourself, so many, for the sake of their own comfort, especially in the off-season, try to purchase additional autonomous heat sources. In this market, underfloor heating systems currently hold a leading position due to their undeniable advantages: affordable prices, quick and easy installation, the ability to control and maintain the temperature down to a degree, etc.
However, like any heating device, the underfloor heating system can fail. Such cases are rare, but cause trouble for the owner. One of the most common malfunctions in the operation of a heated floor is a burnt-out thermostat. We will tell you how to check the thermostat on a heated floor in this article.
How can I replace the temperature sensor?
The temperature sensor used in thermostats for heated floors is a thermistor with a negative TCR (temperature coefficient of electrical resistance). This means that when heated, the resistance of the sensor decreases.
The second parameter required to select a temperature sensor is the resistance value under normal conditions, at 20°. The resistor value is usually indicated on the thermostat body next to the temperature sensor connection terminals or in the product data sheet.
To select a temperature sensor, this data is quite sufficient. The only thing that is difficult to find out and select is the TKS characteristic, that is, the change in the resistance value of the temperature sensor due to changes in ambient temperature.
But this is not a critical parameter; anyway, the temperature on the thermostat is set experimentally. After all, the temperature sensor is installed in the floor and the set temperature on the thermostat sets the floor heating temperature, and not the room temperature.
How to determine the resistance of a temperature sensor
The temperature sensor of the SPYHEAT ETL-308B thermostat has failed. Its technical characteristics were unknown. They had to be determined experimentally.
To do this, external circuits were connected to the thermostat, in accordance with the diagram printed on its body - supply voltage was applied, an incandescent light bulb was connected instead of heating elements, and a variable resistance was connected instead of a temperature sensor.
I had a resistance magazine available, so I decided to use it for calibration. The resistance magazine is a box in which high-precision resistances are placed and there are switches with which you can set the desired value.
Consistently setting the regulator knob to positions from 20° to 30° and changing the resistance value with the knobs in the resistance magazine until the thermostat operates, I built a sign.
Dependence of the thermostat response on the resistance value of the temperature sensor
| Temperature set on the thermostat, °C | Turn-on resistance, kOhm | Turn-off resistance, kOhm |
| 20 | 16 | 14 |
| 25 | 10 | 12 |
| 30 | 8 | 9 |
| 35 | 6 | 7 |
Don't miss: Which radiators are better: aluminum or bimetallic for apartments and private houses
Based on the data in the table, for this heated floor thermostat, a thermistor with a negative TCR of 10 kOhm is suitable as a temperature sensor. The resistance value of the resistor when turning the light bulb on and off turned out to be different due to hysteresis in the thermostat itself. This is necessary so that the heating element of the warm floor turns on less often.
Determining the temperature sensor rating can also be done using a 47 kOhm variable resistor. You just have to disconnect the thermostat from the network every time after turning the light bulb on and off and measure the resistor resistance with a multimeter.
You can do without measurements. It is enough to have several constant resistors with values ranging from 10, 15, 20 and 30 kOhm. Resistors are connected in turn instead of the temperature sensor. By rotating the thermostat knob, you need to determine which resistor the light bulb will turn off and on at a temperature of about 20°C.
Thermistor selection
You could buy it ready-made, but to do this you had to place an order online and wait for delivery. In addition, the price of the issue reached 20% of the cost of the thermostat itself.
Therefore, it was decided to make a temperature sensor from available thermistors. There was a thermistor with a nominal value of 10 kOhm with a negative negative TKS type MMT-4. I decided to use it for repairs.
For connection there was a piece of wire with which the failed temperature sensor was connected. In principle, any wire can be used to connect the sensor, as long as it can withstand a temperature of at least 100°C. To check, the ends of the wires were stripped and wound onto the thermal resistance terminals.
Next, the thermistor was located in close proximity to the incandescent light bulb connected to the terminals for connecting the heating element of the heated floor. Supply voltage was applied to the thermostat.
After a few minutes, the light bulb heated the thermistor, its resistance decreased, and the thermostat turned off the voltage supply to the light bulb. When the thermistor cooled down, the light came on again, and this continued ad infinitum with a period of several minutes.
After checking the operation of the heated floor thermostat, wires were soldered to the MMT-4 thermistor with soft solder and pieces of insulating tube were put on the soldering points.
For reliability, you can put a heat-shrinkable insulating tube on the thermistor. A homemade temperature sensor was installed during the installation of a heated floor and showed stable operation.
As you can see, even without experience in repairing electrical appliances, you can repair a thermostat for a heated floor with your own hands at home, including making a temperature sensor from a standard thermistor.
Attention, the electrical circuits of thermostats are galvanically connected to the phase of the electrical network. Touching exposed parts of a circuit connected to an electrical outlet may result in electric shock.
Design and arrangement of electrical cables
A heated floor system, mounted from an electric cable or using infrared film, consists of a number of elements:
- heating cable, which is a source of thermal energy;
- a temperature sensor that records the degree of heating of the wires;
- a thermostat responsible for connecting all the component elements into a common structure and regulating the switching on/off of the floor in accordance with the heating temperature of the cable.
The thermostat or thermostat looks like a small switch. It is intended to adjust the voltage that is supplied to the wires. Connect this device to a standard electrical network using phase and neutral wires.
The thermostat regulates the voltage automatically. It is supplied directly to the heating cable after the floor in the room has cooled. The degree of its heating is monitored by a temperature sensor, which is mounted near the wires and filled with cement mixture.
Residents independently set the temperature at which the floor surface heating system should turn on. The cable used to equip such a heating structure can be resistive and self-regulating. The latter of them independently reacts to temperature fluctuations and changes the resistance level. In turn, a resistive cable does not have such functions.
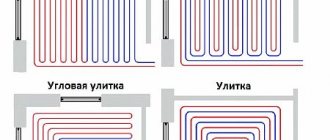
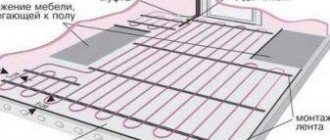
When arranging the system, either a single two-core cable or two single-core cables are used, which are arranged in parallel. The first of them is a mesh of wires with a plug on one side. It is unacceptable to cut it and lay it in a screed in places where large pieces of furniture or equipment will be located.
In turn, single-core cables can be cut and nothing bad happens to the insulation. In the same way, infrared floors are trimmed in accordance with the area of the room that requires heating.
What is a multimeter?
A multimeter is a multifunctional electrical measuring instrument that can be used to measure the characteristics of an electrical signal. Having a relatively small size, it performs the functions of an ohmmeter, voltmeter, ammeter and a number of other devices. The device belongs to the standard category and has become quite widespread.
The multimeter can also be used to diagnose a warm home heating system. It is used to determine the resistance value of the heating cable.
Methods for checking the functionality of a thermostat for a heated floor
You can check the serviceability of the thermostat by replacing it with another known-good thermostat. If there is no second thermostat, then you can connect the heated floors “directly” to the 220 V network, bypassing the thermostat and make sure that the “warm floor” is working.
- turn off the voltage;
- to the wire connected to pin 1 (L-phase) we connect wire 4 (L-phase to the load);
- to the wire connected to pin 2 (N-zero) we connect wire 3 (N-zero load);
- Apply voltage and wait for some time, for example 1 hour. If the floor becomes warm, there is a problem with the thermostat.
We de-energize the system and replace the faulty thermostat with a working one.
I’m glad if you were able to figure it out on your own, but if you still have questions, then call the numbers listed on the website and we’ll figure it out together.
Preparation
- We start by checking the presence of electricity in the house and the supply of electricity to the thermostat, i.e. whether the indicator light or panel is lit (for programmable thermostats).
- If, however, there is electricity in the house and it is supplied to the thermostat through which the heated floor is powered, then you need to check the temperature settings. How many times does it happen when children spin the “wheel” out of curiosity, or when a housekeeper inadvertently “accidentally touches” the buttons on the device?
- After making sure that the electricity is flowing, the thermostat is on, the temperature is set correctly, and the floor is still cold, then you need to make an important decision:
- show “who is the boss of the house” and call an electrician. End. All that remains is to prepare the money and wait.
- show “who is the master and unsurpassed master of the house”, identify the malfunction and, heroically eliminating it, receive the admiring look of his beloved wife.
If you are no longer sitting in front of the TV and decide to act on your own, then you will need a screwdriver and a tester (a device that can measure resistance and voltage) or, at worst, a voltage indicator.
Heated floor repair
Warm floor doesn't work! What to do?
A typical customer case! You have decided to install a heated floor in your home, and the builders who are doing the renovations say, “They have been laying floors since early childhood. More than 1000 heated floors have already been installed and everyone is happy. What should I put there?” You, as a person who sincerely trusts your builders, are afraid to show doubts about their professionalism and entrust them with the work of installing heated floors. From this moment the headache begins! The builders finished the repairs and left for their homeland. The old tiles have been laid, the cold weather has set in, but the warm floor is not working! Let's start looking for the cause of the problem.
1. Floor temperature sensor. Each thermostat comes with a floor temperature sensor, which is installed in a corrugated tube and mounted in the wall and floor in a certain way, under a certain bend. So that it can be replaced in the future. In a floor heating system, the floor temperature sensor is a “consumable item”. Sooner or later it will need to be replaced. This sensor can work for you for 10-15 years, but it can fail after 3-5 months
That's why it's very important to install it CORRECTLY to avoid further problems.
Bricked sensor
How to check the serviceability of the heated floor sensor?
To check the serviceability of the floor temperature sensor, you need to remove the front panel. Unscrew the thermostat installation block and check the resistance of the floor temperature sensor with a multimeter. Each sensor has a factory resistance statement. Your sensor value should match it. If the resistance differs by more than 5 kOhm, or is early 0, then the sensor is faulty and requires replacement.
2. Thermostat. More often, either the relay or the capacitor fails. You can check the functionality of the thermostat by switching to heating mode by applying power to the terminals of the heated floor. The average cost of repairs is about 3,000 rubles. In many cases, it is more advisable to purchase a new thermostat from the same manufacturer. Since the thermostat must be from the same company as the sensor installed in the floor. (However, the DeviTouch thermostat works with floor temperature sensors from manufacturers Teplolux, Eberle, Ensto, Fenix, Oj Electronics, Raychem, etc.)
3. Heating cable (mat). In 95% of cases, the cable heating system fails due to unqualified installation. The most vulnerable part of the heating cable is the coupling. During installation, it is necessary to observe all the rules for laying pitch, cable bending, and the location of the coupling. Also, when purchasing equipment, you need to understand that the cable will be under the tiles. You install heated floors for at least 10-15 years. There is no need to chase cheapness, since a cheap cable is not reliable and may soon fail.
How to check the serviceability of the heating cable?
Each cable has its own resistance. It is necessary to check the resistance value 3 times. Before installation. After installing the heated floor. After filling with screed or tile adhesive. If the cable resistance differs significantly from the rated values, or is equal to zero. This means the cable may have failed. In this case, it is necessary to check the cable with a megger to check the insulation resistance of the heating cores and the shielding braid.
Repair of electric heated floor.
Equipment for searching for cliffs.
Repairing a heating cable (mat) begins with searching for a broken cable or a damaged coupling.
Then the tile in this place is opened and a repair coupling is installed. After this, the resistance is checked and
checking with a megger, as well as a test connection.
In conclusion, I would like to say: Each heating system, including warm floors, must be calculated and selected according to the heat loss conditions of your room. Despite its apparent simplicity, there are many nuances that must be taken into account when choosing a heated floor and thermostat and further installation.
We offer a service for on-site diagnostics of heated floors. Diagnostics will include checking the functionality of your thermostat, floor temperature sensor, and heating cable (mat). Cost: 2000 rubles.
Checking the heating cable with a megger
Megger measurements are carried out according to the same scheme. One probe is the working core, the other is the braid.
What data indicates that your cable is working properly or, on the contrary, is damaged and requires repair?
When the test voltage is applied for 1 minute, the insulation resistance on the heating cable must be at least 100 mOhm.
Here is an extract from the instructions of one of the leading manufacturers of these products, Raychem.
Such tests must be carried out at voltages of 500V, 1000V and 2500V.
The recommended test voltage for heating cables is exactly 2500V.
Here is a clear example of testing the same cable with several! insulation cuts. This is when a voltage of 1000V is applied to it (data in GigaOhms!).
But this is already 2500V. The difference is what is said on the board (data in MegaOhms).
After testing the cores, the same procedure must be repeated between the metal braid and the heated pipe.
The readings between these two tests (core-braid and braid-pipe) should not differ by more than 25% at all voltage levels (500-1000-2500V).
Error
Some experts argue that the heating cable can be damaged by such a high voltage, and more than 500V cannot be applied to it.
Yes, this applies primarily to mineral insulated (MI) cables. Here is an extract from the instructions of the same Raychem on this matter.
True, even there we are not talking about 500V, but a maximum of 1000V.
And the parameters of the minimum insulation resistance in megohms are already different (at least 20 mOhm, not 100 mOhm).
Real values for good cables are usually more than 10 ohms. Here are several measurements of different brands of cables made by Woks Warm Floor specialists.
The lower the insulation resistance of the heating cores, the shorter the service life of the heating cable in real conditions or in case of local overheating.
High-quality samples can easily withstand constant voltage even at 5000V. Before laying and installation, this clearly reveals all hidden manufacturing defects (thin areas or microcracks and micropunctures).
At the same time, many people confuse non-destructive tests (constant voltage from a megger) with acceptance tests, which are carried out on heating cables in accordance with GOST R IEC 60800-2012.
You can check them out at the link above. In whatever ways they do not mock test samples before they go on sale.
Error
Do not touch any wires with your hands when measuring with a megger.
Firstly, this is prohibited due to safety precautions. Secondly, by doing so you introduce an error and underestimate the measured resistance.
Checking when a fault occurs
During the operation of the heated floor, deviations from the normal operating mode may occur. Let us consider the main manifestations of system dysfunction.
No heating over the entire floor area
In this case, you need to start checking for a break from the “head”, that is, make sure that power is supplied to the system. If the mains voltage indicator does not light up, you need to check the machine on the panel. After this, you can check whether voltage is supplied to the input of the temperature controller. The presence of voltage at the input and its absence at the output indicates a malfunction in the thermostat itself. The reason may be either in the regulator itself, or in the temperature sensor, which can be checked by measuring its resistance. If you apply voltage to the heated floor directly, without a thermostat, you can test the cable for serviceability.
A situation may arise when the circuit breaker in the panel that supplies the heated floor is turned off by the protection. This indicates a short circuit. To localize the short circuit, we check the resistance between the phase and neutral wires supplying the heated floor. Before ringing the cable, remove the voltage. Disconnect the power wires from the temperature controller. We measure the “phase-zero” resistance in the area from the panel to the thermostat. If the device shows zero resistance, the wiring in this area is damaged; if the resistance is high, we continue the search. Disconnect the underfloor heating cable from the temperature regulator. We take measurements at the regulator input. If a short circuit is detected during the test, then the damage is located inside the thermostat. If not, all that remains is the underfloor heating cable itself. You can check this by measuring the resistance between the cable cores. In this case, you cannot do without opening the floor surface.
What to do when voltage is supplied to the heating elements, but heating does not occur? In this case, the cable must be tested, that is, checked for integrity (or for break, if you like). Having set the multimeter to resistance measurement mode, we take measurements between the cable cores. A resistance value close to infinity indicates a conductor break.
The video below clearly shows how to check an electric heated floor with a multimeter by measuring the resistance of the heating cable:
https://youtube.com/watch?v=f9lTMSrwI-4
https://youtube.com/watch?v=f9lTMSrwI-4
The heating temperature of the heated floor is not adjustable
If the heating elements over the entire floor area warm up, but the temperature does not change when the setpoint set by the regulator is changed, it is necessary to check the system, determining one of two possible options:
- malfunction in the temperature regulator circuits;
- The temperature sensor is faulty.
In this case, the temperature regulator must be dismantled, disconnecting all wires from it and sent for repair. How to check the temperature controller for a heated floor is shown in the video:
If you suspect a sensor, you should check its resistance. To do this, the sensor wires are disconnected from the regulator and the resistance between them is measured. A conclusion about the serviceability of the heated floor temperature sensor can be made by checking the value of its electrical resistance and comparing it with the passport data. As a last resort, you can do without a multimeter. Since this element cannot be repaired anyway, you can proceed as follows. Buy a known-good sensor, place it on the heated floor, and connect it to the regulator. If you ensure good contact of the sensor with the floor, the system should work if the regulator is working. After this, you can install the new sensor in place. This will require opening up the floor surface.
If the readings are the same
If the readings for both wires are the same and within 10% of the total wire length (refer to product specifications or manual), everything may be ok. However, it could also mean that the break is at the far end of the wire. The most common fault in this case is a damaged terminal connection (at the end of the wire).
If the readings obtained are the same, but the distance value is less than the factory wire length.
This may indicate a complete break in the heating cable in the heated floor.
Example 1: For example, a 25 square foot NADWM-120-350 mat has 100 feet of cable and 15 feet of mat length. If the OTDR reading is less than 30.5 meters, there may be a complete break in the wire.
Example 2. If mats of other dimensions are used, the cable length per 1 square meter can be checked with their manufacturer, or calculated independently. For example, the most common are mats with a width of 50 cm and a wire pitch of 8-10 cm.
By simple calculations, you can approximately determine the length of the cable in a mat 2 m long (area 1 sq. m.) L cable = 10.5 m. To accurately determine the location of the heating cable, you can use the 701K-G test kit:
- Connect the red lead to one (or simultaneously two) conductors of the heating cable
- Connect the black lead to the metal sheath of the heating cable
- Switch the generator to Tone mode (in this mode the generator supplies a signal to the cable)
- Using an inductive probe, we determine the location of the cable by the maximum value of the received signal. To avoid errors, you should reduce the sensitivity of the device to the minimum level at which the signal will be heard.
If the OTDR reading is less than the actual cable length, there may be a complete break in the wire.
Basic working elements of a heated floor
To identify the cause of a heated floor malfunction, you need to know the main components of the system that can affect its operation. So, in general, an electric heated floor system consists of:
- thermostat,
- temperature sensor,
- and directly the heating element itself, which can be a heating cable, a heating mat (a cable fixed on a grid with a certain pitch), or an infrared film.
The functioning of the floor occurs as follows: a current passes through the heating element, after which heat is emitted. Temperature data is sensed by a special sensor, transmitting the received readings to the thermostat.
The job of the thermostat is to control and maintain the temperature: the desired temperature is set manually, and the thermostat activates/deactivates the heated floor system to establish the desired temperature. In order to check the serviceability of each of the elements of the overall underfloor heating system, there are a number of actions.
The first step is to determine the performance of the heated floor
The operation of a heated floor may be disrupted due to a malfunction in the heating element itself. To check its operation, you need to connect the floor to the network without a thermostat. After connecting, you need to wait a while and check whether all areas of the heated floor are heated. If the floor heats up evenly and no malfunctions are detected, it means that the floor heating thermostat or its sensor is not working.
Note! When the underfloor heating system operates from the network without a thermostat, heating is carried out at full power, and this significantly increases energy consumption, while heating must be kept under constant control - turn it on/off manually
How to check the thermostat of a heated floor?
Checking the underfloor heating thermostat involves carrying out a series of simple sequential steps that will help identify the cause of the problem.
First, check if all the wires are located correctly. To do this, focus on their placement diagram.
Secondly, we check the voltage on the contacts. Set the thermostat to the minimum temperature setting, apply a voltage of 220V to the device, and use a special device (multimeter) to check the voltage values on contact No. 1 and contact No. 2. The voltage at these contacts should be the same as at the input, that is, 220V.
Thirdly, we check the serviceability of the relay and temperature sensor.
We move the toggle switch to the “on” position, set the regulator to the maximum temperature value, and apply voltage (220V) to contacts No. 3 and No. 4. When carrying out all these actions, listen carefully: if clicks are constantly heard at this time, then the thermostat for the heated floor has broken down. But if there is no voltage on these contacts, then this indicates a breakdown of the temperature sensor. If you have a programmable thermostat, then information about sensor failure will be displayed on the display automatically. Date: September 25, 2022
How to find a break in a cable with a multimeter?
For a resistive heating cable, such a break in 90% of cases is observed at one of the couplings:
- at the initial
Where it is spliced with the power cable.
- or at the end
How to find out which clutch is at fault? To do this, you will need a multimeter with a capacitance measurement function.
Moreover, the accuracy of measurements and specific numbers do not matter. It is important by what order of magnitude they differ from each other.
Attach one probe to the working core and the other to the braid. Then to another core and again to the braid.
If the measurement values on one core differ several times from the values on the other, then there is a break in the initial coupling.
If the indicators are approximately equal, then there is a break at the end coupling.
Design features of the system
We have already talked about how to lay heated floors yourself. In view of this, it is enough to consider only the main design features of electric heated floors.
So, a warm floor includes the following elements:
- Heating elements (heating cable or infrared film);
- Temperature sensor (for temperature feedback);
- Thermostat (responsible for maintaining the floor temperature in a given range).
In addition, users should be aware that 2 types of heating cable can be used in the design of a heated floor: resistive or self-regulating (which can independently change the level of heat generation depending on environmental conditions).
It is important to remember that when installing an electric heated floor yourself, it is a strict requirement to follow all the manufacturer’s recommendations. This applies to trimming heating elements, their location and fixation.
Warmly bright
from 9:30 to 21:30, seven days a week
- Shop
Product group
- Warm floor
- Choosing a heated floor
- Installation of heated floors
- Heated floor repair
- reference Information
- Air conditioning equipment and heating
- Electrical equipment
- Lighting
- All about repairs
- Interior and design
- Vacation home
Is the underfloor heating not heating?
Enter your contact information in the feedback form or call tel. 458-45-67 from 9:30 to 21:30
More details about repairs can be found in the section Repair of heated floors.
Calculation of heated floors
Use the smart floor heating calculator to select components and calculate the cost of the heating system directly on the website!
Or just call tel. in St. Petersburg 458-45-67 (from 9:30 to 21:30).