Since ancient times, people have laid tiles on the floors of toilets and bathrooms. Over time, it was replaced by a more modern material made of porcelain stoneware. However, both of these finishing materials have one thing in common - they are cold to the touch. It is not very pleasant, after warming up in a hot bath, to step barefoot on the icy surface of the floor. Therefore, many residents are in favor of electric heated floors laid under the tiles.
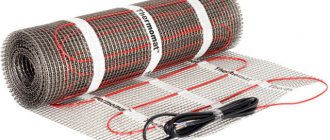
Installation of an electric mat under tiles
And the optimal heating option in this case would be electric mats. Is it possible to independently install a heated floor system in separate rooms of an apartment or private house, what materials will be needed for this, and how to correctly calculate their quantity?
Types of heating mats
There are two types of heating mats that help create an atmosphere of warmth and comfort in rooms where it is necessary to maintain an increased level of comfort.
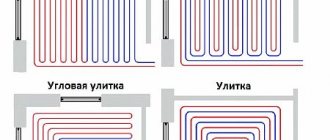
- Cable mats are rolled material designed for floor heating. They are based on a single-core or two-core resistive cable, attached with a snake to a polymer mesh. For convenience, some manufacturers provide the mesh with a self-adhesive bottom layer. The floor surface is heated by the heat generated by the conductor during the passage of current. Air heated near the floor surface rises. As a result, air exchange occurs in the room, due to which a comfortable temperature is achieved.
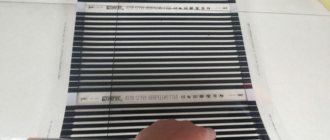
Cable mats - Infrared mats are the same rolled material. However, it does not consist of a cable, but of carbon rods attached to live wires. Despite the absence of a backing, the wires located on both sides of the rods give the material the necessary rigidity, making their installation easier. Carbon rods emit infrared waves that heat not only the floor surface, but also surrounding objects, which transfer heat to the air. Infrared mat
Laying both types of mats is done in the same way. The heating elements are placed either in a concrete screed or under a tile, where a cement-sand mixture replaces tile adhesive.
Approximate calculation of the cost of materials
When calculating the approximate cost of a heated floor, you can proceed from the following prices:
- insulation per m2 - 600 rubles;
- temperature sensor - from 100 rub. and higher;
- non-programmed thermostat model - 600 rubles;
- software thermostat - 3200 rub.
If we take mats priced at 2,000 rubles as a basis, then the total cost of a floor with an area of 5 square meters will be approximately 14,000 rubles.
By choosing a “warm floor” heating system based on infrared or electric thin mats, you will solve several problems at once - effective heating of the floor covering, ensuring a comfortable atmosphere in your home and creating an individual interior.
Arrangement of mats
All cable mats are divided into two types:
- single-core;
- two-core.
Single and double core cable mat
Each of them has its own installation and operation features.
Single-core cable mats consist of a polymer mesh on which a cable of a certain diameter is laid and maintaining a certain distance between the loops. The design of such mats consists of a single core made of brass or other material. The resistance resulting from the application of electricity helps to heat the material.
Structure of a single-core cable
Safety during operation of the heated floor system is achieved by several layers of insulation that cover the core. The maximum heating temperature is about 80°C, but the insulation can withstand more intense heating.
The design of a single-core cable affects its service life, which increases or decreases depending on the heating intensity. This means that as the heating temperature decreases, the service life of the cable increases significantly.
But in this case, to maintain the optimal temperature in the room, you will have to increase the consumption of material.
Twin-core mats consist of the same polymer mesh on which a cable consisting of two cores is fixed. Its device significantly increases the heating power of the system.
Diagram of a two-core heating cable
Despite the fact that during the installation and operation of single-core and two-core underfloor heating systems there is no significant difference, connecting the second option is much easier. Twin-core mats are connected by closing the contacts at the ends of the cable with each other. Connection of single-core systems is carried out by supplying two cold ends of the cable.
Installation of heating mats
[ads-mob-1][ads-pc-1]
Safety precautions when laying heated floors from thermomats
To avoid accidents and failure of the electric heating system both during its installation and during operation, it is important to comply with a number of safety requirements:
- Do not shorten the cables yourself;
- not me installation wires, breaking the coupling connections;
- do not touch the thermostat when trying to change its design;
- Do not install or repair the thermostat under voltage.
( 60 votes, average: 4.73 out of 5)
Heating without gas - the best ideas
Related Posts
How to calculate system power
Laying an electric heated floor under tiles most often means using the system only as additional heating. In this case, calculations are made based on average values:
- to heat the kitchen and other living spaces, 110-150 W/m² is required;
- for bathrooms and toilets – 140-150 W/m². Heated floor power calculation table
When choosing between single-core and double-core underfloor heating systems, it is important to take into account their design and the room temperature that will be most comfortable for each specific family. Although both systems can maintain the required temperature, the two-core system allows it to be achieved much faster.
How to install a cable mat
Electrical underfloor heating systems include three components:
- heating element;
- thermostat;
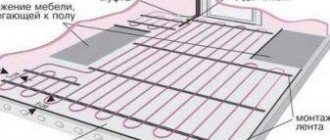
- temperature sensor. Cable mat installation diagram
The mats are laid on a flat base. Moreover, in this case, the mats can be laid directly on the old tiles. If the base is a subfloor, it is necessary to lay thermal insulation on it, for example, sheets of expanded polystyrene, and a damper tape around the perimeter. This will allow you to use the system more efficiently, without wasting energy on heating the lower concrete floor.
Cable mats cannot be laid under furniture if it is not on legs, as well as under household appliances, since when heated, the heat will not be able to rise up and will return to the cable, which will lead to overheating of the system and its failure. The mats should be laid under the tiles at a distance of 15-20 cm from the walls and furniture.
Pros and cons of heating mats
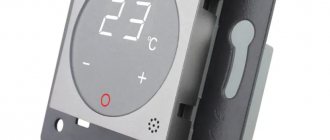
Laying a matte floor begins with installing a thermostat. To do this, use a special drill attachment to drill a round hole in the wall and tap a groove to the floor. The temperature sensor hose is inserted into the groove, after putting a corrugation on it. It should be taken into account that the wires of the underfloor heating system will also be placed in the same groove.
Technical characteristics of cable mats
Before laying the mats, check their functionality. To do this, a tester is used to measure the core resistance and insulation.
The indicator of the first must correspond to the passport parameters with an acceptable error of 5-10%. The insulation measurement indicator must correspond to infinity.
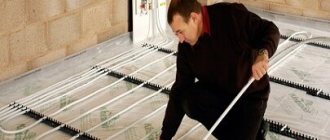
Now the mats are rolled out, starting from the wall on which the thermostat is installed. Having reached the opposite wall, the mesh is cut without damaging the cable, and the mat is turned in the desired direction. In rooms with complex geometry, you can cut off a piece of mesh, freeing the cable, and lay it separately, also in the form of a snake.
Installing a Temperature Sensor for a Cable Mat
When the matting is complete, the heating elements are retested and then a temperature sensor is installed. To do this, it is necessary to lay a groove from the wall along the floor measuring at least 0.5 m. It is important that the sensor hose is located not near one piece of cable, but between two.
Thus, the sensor readings will most fully reflect the current situation. The end of the hose located in the floor is protected by insulation from tile adhesive. The sensor itself is inserted directly into the end of the hose inserted into the thermostat.
If there is no self-adhesive layer on the underside of the mats, the mats are secured to the floor with masking tape, staples or nails, nailing them into the mesh.
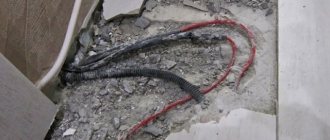
Next, the wires of the mats are inserted into the installation box and connected to the appropriate terminals, and then the system is tested. According to existing standards, the permissible temperature of a heated floor should be 30°C, so this parameter must be set on the thermostat.
Connecting the cable mat to the thermostat
After making sure that the electric heated floor is working properly, you can lay the tiles with an adhesive specially designed for such systems. The glue can be applied directly to the mats, but to avoid damage to the cable, it is advisable to protect it with reinforcing mesh.
It should be remembered that laying tiles on mats is possible only if the consumption of tile adhesive increases. Therefore, the thickness of the coating together with the glue should exceed 2 cm. And the heated floor system can be used only after the glue has completely dried.
Recommendations for use
Heating floors at the present stage is not a luxury, but a household necessity. The systems can use different types of heating elements. They all require different operating conditions. It is believed that film types of devices have a long service life. In order for them to really work for a long time without repair or replacement, consider these simple rules:
- optimal temperature +20+30 degrees;
- It is impossible to operate film types without sensors for regulating a certain temperature;
- Do not cover heated floors with blankets, cardboard paper, or furniture;
- If you are away from a room with a heated floor for a long period of time, it is not recommended to turn it off completely. It is better to set the sensors to minimum power;
- do not damage the integrity of the installed film. Do not drill, drive nails, or perform other similar work;
- turn off the heating system if liquid gets into it. The system can only be turned on after complete drying;
- for a comfortable stay in the heat, the heated floor can be completely turned off;
- Use the equipment only in accordance with the instructions.
How to lay infrared mats
A distinctive feature of mats with carbon rods is the high cost and complexity of connection. And their advantage is that they can be installed without taking into account the placement of furniture, since infrared elements are able to independently reduce the heating intensity when the system is overloaded.
Infrared mat installation diagram
It is necessary to lay heat-insulating material with a metallized surface on the rough base. Then you can start rolling out the mats, cutting them between two rods if necessary. In this case, only one conductor can be cut.
Upon completion of installation, the insulation is removed from the cut conductors. Next, plugs are used, put on conductors that are not involved in the connection. The rest are connected using contacts, after which they are inserted into the thermostat.
You need to lay tiles on infrared mats in the same way as on cable mats. [ads-pc-2][ads-mob-2]