Installation of film heated floors is simple and requires no major repair procedures. All work can be done independently, you just need to study the technology of laying the canvas and understand the criteria for choosing components and related materials. Before starting installation, you should complete the preparatory work and purchase all the necessary materials and tools.
Installation should begin only after checking the completeness of the heated floor and fully understanding the sequence of operations. This will allow you to get optimal results, high-quality installation and performance of the film heated floor. Let's consider the features and procedure for laying infrared film heated floors with your own hands.
Features of the film infrared heated floor
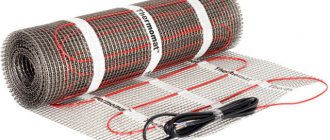
The film type of infrared heated floor is a design in which carbon paste is sealed in polyethylene. The heating element sections are connected by copper bars soldered into the overall circuit. The principle of operation is simple: when connected to the electrical network, carbon generates heat.
Infrared heated floors have the following advantages:
- do not dry out the air;
- heat is accumulated at a level of one and a half meters, this is optimal for a home;
- First of all, objects in the room are heated, the efficiency of this heating method is very high;
- complete safety for humans and animals;
- Possibility of dismantling when moving.
And one more important advantage: to figure out how to install an infrared heated floor, no special skills are required.
Constructions
The room in which you are planning to install a heated floor must be reliably protected from the formation of drafts and other types of heat loss. Therefore, all heating components should be installed exclusively on a heat-insulating layer, which does not allow energy to be wasted on heating the floor slabs, along with the loss of heat into the atmosphere.
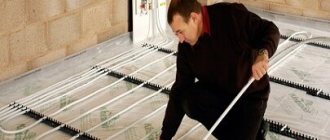
If we talk about the design of a heated floor, then the heating cable must be placed on a thermal insulation layer and secured with mounting tape. Inside the cable there is a snake in which a corrugated pipe is laid at the same distance between the turns. A temperature sensor is placed in this pipe, which is responsible for the heating level of the entire system in the house.
When all the heating components are laid, the screed can be poured on top. The layer thickness is determined based on the cable structure
It is important that the layer has a smooth surface without voids. Tiles or other floor covering are laid on top of the screed
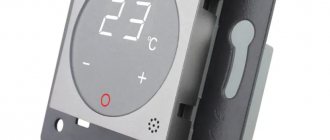
The thermostat is on the wall. The location should be chosen taking into account his comfortable work. The automated operation of the electrically heated floor depends on it.
To protect the electrical circuit from leakage, you need to connect an RCD to the circuit breaker.
Installation and connection stages
To imagine how to connect an infrared heated floor, the installation process can be divided into several stages:
- heated floor drawing
- leveling the rough base, laying out hydro- and heat-insulating layers;
- preparing a place for mounting the thermostat;
- laying infrared film and connecting heating elements;
- primary testing;
- installation of a temperature sensor;
- connecting the thermostat
- system performance testing;
- laying polyethylene (in addition, hard covering for carpet or linoleum)
- laying the final coating.
The connection diagram for an infrared floor is not complicated; you just need to carefully study the instructions and get acquainted with the secrets of experienced craftsmen.
Types of material
Two types of material are produced: with a bimetallic and carbon heater. The first one is cheaper and is made on the basis of polyurethane polymer. It must not be connected to the ground wire. Therefore, they are connected via RCBO or RCD. This is a mandatory condition that complicates the installation of the system. Another feature of the bimetal version: installation of such an electric heated floor under the tile is prohibited. Models with a carbon element are more expensive, but there are no restrictions on their use and no additional difficulties during installation.
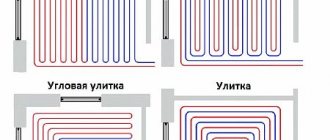
Scheme for laying infrared film
It is recommended to draw a detailed plan to scale on a sheet of paper, which shows how to install an infrared heated floor.
The following points are taken into account:
- the film is not placed in places where large furniture and electrical appliances will be located;
- to effectively heat the room, the heated floor should occupy less than 70 percent of the total area of the room;
- about 10 cm away from the walls;
- the film cannot be laid overlapping;
- You must immediately foresee where the thermostat will be installed.
The “cheat sheet” will be very helpful during installation, especially if the master is doing this work for the first time.
Advice. During installation, you need to minimize walking on the film and prevent its mechanical damage.
Selection of system components
In addition to carbon heating strips sealed in Mylar film, the film floor system requires a thermostat equipped with a temperature sensor.
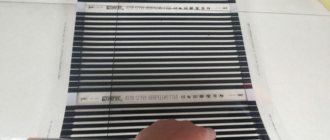
Film options
There are many options for film flooring on the modern market. And they all have approximately similar characteristics: power consumption from 25 to 80 W/h, and operating temperature from 30 to 50 °C.
There are two types of film systems on sale:
- solid - in them the film is completely covered with carbon material;
- striped - in them carbon material is applied to the surface in the form of strips 15-20 mm wide.
The difference between them is that in continuous systems the material is applied by rolling it over the surface in the form of a paste, while in striped systems it is applied by fragmentary spraying.
For small rooms, it is better to choose a film whose width is 50 cm; for larger rooms it is more profitable to purchase strips 100 cm wide
The thickness of the material can vary from two microns to 0.4 millimeters. The roll length is 50 meters.
There is an opinion that it is better to choose the thinnest films. But, as reviews show, the smaller the carbon layer, the faster the system fails. Therefore, it is more advisable to purchase material no thinner than 3 mm. For example, for European countries and the USA, the optimal option is a material thickness of 0.338 mm.
Such systems are not cheap. The average price range of film IR systems from leading manufacturers varies between $20-25 per square meter. You can read more about the types of film heated floors in this material.
Calculation of the required quantity
Installation of film flooring with infrared heating is carried out only in the usable area of the room.
The percentage of area covered depends on whether the IR system acts as the main or additional heat source:
- 80% of the area - as the main heating;
- 40-50% of the area - as a supplement to radiator heating.
A pre-drawn diagram of the system zones layout on a sheet will help determine the total length of all strips. By calculating the length of each fragment and adding up their number, it is not difficult to calculate the required total length of the coating.
When calculating the area to be covered, it should be taken into account that according to the standards, each wall will need to be indented by 10 - 20 centimeters
To prevent premature failure of the floor system, it is necessary to distance yourself from the central heating pipes and risers when laying them out. The laid strips should not intersect or overlap each other.
When placing fragments on the plan and calculating their length, also keep in mind that the length of each strip should be a multiple of 17-18 centimeters, since it is in these places that the cutting lines are located.
Thermostat for temperature control
The operation of the IR system is controlled by the thermostat. The temperature sensor included with it is placed between the heating elements and connected to the device through contacts. The sensor reads the temperature from the surface of the film and transmits the data to the thermostat, which, in turn, operates and puts the system into operation.
The main purpose of the device is to monitor the floor temperature using sensor readings and adjust the heating power in accordance with the specified parameters.
There are a huge variety of options for modifications of regulators that differ in functionality on the market today.
All of them are divided into two types:
- Mechanical - equipped with keys and mechanical wheels and are suitable for arranging small systems.
- Electronic – equipped with push-button control and a display, suitable for small, unzoned rooms.
Programmable models are equipped with touch screens, with which you can set 4 time modes at once, thereby saving up to 50% of energy consumption.
Temperature sensors, depending on the type of device and type of floor covering, come in two versions. For soft surfaces they are available in the form of compact plastic containers. For hard ones - in the form of larger elements equipped with gel protection against the impact of adhesive compositions on the strips and to prevent mechanical damage.
Some models of thermostats are capable of reading information about the heating of the floor surface, others are able to additionally analyze the degree of heating of the air in the room
When choosing a device, you should focus on the power of the thermostat. It is calculated based on the fact that one square meter of film consumes on average 50-70 W. To determine the required value, the indicator is multiplied by the size of the working area covered with heating elements.
Budget models operating from the network often suffer from the fact that in the event of a power outage they cannot resume operation on their own. Therefore, it is better to give preference to models that have a battery. Read more about choosing and installing a thermostat for a heated floor.
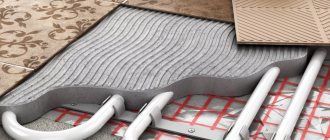
If the film system is supposed to be combined with a porcelain stoneware or tile coating, you will need to build a cement-sand screed
What should be the basis
The requirements for the subfloor are minimal. This is a big advantage of installing an infrared heated floor over a water one. It is enough to clear the subfloor of debris and make sure it is dry. Fill out small holes.
How to install infrared heated floors if the unevenness is large? It is advisable to pour a thin screed if the differences in unevenness exceed 3 mm, but begin installation only after the concrete has dried.
It is recommended to lay a waterproofing layer on the subfloor of the first floor in a private house - a regular polyethylene film of about 50 microns. Seal the joints with tape.
Advice. If the heated floor is installed in an apartment above the first floor, there is no need for waterproofing.
Then heat insulating mats are laid. Hydro and heat insulating layers are spread over the entire surface of the room.
Where is the best place to lay warm film?
There are practically no restrictions on the installation of film heated floors. It can be installed in any room where the requirements for connecting electrical appliances are met.
In houses and apartments, infrared flooring is installed in the bathroom, thereby creating warm tiles under your feet. This modern type of heating is suitable under laminate or any other finishing coating in the bedroom, kitchen, dining room, hallway or children's room.
This heating source has proven itself well in hospitals, kindergartens and schools. There are options when it is installed on walls or even on the ceiling.
How to prepare a place for a thermostat
It is convenient to install this device in the wall, raising it approximately 20-30 cm from the floor. A 2 cm recess is made in the wall. The size corresponds to the dimensions of the thermostat.
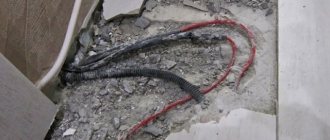
From the resulting hole down to the floor, cut a groove. Cables will subsequently be laid there to connect the film floor to the thermostat and the electrical network.
Advice. It is best to hide the cables in a corrugation. This will greatly simplify the task of repairing them.
Laying infrared film and connecting heating elements
The film is carefully cut along the lines intended for this purpose to obtain pieces of the desired size. Place the thermal film towards the thermostat. You need to make sure that the copper strip is at the bottom. The film is fixed together with construction tape.
To connect the heating elements together, proceed as follows:
- the stripped tip of the wire is installed inside the contact clamps;
- a clamp with wires is attached to the heating element of the film (one end is located on the copper busbar, the other - inside the structure);
- fix with pliers;
- insulate the places where the tires are cut and where the electrical cable is connected with bitumen tape.
Advice. You need to plan the sections of infrared film so that there are a minimum of connections. The length of one strip should not be longer than 8 meters.
To prevent the joints of the heating elements from sticking out, recesses are cut out for them in the heat-insulating layer.
Connection of heating elements and connection to the thermostat
The infrared floor is connected to the thermostat only after the test has been carried out. This is required in order to determine the load on the device. If it turns out to be at least 20 percent less than that specified in the technical specifications of the thermostat, then everything is correct, and you can proceed with the installation. At the same time, connecting the heated floor to the thermostat must be carried out according to the instructions from the manufacturer.
To ensure that the temperature sensor does not interfere with the floor covering, it is hidden in a recess cut into the heat insulator. The groove will also be needed to route the wire to the thermostat.
Wires for infrared heated floors, leading to the electrical network and thermostat, are routed to the baseboard. They are also placed along a groove cut into the heat insulator and secured with tape. How to properly connect an infrared heated floor to a thermostat is indicated in the device diagram.
Testing is carried out at a given maximum temperature. Everything is done correctly, if there is no sparking or overheating, the floor is evenly heated.
Possible mistakes
Despite the simple installation of infrared heated floors, beginners make some mistakes during operation that negatively affect the operation process:
- Using film flooring in wet areas. When water gets on the film, a current leak occurs, to which the protective equipment reacts. As a result, the floor will not work due to constant auto-shutdown. If protection is excluded from the circuit, due to current leakage, the wiring insulation will begin to melt, and this will lead to a short circuit or fire.
- Installation of film in screed or tile adhesive . The binder or adhesive composition is an alkaline medium, which quickly corrodes the laminating layer. The contacts, being in the screed layer, are subject to electrochemical corrosion, which will lead to their rapid destruction.
- Laying wires over a layer of thermal insulation substrate . Mechanical load is transferred through the floor covering to the wires and over time the insulation wears out, leading to a short circuit. It is necessary to cut grooves for the wires in the substrate. If the thickness of the substrate is more than 4 mm, then the depth will be sufficient even for overlaps.
- Poor quality clamping of clips. This should be done with special crimping pliers. But many craftsmen, due to the lack of them, use simple pliers, which do not provide sufficient contact density or, conversely, excessive force contributes to the brittleness of the connection. A loose contact will spark and burn until it burns out completely. In the worst case, contact sparking can lead to voltage surges, which is dangerous for the entire intra-apartment network and turned on household appliances.
- Incorrect installation of the clip. The connecting clip must go inside the film on one side, in direct contact with the copper busbar.