Obviously, the reasons for the unsatisfactory operation of a kitchen hood can be two main factors: either the exhaust ventilation ducts are clogged, or the device is not being used correctly.
For proper operation of the device, it is important that normal natural air flow is maintained in the ventilation system. Then the operation of the fan only increases the rate of air exchange in the kitchen, which helps to quickly clean the air masses during cooking.
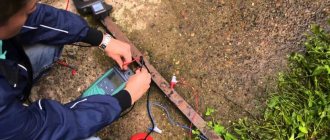
It is quite easy to check the functionality of the ventilation system. You should hold a lit lighter or a thin strip of paper near the ventilation grille. By the deflection of the flame or the movement of the paper strip, you can judge the effectiveness of the exhaust ventilation.
If the ventilation duct is clogged and does not function well or allows very little air to pass through, it is necessary to take measures to clean it. In a private home you can do this yourself.
This cannot be done in a high-rise apartment building. The only way out is to inform the utility services so that they can take care of this issue.
Why does the hood itself not draw air well? The answer to this question suggests itself. Most likely, it is being used incorrectly.
Most often, an increase in unpleasant odors and a decrease in air flow speed are associated with untimely maintenance of the device. This refers to failure to comply with the deadlines for replacing or cleaning filters.
The ekb.service-eco.ru service center will help you quickly eliminate the cause of the kitchen hood malfunction.
According to the instructions, the carbon filter must be replaced every 6 months. The grease filter needs to be cleaned every 3 weeks. If it is disposable, then it should be changed. In this case, it is necessary to thoroughly wash the hood grille on which the filter is installed.
We must not forget about the rules for using the device. So, the hood should be turned on in advance, before turning on the stove, and turned off no less than 15 minutes after the end of the cooking process.
Then she will have time to remove all unpleasant odors. When the stove is running, the device must also be turned on, otherwise hot air and steam can damage it. It is prohibited to operate the appliance over open burner flames.
It happens that the hood starts to work in the opposite direction. Air is not removed from the kitchen area, but, on the contrary, is drawn in from the ventilation shaft.
The problem in this case is most likely due to improper installation of equipment or excessive sealing of the kitchen area.
Why doesn't the hood work?
Even a new hood may not work in the kitchen, let alone the one you’ve had for a long time. In this case, it is not necessary to immediately call the specialist. You can try to find the problem where the device does not respond to commands and fix it yourself.
Typically, the cause may be:
User errors
- Firstly, be sure to regularly change or clean the filter. If it is mesh, clean it 3 times a week. Change the carbon filter once every 6 months or according to the message on the panel that appears in the latest models for your convenience.
- Secondly, you cannot run the hood if there is nothing on the hob. Overheating will have a bad effect on the system, after which it will need to be repaired.
- Thirdly, the hood must be turned on in advance, about 3 minutes before cooking. And turn it off 20 minutes after you have prepared everything. Otherwise, the fan does not perform its function, and odors fly around the kitchen.
Lost contacts
If you have noticed, when the hood is turned on, it vibrates a little, which can cause the contact on the block or higher up the chains to break. For this reason, the kitchen hood rarely works, but it is worth taking this into account when diagnosing.
Violation of installation rules
If installed with flaws, the hood may fail over time due to a poor connection of the wires or due to a broken corrugation.
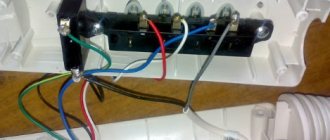
Electrical wiring problems
When wondering why the hood is not working, check the socket, switch on the panel, etc.
see also
Comments 46
I have the same one, once every six months I have to take out the sensor unit, remove the transparent cover and wipe the inside of the board with alcohol. IT REALLY HELPS. Whatever one may say, it is not 100% protected. Take it out, wipe it and you will be happy)))
OK. I'll take care of it this week
I just removed the moisture from the ballast on the sub, there is no hood there, but the principle is the same 1. I drained the water and bathed the block in isopropyl alcohol, alcohol reacts with water to form hydrates, thereby binding it. 2. I drained the alcohol with the remaining water and dried it with a hairdryer, the headlight started working. The same thing IMHO needs to be done with the boards and the exhaust sensor, 100 percent of the water got on the sensor film and short-circuited.
sounds encouraging. I'll just try to wipe it off
Wiping will not help, the water has been absorbed somewhere.
Well, if it doesn’t help, then you’ll have to give it a bath, there’s nothing to lose
I’d rather use a remote control for the chandelier, four buttons (you can easily buy the unit and remote control at a chandelier store). And you don’t need to drill and the speed can be adjusted
wow, you came up with the idea. Just think, I have a remote control for 4 channels lying around idle)) Only you can’t adjust the speed with it, but the idea is great
As a last resort, use toggle switches.
exactly. I just started thinking about this. That is, it’s theoretically possible to throw out the board altogether and install buttons? I had this on my last simple hood, no circuit boards and nothing to break
disassemble the panel and wipe all contacts, as well as the buttons from the inside, using an alcohol-containing liquid
let's try. I already read about this method on the internet.
The most important thing in this matter is to take alcohol-containing liquid inside before the analysis process, so as not to be nervous and do everything carefully!)).
))) good advice, it’s impossible without it))
The most important thing in this matter is to take alcohol-containing liquid inside before the analysis process, so as not to be nervous and do everything carefully!)).
Primary diagnosis
Often the hood does not work due to problems with the electrical wiring, so we check it first. But if you don’t understand anything about electrics, it’s better to call a specialist.
So, when the hood at home does not work, you need to make sure that everything is in order with the outlet. If other equipment is turned on from the same outlet, the wire or contacts in the device itself may be damaged. Check the wire and plug for damage. And inspect the contacts.
Everything is fine? Then we next look at the switch through which voltage is supplied. Ring the wire, conductors and switch. If it does not work in the “On” position on the switch, then that means the reason is there.
To accurately check that there are no contacts in the switches, you need to connect the conductors without it and plug the device into the network. Happened? Therefore, the switch needs to be repaired or replaced.
The cause of a hood breakdown may be due to the protection elements installed in the device. You need to see the fuses; it happens that over time they burn out and must be replaced.
Next we will tell you how to fix other breakdowns if no problems are found with the wires.
How to fix a hood light?
Users often use hood lighting as an additional option. It's really convenient, and the LEDs provide good lighting.
If the light in the hood breaks, the procedure is as follows:
- Screw the light bulb into another fixture. Perhaps it has served its purpose and needs to be replaced.
- Turn on the fan to see if the system works at all. Works? Let's move on to point 3.
- Check the quality of the voltage in the sockets with an indicator screwdriver. Also check to see if the shield has been knocked out. If there are no faults, then inspect the cord, ring the backlight switch and other circuit elements. So, you will find a weak point, but usually the cause is a burnt out light bulb or a broken socket.
Preventive measures
In order for the hood to work and the fan to effectively pass air into the room, the following steps must be performed annually:
- Check the air exchange in the ventilation system with a piece of paper or a lit match. The method clearly shows the occurrence of a problem by the quality of drawing fire or a leaf into the hood. After installing new ventilation, you need to do this test immediately. Having remembered the deviation value, you can draw conclusions about the quality of air flow into the room.
- Regularly remove the grille and clean the hood with improvised means. If necessary, do a general cleaning of the structure by disconnecting its parts and carefully inspecting the internal components.
- Special services must monitor the general ventilation system of the house. If such an inspection is not carried out, then you need to submit an application for inspection of ventilation pipes to the management company.
How to fix the hood speed switch?
Here, the reason why the hood does not work is clear - the button in the control unit is broken.
What do we have to do:
- Remove the cover and inspect the button, the contact may have burned out.
- Check the tracks on the board.
- Ring the chain.
- And inspect the starting capacitor, it can also burn out over time. And then it must be replaced.
How to eliminate weak cravings?
Another well-known breakdown is why the hood doesn’t work, it doesn’t pull. What to do?
We are looking for the reason in filters that have not been cleaned or changed for a long time. And in a mesh that collects fat. If it is a filter, clean it or change it, depending on the type and period of use.
Poor draft also happens because a vacuum has formed in the room, since all the windows have been closed. Then the hood sucks in air poorly or stops doing so altogether. Just ventilate.
And there may be no draft in the home ventilation duct. Bring a lighter with an open flame to the ventilation. If the flame does not stretch towards the channel, forced ventilation is needed.
Information selection
All kitchen hood malfunctions and their elimination. A detailed description of the hood is provided. Exhaust device. Principle of operation. All kinds of malfunctions of kitchen hoods Eurosoba, Gorenje, Renova, Vestel, Kaiser, Pyramida are considered. Cata, Best, Turbo, Universo, Best, Siemens, Elika, Whirlpool. The malfunctions, their causes and the main detailed and step-by-step instructions for disassembly, fault detection, repair and subsequent assembly are described. You will receive answers to all categories of questions as well as invaluable guidance on how to fix any kitchen hood malfunction yourself, quickly and efficiently at home
How to fix an exhaust fan?
It must be said right away that the hood in the kitchen may be humming not because the fan in it is broken. Some models are not pleased with the build quality; as a result, a hum can be heard even at minimum speed. Therefore, it is important to choose the device wisely when purchasing.
If you are sure that the noise is acquired, check the fastening. Even if there is a small distance between equipment and furniture, there are vibrations that can be heard as noise. Tighten the fasteners or place a piece of foam rubber in the gap.
But when the engine is noisy, and nothing else, the fuse has probably blown out - buy a new one.
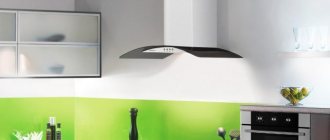
We solve popular problems with hoods: main equipment malfunctions
Cooking is accompanied by a variety of aromas: pleasant and appetizing or the smell of burnt food. Combustion products enter the air, which negatively affect human health. To prevent the spread of odors, it is recommended to turn on the kitchen hood.
To produce the device, strong and durable materials are used that have thermal and anti-corrosion properties and prevent mechanical damage. But it happens that the hood may not work as expected. We tried to describe in detail 4 types of possible malfunctions and their causes.
We invite you to familiarize yourself with: “TOP 14 popular built-in hoods in 2022.”
Is your hood making strange noises?
Many people wonder: why does the hood whistle, make noise, or creaks when it’s working? The answer can be found by reading the technical specifications.
Any model, for example Eleyus Lana 700 60 BL, has a certain noise range, and extraneous sounds appear for several reasons:
1. Factory defect. Determined by special expertise at the service center.
2. Clogged filters or ventilation shaft. To get rid of this problem, cleansing measures are carried out.
3. Incorrect installation of equipment: the presence of a large bending angle, loose connections at fastening points, many narrowings.
4. Inconsistency in the diameter of the exhaust duct. If you connect a hood with a capacity of 600 to 1000 m3/hour to a pipe with a size of 100 mm, although the instructions indicate a minimum of 130 mm, then noise may occur.
Some modifications based on factory settings may be loud. To select the right equipment, it is recommended to study the technical data before purchasing.
What to do if the hood does not work completely?
What to do if the hood in the kitchen is completely broken and won’t turn on? It's difficult to repair without a technician. You will see that nothing is working: the fan is standing still, there is no light, and so on .
First, check the wiring again. Is everything okay with the cord, or is it broken, is the socket working, etc. If the reasons cannot be found, we call back the entire chain.
You need to check the switch especially carefully for burnt contacts. And look at the condition of the fuse, as well as the capacitor, so that it is not swollen .
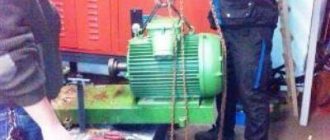
You have checked everything, there are no faults, the engine is probably broken. As a rule, it is expensive to repair and it is easier to purchase a new one.
Replacing the engine yourself:
- Unplug the hood.
- Pull out the filters.
- Open the bottom panel.
- Turn off the backlight.
- Remove the hood from its niche.
- Disconnect the fan from the motor, usually by removing the clamp.
- Remove the electric motor. You need to unscrew the screw, disconnecting the green ground wire, and then cut the wires from the engine.
- Unscrew the fasteners and remove the engine.
- Attach the new motor to the mounting plate and place it inside the device. Don't forget to connect the motor, including grounding.
- Reinstall the fan, securing the clamp.
- Hang the hood on the bracket, connect it to the network and check the operation.
DIY repair
If the hood does not turn on, the first thing to do is check the power circuit. If the working light is on, there is most likely a malfunction in the motor or control circuit. It is not difficult to start a single-phase motor - to do this, the operating and starting phases must differ by 90 degrees on the windings. To do this, you should connect the windings in parallel (attach a capacitor to one). It is already included in the motor, so to determine the contacts you need to look at the instructions on the motor itself.
If the case is a three-phase motor, then the windings are connected in a triangle. Instructions for correct connection should also be on the housing. If the motor is working properly, you need to check the circuit for voltage. For this you will need a tester. When the motor is running at a constant speed (approximately 90%), the cause of the breakdown should be sought in the control circuit.
Tips for using home hoods
In order not to worry about how to repair the hood, you should follow simple rules:
- The hood should hang from the gas stove at a level of 80 cm and 70 cm from the electric hob. Otherwise, the device will become very hot and suffer damage. And if you hang it lower, the efficiency will suffer.
- When changing gears, it is better to start with a low speed so as not to put a sudden load on the engine.
- Do not start the appliance if the stove is empty, as the motor will also overheat.
- Change and clean filters. Otherwise, the engine becomes covered with grease, as well as the circuit board, lamps, and so on. This leads to overheating and breakdown.
- Install a protective relay to protect the device from power surges.