A compact homemade mini drill can be used for drilling printed circuit boards if you suddenly decide to assemble some electrical appliance with your own hands. In addition, it is useful for ordinary household purposes, if there is a need to drill a small hole in a wooden board or plastic. It is much more convenient to work with such a tool than a large drill or screwdriver, since the mini version is much lighter and more compact, which allows you to perform small work faster and with better quality. Next, we will tell you how to make a mini drill from a motor with your own hands, providing photo instructions and visual video examples.
Mini drill attachments
A cutter made from a wheel from a lighter. Ordinary drills may not be enough if you are not a radio amateur, but are engaged in model making or other types of creativity that require the use of a mini drill or drill. Some attachments are easy to make yourself:
- Milling cutter. You can use a spinning drum from a lighter. Place it on a suitable size bolt and secure with a nut.
- Grinding head. A small nail will do. Place a cork champagne cork on it or wrap a cylinder of electrical tape around it. Cut a rectangle out of sandpaper of the required grit and glue it around the circumference of the head cylinder. To process different materials, you will need several of these heads.
- A circular saw. The upper or lower part of a C-size battery – the so-called “barrel” – is suitable for manufacturing. The battery material is strong enough to make a compass disk. To mark, use a compass to mark the hole in the center. The oblique teeth must be the same size to avoid runout during operation. To fix it in the drill chuck, use a bolt and secure the disc to it with nuts. As you can see, it’s not difficult to make a mini drill with your own hands from a motor if you are full of enthusiasm. Many scrap materials that you most often throw away will work. The only thing you will have to spend money on is a collet: making it yourself is extremely difficult.
DIY drill guide
We bring to your attention the third budget version of a homemade device. The design is also quite simple to manufacture, but is made of metal. This idea belongs to the author of the YouTube channel Be Creative.
Materials that will be required for the manufacture and assembly of the drill stand:
- profile pipe;
- metal bushings;
- clamp for drill;
- steel plates;
- guides;
- return springs.
First of all, it is necessary to make a movable part of the stand to which the electric drill will be attached. In the previous version it was made of wood, in this one it is made of corrugated pipe.
Cut a piece of square profile and cut out the ends of the saddle. Then we weld two bushings to it.
In the middle you need to weld a clamp to attach the electric drill. It can be made from a piece of round pipe, two nuts and a bolt.
Next, we cut off three pieces of steel strip and weld the base of the stand (support platform) from them.
We weld guides made of smooth reinforcement to the base. We put springs on them.
We fix the drill with a clamp, and then put the moving part on the guides.
The homemade drill stand is ready. Yes, it looks very primitive and flimsy, but it can be made very quickly from scraps of metal.
The detailed manufacturing and assembly process of this structure can be seen in the video below.
Wow??? Genius Idea
Complete analogue of the factory “Dremel”
Drill example
The original housing is also made independently in such a way that the engine is tightly fixed inside, while leaving a gap or an open part in the heating area.
The body of the mini-drill can be any plastic tube.
There are models that used a tube of sealant, a syringe, a plastic tube of toothpaste or children's candy.
A piece of plumbing plastic pipe cut to the required length will also work, but in this case the open ends will need to be sealed with some kind of movable “plug”, for example, acrylic or cut out of plastic.
You can make a mini-drill chuck or clamp yourself, for example, from a regular connecting terminal, or buy it on the market or in a store. For collets, you can contact engraving workshops, as well as modeling departments or sections of components for household power tools.
The resulting tool is a universal option; Depending on the type of repair, various attachments are fixed with such a clamping chuck: drills, cutters, discs with a cutting edge or screwdriver heads.
Types of machines
Despite the homemade assembly, each machine allows the production of a wide range of parts of varying complexity and configuration. If the unit is installed correctly, it will be practically inferior to professional factory analogues in terms of accuracy and speed of operation.
If you use a high-power drill, designed for long-term uninterrupted operation, then on such a machine it is possible to set up mass production or processing of various elements.
Each type of machine provides for the performance of different jobs and has its own characteristics.
Drilling
A drilling machine is necessary for forming holes in various surfaces - both flat and multifaceted elements made of wood, metal, plastic, glass. The diameter of the hole and the material of the part are determined by the type of cutting element used - drill.
The principle of operation of the unit is based on the fact that the mechanism that provides the torque of the cutting element (in our case, a drill) is located directly perpendicular to the surface being processed on a special bed - a spindle mounted on a stand. When the spindle is lowered, the drill enters the surface and makes a hole in it.
The main advantage of working on a machine over manual processing is that the hole is more accurate. The attached drill can be clearly focused and directed to the desired location.
Turning
The processing of parts on a lathe occurs due to the rapid rotation of the workpiece around its axis, which is ensured by a spindle rotating from an electric motor, in this case it is a drill chuck. The cutting element is fed manually from the side, perpendicular to the rotating workpiece, or penetrates inside, depending on the type of work being performed.
A lathe is used for internal and external machining of metal, wood or plastic parts:
- thread cutting;
- screw cutting works;
- trimming and processing of ends;
- countersinking;
- deployment;
- boring.
The workpiece is clamped in the machine between the torque-providing element (an attachment in the drill chuck) and the pressure guide bushing. The pressure sleeve is placed on special skids and fixed in the desired position with a nut. The length of the runners will determine the size of the workpiece that can be installed in the unit.
The drill is fixed in the frame “tightly”.
Milling
A milling machine is used for processing metal and wooden workpieces using a milling cutter - a tool with special cutters and teeth. During operation, the cutter, turning around its axis, removes part of the outer layer from the workpiece, giving it the required shape.
Using a cutter, grinding and other work is carried out:
- cutting;
- sharpening;
- trimming;
- countersinking;
- sweep;
- thread cutting;
- production of gears.
Method number 3 – Antiperspirant idea
Well, the last version of a homemade mini drill, which we would like to provide to the readers of Sam Electric - using a cassette motor and an antiperspirant container. The advantage of this model is that it is controlled by a separate on/off button and has a convenient housing. Such a homemade product will be powered by a conventional power supply, which must be selected based on the characteristics of the motor.
So, first you will need to prepare the following materials:
- motor from a tape recorder;
- suitable collet with drill;
- used antiperspirant;
- RCA socket for connecting power and a mating part for it;
- power unit;
- switch from an old carrier.
The first step is to make a mini drill according to the instructions provided at the very beginning: place the collet on the shaft and secure it with bolts. Next, the motor housing is installed in the antiperspirant. As you can see from the photo, the dimensions are ideal for installing the part. If the motor has free movement inside the housing, secure it with electrical tape and hot glue.
After this, you need to drill a hole in the top cover for the exit of the collet or the drill itself. At the same time, you need to make a hole in the bottom for the power connector. Using a utility knife, you also need to cut out a window for the switch, then solder all the elements of the circuit in series and install them in a place convenient for you.
The advantage of this version of a homemade mini drill is its convenient operation, small size and stylish appearance. We recommend doing this particular option at home, because it is the most convenient, safe and at the same time affordable.
Review of various creation ideas
Installing the motor on a homemade drilling machine
Let's move on to the most crucial moment - installing an electric motor on the machine. If we do something wrong here, then we may not succeed. It is necessary to maintain maximum perpendicularity and alignment of all components and assemblies. Let's start by attaching the engine to the machine. We continue with our step-by-step instructions on how to make a drilling machine with your own hands.
STEP 1: Mounting the motor. We cut out a metal plate to mount the engine to the profile pipe. Our engine already has a full-fledged mounting location. We make a plate of the same size, drill mounting holes so that they coincide with the holes on the engine. We weld the plate to the profile pipe strictly at a right angle. We install the electric motor and screw it tightly to the plate with bolts.
STEP 2: making the adapter coupling. In order to somehow make friends between the motor shaft and the cartridge, you need to make an adapter. It must be done on a lathe because it must be perfect in all respects. If you do anything wrong, then when the motor shaft rotates there will be a terrible beating on the drill, which will not allow you to work normally. It is better to order an adapter for a homemade drilling machine from an experienced turner. Take all the necessary dimensions for making the adapter coupling, and take everything to the turner, let him do it.
STEP 3: Attaching the chuck. When we already have the adapter coupling, we can begin to attach the cartridge. We fix the cartridge on the coupling, and the coupling on the motor shaft. We check for alignment. If everything spins without any beats, then you can start connecting and painting the homemade drilling machine with your own hands.
STEP 4: connection. Since we have a three-phase motor, we need to connect all three phases into one, and connect them through two capacitors. We connect the button to turn the mechanism on and off. Also, it is necessary to introduce a switch into this system that changes the direction of rotation of the electric motor.
STEP 5: painting. The final stage of the instructions on how to make a drilling machine is painting. We clean all the welds, wrap all threaded elements and cables with masking tape, and begin painting. Before doing this, it is worth degreasing all surfaces so that the primer and paint adhere as expected.
To securely fix various parts on the tabletop, you can make a homemade vice for a homemade drilling machine with your own hands. They will help hold absolutely any parts, which facilitates correct and accurate drilling of holes.
That's all for us. Our instructions once again confirm that, if desired, you can make absolutely any device. It saves you hard-earned money, and promotes the right technological thinking
Thank you for your attention!
Toothbrush device
All parts of the brush need to be cut off, leaving only the body. Then you need to connect the shaft of the miniature motor with the drill using a collet mount. The collet clamp is purchased separately, taking into account the diameter of the engine shaft.
The chuck is suitable for shafts with a diameter of 2 mm. The brush motor has a smaller diameter. It is first necessary to grind each fastener to a cone-shaped shape. This will allow you to adjust the diameter of the engine shaft to the size of the cartridge mount.
The drilling machine can be made from a blender, electric manicure tool and other devices.
A mini-drill is sometimes equipped with a speed controller and other options.
The video shows how to make the equipment.
How to insert a drill correctly?
To correctly insert the drill into the chuck, you need to know the following. The hole intended for clamping the tool is no more than 2 cm deep. The deeper the drill is set, the more securely it will hold in the chuck. There are two types of chuck clamping mechanisms:
- manual, tightened by hand;
- key, wrapped with a key.
In recent years, household drill models have been equipped with a manual (quick-release) chuck - it is simpler in design and quicker to operate.
To install the drill in the chuck you need to follow these steps:
- Turn the cartridge counterclockwise. The jaws should move apart to a distance slightly larger than the diameter of the drill.
- Insert the drill bit between the jaws until it stops.
- Smoothly turn the chuck clockwise, making sure that the drill is clamped evenly on all sides.
- Tighten the jaws by hand or with a wrench.
Video: how to insert a drill and secure it
When fixing the drill in the chuck, considerable force can be applied, especially if the drill has a large diameter. It should be remembered that you will then have to do the reverse operation to remove the drill or replace it with another one. When clamping the drill, look for the “golden mean”: fasten the drill securely, but so that it can be removed from the chuck without any problems. The required effort is easily determined after a little practice - muscle memory kicks in.
Drill with fishing reel
This do-it-yourself manual micro-drill can be called the simplest and most effective. If you do it, then you won't have any problems making a hole. A do-it-yourself drill of this type can easily be called the best; if something goes wrong, you can easily fix it.
What do we need:
- The reel is inertialess.
- A collet or an old drill chuck.
- Hot melt adhesive.
- Small drill.
The process of assembling a homemade drill from a coil can be divided into two main stages?
- First of all, we must dismantle the spool with fishing line, and cut off the axis that we do not need. This is what it looks like in the photo.
- Glue the cartridge or scurvy onto the remaining rod. You can use hot glue, but it will be more effective to do everything using cold welding.
When everything dries, we check how our mini drill works with our own hands. We found this video for you on the Internet, here each stage is described in more detail.
DIY mini drill examples and videos
Power and Control Components
It’s great if you have a power supply with an incoming power controller - this will make it possible to change the speed of the drill during operation. If you use a regular power supply, for even greater comfort it is advisable to install a power button on the casing. You can use either a 2-position switch (on/off) or a breaker button - it depends on your tastes. It would not hurt to also equip the shell with a plug suitable for the power supply.
To learn how to make a mini-drill with your own hands, see the following video.
A mini-drill is a universal assistant for a master when carrying out minor home repairs. It is also used to repair various types of digital and computer equipment or radio electronics. You can find the device at the market or in an electrical equipment store, but this can be expensive.
Therefore, if you don’t have a mini-drill at hand, and you don’t have the time or desire to spend your own money on buying one, you can take the advice of experienced craftsmen and construct a tool at home, using available tools and materials.
Content
Complete analogue of the factory “Dremel”
To make it, you will need a motor with a 5V or 12V power supply, which can be removed from a broken children's toy, a miniature fan, a printer, a tape recorder, or simply bought on Aliexpress. If you plan to use the drill for more than just drilling printed circuit boards, you can make a convenient housing from a polypropylene water pipe. We select the diameter so that the motor holds tightly to the walls. Ventilation usually runs along the shaft. You can use an empty tube of construction sealant.
End caps can be cut from any material: for example, PVC or acrylic. If the engine is powerful enough, a charger from an old mobile phone will not work. You need a current reserve of at least 3A (for 5 volts). A good option is an old computer power supply (you can buy it for pennies on the radio market).
The collet chuck can be purchased in the store: the department of components for engravers and Dremels. If there is a need to adjust the speed, you can make the circuit yourself, or purchase a ready-made unit.
The illustration shows a Chinese regulator and a power supply from an Internet router (12V, 1.2A).
With this homemade “Dremel” you can not only drill miniature holes. By installing the appropriate attachment, you can work with a milling cutter, cutter, or cutting disc.
Design
Inside any mini drill there is a grinding machine, that is, a device for direct grinding. All of the above functions are performed thanks to attachments and cutting tools installed in the chuck.
A significant difference between the design and a standard size drill is the rotation speed of the spindle sleeve. Popular models of mini hand drills maintain speeds from 10 to 30 thousand per minute. Due to the high speeds, there is no need to secure the workpiece being processed, because it will not be pulled out of your hands. This feature is very convenient when working with engraving and grinding.
Interestingly, the Hammer mini drill is equipped with a flexible shaft, which allows you to use attachments in the most difficult to reach places without unnecessary discomfort. It is very convenient to use a flexible shaft when you do not need to hold the drill in your hand. To do this, the electrical appliance is suspended on a special stand. This approach will free your hands, reduce vibration and overall noise levels.
Safety precautions and selection rules
One of the key conditions that every owner of a hand drill should observe is the safe operation of this tool. The latter involves taking into account simple rules.
- Drilling a part can only be done after it is securely fixed. Ignoring this condition may result in damage to the item being processed or injury to the performer.
- Do not touch drills and attachments - both while the drill is running and after a short period of time has passed since its completion. This is explained by the fact that the processing of hard materials with a rapidly rotating cutting tool involves strong friction, the natural consequence of which is heating.
- After the drill is securely fixed, the performer should remove the key from the chuck.
- To prevent the cutting tool from becoming dull, it must be cooled periodically, taking breaks in work or applying a special suspension. In this way, you can not only extend the service life of the drill, but also make the holes more accurate.
In addition, to avoid eye damage from chips and other small drilling debris, you must wear safety glasses.
To ensure that the purchased hand drill does not disappoint its owner, it must meet the following conditions:
- high quality manufacturing of all visible structural elements (if there are burrs, sharp edges and other defects, it is advisable to refuse to purchase the tool);
- comfortable handle shape (the presence of a protective coating is also welcome);
- smooth rotation of the cartridge;
- absence of extraneous noise during operation.
Special attention should be paid to the material of the handle, which can be wood or plastic. As for the type of hand drill, the optimal solution is a two-speed tool with a large number of functions
This is especially true for performing complex work - tasks that are almost impossible to solve without changing the rotation speed.
As for the type of hand drill, the optimal solution is a two-speed tool with a large number of functions. This is especially true for performing complex work - tasks that are almost impossible to solve without changing the rotation speed.
Method number 3 – Antiperspirant idea
Well, the last version of a homemade mini drill, which we would like to provide to the readers of Sam Electric - using a cassette motor and an antiperspirant container. The advantage of this model is that it is controlled by a separate on/off button and has a convenient housing. Such a homemade product will be powered by a conventional power supply, which must be selected based on the characteristics of the motor.
So, first you will need to prepare the following materials:
- motor from a tape recorder;
- suitable collet with drill;
- used antiperspirant;
- RCA socket for connecting power and a mating part for it;
- power unit;
- switch from an old carrier.
The first step is to make a mini drill according to the instructions provided at the very beginning: place the collet on the shaft and secure it with bolts. Next, the motor housing is installed in the antiperspirant. As you can see from the photo, the dimensions are ideal for installing the part. If the motor has free movement inside the housing, secure it with electrical tape and hot glue.
After this, you need to drill a hole in the top cover for the exit of the collet or the drill itself. At the same time, you need to make a hole in the bottom for the power connector. Using a utility knife, you also need to cut out a window for the switch, then solder all the elements of the circuit in series and install them in a place convenient for you.
The advantage of this version of a homemade mini drill is its convenient operation, small size and stylish appearance. We recommend doing this particular option at home, because it is the most convenient, safe and at the same time affordable.
Review of various creation ideas
From a ballpoint pen
To make a drilling device from a ballpoint pen, no electrical elements are needed, and no skills in working with power tools are required.
You will need a ballpoint pen with an automatic mechanism, hot-melt adhesive, a stick with jumpers at the end that rotates the drill, and a drill of the required size. The main load falls on the body, so you need to choose samples made of metal or thick plastic.
Build process
The ballpoint pen is completely disassembled. A drill is inserted into the lower part of the body, from which the rod usually comes out. The shank is fixed into the hole on the stick. To ensure that the entire working structure of the tool becomes a single mechanism, the parts are fixed to the inner walls of the body with hot-melt adhesive. The drilling process will be performed through mechanical action on the stick, which serves as the handle of the device.
Structural elements
By studying photographs and drawings of stands for drills (homemade or factory-made), we can identify the main structural elements inherent in all machines without exception:
- Tabletop base;
- Vertical guide;
- Drill mount;
- Lifting and lowering mechanism;
- Handle.
The underlying base provides stability to the structure and dampens vibration from a working tool. It houses fasteners for the remaining elements of the rack, a vice and clamps for parts. It is allowed to leave holes in the base for through drilling of parts.
Metal or wood (solid wood, plywood) is suitable as a tabletop material. To combat vibration, it would be a good idea to add a layer of dense rubber under the base. The base must be massive, the minimum size in terms of 600 x 600 x 30 millimeters. You can make holes in it for attaching to a workbench - this will give additional stability when working.
The guide is a vertical rail that is installed on the base and holds the drill mount. The slats can be metal (pipe, channel) or wood (block, plywood). In some models (usually metal), the guide is combined with a lifting and lowering mechanism. Removable slats are installed on a bolted connection, the rigid connection is made by welding. The donor of the finished base with a guide will be the tripod of a failed photo enlarger or microscope.
The drill is mounted on clamps or brackets with a hole in the center. As with the rack, the mounts can be designed to be removable for different types of drills. The handle is placed on the side or on top of the structure, with its help the position of the cutter relative to the bed is adjusted.
Homemade collet coupling of the simplest design
The simplest collet, operating on the principle of a coupling, can be made of steel wire with a diameter of 1 mm. It should be borne in mind that the collet of the proposed design is not a universal clamping device and can only be used for drills of the same diameter
It is important that the transverse size of the drills used corresponds as closely as possible to the diameter of the output shaft of the drive motor. In addition, it is important to consider that such a collet can only be used when drilling materials with low viscosity
Homemade wire clamp
To manufacture a collet coupling of the proposed design, the following consumables, fixtures and tools will be required:
- a cylindrical metal blank, the diameter of which corresponds to the diameters of the output shaft of the electric motor and drill;
- steel wire;
- electric soldering iron;
- soldering flux.
Clamping mechanism
The next important component of the device is the chuck used to hold the drill. To make a clamping device, you must first purchase a collet chuck . It is a clamping device capable of firmly holding cylindrical objects. Having secured the drill in the collet chuck and firmly clamped it on the motor axis, you just need to connect the power supply or batteries to the motor.
This simplified version of a mini-drill is already capable of drilling holes.
If you do not want to burden yourself further, and you will not use the tool very often, you can leave it as is.
However, holding the “naked” motor in your hands is uncomfortable, and the mini-drill looks unattractive. To bring what you started to the finish line, you will need a shell and separate control components.
Manufacturing process
When you have prepared the body and core, you can begin directly assembling the drill with your own hands:
- Place the cartridge with the motor connected to each other in the jar. This must be done so that the wires that stick out from the socket are then placed in the lid of the jar.
- When the cartridge fits completely into the jar, lock it. To do this, fill the voids on the sides with hot glue and wait until it sets completely.
- Attach the switch to the cover and connect the power wires to it. It can also be placed on glue.
- We connect all the wires to the switch; the connection diagram is standard. You can use an ammeter for accuracy.
- After connecting the wires, they need to be insulated using electrical tape or hot melt adhesive.
- Screw the lid onto the jar and attach the drill to the other side.
The good thing about a ready-made mini-drill is that it can run on both batteries and electric power. We considered the option of assembling a universal model.
Naturally, without having the skills to work with electricity, it will be extremely difficult to assemble such a drill with your own hands. Below we suggest you consider options for assembling simpler drills for small household needs.
How to assemble a drill with your own hands based on the handle body
To make it you will need the following materials: ballpoint pen; drill with the required diameter; hot glue; a durable stick with handles at the end that can be used to rotate it.
Pay special attention to the choice of handle for the manufacture of a future drill, and specifically to its body, since during operation the main load will fall on the body. The requirements for the handle body are:
The requirements for the handle body are:
- it must be as strong as possible to withstand loads;
- the best option is a body made of high-quality metals;
- If there is no pen with a metal body, choose a pen with a thick plastic base.
The build process looks like this:
- Disassemble the handle until only one body remains.
- The lower part of the body, where the writing rod usually sticks out, needs to be unscrewed.
- Instead of this part, insert a drill into the body in such a way that its working part sticks out from under the lower part, and the second part is inserted into the hole that is in the stick.
- The stick is inserted into the body at the same time as the drill.
- To ensure that the structure of the drill is complete, it is fixed to the wall of the housing using hot-melt adhesive.
- When you twist the mechanism using the special handles, the drill will rotate, providing the desired work by pressing the handle body.
https://youtube.com/watch?v=kKLL_tvTc94
Popular types of attachments
The most popular drilling device is a stopper, which makes it possible to quickly and easily drill holes at the required depth. The design of the simplest rod of the device contains an auxiliary handle, on the surface of which a scale metric is used.
The nozzle has a more complex structure and, accordingly, greater functionality, with which you can control:
- hole depth;
- the location of the axis relative to the plane of the workpiece.
The rip fences, intended for use in combination with the device for construction and repair work, are placed on powerful drills, with the support of which holes are drilled in concrete and brick building systems. Horizontal fasteners of this type consist of a stop with a scale and an additional handle for the drill. In some modifications of synchronous installations, there is an integrated suction for removing residues, which is connected to the device.
A device for a drill, with the support of which you can perform carpentry work, is popular among Russian specialists. An electric drill equipped with such a device is a milling unit. In its installation, there is a vertical support with guides, in which a special basket with a galvanic device installed in it moves. Of course, this kind of vertical milling mechanism is not able to guarantee the same accuracy and efficiency as special equipment, but it is suitable for simple work in a home workshop.
A fairly large group of hand-held power tool accessory components are drill bits that can be used to drill at an angle. Such a device for drilling holes functions where a typical drill cannot be used. Depending on the modification of the equipment, the working head can be placed at different angles (up to 90°) relative to the axis of rotation of the drilling machine chuck. More well-known and necessary are devices for drilling at an angle of 90 degrees.
Second option - Self-assembly + (2 videos)
If the task is to make a miniature instrument with your own hands, then you must initially select an electric drive. A motor from various devices - a printer, an old cassette recorder, or from an ordinary children's electrified toy - can be used as an electric drive.
Depending on the power of the electric motor, you can build a mini grinder in two directions. The first direction is to use a network power source. For example, from an old mobile phone. The second direction provides for a completely autonomous model consisting of a motor that will be powered by batteries or accumulators.
The difference between the two directions is in the design of the case. In the first case, space will only be required for the electric motor, and in the second, a battery compartment will need to be installed.
It is very convenient to use a piece of PVC pipe for the body. If its diameter is slightly larger than the diameter of the electric motor, then electrical tape can be wound onto the motor. You can secure the engine using a glue gun.
As plugs, you can use plugs that are placed on PVC pipes during transportation and storage. It is necessary to make a hole in the front plug for the motor shaft, and in the rear plug for the power wire. The power connector and switch must be secured to the housing.
The ideal option would be to attach some kind of collet clamp to the shaft. This will allow you to use standard burs, drills and non-standard mini cutters and discs. If installing a collet clamp does not work, you can connect the shaft and cutting tool using a double contact from an electrical block.
In a similar way, you can make a case for a mini angle grinder with autonomous power supply. Only after installing the engine in it, it is necessary to install the battery pack. The battery wires will be connected through a switch mounted on the case.
In both cases, on mini grinders you can use both homemade tools and standard industrial ones - burs and drills.
https://www.youtube.com/watch?v=8wihkqVEz1k
Simple mini drills
Many people who do not want to shell out a significant amount of money for a ready-made tool often ask how to make a mini drill with their own hands.
You can make your own small mechanical drill using an old fishing rod reel.
To do this, you need to remove the spool from the reel (the core in the form of a cylinder on which the fishing line is wound) and cut the protruding metal axle to the desired size. Then you need to glue an old cartridge from a conventional drill or collet to the protruding rod.
Video:
A collet is a device for clamping round-shaped parts in a small chuck; in this case, you will need to clamp a drill.
You can attach the collet to the spool axis using cold welding or hot glue. After the glue or weld has dried, you can insert a small drill into the collet and get to work.
By twisting the reel handle, the mechanism rotates the collet with the drill, thereby creating holes in the desired material.
It is necessary to take into account that the resulting mini-drill must be held strictly perpendicular to the surface being drilled, otherwise there is a risk of breaking the drill. It is also not recommended to press hard on the instrument.
You can also make a mini drill with your own hands using an old motor from a CD player.
To start the engine, you need either a suitable power supply or a battery (or several smaller ones). The collet must be attached to the motor shaft using cold welding or glue.
It should be noted that the diameter of the motor shaft is usually 1.5 millimeters. Sometimes there are motors with a shaft diameter of 2.3 millimeters.
This size must be taken into account when choosing a collet, since the shaft must fit into the hole tightly, without gaps. Otherwise, there will be vibrations during drilling, which will sooner or later damage the mechanism.
After the collet is placed on the shaft, you need to attach the wires to the motor that will go to the voltage source. It is best to solder the wires, which will improve the strength of the fastening.
Then you can insert the drill into the collet and start working. The motor may start to spin in the opposite direction (not the one needed), in this case it is necessary to swap the wires, otherwise there will be no drilling.
Using the same principle, you can assemble a mini-drill with your own hands, using motors from other electrical appliances.
When using a motor from a small washing machine, the mini-drill will be more powerful, and drills of larger diameter can be inserted into it.
Another good option would be a motor from an electric razor, faulty screwdriver, printer or fan.
You can leave the mini-drill as is, and it will cope with its functions, or you can place the motor and collet in a plastic case, this way it will be much more convenient to hold the tool.
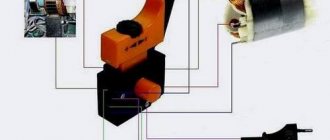
Engine from a car radio: collecting materials
Since the main necessary part is the electric motor, the sections will be standardized based on what and where the engine is obtained. This section discusses the option of making a drill from a car radio motor. For these purposes, both a relatively new CD radio and an old cassette tape recorder are suitable.
Due to the fact that radio tape recorders have DC motors, they require a power supply or an autonomous energy source (such as batteries). Therefore, to make a power supply you must have the following materials:
Mini drill assembly diagram.
- Step-down voltage transformer (220/(3-25) Volts).
- 4 diodes for the diode bridge (selected according to the engine power).
- Voltage regulator.
- 2 capacitors of 100 µF.
- 2 resistors, one of which is variable resistance.
Finding a diagram of a primitive power supply in specialized literature will not be difficult, so it is not worth dwelling on it in detail. In this case, you should select the voltage with the regulator so that the rated voltage is supplied to the engine. Despite the fact that a DC motor from an old player, CD player or radio can operate at almost three times the voltage, this is not recommended.
Another important point is the selection of material for the body. It could be anything: a metal cylindrical body from a flashlight, an empty deodorant container, it is possible to use pipes with a small nominal bore (selected based on the diameter of the engine) or any other available materials. At the same time, the housing from the flashlight is considered the most successful for the drill, since it already houses a compartment with power supplies (batteries), and to operate you just need to connect the motor to the output points.
The next important part that you need to get is a collet (clamp) for drills. It can be removed from watch screwdrivers or purchased in a store
The latter is much simpler, but you should remember that they are less durable and you will have to change it periodically. One more point - regardless of where the collet is taken, it is necessary to think about its attachment to the drill. Since it must rotate freely on the mechanism, securing it will not be an easy task. Here, a purchased collet will have some advantage over one cut from a tool, since it has a pre-made fastening system. However, the latter is unsuccessful on most models.
After collecting all the materials, you can begin making the drill.
Scope of application
The mini drill is widely used to perform various tasks.
- Creating holes in plastic, circuit boards and other objects. Of course, the device will not be able to drill through thick iron, but it will be strong enough to make a hole in a sheet up to one millimeter thick.
- Screwing and unscrewing small head and thread screws. Such fasteners are found mainly on automatic machines (switches), electrical wiring panels, office equipment, as well as in small, low-power electric motors.
- Equipped with special attachments, it can be used as an engraver or grinder; for this purpose, spherical attachments with a rough working surface are placed in its cartridge. During rotation, the nozzle processes the part or applies the required pattern.
These are the main areas where a mini-drill is used, but, in addition to them, it has found extensive use in everyday life, for example, for processing (cleaning) two objects made of plastic or glass that are being glued together. When preparing the joints, both products are cleaned, after which the surfaces are adjusted so that the pieces are closely adjacent to each other.
From an old tape recorder
Another basis for a mini-drill can be the electric motor of a well-worn player or tape recorder that rotates a CD disc. The standard motor of such devices runs on 6V voltage, so you may need to additionally purchase a portable power supply or build a mount for a battery or battery.
Using two soldered wires, the power unit (via a switch button or without it) is attached to the motor and fixed with tape or glue in a homemade tube-shaped housing. After this, the same collet chuck is attached to the shaft, which holds the drill.
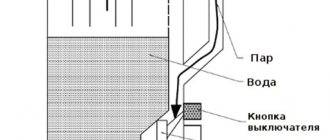
Economical option without housing
The most budget model of a mini-drill is a regular electric motor, to which a power unit is connected through wiring without a housing.
A 12-volt motor will require a power supply consisting of a 30-watt transformer and a rectifier bridge, for example, on a 1N1007 diode.
The inclusion of a simple capacitor in the circuit, up to 25 V with a capacitive characteristic of 1000 microfarads, will protect the motor from pulsating oscillations of the winding during voltage rectification.
The chain works reliably, but as the load increases, for example, when drilling dense material, the voltage will drop, which will lead to a stop in rotation. The voltage can be stabilized by adding stabilizers to the KR142EN8B or L7812CV circuit
After the drive unit is ready, a chuck is made or purchased - even a pen rod in which the drill is fixed with glue can be suitable for home drilling of miniature holes. The cartridge can also be replaced with the previously proposed collet or screw terminal.
What to make it from
On the Internet you can find a lot of video materials on making homemade models of mini devices. The most popular designs of mini drills are represented by the following list:
- MD from an electric cartridge.
- A complete analogue of the factory “Dremel”.
- Drill made from a toothbrush.
- MD from the printer drive.
- Economical option without housing.
- Second life for an old tape recorder.
- Antiperspirant idea.
MD from an electric cartridge
Every home has an electric light bulb socket. The body can be made from it. There are standard sockets and housings for minion bulbs. Both of them are suitable for homemade products. It all depends on the outer diameter of the electric motor.
Manufacturing proceeds as follows:
- The core of the fittings is removed.
- Unscrew the back cover.
- A motor is inserted inside the housing, the side surface of which is covered with hot glue or cold welding.
- Adjust the shaft thickness to the size of the collet clamp hole.
- A polymer lid from a plastic container is glued to the front of the case. A hole is first cut in the cover to allow the motor rod to pass through.
- The cartridge is secured to the shaft with a transverse locking screw.
- The motor wires are threaded through a hole in the screwed cover, which are then connected to the output terminals of the rectifier.
- If you can place a microswitch in the back cover of the electric chuck, then using the drill will be convenient.
Note! The rectifier regulator changes the current and voltage, thereby increasing or decreasing the rotation speed of the functional attachment. At the same time, we must not forget that if the permissible current is exceeded, there is a risk of “burning” the motor
Complete analogue of the factory “Dremel”
A mini drill is often called a Dremel by name - the leading manufacturer of this type of power tool. It is almost impossible to make a homemade product completely similar to the Dremel model.
It all depends on the master in terms of selecting spare parts. Making homemade products in a home workshop can never compare with professional MD production. Although, with some effort, you can achieve some success in this direction.
Advice. There is no need to blindly copy an industrial production model. It is better to purchase a ready-made tool.
Drill made from a toothbrush
Those who have used electric toothbrushes know how quickly the cleaning heads become unusable, and new brushes are impossible to find on sale. If you have one lying around the household, then this is a suitable option to make a mini drill.
The difficulty of manufacturing is to remove the vibrator and install the cartridge on the engine shaft. The device is powered by a battery or an 18650 battery. Such a device will not have a large number of motor shaft revolutions. But the MD will serve well as an engraving tool.
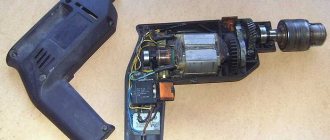
Dynamo from printer drive
An old printer is an excellent “supplier” of parts for making a mini drill. The electric motor and power supply are removed from the device. If the electric motor shaft is too thick, it is ground on a grinder. The engine is turned on and brought to the abrasive. Regularly measuring the diameter, the turned rod is adjusted to fit the opening of the collet chuck. After completing all the work on installing the housing, attaching the cartridge, and installing the limit switch, the device is connected to the power supply. After this, all that remains is to install the desired functional attachment and get to work.
Engine from an old printer
Economical option without housing
In order not to search for a suitable product for the drill body, the motor is wrapped in 2 layers of shrink film. The heated coating tightly covers the side surface of the motor, thereby creating reliable insulation of the power tool.
Mini drill without housing
Second life for an old tape recorder
A thrifty owner can find an old tape recorder or player. If the sound reproducing device is made in a stationary form, then use a power supply, as in the previous case.
The engine from the player is also adapted to rotate the cartridge with the nozzle. The device will be mobile, since powerful AA batteries are placed in the power supply instead of batteries.
Electric motor from a tape recorder
Antiperspirant idea
The body of a used roll-on deodorant is quite suitable for making a mini drill. The advantage of this option is the shape of the plastic bottle. It is made so that it is comfortable and firmly held in your hand.
Roll-on deodorant body
Additional Information. When manufacturing the MD case, you should try to install the power button within the reach of the worker’s thumb. This will create an additional comfortable option for controlling the device.
Make or buy?
An electric drill is a ready-made drive, gear, spindle and chuck in a monoblock. Place it on the carriage of the machine and you can drill. In terms of accuracy, the solution, generally speaking, is not optimal (see below), but in many cases it is acceptable, but eliminates the need to order expensive turned parts of increased accuracy, see below. In view of this, frames for installing drills are now sold only on the street from trays; prices are affordable. When choosing one to make a drilling machine from a drill, be guided primarily by the operating mode of the equipment; The price also depends on it:
- Occasional drilling/milling for yourself with the accuracy of what you get - cast plastic bed or stamped steel. The feed mechanism is lever with a cranked lever (see below). Carriage sliding bearings (see below) are steel on steel or with nylon liners. Prices are $20-$30.
- Regular drilling for yourself or to order with ordinary machine-building precision. The materials processed are up to the hardness and toughness of ordinary structural steel. Everything is the same, but the sliding bearings are steel on steel (worse) or with bronze bushings, and the frame is cast iron or (more expensive) composite, also vibration-absorbing. Prices: $30-$40.
- Regular drilling and milling of any materials that can be tooled with periodic overloads of the tool and/or with increased accuracy - plain bearings are only bronze on steel, cast iron frame. The feed mechanism is rack and pinion (see below); vibration-absorbing console. Prices: $60-$180.
Choosing a bed
The stand for the drill (which sellers for some reason stubbornly call stands) must be chosen not according to - not “China”); Now the market is full of “German China”, not to mention products from post-Soviet states. The design needs to be checked.
First, samples with plastic non-nylon liners for sliding bearings are definitely rejected: runout and drill drift of more than 0.5 mm will appear already on the 10th – 20th “hole” and will further increase. The second is console play. We take it by the far end, swing it up and down and to the sides while holding the latch. There should be no noticeable “chatter” (the tactile sense of an untrained person feels a beat of 0.4-0.5 mm).
Next is an inspection of the structure, see Fig. below. For regular drilling, the one shown in pos. 1. The ideal option is at pos. 2: collet clamp of the drill, shifting the column to the side reduces the vibration of the console by an order of magnitude, and by turning it sideways by 45 degrees, you can mill the part by hand with the precision “as best you can” on a standard fixed table, removing a couple of table fasteners, because in this case, its manual displacement relative to the horizontal working axis of the console will be linear.
How to choose a bed (stand) for a drill
And here is a sample for pos. 3 do not take under any circumstances. Firstly, the collar of its column is low and its fastening is unreliable. Secondly, longitudinal grooves under the table facilitate manual milling “as it happens,” but, unlike diagonal ones, they do not dampen vibrations of the bed. Moreover, they will concentrate where shown by the arrows (the tide under the column is made too narrow) and from there they will go straight into the column and table.
Which is cheaper?
Bench Drill Press Spindle Drawings
Let’s say the price for the machine you like doesn’t suit you. Or a drill, if it’s a “crowbar” one, with an impact mechanism, that was used in work on building structures and the beating of the chuck is visible to the eye. Then the first thing we do is find out if there is a craftsman within reach who owns a lathe with high precision (no rougher than 0.02 mm). Which, by the way, is not a fact - a high-precision machine is very expensive and never pays off with the flow of regular orders. But let's say he was found. We take the drawing in Fig. on the right, we go to him and ask if he can turn it out of steel no worse than 30KhGSA, and how much he will charge for the work. “This” is the drawings of the tabletop drill spindle. The rest of its parts can be turned on a regular machine, or found in ruins at an iron market or in your trash. Most likely, it will turn out that it is cheaper to buy a bed + table, and if you estimate the costs for the rest, then perhaps a drill of increased accuracy will emerge. There are some of these on sale; they can be recognized by the absence of a striking mechanism and a collar specifically for installation in the frame: a turned steel cuff is put on it.
Tools and materials
Required:
- electric cartridge,
- engine,
- plastic container for soap bubbles,
- sharp knife,
- hot glue,
- insulating tape,
- soldering device,
- toggle switch
Preparatory work
To make a housing in the lid of a jar of soap bubbles, use a heated soldering iron to make a hole with a diameter slightly larger than the diameter of the base of the drill. The bottom of the container must be removed. The core of the tool is made from a motor and a cartridge. An engine of suitable power can be taken from old equipment. Before attaching the engine and cartridge, they are degreased with acetone. Fastened by cold welding or hot glue.