Installation of the Sonoff Basic wi-fi relay (in Russian - Sonoff Basic) involves its serial connection to the power circuit of a household electrical appliance or other electronic device powered by a 220v network. The Sonoff Basic relay stores information about timers in the device's memory.
Pairing with the gadget and setting it up will require installing the eWeLink application. When the relay and device with the eWeLink application are on the local network (connected to the same Wi-Fi), it is possible to send commands without an Internet connection.
Time synchronization is carried out from the Chinese cloud, so Sonoff will continue to work according to the set timers during a long absence of the Internet, until the device is rebooted for the first time. Works great in conjunction with motion sensors.
Instructions for connecting Sonoff Basic
We will need:
- Wifi relay Sonoff Basic (or Sonoff Basic R2, R3 there are no differences when connecting).
- A household appliance that we will automate. I will make a smart extension cord.
- Tools - a stationery knife, wire cutters, a small Phillips and flat-head screwdriver.
Let's get started:
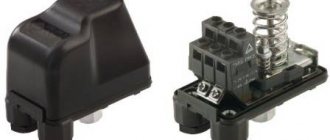
- Remove the relay from the packaging. The Sonoff Basic kit includes: side covers, bolts for fastening the covers and brief instructions.
- Decide on where to install the relay. I usually place it in the middle of the length of the power cord. Sometimes such installation is impossible if the wire runs behind a closet, under a sofa and in other hard-to-reach places. Using wire cutters we cut the power cord of the electrical appliance at the installation site.
- Using a utility knife, carefully cut off the first layer of insulation. Do not cut through the wires. There are three wires under the insulation, of which: brown phase (L), blue neutral (N), yellow-green ground (PE). We strip the insulation on the phase (L) and neutral wires (N). Ground connection is not provided. We bend the wire to the side, we will not connect it.
- We connect a part of the wire with a plug to the left side of the Sonoff Basic. It will go into the outlet. We insert wires N and L into the green block, the inscription on the body is Input . Use a flat screwdriver to clamp the contacts. If you don’t know where the phase is, a phase indicator will help.
- We connect the electrical appliance wire to the right side of the Sonoff. We insert wires N and L into the green block, the inscription on the body is Output . Use a flat screwdriver to clamp the contacts.
- The third wire remains - ground. Between the body of the device and the place where the cover fastening bolt is screwed in, there is a place where it fits flush and won’t go anywhere. We remove it so that it does not interfere with closing the lid. Additionally, it can be insulated.
- Use a Phillips screwdriver to tighten the Sonoff Basic side covers with the bolts supplied with the device. The side covers press the wire by the insulation, which prevents the wires from being pulled out of the terminal block if the relay is accidentally touched. Assembly is complete.
Control from multiple phones
To interact with the relay through several smartphones you can:
- Log in to the Ewelink application from one profile.
- Delegate rights to another profile in the application itself.
To delegate:
- Open the application and expand the connected relay to full page.
- Click the “Share” button and in the new window “Share device”.
- Enter another account and click OK.
Now the relay will be activated on another account and can be controlled. Synchronization of such parameters as: status, timers, settings will work immediately.
Setting up work in the eWeLink application
Download the eWeLink application to your gadget from the AppStore or PlayMarket. Register an account. Entering your email is required to receive a confirmation code. The password is at least eight characters.
After registration, we get to the main menu of eWeLink. Relay control is only possible using this application. Control from a computer is only possible by installing a virtual machine with mobile OS or by sending http commands after reflashing the relay.
Sonoff Basic pairing
We connect the gadget to the home Wi-fi network, and Sonoff Basic to the 220v network.
Only 2.4G Wi-Fi networks are supported.
Press and hold the button on the Sonoff Basic until the LED indicator starts flashing quickly or flashing 2 times and lights up.
In the application, press the + button, then Quick Pairing. The wireless network name field will be filled in automatically with the name of the network to which the gadget is connected. All that remains is to enter the Wi-fi password. Next we wait for pairing.
After successfully finding the device on the network, under the time we will see the inscription “Registering...”. Enter the name Sonoff Basic to display in the application. Click add device. Pairing is complete, as indicated by a constantly lit green LED indicator.
Sonoff Basic will appear in the main menu of the eWeLink application in the OFF state. To start it, tap on the OFF button and get the ON status.
Clicking on the name takes you to a separate settings menu. The connection activity icon is displayed on the right. If we are working within the same network, there will be an icon indicating a local network.
The lineup
Now that we have figured out how the Sonoff smart relay works, let’s move on to a review of the proposed solutions. By the time this article was written, on the company’s official website there are 9 models of Wi-Fi connectors and 9 models of other smart products: sockets, switches, lamps, sockets. Let's look at what they are and the characteristics of some of them:
- Basic 10A is the simplest model, the relay is designed for current up to 10A, maximum load is 2.2 kW. Operates in the voltage range 90-250V, according to the wireless communication standard 802.11 b/g/n, operating temperature from 0°C to 40°C, Case dimensions: 88*38*23mm.
- RF - distinctive feature: support for remote control via 433MHz radio remote control (not included in the kit, you can bind any one).
- Dual - differs from the characteristics of the previous one only by the presence of two channels. So you can manage two loads from one device, but how many can you connect? The maximum current for one device is 10A and power 2200 W, and for two devices a total of 16A and 3500 W. Case dimensions: 114*52*32mm.
- TH10/TH-16 - models with temperature and humidity sensor: DHT11, AM2301, DS18B20 (temperature only). They connect to the 3.5 mm jack on the side panel. TH10 differs from TH16 in maximum load current - 10 and 16 amperes, respectively.
- POW 16A, the main difference is the ability to monitor the power consumed by the load. This is especially true when used to control a heater with a load current of up to 16A. With the ability to display daily and monthly reports. Case dimensions: 114*52*32mm. In the POWR2 version, it is possible to view the current consumption and what voltage is in the network.
- 4ch PRO is the largest option in the line. The main feature of the characteristics is to control 4 channels of consumers with a power of 2200W, that is, 10A per channel. Size: 145*90*40mm. Designed for installation in an electrical panel on a DIN rail and occupies 8 modules.
The cost of the simplest relay at the time of writing is $3.5, and the most expensive is $20. How many devices can be connected to one Sonoff Wi-Fi relay, as you can see, depends not only on the current consumed, but also on the number of channels
Setting up Sonoff Basic in eWeLink. Timers, work according to schedule.
The menu items available are:
- Share . Allows you to control one relay from different accounts. For example: The extension cord can be controlled by all family members from their smartphones.
- Scheduled . Setting up Sonoff on a schedule. Allows you to set up time operation for any day of the year, indicating a specific turn-on or turn-off date. It is possible to execute commands one-time or repeated by day of the week.
- Timer . Countdown to the time the action was ON or OFF.
- Cyclic timer . Start the ON/OFF action, after a specified time the ON/OFF action.
Firmware update, additional features
To the right of the relay name, by clicking on the three dots, we get to the additional menu where we find:
- Change the device name .
- Firmware update to the latest version.
- Activation of work in the local network .
- Notification for operations …. Sending notifications about device operation.
- Power-on-State . Important setting. Determines the behavior of Sonoff Basic after power is restored. For example: after turning off the light, the relay can go to the ON, OFF state or the last active state during which the power supply was lost.
- Turn off network indicator . If you do not activate this item, the green indicator will always be on when successfully connecting to the Wi-Fi network. Shines into your eyes at night. I'm turning it off.
- Duration . The parameter sets the time after turning off Sonoff Basic after turning it on.
- Story . Device operation log.
- Module data. Firmware version, MAC address, other system information.
If the declared functionality was not enough, it is possible to update these wireless modules to custom firmware. For example, flash it on Tasmota, with subsequent integration into smart home systems.
Reviews
Having read a lot of reviews on the Internet, we can say that people really like the innovation. We hope to soon be able to control everything with the click of a button or using a smartphone. There is a lot of negativity towards the mobile application. But here you need to take into account the fact that this innovation appeared quite recently.
The software is constantly updated, and the developers fix bugs. Dear readers, those who are the proud owners of this device - tell us your impressions. How much more convenient has life become with a WiFi relay connection? It is very interesting to hear feedback first hand.
Working algorithm
Each device has a sequence of commands and actions that it performs, Sonoff Basic has it like this: The relay communicates with its server on the cloud by connecting to the Internet through a router. We download the application and connect to the relay, working directly with it. There is a control method by pressing a key on the front side of the device. Such simple controls do not require special knowledge in mechanics and physics, so even a beginner will understand it. Easy automation is the key to the company’s popularity.
It is also worth mentioning that you can write the control program embedded inside the relay yourself if you have minimal programming and electronics skills. The Arduino IDE will help you with this task, which can easily cope with the load in the form of an ESP8266 and everything that Sonoff is “stuffed with”. You will also have a huge database of libraries and examples to help you, both in the IDE itself and on the Internet on forums.
An important nuance: each relay has a unique ID, which is built into the module upon purchase, so if you decide to experiment with the firmware, it is better to make a backup copy of its factory version.
Scope of application
Traditional switches are gradually becoming a thing of the past due to inconvenience of use, complexity of connection and installation, as well as a small resource. Wireless analogues have better qualities.
They have a stylish appearance and install within a few minutes.
The use of such products is relevant in the following cases:
- When moving an old switch, when pieces of furniture interfere with its installation. The new device can be mounted anywhere in the room - on a wall, mirror, cabinet or other element of the room.
- To eliminate electrical errors. When installing wiring, mistakes are often made that affect the comfort of living in an apartment or house. In such cases, it is not necessary to make a strobe or plan expensive repairs - you can install a wireless switch (with or without a remote control).
- When there is a shortage of space. The classic option is that it is difficult to install the switch on a cabinet or other piece of furniture due to the complexity of the mounting. Wireless analogues are overhead, and their installation is accessible even to beginners. In addition, during the installation process there is no need to lay the cable and worry about its disguise. And the radio switch can be placed anywhere, be it a coffee table, bar counter, bedside table or other piece of furniture.
- In wooden houses. The advantage of buildings made using wooden materials is undeniable. They are distinguished by their durability, ability to retain heat, and also low price. But when installing wiring, problems arise due to increased safety requirements. The best option is to install open wiring, but it spoils the appearance of the interior and is susceptible to mechanical damage (including from rodents). Making hidden wiring in a wooden house is quite a problem. The best solution is to install wireless light switches, which simplify the process of installing hidden wiring and save money.
- To control lighting from multiple locations. There are situations when turning on the light needs to be done from 2-3 parts of the room. To avoid running wires to each switch, it is better to use wireless devices. With their help, lighting control is simplified and installation time is reduced. If desired, you can install wireless switches with a remote control.
- If necessary, install additional switches. It happens that after completion of the repair work the chosen location is not satisfactory and the installation of an additional device to control the light is required. Installing a wireless switch solves the problem.
- To turn lights on/off over long distances. What to do in a situation where you need to turn the lamp on and off from another room or even from the street? Running a wire to install an additional switch is expensive and unsafe, but new technology allows you to avoid such problems. The peculiarity of radio switches is their large operating range - up to 350 m (depending on the model). Control can be done using a simple remote control, which for convenience is made in the form of a key fob.
- In order to preserve the design of the room. If installing a switch in a recess is not possible, you have to install overhead types of products that spoil the appearance of the room and do not look very solid. The solution to the problem is to install a wireless device that is thin and fits perfectly into the interior.
- As an alternative to conventional devices. During the next renovation of an apartment or house, you want to introduce some innovations into the design and make life more comfortable. One way is to install a wireless remote switch. Such products will cost more, but they are easy to install, have a solid appearance and provide ease of lighting control.
Inner world
The brain of the device is 32-bit ARM Cortex STM32F030C6T6. WiFi on a separate sealed chip, similar to esp8266
The flux, in my opinion, was washed perfectly. I couldn’t see the flaws through the magnifying glass. The ends of the wires do not stick out from below. Loaded conductors are reinforced with solder. Moreover, on the back side there are complete instructions for the switches - and there is where to get confused without instructions!
The low-voltage part is separated from the high-voltage part by cuts. Relay 10A 250B. Well, that is, 10A is the nominal value. I wouldn’t commute all 10 on a regular basis. If you need a powerful load, we put something more serious in the second cascade. By the way, constant voltage power supply in this option can be useful.
Capacitors 400V 105°C
The WiFi antenna is printed on the board, there is no pigtail for an external one - but hardly anyone expected it.
Serial ports are without combs, but neatly routed, tinned and marked.
Let's summarize
Quite an interesting device, through which you can automate the switching on and off of lights, various types of motors (for example, opening garage doors, or activating hoods). It is quite easily integrated into the overall complex of smart home devices and is practically no problem to set up. Of course, the lack of Russian language in eWeLink is confusing, but the abundance of graphic symbols will not let you get lost in the program.
Alternative firmware
As stated above, as shipped, Sonoff can only be used to build a working prototype.
IMHO, of course, everyone decides for themselves. Therefore, in the absence of alternative firmware, the device is of little interest. But they exist. If you know more, please let me know and I’ll add to the list. xoseperez/espurna, indicated by comrade eschava Free software, GNU General Public License MQTT REST API, Domoticz, Home Assistant Integration with Alexa announced Over-the-air (OTA) updates
arendst/Sonoff-Tasmota, indicated by Diablo comrade Free software, GNU General Public License MQTT, openHAB, Home Assistant, Domoticz, HomeBridge, SmartThings Integration with Alexa mentioned Over-the-air (OTA) updates
Functionality of the native firmware-cloud-application complex
Taking into account the distrust of the Chinese cloud, the advanced functionality here is of little interest to me.
We need a demonstration of the functionality of the hardware. But I must admit that here the marketers jumped over their heads and put very cool animated GIFs on the site. I'll hide it under the spoiler. I also made a very short video. Actually, it shows operation from physical keys, radio and WiFi in any mixture. The only difference is that when receiving a command from the radio, the LED first flashes green. There is no such thing from the button or from the application. Additional Information
For the relay to operate, the first modes are set - independent switching of each of the 4 channels and fixation in this position.
The second is that when you select any channel, the previous one is turned off.
The third is that when you select a channel, it turns on briefly and then turns off.
How “short” is set in the binary system with a 4-bit switch, from 0.25 to 4 sec.
Further, different modes can be configured for different channels, so there are many options.
There are 8 timers of different types.
It is important that they are executed by means of a microcontroller; the Internet is not needed to operate.
That is, a correctly written alternative firmware can do the same.
Alexa and company
Integration with Amazon Alexa is declared for both official and alternative firmware.
In our Palestines this does not yet work. But this is the future... More information
... automation for a private client and the ring in which Amazon, Google and Apple have already fought. By the way, Yandex also has its own Alice. Yes, the idea of buying a home spy with your own money, who eavesdrops 24/7 and sends the results to someone else’s uncle is Orwell in crystal clear form.
But there is a market for hundreds of yards, people in ecstasy and paranoids will be trampled by herds of enthusiastic users. What an irony, by the way, with Ridley Scott's great Apple 1984 video