“Why explain about such little things - it’s so simple!” - some experienced home craftsman will say, and from his point of view he will be right. Indeed, the task is not the most difficult if you know how to approach it. But, unfortunately, there are also a large number of such new homeowners, especially among recent urban youth, whom their fathers and school taught little in terms of housekeeping. And they have to be instructed even in such seemingly trivial problems.
How to connect a cartridge to wires - a short guide for beginners
By the way, some of them almost flaunt their ignorance and inability - they say, I will always have enough money to call a specialist. This is truly a great position, but with some flaws. Well, firstly, even very wealthy people have severe financial crises - there are countless examples of this. And secondly, you need to find a specialist and wait. Try, say, find an electrician on a holiday evening if your living room light suddenly goes out? You have to be nervous and swear, call and wait tediously... And then the whole thing turns out to be such a trifle that the defect could be eliminated independently within ten to fifteen minutes. You just had to, for example, know how to connect the cartridge to the wires with your own hands...
So learn - sometimes it can be very useful!
What is a cartridge, what functions does it perform?
An electrical system consists of many elements. These are lamps, connection cables and special installations that are necessary to control or communicate different parts. Cartridges are such installations; they perform two important functions:
- Connect the light bulb base to the electrical cable.
- Fix the light bulb in the lighting fixture.
Products are made from different materials.
The history of the development of electricity consisted of different stages, but much more convenience was added when the threaded base with a cartridge was invented. The versatility of this connection allows you to use different lamps.
A variety of materials are used in the production of cartridges. This is usually high temperature resistant plastic, metal or ceramic. There are also unique models made from silicone.
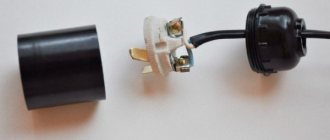
Connection of old-style carbolite.
Let's start with carbolite ones. This cartridge is collapsible and consists of three parts:
- cylindrical body with thread
- bottom
- ceramic insert with contacts
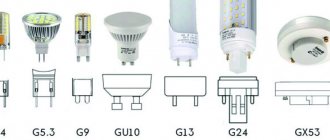
Most often in our apartments we use cartridges marked:
- E27
- E14
The value in numbers indicates the diameter of the lamp base in millimeters that is suitable for this socket.
The letter “E” indicates that it belongs to the screw series with Edison threads.
There are also pin type, G series and some others presented below.
Such products are designed for a current of no more than 4A. That is, in a 220V network you can connect a load of up to 900W to them.
What parts does the cartridge consist of?
It is a prefabricated structure consisting of several parts. Inside the housing there is also a core, a screw-type clamp, a clamping contact and a thread through which the light bulb is screwed.
Schematic representation of the structure.
Core
For its production, ceramics, plastic or carbolite are usually used. These materials allow the lamps to work, but at the same time, electricity costs remain minimal. Depending on the design of the cartridge, the dimensions of the core and its shape may vary.
Screw clamp
Its main function is to ensure the connection of conductor and terminal parts. They are found in lamps marked O, U, C. In the design of new models, the terminals can be located outside.
Pressure contact
The pressure contact is the contact that is pressed against the metal or semiconductor. It is made from brass. Some products may have two or four plug-in contacts, while in others their function is performed by one spiral.
Thread
It is a necessary element in the design, but can also be different. There are threads designed specifically for use in industrial premises, and there are also household options. There are also models for outdoor installation; they are not afraid of snow, rain and are able to work in difficult conditions.
Threaded connection.
Frame
Modern models of cartridge cases are made of ceramics. This material can withstand high temperatures without melting, deforming or breaking. Also, modern versions have a non-separable design with built-in threads.
Model type E27 made of carbolite.
Common Mistakes
There are several basic mistakes that those with little experience in connecting cartridges make:
- Installing the chandelier before installing the sockets. It is much more convenient to do the work on the table, and only then hang up the equipment.
- Secure the terminals of the twisted wires without tinning them. This option is unreliable and the contact inevitably deteriorates over time.
- Connecting the phase to the side contact. This not only negatively affects the operation of the lamp, but also poses a danger to humans when replacing it.
- Often the screws that hold the contact plates on top of the ceramic coating are overlooked. If they are not tightened tightly, the contact will be poor, which will lead to constant overheating of the cartridge during operation.
Do not insert different wires into adjacent holes.
- Inserting the neutral and phase wires into the parallel sockets of the keyless chuck. This causes a short circuit when power is turned on.
- Replacement of the group due to poorly pressed central contact. Often this element bends and does not put pressure on the base. But if you carefully bend it, the fault can be eliminated without installing a new part.
Connecting the lamp socket to the wires is not difficult, since there are few connection options and they are all simple. The main thing is to follow safety precautions and prevent shorting of wires with opposite polarization.
Operating principle of screw chuck
All components are interconnected, each has its own task. To transmit current, 2 brass contacts, threads, and mounting strips are used. When connected, the contacts touch the lamp base.
Important! According to safety rules, the phase is connected to the central contact of the light bulb base. This will eliminate human contact with the phase.
This diagram is the principle of operation of both models E and G, but the latter differ in their simpler design and the way the current is transferred to the bulb base.
Connection of elements.
Types of cartridges
There are two main types of lamp sockets on the market today – screw and pin. They differ in design and type of connection, but are universal for different lamps.
Pin
They operate from a network with a voltage of 220 volts and are marked with the Latin letter G. Pin designs are used in spotlights. There are models of different capacities for both production and home use. Pin options may differ in material, dimensions, fastening elements, and the number of contact parts.
Pin element in a suspended ceiling.
Screw
Their design has an internal thread and is used to connect lamps with a threaded base. Most often they use E14 or E27. In addition to the two main ones, there are 6 more varieties of cartridges of this type. An important characteristic is the diameter; the network load and power depend on it.
Screw chuck.
Adapter cartridges
Another, separate type of design. Its functionality can be understood immediately from the name; it allows you to switch from one base option to another. For example, from E14 to E27. This may be necessary during repair work or when purchasing a lamp with a different base.
There are no problems with the operation of the adapters, but it should be taken into account that the structure will lengthen. As a result, the lamp will protrude slightly more than usual. For some lamps this is almost unnoticeable, but for others it greatly spoils the appearance.
Adapter from E27 to E14.
Repair of a collapsible electric cartridge
Using needle-nose pliers
When the light bulb starts to flicker or burns out during operation, the user can judge that there is a problem with the socket. This is one of the most common breakdowns. If you hear an unpleasant buzzing sound when you turn it on and smell a burning smell, you need to inspect the product. If blackened contacts are found, they should be cleaned. It may also be necessary to replace the socket in the chandelier with a new one.
For repairs, it is necessary to disassemble the cartridge into its components, inspect and clean the contacts to a characteristic shine. The housing must be unscrewed, holding it by the bottom. If you can’t unscrew it, you can pull it out with thin-nose pliers by grasping the edge of the base.
There are times when the light bulb cannot be unscrewed from the socket due to damage. Then it's harder to get it out. First of all, you should turn off the power to the lamp, and then use one of the described methods.
The socket without a light bulb can be unscrewed with a plastic bottle
How to unscrew the socket if a light bulb bursts:
- Using thin-nose pliers or pliers. You need to tear off the fragments of the flask without dropping them on the floor. Then the base is unscrewed with thin-nose pliers. The base needs to be grabbed by the edge and pulled out. The work must be done carefully, trying not to damage the E27 electric cartridge.
- Using a plastic bottle. It needs to be melted a little at the neck part and inserted into the base. You should wait a few seconds until the plastic hardens and sticks, and then start unscrewing the structure. The bottle is chosen, since its neck will be easily screwed into the base.
- Disassembling the electric cartridge. Only suitable for old carbolite cartridges. The product must be carefully disassembled into its components and removed from the lighting device.
Marking
There are markings on the surface of the cartridges indicating the main characteristics:
- the letter T indicates the standardized temperature;
- amperes (A) indicate current values;
- voltage is measured in volts and marked with the letter B;
- IPXI symbols are printed on the outside of the product, marking the moisture protection of the product.
Additionally, such data as the type of current (for products with a switch), the emblem or name of the manufacturer, and the maximum operating temperature are marked.
Example! The most popular cartridges of types E14, E27 operate at a voltage of 250 V. In the E14 model, the rated current is 2A, and in E27 – up to 4A.
Technical characteristics of E27-FM.
Advantages and disadvantages of popular types of cartridges
Most often, products made of carbolite and ceramics are presented on the market. To understand the nuances of operation, you need to study the main advantages and disadvantages of such cartridges.
Main advantages
Availability. Products made from these materials are widely represented in specialized sales outlets; the price is low, so you can replace a failed product at any time.
Range. Different sizes of sockets for lighting lamps are made from ceramics and carbolite. You can choose the option you need or even buy an adapter.
Work at high temperatures. At high temperatures, materials retain their properties and there will be no deformation or melting.
Flaws
Low quality. The low price also affects the quality of the products.
Fragility. Together with relatively low quality, this often leads to breakdowns.
Quality of contacts. In inexpensive models, they are made of ordinary metal, which becomes covered with rust during use, which, in turn, worsens the connection and increases heating. To prevent the element from malfunctioning, the contacts will have to be cleaned regularly.
Options for solving the problem
There are several methods for solving the problem, which have their own disadvantages and advantages. The user chooses the optimal method based on the nature of the lamp destruction, available tools and the time available to correct the damage. Before the light source is de-energized, it is recommended to turn off the automatic fuse located in the distribution board. If fluorescent lamps filled with mercury vapor are destroyed, it is necessary to ventilate the room and wipe the floor with a solution of potassium permanganate.
Pliers
To unscrew the light bulb base with pliers, you need to carefully grab the metal edge with the jaws and turn the part counterclockwise. It is possible to install the jaws of the tool inside the base, carefully unclench the handles and unscrew the part. The remaining glass is carefully broken off; it is recommended to lay newspapers on the floor. To destroy the rust layer, WD40 liquid is applied to the joint line of the parts; it is allowed to compress the sides of the base into the cartridge, separating the contacting surfaces.
Plastic bottle
In order to unscrew a broken light bulb with a plastic bottle, you should heat the neck over the flame of a gas burner or lighter. After the material begins to melt, the bottle is inserted into the base and pressed by hand. The soft plastic gets caught in the rough surface of the metal sleeve and then hardens. Heating the base body additionally promotes the separation of rust particles; the joint line can be treated with WD40. Before starting the procedure, it is recommended to remove the remaining glass bulb and lamp stem.
Wine cork
It is possible to unscrew a broken light bulb with a plastic cap from wine bottles; the heated element is inserted into the inner cavity of the sleeve
Caution should be exercised when heating the product as melted or ignited plastic will cause thermal and chemical burns if it comes into contact with the skin. It is possible to use a wooden or cork plug with suitable dimensions, which is inserted into the hole and then unscrewed along with the base
Disassembly
To remove the remains of the light source from a collapsible carbolite socket, you need to carefully separate the halves of the product along the threaded joint. Since shards of glass may stick out from the lamp, it is recommended to use gloves and an additional thick cloth or first break out the remains of the bulb. After disassembling the unit, you can remove the base from the cartridge (using pliers, a screwdriver or another tool). The technique is not applicable when using solid ceramic or plastic cartridges.
Potato
When using metal tools or plastic products, it is necessary to remove any remaining glass parts that fall on the floor and get into the cracks. To reduce the labor intensity of harvesting, a potato cut in half, the diameter of which exceeds the diameter of the flask, is used. Half of the potato is carefully placed on the glass shards, the remains of the lamp are twisted out of the socket. The use of other vegetables is not recommended, since the pulp does not provide close contact with the lamp fragments.
other methods
There are also additional ways to remove the remains of the lamp from the socket:
- Using newspaper, thin cardboard or coarse burlap, tightly rolled into a tube, the diameter of the resulting product is slightly larger than the size of the hole inside the base. The tube is inserted into a metal sleeve and further crushed, then the user begins to rotate the product, while simultaneously removing the remaining lamp from the socket.
- To remove lamp residues, special plastic pliers with sponges that fill the internal volume of the base are used. After spreading the jaws with the handles, the sleeve is unscrewed. A special tray is installed on the instrument to collect glass fragments and compound.
- If the base is firmly stuck to the cartridge, it is recommended to destroy the side wall by bending the edges inward. Then the remains of the lamp are unscrewed with pliers or scissors, which rest against the resulting protrusions. If the method does not help, then all that remains is to crush the outer part of the cartridge with pliers or a similar tool. After removing the debris, it is necessary to repair the lamp by installing new parts instead of the broken ones.
Nuances of proper installation
According to the standard, the socket is attached to the lamp through the bottom, in which there is a hole, through which the electrical wire is routed. But there are also non-standard designs with their own connection nuances.
It will be useful to read: Connecting the cartridge.
Connecting with wires
You cannot create a direct connection between the cartridge and the cable. Firstly, the cartridge must be securely fixed in the structure of the lamp, and secondly, a plastic sleeve with a hole for the wire is added to the structure. A plastic screw is attached to this sleeve to secure it in place.
Wired connection.