Electrical supply by air
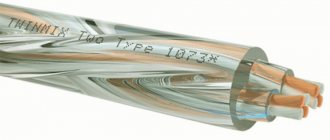
Self-supporting insulated wire
The air supply method is the most optimal; it does not require a lot of time and money. But the standards set requirements that not all houses meet:
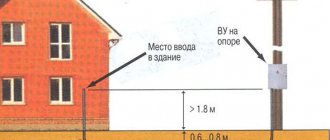
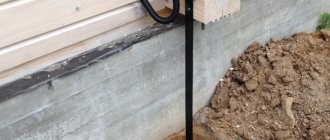
- The cable entry into the house must be located at a height of at least 2.75 m. If the height of the house is sufficient, a distribution panel with an RCD is mounted on the wall, and the cable from the pole is connected to it. If the house has a smaller height, a special rack (pipe rack) is installed. It can be of a curved shape called a “gander” (in the picture on the left) or straight (in the picture on the right). These two entry methods differ in the method of attachment to the walls of the house (see photo). Methods for installing a rack for air supply of electricity into the house
- The distance from the pole to the entry point should not exceed 10 m. If this distance is greater, additional support is installed. The distance from it to the power line should not be more than 15 m.
- The tap from the power line is made: up to 10 m - with copper wire with a cross-section of 4 mm;
- from 10 to 15 m - with a wire with copper conductors with a cross-section of 6 mm.
- aluminum wires are used in any case with a diameter of at least 16 mm.
Connecting to a power pole by air
Although copper wires require a smaller diameter, they cost significantly more than aluminum wires. Therefore, the introduction of electricity into the house from a pole is most often made from cables with aluminum conductors. There are two ways:
- Stretch a torso or wire between the posts and attach a current-carrying cable to it with special clamps.
- Use self-supporting wires for which support is not needed: SIP (self-supporting insulated wire). It is connected using:
- insulators (glass, polymer, porcelain);
- special fittings.
Special fittings appeared not so long ago, but are becoming increasingly popular. It has a certain margin of safety. If it is exceeded (falling trees, massive snow melting, etc.), the fittings are destroyed, but the cable remains intact and the power supply is not disrupted.
From the place where the input cable touches the wooden wall of the house to the place where the shield is installed, the cable must be laid in a steel pipe
Inputting electricity into the house from a pole through a pipe stand
Air supply of electricity to the house also has disadvantages:
- The electrical wiring is exposed, which can cause damage.
- Hanging wires limit the possibilities for accessing large equipment (truck cranes, aerial platforms, etc.).
Section of Responsibility
It is through the meter that responsibility can be divided between the electricity supplier and consumer. The metering device and all lines that connect to it belong to internal supply projects. But supplying electricity to a house from a pole using a SIP wire or any other wire is the scope of servicing city electrical networks.
Disputes may arise at this point, since the electricity supplier does not allow supply until the meter is sealed. And since meters are installed exclusively by distribution network employees, the consumer has difficulties installing the outgoing line. The ideal option is to install all the internal wiring and lead the cable to the façade of the house to connect to the central power supply line.
Stages of electrical wiring work
To create underground wiring, you must have special knowledge:
The first step is to mark the route on the ground for the power line in a summer cottage, suburban area, etc.; When marking, it is possible to use all kinds of stakes and ropes. It is necessary to carefully ensure that there is no intersection with communication networks; It is worth creating a cable layout plan. The drawing indicates the distances for the cable exiting the ground, as well as its turns.
It is important to check before installation whether the wiring is disconnected from the mains voltage; Then a trench is dug according to the markings made. As a rule, its depth is 80 cm, the width for laying one cable is 20 cm. The bottom of the dug trench should be compacted; There is an option - the bottom of the trench is lined with red brick; If you plan to conduct electrical wiring across the road, then in this case the depth should be at least 120 cm; When laying the cable in the ground, it is necessary to clear the trench of branches, stones and other objects; Next, pour a sand cushion -12 cm
It will protect against the possibility of wire breakage; The de-energized wire must be placed so that it is not too taut. As a rule, they lay the whole wire without connecting sections; The final stage is backfilling the trench with electrical wiring. After this, the cable is checked for short circuits and its armor is grounded
The bottom of the dug trench should be compacted; There is an option - the bottom of the trench is lined with red brick; If you plan to conduct electrical wiring across the road, then in this case the depth should be at least 120 cm; When laying the cable in the ground, it is necessary to clear the trench of branches, stones and other objects; Next, a cushion of sand -12 cm is poured in. It will protect against the possibility of a wire break; The de-energized wire must be placed so that it is not too taut. As a rule, they lay the whole wire without connecting sections; The final stage is backfilling the trench with electrical wiring. After this, the cable is checked for short circuits and its armor is grounded.
Be sure to watch the video on how to lay cables in the ground correctly:
In winter, underground installation of the electrical wiring line is permissible; the following must be taken into account:
- Before installation, the cable is warmed up in the living room. The heated cable is laid, preventing freezing. If the frost is more than 20 degrees, the possibility of installation is excluded;
- If the air temperature is minus 5 or higher, it is possible not to carry out the warm-up procedure if the wire is high pressure;
- At a temperature of minus 7, it is permissible to lay a conductor protected by insulation;
- If the temperature is minus 15 or higher and the conductor is protected with PVC film or a rubber sheath;
- Laying at minus 20 degrees is possible, if the wire is protected with PVC sheath or rubber insulation and if there is a lead sheath on top.
There are details that are worth considering; they will help to carry out the work more correctly:
- Armored cable is used for wiring;
- If electrical wiring passes through the foundation, protection is required in the form of a pipe with a diameter 3 times larger than the diameter of the cable;
- When the soil freezes deeply (more than 70 cm), the pipe protecting the cable is strengthened to avoid deformation or breakage;
- Plastic and corrugated pipes cannot be used for protection. These pipes are short-lived and do not have the required strength;
- It is not recommended to lay wiring in areas where there is parking (playgrounds, sidewalks), where there is an increased load.
These rules for laying underground wiring must be followed for safe work and subsequent operation. If the rules are violated, troubles may arise that will be difficult to correct.
Entering electrical wiring into the house
When laying a cable underground in a country house, it is necessary to take into account that when introducing a conductor into a structure (house or other building), it must not be passed under the foundation. Usually, during construction, an embed is built into the foundation strip - a piece of pipe protruding outward by a few centimeters, into which an electrical wire can be easily inserted.
Sometimes the owners of a house with a monolithic foundation do not want to drill into the foundation to install mortgages. The solution in this case is this: the cable is inserted inside a metal pipe and rises along the wall of the structure to a certain height (usually this is the level at which the incoming cabinet is installed). At this mark, a mortgage is embedded in the wall, through which the wire is inserted into the house.
If an armored cable is used as a conductor, its sheath must be grounded. This can be done by welding or soldering an insulated wire to it, which must be set to “zero” in the electrical panel.
This should not be neglected, otherwise, if the phase breaks through, it will fall on the armored shell, touching which, the person will receive a strong electric shock, and it’s good if the matter does not end in the death of the victim. If the armor is properly grounded, then in the event of a breakdown, an automatic switch will operate, cutting off the current supply until the problem is resolved.
Advantages and vulnerabilities of underground electrification
Inserting an electrical cable into a house underground instead of overhead lines has a number of advantages:
- does not spoil the architecture and design of the site;
- does not experience atmospheric influences;
- high fire safety.
In addition, eyeliner made in this way is protected from theft and vandalism.
This is especially important if the building remains unattended for a long time. Underground installation of electrical cables has some disadvantages:
- may be subject to mechanical stress during the process of swelling and subsidence of the soil;
- the influence of groundwater, soil freezing, pressure from the roots of large trees;
- Insects and rodents can damage the wiring;
- it is susceptible to aging and corrosion.
Correct cable routing
The cable itself is laid in a “snake” trench.
SNiP 3.05.06-85 stipulates that cables in trenches should be laid with a margin of 1-2%. This reserve is precisely provided by the snake.
Just don't go overboard with the bends.
Error No. 7: It is not allowed to make a reserve in the form of rings.
Why are these extra bends needed at all? As it turns out, not for emergency repairs at all. If the CL is laid in a perfectly straight straight line, then the temperature deformations that will accompany the operation of the CL will sooner or later damage the input. Error No. 8 Before and after laying, do not forget to test the insulation of the cable cores with a megometer.
A small layer of sand is again poured on top of the laid cable.
Backfilling the trench with sand
Mistake #5
The bottom layer of the trench must be filled with sand; do not skip this step.
Otherwise, sharp pebbles and other foreign elements in the ground will damage the insulation after some time.
Mistake #6
The sand must be compacted. Do not lay the cable on a loose base.
What to do if you don’t have sand in stock and don’t want to order it? In this case, sift the excavated soil.
The fraction of individual elements after sifting should be no more than 5 mm.
Is it possible to do without this sand pillow or its equivalent? Why is it even needed? No you can not.
In addition to protecting the insulation from sharp objects, it plays another important role. The layer of sand under and above the cable is practically not subject to heaving.
It can be easily compacted, as a result of which there is no subsidence of the soil in the trench. No drawdown - no voids.
Namely, they lead to local overheating of the cable. The result is a situation where, in the place where a shallow hole is formed, the cable heats up significantly more than in the same area, but a couple of meters away.
Due to the temperature difference, the cable begins to “pull”. Under significant loads, the PVC insulation bursts and subsequently begins to actively suck moisture through these microcracks.
Well, don’t forget about the drainage properties of sand. Even if water reaches a depth of 0.7 m, it will pass through the sand without stopping near the cable line itself.
Cautions
The underground cable for electricity in a private house should only be armored.
The metal pipe for wiring should not be solid, since when it is filled with groundwater, the ice formed in severe frost will damage the cable.
The wiring must be grounded. To do this, a separate insulated wire is soldered to the armor. The second end is connected to ground on the shield or neutral terminal. In the event of an emergency, the machine will turn off the power.
Choosing the right cable and complying with all requirements during its installation is the basis for long-term and safe operation of the electrical main.
When installing an electrical input into a house, each of us thinks about how it is better to do it - overhead or underground?
Installation of air SIP is always much faster and several times cheaper.
Firstly, it is more reliable. And secondly, it does not spoil the facade of the building or the appearance of the surrounding area.
Often these two methods are combined. Initially, an input is made to a special pipe stand from a support.
And from this distribution cabinet the cable is laid in the ground and brought into the house. When the support is located not far from the building, some SIP wires are mounted directly on the facade.
But we will turn specifically to the underground input. Let's look at what difficulties you will encounter when laying cables in the ground and place special emphasis on common mistakes when performing this work, which ultimately, sooner or later, lead to failure of the cable line.
Cable installation in the ground can be done in two ways:
- without any protection (using armored KL grades)
- in pipes or special corrugation
Let's look at the first method first. Here, as a rule, a cable with tape armor is used - VBBbShv or AVBbShv.
It is not at all necessary to use armor of the type AABL, AAShV, where there is a one-piece cast protective shell made of aluminum. It could just be ribbons overlapping each other.
In this case, armor protects not so much from external influences (someone started digging where they shouldn’t), but from deformation and traction forces during soil heaving.
The same applies to the SIP wire. It cannot be laid in the ground, even in pipes.
You can often find videos on YouTube where copper CLs with 6mm2 conductors or 10mm2 aluminum are used. This is explained by the supposedly small number of electrical appliances in the house or country house.
In terms of load, this may be enough for you, but in terms of compliance with the requirements for the minimum cross-section of the PEN conductor, you will have a violation. For single-phase power supply, the cable must be three-wire, for three-phase power supply, it must be five-wire.
The selected cable should be carefully laid in the trench. What size should it be, what distances should be maintained when excavating it?
It is necessary to maintain a certain distance of 60cm.
After laying in the ground, the cable should not fall on the line of action of the foundation force, directed at 45 degrees from the base.
Standardized clearances from plants and trees on your site are also required. Here are the minimum dimensions for underground cable laying from nearby utilities, structures and obstacles.
Independently connecting your home with SIP wires to the line
You can connect the SIP to the house yourself, but you will have to entrust its connection to the line to electricians. However, in order to correctly install the cable, you need to familiarize yourself with the technical standards, which can be obtained from the relevant organization. Making such demands is justified by the safety of the entire line, and not just your home.
Basic Installation Requirements
To install a SIP cable from the line to your home, you need to know the basic requirements:
- the minimum height of the supply cable above the ground is 2.75 m;
- a similar distance must be maintained from windows, doors and loggias.
Typically, the consumer connection is made using a SIP 4 cable without a supporting core. The cross-section of such a wire is 16 mm2, which meets the requirements of the PUE. Conductors of a smaller cross-section may not withstand the load, so such cables are prohibited from being used for entry into the house.
Before you start pulling the cable into the house with your own hands, you need to draw an exact diagram of its passage from the pole to the building. This will help you take measurements to purchase the wire. Moreover, you need to buy SIP with a small margin, taking into account measurement errors
It is important to pay attention to the number of cable cores. If the connection is single-phase, it is enough to connect 2 wires to the house, that is, a phase and a zero. For a three-phase connection you will need 4 wires
For a three-phase connection you will need 4 wires.
The house input will have to be connected to the main line. To do this, you will need to install a special connector on each core. It is best to connect SIPs with piercing clamps. They will eliminate the need for stripping cable ends and ensure a tight connection.
When laying an overhead connection line from the pole to the house with your own hands, you must take into account the PUE standards. The rules clearly state that the maximum distance from the consumer input to the support is 25 m, otherwise an intermediate pole will have to be installed.
Input connection options
You can extend SIP from the pole to the house by air or underground. The first method is easier. In addition, the cable is always under supervision and has free access for repairs. Underground installation is more difficult, however, it protects the wire from accidental breakage.
Which method is preferable is chosen by the owner of the house himself, and installation work is carried out as follows:
- For an aerial connection, the cable is secured with anchors to the facade of the building. For aesthetics, it can be laid inside a corrugation or plastic case. For your information, if the walls of the house are wooden, then the use of a box is mandatory.
- An underground connection involves digging a trench from the house to the pole at a depth of 800 mm. The wire is laid in a PVC pipe or corrugation. Only the ends of the pillar and the façade of the building come to the surface. The cable is fixed to the wall with anchors in the same way as for the air connection.
Further work involves introducing the wire into the building.
Which wire is better to introduce into the house?
A dispute often arises that SIP is not suitable for entry into a building. Why? After all, it is isolated and also resistant to many negative factors. In fact, this is true, and it can be introduced inside the house. However, SIP is very rigid and does not bend well, which increases the complexity of installation. It is recommended to lay a cable with copper conductors inside the building, since this metal is the best conductor of electricity. Many electricians recommend making internal input using a VVGng cable.
To make an entrance to the house, a distribution panel is installed on the facade. A self-supporting insulated wire is connected to it, inside it is connected to automatic circuit breakers and an electric meter, and from them a copper cable is brought out into the house.
Connecting SIP on a support
The final work is to connect the entire input to the main line. When laying underground, the SIP coming out of the sleeve is lifted along the pole, securing it with clamps
It is important that the plastic sleeve extends out of the ground to a height of 2 m
For an air connection on the facade, the SIP is fixed with a clamp to the anchor bracket. A roller block is installed on the pole and the wire is pulled along it. The end of the SIP on the pole is secured with a clamp with a loop, placing it on the anchor bracket.
Connecting the SIP to the insulated main line is done with the same piercing clamps. If it is necessary to connect SIP with bare line wires, connecting aluminum sleeves are used. The ends of the main and SIP cores with the insulation removed are inserted inside, after which the sleeve is pressed. Bolted connectors for subscriber branches can also be used.
The first supply of electricity to the consumer is carried out in the presence of a representative of the energy company.
Country affairs
If you still haven’t decided which method of laying cables in the ground to choose, we recommend following our simple tips. There are a lot of ways to accomplish this task. Professionals still cannot decide which method is better - ground or air.
We suggest that you give preference to the earthly method. It's easy to explain. Usually the distance from the pole to the house is large and most likely you will want to install outdoor type lighting. In these cases, the earthly cable laying method is ideal.
To lay an electrical cable underground, follow these simple instructions. First of all, you need to purchase an electrical cable for laying in the ground at your dacha.
After this, you can start choosing the most suitable cable route. In this case, certain features should be taken into account. The cable must be placed 1 m from massive trees. Please take this into account.
Laying a cable is not as simple a process as it seems at first glance. You need to make sure that the wires do not get tangled, and you should not place it in places with high load.
You should start by creating simple markings, and then move on to excavations. The trench where the cable will be located should be no narrower than 70 cm.
As for the depth, cable lines up to 20 kV should be laid to a depth of 0.7 m, up to 35 kV - 1 m, with streets and squares - 1 m, regardless of voltage, oil-filled cable lines should be laid to a depth of 1. 5m.
Once you have created the required trench, you can begin filtering it. In other words, remove all stones and other objects. The next step is to create the pillow. It is better to make it from a material such as sand.
The depth of the pillow should be approximately 10 cm. We recommend that you give preference to the ABVg cable. This is a universal option. To ensure cable protection, we recommend that you use asbestos cement pipes. The cable should be laid freely so that unnecessary pressure is not placed on it. We advise you to create a separate cable layout plan.
Important! Lightning rod in a private house, here!
After all the preparatory steps, you can start filling the cable. This should be done with sand. Its layer must be at least 10cm. The final stage will be laying the warning tape. The final stage will be filling the trench with earth.
Laying electrical cables underground
The laying of electrical cables underground must be carried out in compliance with all technical standards. You should know that it is better to plan the route initially; its radius should have clearly defined dimensions, which should not exceed the permissible norm for each individual cable.
You must take into account the presence of distribution couplings. The cable must be delivered on cable drums, which in turn are delivered on special vehicles.
You should note that the drums should be unloaded very carefully. We recommend that you consult a specialist if you doubt your capabilities. Laying cables underground requires careful preparation and the necessary knowledge.
Laying an electrical cable in the ground
Pay attention to cable selection. The successful installation of an electrical cable in the ground depends primarily on its quality. We recommend that you give preference to copper cables
We recommend that you give preference to copper cables.
They must be armored. The cable that you must purchase must necessarily have technical documentation, which will indicate exactly what it is intended for.
In our case, this is a gasket in the ground. The cable should only be laid from a special drum. You must take this into account.
The cable itself must also have some protection. Let it be a steel braid. Such a cable will cost more, but you will not doubt its quality for a minute.
Take into account all the recommendations given, and you will successfully lay an electrical cable in the ground
Special attention should also be paid to safety precautions. Use special clothing and accurately carry out the necessary calculations. The cable must fit with a certain margin
The cable must fit with a certain margin.
It is very important. Do not put tension on the cable. The margin should be approximately 2%
To correctly connect cable joints, use couplings. Clearly determine the distance between the coupling and the cable. It should be approximately 250 mm
The margin should be approximately 2%. To correctly connect cable joints, use couplings. Clearly determine the distance between the coupling and the cable. It should be approximately 250 mm.
Section calculation algorithm
There is a proven diagram for calculating the cross-section of the input cable, which is used in design. It is based on the postulate that the cross-sectional diameter of the input cable is selected depending on the expected power of all devices operating in the apartment.
Stage 1: Inventory
At the first stage, a list of electrical appliances that are present in the apartment is compiled. It is assumed what equipment will be purchased in the future and the list is expanded. Assumptions, of course, are best made with a reasonable margin for the long-term future. Each device is assigned an approximate power consumption.
You can use a table that roughly shows a list of typical household electrical appliances and their approximate power consumption.
| Name of electrical appliance | Approximate power, W | Name of electrical appliance | Approximate power, W |
| TV | 300 | air conditioner | 1500 |
| Printer | 500 | instantaneous water heater | 5000 |
| computer | 500 | boiler | 1500 |
| hair dryer | 1200 | drill | 800 |
| iron | 1700 | hammer drill | 1200 |
| electric kettle | 1200 | electric sharpener | 900 |
| fans | 1000 | Circular Saw | 1300 |
| toaster | 800 | electric planer | 900 |
| coffee maker | 1000 | jigsaw | 700 |
| vacuum cleaner | 1600 | Grinder | 1700 |
| heater | 1500 | a circular saw | 2000 |
| Microwave | 1400 | compressor | 2000 |
| oven | 2000 | lawn mower | 1500 |
| electric stove | 3000 | electric welding machine | 2300 |
| fridge | 600 | water pump | 1000 |
| washing machine | 2500 | electric motors | 1500 |
| lighting | 2000 |
Stage 2: Simple Arithmetic
Next, the total cardinality of our list is calculated. The approximate power required for lighting is added, depending on the size of the apartment, the expected lighting intensity, and the expected type of lighting fixtures.
The resulting figure is an estimate of the power consumption in the apartment for the case if all devices are turned on at the same time. However, such a situation is very unlikely, and therefore in electrical engineering it is generally accepted that a maximum of 75% of the available equipment is turned on at the same time. And the resulting total power is multiplied by a factor of 0.75, and the resulting figure is taken as the basis for calculating the cross-section of the input cable.
Stage 3: Logic and Physics
Currently, electrical cable cores are made of copper and aluminum. There are formula relations that connect the maximum permissible current (and, accordingly, power) for a copper cable with the diameter of its cross-section. For standard copper cable sizes, there are calculated current and maximum power ratings for 220V and 380V AC. The following table provides these figures in a "usable" form.
| Conductor cross-section, mm | Voltage 220 V | Voltage 380 V | ||
| current, A | power, kWt | current, A | power, kWt | |
| 1,5 | 19 | 4,1 | 16 | 10,5 |
| 2,5 | 27 | 5,9 | 25 | 16,5 |
| 4 | 38 | 8,3 | 30 | 19,8 |
| 6 | 46 | 10,1 | 40 | 26,4 |
| 10 | 70 | 15,4 | 40 | 33,0 |
| 16 | 85 | 18,7 | 75 | 49,5 |
Let us assume that the calculated power of all devices is 12 kW, and with a coefficient of 0.75 - 9 kW. It turns out that you need to choose a cable for which the maximum permissible power will be at least 9 kW. For a voltage of 220 V, a cross-section with a diameter of 6 mm is required - it is capable of passing a current of 46 A and a power of 10.1 kW. For the smaller cross-section from the table - 4 mm - the maximum permissible current is 38 A, and the power is 8.3 kW. This is less than necessary, so a cable of this cross-section will not work and you should stop at a 6-mm cross-section.
Entry into the accounting cabinet
The main question when installing on a facade is where and how to connect SIP? You can, of course, enter the wire directly into the distribution cabinet, but then a headache arises with laying SIP along the facade and, most importantly, with connecting the aluminum conductor to the input circuit breaker.
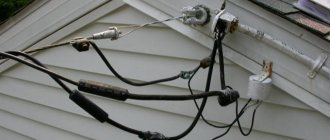
SIP is a multi-core wire, and according to GOST, such contact connections require the mandatory use of a tip. Without it, in a year you will see a picture like this.
Read how this problem is solved in a separate article.
Spoiler: the simplest and most convenient option in this case is crimping the SIP core with aluminum pin lugs NShA 16-14. Or even better NSHAL (tinned aluminum pin tip).
EKF has these in stock.
Error No. 14 Do not insert aluminum SIP conductors directly into the meter.
In a year or two, the terminals on it will burn out and you will need a new meter.
Moreover, the PUE says that a switching device must be installed in front of the meter.
Many people mount a distribution box high on the facade, in which the wires are actually disconnected and the transition to a copper cable occurs. However, it all looks cumbersome and ugly.
In addition, it is advisable to place a metal box on a wooden base rather than a plastic one. Over the years, plastic dries out and falls apart.
But metal is not a gift at all. Over time, it begins to rust and dirty streaks from it spread across the facade.
How to serve input
The very first thing that needs to be done after installation is to test the resistance of the insulating layer, as well as the zero-phase loop. If the tests give a satisfactory result, then the main switchboard and input can be allowed to operate. Six months after installation, it is imperative to tighten absolutely all screw connections - start from the circuit breaker, which is installed before the meter, and end with the clamps on the ASU.
Once every five years it is necessary to reupholster, and if oxidation is detected, cleaning must be carried out. At approximately the same frequency, you need to inspect the wires to identify damage. The input can last about 30 years. After this period, it is necessary to conduct a thorough examination of the cable. If there is melting on the insulating layer, drying out, or crunching in the cable, this indicates that the conductors are not coping well with the load that is placed on them. Therefore, it is recommended to replace the input with a more powerful one.
These are approximate inspection times. If you notice damage early, it is recommended to check the condition of the entire cable and, if necessary, replace it. The best way out of the situation would be to calculate and install a new input. Moreover, you need to make a power reserve of about 25-30% so that the wires can cope with any peak loads.
Specifics of using SIP
Using a wire in an overhead line
You can install a SIP cable on a support or facade, making branches and other connections. When working with wire you must:
- pre-install the VLI supports by securing the clamps to them;
- roll out by installing rollers using a special belt or hooks. The wire is pulled to the outer supports with a drum. They work manually with a cable leader;
- secure the electrical conductor to the supports. The load-bearing core is fixed with an anchor clamp;
- tension the cable using a hand winch with a grip amplifier;
- select a 2-wire SIP-4 for a single-phase network, and a 4-wire SIP-4 for a three-phase network.
The tension must be done smoothly, without distortions, until the head of the torque wrench breaks.
Inputting electricity into a wooden house
It is possible to operate a wooden structure only if the possibility of short circuits and overheating of the input wiring is completely eliminated. Many owners of wooden houses do not know how to increase the safety of such a structure. Before introducing electricity, it is necessary to bring the internal wiring into proper condition. When operating electrical appliances in a wooden structure, the following rules must be observed:
- Free movement of the input wiring is not allowed. In this case, it is possible that the wire insulation may chafe and form a short circuit. There is a high probability of the input wire breaking if it is accidentally caught by any object while moving. Therefore, before connecting to the power line, it is necessary to ensure a safe height of the input wire. Part of the wiring in the house must be placed in special casings, channels, sleeves that prevent the free movement of the wire.
- Follow the rules for connecting powerful devices. The use of such electricity consumers requires a dedicated electrical wiring line. When connecting high-power devices, this circuit should be equipped with a separate automatic fuse (electrical circuit breaker). The connection diagram for high-power devices should be worked out at the design stage of the house.
- Try to avoid connecting electricity with an uninsulated wire. If an uninsulated aluminum wire is connected to a wooden house, then the structures may catch fire if a short circuit occurs in the immediate vicinity of the wooden structure. To avoid the negative consequences of incorrectly connecting electricity to a wooden house, it is necessary, after bringing the internal wiring into proper condition, to make the connection using a self-supporting insulated wire (SIP) or to make an underground supply of electricity. This method of connecting electricity is the safest for this category of households.
Underground electricity input is used to connect not only private houses, but also multi-apartment buildings in urban areas are also connected in this way.
The work is carried out in the following sequence:
Obtain permission for underground connection of the house. Before introducing electricity into a house underground, it is necessary to make the necessary calculations and obtain permission to carry out excavation work. Specialists must calculate the cross-section of the conductor and the brand of wire used; it is also necessary to coordinate the laying of the trench from the power line support to the foundation of the house. The depth to which the cable is laid is usually 0.7 - 0.8 meters, and if there are other underground communications along the cable route, then it is necessary to coordinate the excavation work with representatives of utility services. When all the permitting documents are ready and the electrical circuit has been calculated, you can proceed to connecting the electrical current to the wooden house. A trench about 0.8 meters deep is made from the power line support to the foundation of a wooden house. The entry point of the electric cable into the ground is reinforced with the help of a metal pipe, which must be raised along the power line support to a height of up to 2 meters. Typically, introducing electricity into a wooden house does not require making holes in the foundation, so the cable in this place is freely routed under it and brought out directly outside the wall of the house. It is necessary at the point where the cable enters the building (given that groundwater may pass too close, or in cases where the soil is subject to significant deformation), to use asbestos or reinforced concrete pipes in which the cable is placed. It is necessary to carefully seal such placement of conductive material to prevent groundwater from entering the pipe. If this is not done, then when the water freezes, the current-carrying core of the cable may be damaged. If to connect electric current to a wooden household you need to punch a hole in the foundation, then the diameter of such a hole should be several times greater than the width of the cable. A thick-walled metal pipe must be installed in the hole in which the electric cable will be laid
When the cable is laid according to all the rules, the trench is buried, having previously placed tapes underground above the cable with the inscription: “Caution cable.”
See the video below for how to lay a cable in the ground:
Required safety standards
To ensure the electrical safety of installed wiring in a country house, the use of elements such as protective grounding, RCDs and automatic circuit breakers should be provided in advance.
Protective grounding
As mentioned earlier, in most cases, old four-wire power lines are used to power country houses. This means that a combined neutral and ground wire is used. If it breaks, life-threatening voltage may appear on the equipment housing. The machine will not turn off due to the rated current flowing through it. To eliminate such situations, it is necessary to install an additional grounding circuit on the site.
Design of a protective grounding loop
Note! To install a grounding system in a dacha, it is recommended to use factory-made modular-pin circuits. They can be installed in any type of soil without loss of performance characteristics
RCD
Installing a residual current device allows you to ensure the safety of a person from electric shock, as well as prevent the development of a fire. The RCD reacts to leakage currents that are formed when the insulating coating of the cores is damaged or when the neutral wire breaks. It is recommended to mount the RCD directly at the power input.
The shutdown setting is selected taking into account the calculated leakage currents of all electrical equipment used in the country. The resulting value must be increased three times. RCDs with the following rated differential currents are available for sale: 10, 30, 100, 300 mA.
Connection diagram for RCDs and circuit breakers
Automatic circuit breakers
To protect cable lines from overload currents and short circuits, circuit breakers should be used. They are established for each individual consumer group. Selection is carried out in accordance with the calculated current consumption. As a rule, individual machines are mounted on lighting and socket networks.
Correct cable routing
The cable itself is laid in a “snake” trench.
SNiP 3.05.06-85 stipulates that cables in trenches should be laid with a margin of 1-2%. This reserve is precisely provided by the snake.
Just don't go overboard with the bends.
Error No. 7: It is not allowed to make a reserve in the form of rings.
Why are these extra bends needed at all? As it turns out, not for emergency repairs at all. If the CL is laid in a perfectly flat straight line, then the temperature deformations that accompany the operation of the CL will sooner or later damage the input.
Error No. 8 Before and after installation, do not forget to test the insulation of the cable cores with a megometer.
A small layer of sand is again poured on top of the laid cable.
Useful tips
Since only experienced and knowledgeable specialists can correctly lay a cable in the ground, let’s consider their advice:
- After filling the wire with sand, the warning tape should be laid exactly above the wire. Subsequently, during excavations, it will help locate the cable and prevent its damage.
- Only a whole section of cable is laid in the trench. There should be no underground connections.
- The trench should not be located under loaded areas (where people, cars or garden equipment move).
- If metal sleeves are used, their diameter should be at least three times the thickness of the wire.
Using these simple tips, you can avoid some styling mistakes.
Several cables can be laid in a trenchSource dom-i-remont.info
Scheme for introducing electricity into the house
The scheme for introducing electricity into a house is strikingly different from the electrification of a home in an apartment building. Living in an apartment, you may not know anything and may not even guess about the existence of all kinds of input devices, gas grounding busbars, electrical panels and other equipment, and all issues related to electricity will be assigned to the housing office, homeowners association, etc. When dealing with it, you you will have to decide everything yourself, including delving into many of the intricacies of the operation of electrical equipment
It is also important to take into account that an apartment is a relatively small room with almost the same microclimate
A private house is literally exposed to all the elements - heat, frost, wind and precipitation, which, in turn, greatly affects the stable supply of electricity. In addition, not only the residential building, but also various outbuildings are connected to electricity at the dacha site.
As a rule, electrical installation work begins simultaneously with construction. Before building a house, you should think carefully about how to supply electricity to the site.
Electrical distribution principle
First you need to decide what an electrical input is. This is the border between two spheres of power supply - external and internal. This is the same line that connects the home and municipal parts of the power supply
Therefore, knowing how to introduce electricity into a house from a pole with your own hands is extremely important. After all, this is the area where the load is highest.
Consequently, the requirements for input arrangement are the highest. The input resource is three times lower than the electrical wiring in the house itself.
Judging by the experience of electricians, there are several connection points:
- In 95% of cases, private houses are connected to power supply from overhead power transmission poles.
- No more than 1-2% of cases - to collector nodes of underground cable routes.
- In approximately 3-4% of cases, the connection is made to low busbars of transformer substations.
Choosing a cable route
There are two ways to connect objects with electrical wires:
- Air. A series of supports are used, to which a wire is sequentially attached from the source to the entry point into the room.
- Underground. The cable is laid in a trench and covered with soil.
The first method is much simpler. As a rule, the area of a summer cottage is small; the distance from the energy source (house or external electrical panel) does not require the installation of poles. Usually, brackets are attached to the walls of buildings and that is all. However, the integrity of the cable with this installation method is always at risk. A strong gust of wind, falling trees, or repair work can cause the cable to break or become disconnected from the panel. This may pose a serious threat to people or animals.
In addition, it is necessary to take into account the specifics of aerial installation of wires. You have to work at heights, often alone. Not all dacha owners can afford this, since the procedure is quite dangerous, fraught with injury or more serious consequences.
Installation work at heightSource alppromm.ru
Underground wiring eliminates these problems. The only problems with this method are a lot of labor costs and a lack of understanding of how to lay a cable underground without errors. The general procedure seems quite simple, but along the way, users often encounter difficulties. Oddly enough, the most questions arise from people who have some technical training. They understand that it is necessary to follow certain rules, maintain distances, gaps, and comply with regulatory requirements.
The main difficulty that arises when laying cables underground is excavation work. If there are landscaping elements, buildings, or plantings on the site, you will have to choose the most convenient route for the route. It is necessary to combine two requirements:
- Ensure minimum trench length to reduce labor costs.
- Keep plants and landscaping elements intact.
It is impossible to change the location of buildings, so you have to build a trench between them. The area of the plot is most often occupied by plants, so one or two beds are usually sacrificed.
Layout diagram on the siteSource elektroznatok.ru
After the problem with the routing has been solved, the next question arises - to what depth should the electrical cable be buried so as not to damage other types of wires or communications. For areas located in areas of floods, flooding or with high groundwater levels, this issue is very important. It is impossible to lay the cable in water, so you need to know exactly the depth of the aquifers.
Another important issue is the method of digging the trench. It is preferable to use machinery, however, the area may not have room for a tractor to pass through. In such conditions you have to dig manually. This is difficult, but you can invite assistants or, as a last resort, hire a couple of workers and make the task easier for yourself.
The main reason for choosing underground cable laying is reliability and comparative cheapness. Installing poles requires considerable costs, both from a financial point of view and in terms of the amount of work. Even if your own supports are not required, sagging and wind load will sooner or later create conditions for cable breakage. It's good if it comes off from the source side. Otherwise, undesirable consequences may occur.
If the soil is sandy, work moves fasterSource yandex.ru
Briefly about the main thing
Underground cable laying eliminates accidental breakage and electric shock to people. Despite the need to perform excavation work, this method is considered more preferable, since there is usually no need to maintain or repair the wires.
Before laying a wire underground at the dacha, you should draw up a working drawing where the route will be marked in compliance with all permissible distances and gaps
In addition, it is important to maintain the specified trench depth and avoid sharp turns
Only suitable grades of conductor should be used and the correct cross-section should be ensured. Power should be calculated with a margin, since the load may increase.
Conclusions: should you choose an overhead or cable line?
An air line is suitable for you if:
- You want to significantly save time and money on input installation.
- You don't want the wire to be stolen by intruders.
- A hanging wire will not spoil the appearance of your site.
- You don't want to dig a trench or hire people to do it.
An underground cable line is suitable for you if:
- The appearance of your site is important to you.
- In your area, there are strong winds and wires often break due to falling trees.
- You have large-sized agricultural equipment, and you need to power several buildings in your yard.
- The power line support is located more than 25 m from your home, and you do not want to spend money on installing an additional support.
- https://ProFazu.ru/provodka/cable-wire/kabel-dlya-vvoda-elektrichestva-v-dom.html
- https://StrojDvor.ru/elektrosnabzhenie/kak-pravilno-provesti-podzemnyj-kabel-dlya-elektrichestva/
- https://electrikmaster.ru/vvod-elektrichestva-v-dom/
- https://domikelectrica.ru/montazh-kabelya-v-zemle-20-chastyx-oshibok/
- https://ichip.ru/sovety/remont/po-vozduhu-ili-pod-zemley-kak-podvesti-elektrichestvo-k-zagorodnomu-domu-653352