Hi all! I think many motorists and just electricians will agree that having a multimeter is very helpful in everyday life. It can be useful in everyday life and when servicing or repairing a vehicle. Therefore, today we’ll talk a little about how to use a multimeter and do it correctly.
You can call the device a tester, a multimeter (MTM) or a tester. Although a tester and an MTM are not exactly the same thing. But I suggest that you don’t get hung up on notations, but simply talk about the current topic.
Using such devices, you can check voltage parameters, the operation of electrical equipment, and measure current and resistance. In general, MTMs are multifunctional devices and should be in every driver’s car.
Tool Application
There are several basic jobs that such a screwdriver can perform.
It is most often used to check the functionality of sockets and switches. It also very often allows you to check the serviceability of various extension cords completely safely. Moreover, with such a phase detector you can check not only the presence of phase voltage, but also the presence of grounding. To carry out such a check, it is necessary to touch the phase contact of the socket with the working tip of the tool. This contact is made in the form of a copper strip, which is located next to the inlet holes for the plug.
An indicator screwdriver is used to check the functionality of switches and sockets.
If the light element does not light up, then the grounding is working. The opposite situation indicates that the grounding is “broken,” therefore, it is necessary to check all electrical wiring.
Very often, using a hand-held tester, you can determine the phase on a chandelier or other lighting fixtures. Phase currents must be on the internal contacts and in no case on the threads. If the opposite situation occurs, then you cannot use such a lighting device in order to avoid short-circuiting all the wiring.
Checking the current supply in such a situation must be done with extreme caution, since touching both contacts at the same time will result in a short circuit in the entire circuit. Also, such screwdrivers can be used when there is a loss of voltage in the network, which can occur due to the transfer of excess currents to any household appliance
In this case, it is necessary to connect this device and install the tip of the device on its body. A dim glow from the LED will indicate the presence of a leak. If, on the contrary, the light has become much brighter than usual, then there is a direct connection of the phase to the housing. In both such cases, the lighting device should be immediately switched off and repaired.
Also, such screwdrivers can be used when there is a loss of voltage in the network, which can occur due to the transfer of excess currents to any household appliance. In this case, it is necessary to connect this device and install the tip of the device on its body. A dim glow from the LED will indicate the presence of a leak. If, on the contrary, the light has become much brighter than usual, then there is a direct connection of the phase to the housing. In both such cases, the lighting device should be immediately switched off and repaired.
We don’t use such a tool very often in everyday life, but there are times when its presence is simply necessary.
Because any careless movements when working with electricity can lead to dire consequences.
What is current leakage on a car?
Standard consumers of electricity in a car that operate in continuous mode include: a clock, an electronic control unit, an immobilizer, an alarm system and other devices. This is necessary to maintain their performance.
The total current of these consumers is no more than 80 milliamps. If the current in the electrical circuit of the car is more than the electronic units and systems consume, then unwanted leakage currents have appeared in the circuit.
What is this
Multimeter dt 830b
Not all car owners understand what a device called a multimeter is. If you look at the essence of the device, it is an ammeter, which is equipped with additional functions. A standard multimeter consists of:
- ammeter;
- voltmeter;
- ohmmeter.
This is a device for testing electrical equipment, capable of taking measurements of various quantities and indicators. Therefore, the device is also often called a tester. This is due to the availability of testing devices for measuring various quantities. In Russia, the popular name “tseshka” was assigned to it. This is explained quite simply. Previously, instead of modern multimeters, they used a simpler Soviet solution, which was called Ts20. It combined the functions of an ammeter and a voltmeter. The line of devices produced after the Ts20 also retained the prefix Ts. As a result, the new multimeters began to be called “tseshki.” All multimeters are divided into:
- analog;
- digital.
We'll talk about them in more detail a little later. First, let's look at the functionality.
The set of built-in equipment largely depends on the manufacturer and cost. Therefore, all devices are equipped with different properties and capabilities. Moreover, this applies to analog and digital devices. In total, with the help of modern multimeters you can:
- measure current strength;
- check the performance of the LEDs;
- test transistors;
- ring, that is, measure electrical resistance;
- determine the voltage frequency;
- check the transmission of static current;
- test electrical capacitances;
- measure inductance (a very rare function);
- check high currents;
- measure resistance;
- check the temperature.
Also, each manufacturer adds other functionality, in addition to measuring. Thus, on many models you can find backlit displays, a function for recording and saving test results, protection against incorrect settings, etc. This depends on what kind of sophistication the manufacturer has gone to in order to diversify the functionality and make the device more attractive in the eyes of consumers. Just keep in mind that you have to pay extra for all the additional features and wide functionality. But sometimes it makes no sense to pay for features that you won’t actually use. This is one of the key rules when choosing a multimeter.
Checking for cable breaks or short circuits on the line
We insert the probes into the socket, as in the first 3 methods. We move the switch to the “.)))” section, disconnect the cable being tested from the power source, and if necessary, strip the ends to bare metal.
We close one side to each other, connect the tester to the other, if the line is intact, we will hear a characteristic squeak, which will stop when opened.
In this case, the cable being tested is intact and does not have a short circuit. If there is no squeak, this means damage to one or more wires.
If it continues after opening, there is a short circuit on the line and further operation of the cable is unsafe.
More advanced devices have additional functionality that should be described in detail in the instructions for using the multimeter. The presence of which in high-quality devices is mandatory.
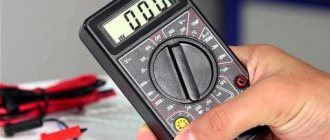
How to use a digital multimeter
Which refrigerator for a car is better to choose?
Once the electrical tester (multimeter) has been selected, you can proceed to use it. Almost all multimeters are assembled in the same way, so the instructions differ little depending on the model. Unless the presence of various advanced functions may be present on the device. But you can always find out about it from the instructions for the device. We will present standard instructions suitable for almost all models.
Network voltage measurement
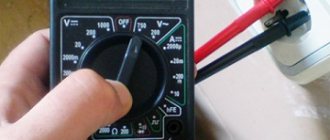
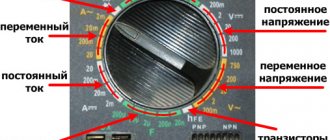
So, the visual digital multitester is divided into several blocks, thus forming a kind of “dial”. The dial values can be set using the handle in the middle. Basically, the multimeter contains several main blocks:
- OFF. Everything is clear here, the multimeter is turned off;
- ACV. The abbreviation AC usually stands for alternating current. And the symbol V indicates that the block is designed to measure voltage;
- DCV. DC means direct current. By analogy with the previous paragraph, the letter V indicates voltage measurement;
- DCA. DC current measurement;
- Ω. This symbol means resistance measurement.
Additionally, the “dial” may contain blocks for checking diodes, continuity testing, measuring 10 A circuits, temperature, etc.
Resistance measurement
At the bottom there are usually connectors for connecting probes. They are signed and require connection to certain poles of the circuit being measured. The black probe is always connected to the COM port. Red connects to the other two depending on the situation. VΩma allows you to measure current up to 200 mA. If higher, you need to use the second connector, which is marked as 10 A.
DC voltage measurement
Voltage measurement
To measure voltage, for example, in a socket, you need to set the switch to ACV mode. The probes must be connected to the COM and VΩma connectors. The voltage spread can be set to 750 V. Then touch the sockets of the socket with the probes. It makes no difference which probe touches which hole, since the voltage is variable.
DC voltage is measured in the DCV block. Here the spread of current values is greater. The probes in this dimension must be connected in parallel.
Current measurement
You need to start measuring the current strength by determining the approximate current value. If it is unknown, it is better to switch the probe to the connector marked 10 A. The measurement must be made by connecting in series under load.
Resistance measurement
This parameter is measured with the voltage in the circuit turned off. The mode to which the multimeter must be switched is Ω. Then set an approximate value and, depending on the indicator, select a more accurate range.
Ringing
This is probably the easiest mode. It allows you to establish the integrity of a circuit or conductor section. If everything is in order with the circuit, a beep will sound. More complex measurement systems can be found in the instructions for the specific device.
How to prepare for testing car wires
Before checking the wiring in your car with a multimeter, you will need to prepare a regular digital household multimeter, test leads, a long wire and alligator clips. You will also need to have a vehicle repair manual and a wiring diagram.
Having an electrical diagram of the circuit will greatly simplify diagnostics and help identify loads, wires, switches and control devices in the circuit. Thanks to this, the user will be able to understand how the current should flow in the circuit, how it is protected, and also in what state it is usually closed or open. If there is no diagram, you can buy it or download it from the Internet for a specific car brand.
Important! When studying the circuit, you will need to pay special attention to the connectors, connections, switches and components in the circuit where there is a possible break. To avoid confusion, identify wires by color and the terminals, switches or loads to which they are connected. Carefully disconnect the connectors so as not to damage them. If possible, disconnect the sensor connectors from the rear side or from the wire side.
Checking relays and fuses
According to the Auto Repair Manual, it is determined which fuse or relay is associated with the non-working equipment. If there are several non-working components, the common points in the circuit are determined from the connection diagram. This will significantly narrow down the troubleshooting area.
Check sequence:
- Turn off the engine.
- Open the cover of the fuse compartment, which is usually located under the steering wheel or under the hood of the car, and is indicated by a small electrical symbol.
- There is a guide on the fuse box cover to help you determine the function of each and locate it.
- Using the small pliers supplied with the block, release the fuse being tested without any effort.
- If, upon external inspection, a black spot is noticed on the numbers or a broken thread, then the fuse has blown and must be replaced.
For a more accurate check, use a multimeter in dial mode. If the fuse does not ring, it is faulty. Replace the blown fuse with a new one with similar characteristics.
Visual inspection of wiring
Before testing the wires with a multimeter in the car, perform a visual inspection of the wiring. In order to find a damaged wire, open the non-working equipment of the car and find the power wires. In many cases, this will require removing interior trim panels. If the wires are enclosed in a flexible plastic tube, carefully remove it so that they can be inspected. If a wire is found to have damaged insulation, it will need to be replaced.
How to check an outlet
Which battery is better to choose for a car?
To check the connection of devices to the electrical network, use a socket tester. The device is equipped with three LED indicators, which, when lit, indicate that the socket is connected correctly. If any of the indicators are not lit, there is an error in the connection. This may be a lack of grounding or incorrectly connected phases. The device is easy to use: to identify faults, just plug it into a power outlet. You should not turn off the electricity supply.
A connection test is a mandatory condition for installing electrical equipment.
DC Voltage Diagnostics
The probes are installed in the corresponding sockets “com”, red - “V\Ω”. We move the switch to the “V-” position; for more correct operation, if there is no information about the voltage, you should start from a higher level.
To test, take a regular battery or rechargeable battery, connect the red to positive, black to negative. Numbers with readings will appear on the display; if there are zeros in front of the integers, this means that the voltage is much less.
In such a situation, you need to rotate the switch and gradually reduce the test level until a single value appears.
If a minus appears in front of the numbers, it means that the plus and minus are confused, you just need to move the probes from place to place.
Basic types of multimeters
The most common type of multimeter is digital. It is a small device with a switch of functions, modes, screen and probes. Using the switch, the user sets the necessary settings for the upcoming measurement. Then the probes touch the connectors of the circuit being measured and receive the values on the display screen.
Digital version of the device
The digital multimeter has a high input impedance of about 11 MOhm and a capacitance of 100 pF. Typically, multimeters can measure DC voltage up to 1000 V, AC up to 750 V, DC current up to 10 A and resistance up to 2 MOhm. An analog multimeter consists of a magnetoelectric device, several resistors and shunts. Due to the fact that the input impedance of the analog multimeter is not high enough when measuring high-resistance circuits. Another significant drawback is the inability to automatically determine polarity, as in digital ones. Therefore, you need to monitor which poles the terminals are connected to.
Learn more about current measurement
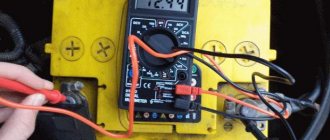
In principle, everyone who studied physics at school knows how to measure the current strength in a section of a circuit. It is necessary to pass current through the device: that is, connect it to the open circuit. In laboratory conditions it is simple, there are verified parameters and a device with a safety margin. How, for example, can you check for current leakage on a car battery?
Not every tester is suitable for this type of work. The current measurement limit must, at a minimum, exceed the power of the headlight lamps. For example, you have 55 W halogen headlights. The total power is 110 W, divided by the voltage 12 volts, we get a value of about 10 amperes. This means that the household tester must have a DC measurement mode with a limit of 20 amperes.
Next is the standard inclusion (as in a school laboratory):
- Disconnect the negative wire (ground) from the battery.
- We securely connect the negative measuring cable of the tester to the negative terminal of the battery.
- We connect the positive measuring cable of the device to the negative wire of the car.
We see leakage current when consumers are disconnected. If it is measured in amperes, we remove the fuses one by one and find the node that gives the parasitic load.
There should not be zero current: the on-board computer, radio, and alarm system (if equipped) are constantly powered. But these are tens of milliamps. If the value is an order of magnitude higher, the tester will help you find the problem area.
Types and types of multimeters
Today there are many types of multimeters, which ones have what functionality. There are devices for professionals, cable technicians, and radio amateurs. There is something simpler. Like all other devices, there are two types of testers. These are analog and digital. True, there are practically no analogue ones - those with an arrow - now. They are rare, they are used by those who could not get used to digital ones. Pointer multimeters are sometimes characterized by greater measurement accuracy. But, basically, the industry produces a more modern modification - a digital tester. Fundamentally, it is no different, only on the screen it does not have an arrow, but numbers. In principle, this is somewhat more convenient. Compare the top photo of the analog tester and this one of the digital one:
Agree that the digital designation is much more convenient than the pointer designation, where you still need to determine the arrow reading on the scale. True, for those who have worked with an analog tester for a long time, this will not be difficult. However... There are models that have both an arrow and numbers. This is convenient in terms of updating information. On a digital display it is updated up to 4 times per second, and on an analogue display up to 20.
As a result, we can estimate the measured value somewhat faster and better, although not as accurately. Some modern models even display a graphical signal, like on an oscilloscope. Since everything is now computerized, there are also models that work from under the computer and immediately transmit readings to it.
In general, there are a lot of different tester models. The main thing is to take into account the accuracy of the device when choosing. And of course, functionality. Indeed, with the help of this device, in addition to basic measurements, you can look for wiring in walls, measure the capacitance of capacitors, take characteristics of magnetic fields, measure frequencies..... It all depends on the direction and your level. Today we will focus on the simplest and most necessary measurements.
Getting to know your device
To begin with, I propose to talk about multimeters themselves as electronic devices. Next, detailed instructions will be presented for beginners or, as they say, for dummies.
Let's look at the front panel of the device for measuring indicators in the car and at home. Typically, several values are indicated on the front. Namely:
Do-it-yourself repair of chips and cracks on the windshield: affordable methods Category: DIY repairs
- OFF. Everything is clear here. The device is turned off;
- ACV. This designation indicates alternating voltage;
- The Ω symbol here means resistance;
- DCA is DC;
- Completes all DCV or DC voltage;
- 3 connectors with corresponding indicators;
- Directly the dial itself or the electronic display.
As for the 3 connectors. The probes are connected through them. The set with pliers is included with the MTM, so everything should be clear here.
There is one note regarding how and when to connect certain probes to the tester. There is a black wire that invariably always goes into the socket that is marked with the symbols COM.
But with red the situation is more complicated. It all depends on what kind of measurements you are going to take with your digital multimeter. When making measurements of mains voltage, resistance or current up to 200 mA, then you only need the VmA output. If the value exceeds 200 mA, then connect the red probe to 10 ADC.
I think we've sorted this out. If you do the opposite, you will not be able to use the tester for a long time. The reason for this will be a blown fuse. As in the case of the cigarette lighter fuse in a car, fusible elements are also used here.
Analog MTM
Most motorists and electricians prefer digital multimeters. These are modern devices with wide functionality.
But there are also outdated devices on the market. They are called analog or pointer. Whichever is more convenient for you. But their characteristics and efficiency are significantly inferior to digital solutions. Using a pointer tester is not the best option, since the scale has a larger error.
And in general, using such devices is not particularly convenient. It is better to immediately switch to good quality digital devices.
I would include the following models as such:
- DT830;
- DT832;
- DT838;
- Resanta DT 181;
- Resanta DT 182;
- DT9205a;
- Ermak;
- Mastech, etc.
Although I will not hide the fact that some continue to use digital testers. They probably have had them in their toolbox for a long time, or the motorist simply doesn’t want to spend money on a digital device, since he is completely satisfied with his dial multimeter.
A regular screwdriver indicator is the simplest solution
The simplest and most common probes are equipped with neon lamps. The principle of their operation is as simple as possible.
When you check the voltage in the outlet, the electric current passes through the resistor installed inside the indicator (this resistor limits the current, its value is at least 0.5 mOhm) and is transmitted to the first contact of the neon light bulb.
In this case, the second contact of the light bulb is closed to the user through a contact located on the handle.
In such screwdrivers, the human body resistance and capacitance are part of the light bulb circuit. In other words, when you touch the contact with your fingers and the live wire with your sting, you will see the light bulb glow (provided that there is voltage in the network).
If there is no contact with the user, the lamp does not light up. The main disadvantage of this type of screwdriver is the rather high voltage threshold - not lower than 60 V.
Therefore, they are only suitable for detecting phase presence and voltage. It will not help determine open circuits. So, this indicator screwdriver is not multifunctional - it only allows you to determine the absence or presence of voltage in the network.
How to ring chains correctly
A call is a check to see if there is a contact on the network. This function is used mainly by advanced repairmen who restore equipment or devices. The average person usually doesn't need these features, but you should still understand how to use them.
Use the switch to select the dialing mode (it is indicated by a triangle with a vertical line or vertical brackets similar to the “volume” icon). Then you need to ring the track with probes. If it is intact, then you will hear a squeak from the speaker.
Read the instructions before using the device
In what cases is it necessary to use a multitester in dial-up mode? If you need to determine the performance of the cable. For example, you laid a couple of dozen cables for a LAN network to each table or device, but forgot to label them. In this case, it can be easily determined. You need to select one cable, strip two wires on it and short them (for example, yellow and green). Then you go to the other end of the bundle and connect the green and yellow wires on each cable. When the tester beeps, you have found the cable you are looking for.
We have listed the basic rules for using a multimeter for beginners - this is enough to perform 95% of all household operations. A home electrician is unlikely to need to check transistors and other complex functions - only electronics repairers need them. Therefore, you should not bother yourself.
Brief description of popular models
Which multimeter to choose for home and car? If you find it difficult to choose a suitable model, then you should pay attention to several options that have optimal functionality, are easy to use and can satisfy most basic requests:
- ADD 8055. This tester model is aimed at diagnosing and identifying problems in car batteries. But it successfully copes with monitoring parameters in automotive power units during a cold start, and also takes readings on various electrical networks and devices.
- ADD 280. This device is used for testing diesel engines and, in particular, glow plug units in them. With this device it is easy to detect unstable sparking of such systems.
- ADD 3055. With this multimeter it is easy to examine control units and all kinds of sensors, as well as the electronics of any car. The above is confirmed by the fact that this device is widely used by craftsmen who service vehicles.
- ADD 8630. Capable of assessing the technical condition of automobile generators, starters, and batteries. Such a device contains a multifunctional unit, which is designed in the form of a printer. With its help, the test results can be printed on paper.
- ADD 91. This device can be called a multifunctional measuring system, which is widely used by electricians and mechanics in the automotive industry. Equipped with a backlit display, it has the ability to simulate signals generated by various sensors.
Other reasons for battery discharge
What to do if the driver measures the current consumption and it does not exceed the norm? As mentioned above, difficult starting after a long period of parking may not be caused by leakage currents. Some of the most common causes of this problem may include:
- High battery self-discharge.
- Generator malfunction.
Testing the battery for self-discharge
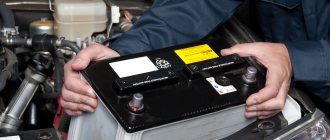
To determine the condition of the battery, you need to remove it from the car and wipe it clean with a rag soaked first in a solution of baking soda, then in water.
If the battery is serviceable, you need to check the density and electrolyte level in each section (there are only 6 of them). The battery is then fully charged by the mains charger to normal voltage (12.7 V without load). We recommend: How to maintain a maintenance-free car battery
All that remains is to leave the unconnected battery for several days and then measure the voltage at the terminals again. If the voltage loss is more than 0.2 V, then the problem is in the battery. You will have to buy a new battery or try to restore the damaged one, at least temporarily, by contacting the appropriate specialists. If the battery “holds”, then either the problem has been eliminated (for example, water was added to semi-dry jars), or the problem is different.
Operating rules
To measure the voltage level in a home network or outlet, be sure to set the switch to the ACV position. The black wire is connected to the COM connector, and the red wire to V/mA.
If the maximum permissible value is unknown, then you need to start taking measurements with the maximum possible value of 750 V. When the number “0” appears, the user needs to switch to using another scale, because there is a lower voltage level. To carry out measurements with constant voltage in the electrical wiring of cars or vehicles, you need to set the switch to DCV mode.
If the device is used incorrectly, it may break and become unusable. This problem often occurs among users who do not know the current value. In this case, you need to connect the wires to the red probe (10 A connector). A small value appears on the display.
The safe mode for using the device is voltage measurement. To do this, set the rotary switch to position W and take measurements. Before doing this, you need to turn off the power to the circuit. Using a multimeter, test the electrical circuit. The switch is turned to the desired position and the red probe is connected.
Video on the topic
Contents of the article
Hello everyone! I think many motorists and just electricians will agree that having a multimeter is very helpful in everyday life. It can be useful in everyday life and when servicing or repairing a vehicle. Therefore, today we’ll talk a little about how to use a multimeter and do it correctly.
You can call the device a tester, a multimeter (MTM) or a tester. Although a tester and an MTM are not exactly the same thing. But I suggest that you don’t get hung up on notations, but simply talk about the current topic.
Using such devices, you can check voltage parameters, the operation of electrical equipment, and measure current and resistance. In general, MTMs are multifunctional devices and should be in every driver’s car.
Safety precautions
The multitester is a fairly reliable device from a safety point of view. However, its use still requires compliance with certain rules. The tester has internal protection against excessive loads. However, if the device is not handled correctly, it can quickly fail.
When measuring input AC voltage, it is recommended to adhere to the following rules:
- If the approximate value of the measured voltage is unknown, the switch must be set to the maximum range.
- Do not apply voltage exceeding 750 volts to the input. Otherwise, there is a high probability of destruction of the internal circuit.
Important! Do not touch electrical components without wearing dielectric gloves. When measuring input DC and AC current, the following rules should be observed:
When measuring input DC and AC current, the following rules should be observed:
- If preliminary data on the value of the measured current are not predetermined, the switch is set to the maximum possible range.
- If the LCD display is set to one, the trigger should be placed on the adjacent range in the direction of the higher value.
- Test time when working with the 20-amp range should be no more than 15 seconds. The fact is that there is no fuse for this mode.
When measuring the internal resistance of a circuit, make sure that the power supply is turned off and the capacitors are completely discharged.
You should also adhere to the rules for storing and caring for equipment. Do not apply voltage to the input when the rotary switch is in the Ohm position. It is not recommended to operate the device with the lid open or partially closed.
There is one more rule regarding the proper use of a multimeter. It is not permissible to replace the galvanic element and fuse while the device is running. It is necessary to turn off the multimeter and disconnect all probes.
Method for checking capacitors with a multimeter
All capacitors are divided into polar and non-polar. Polar capacitors are electrolytic, all other modifications are non-polar devices.
The peculiarity of polar models lies in the method of soldering them to the board. The positive contact is soldered to the positive side of the board, and the negative contact to the negative side. Non-polar ones can be soldered however you like.
As for safety when working with polar capacitors, if the contacts are incorrectly soldered, it can explode (applies to Soviet models); imported ones have special creases on the top of the case, which in the event of an explosion will simply open and suppress the accident.
Polar capacitor
Speaking about the properties of a capacitor, it should be noted that it constantly passes only alternating current through itself, direct current passes only for a few seconds (until it is charged), and then does not pass through. To measure the capacitance of capacitors with a multimeter, they must have a capacitance of 0.25 microFarad. Otherwise, you will need a device such as an LC meter.
To start measuring, you need to find out where the negative contact is on the capacitor. This is done simply. Manufacturers put a black tick on the case, which indicates that there is a minus under it.
Minus marker on the body
Take the item being tested and, using any metal conductor, connect the contacts to each other. That's it, the capacitor is discharged. Now take a multimeter and set it to dial mode. Place the probes against the contacts. The first thing the device will show is the minimum indicator, but the tester has a battery that produces direct current. It turns out that if you continue to hold the probes on the contacts, the capacitor will charge and the readings will continue to grow indefinitely (1 on the display).
If, when you initially connect the multimeter to the device, the resistance is zero or immediately shows one, then this capacitor is not working.
Rating of digital multimeters for the home in 2018
Before choosing a digital multimeter for your home, you need to decide on its purpose. Depending on what kind of work the user will carry out, you can opt for a cheap model with a minimum set of capabilities or, conversely, buy a more expensive multifunctional device for a wide range of tasks.
CEM DT 912
A fairly simple but functional device for determining a large list of measurements. The base error is 2%. Not the highest figure, but sufficient for household needs. It is possible to check the integrity of circuits, diodes and batteries. Special features of the Sem DT 912 include storing measurement values, display backlighting and a sound signal. The device is powered by a 9 V battery.
CEM DT 912
Uni-T UT33A
Another option for an inexpensive multitester option. Can perform basic functions of measuring voltage, current and resistance. Checks the integrity of the circuit and diodes. The error is 1%, which is not bad for a household appliance.
The measurement range is automatic. It does not know how to remember measurement values, and there is no screen backlight either. But there is a function of automatic shutdown during prolonged inactivity and notification with sound signals. Power is supplied from two AAA batteries.
Uni-T UT33A
Proconnect DT 182
A simple and cheap device that is capable of carrying out simple measurements of circuits, diodes, voltage, current and resistance. For an inexpensive model, it has a fairly high accuracy rate, the error is only 0.5%. The maximum voltage with which the device can operate is 600 V, which is quite enough for home use. There is no display backlight, no memory, but there is a sound alert.
Proconnect DT 182
Master Professional M890G
A home multitester designed for users with advanced skills in using such devices. The device has a classic set of possible measurements: alternating and direct current, direct and alternating voltage, resistance, capacitance and frequency. In addition to them, it is possible to check the integrity of the circuit, diodes and temperature.
The instrument error is 0.5%. The maximum voltage value is 600 V. Measurement accuracy ranges will have to be set manually. There is no memory mode or display backlight. The device is powered by one 9 V battery.
Master Professional M890G
How to choose the right multimeter
A definite recommendation for those who are not interested in radio electronics is a basic digital tester of the 830, 832 or 182 series. Its price is several hundred rubles. The only drawback of such a device is the small current measurement range. However, it is sufficient for household measurements.
If you service the car yourself, you should choose a model with a strong rubberized casing, with a current measurement limit of at least 10 amperes.
Such a device will cost about 1000 rubles, but its safety margin is higher.
Purchasing pointer testers today does not make sense. Perhaps for specific tasks, when it is necessary to monitor certain impulses in real time.
Types of Multimeters
Before choosing a digital multimeter for your home, let's look at the possible types. The modern market offers two types of testers: analog and electronic. Analog instruments display measurement values on a graphic scale with divisions and an arrow that moves along the same divisions. The scale contains graduations that determine one or another measurement indicator.
The main disadvantage of analog testers is their insufficiently accurate measurements. As a rule, even the highest quality devices of this type provide distorted indicators. The device is useful only if the master needs only indicators of general value. Globally, analog devices are used extremely rarely, and exclusively for home use.
If you are puzzled about which multimeter you need, trust the experience of professionals; experts recommend sticking with electronic devices. Such devices are equipped with a digital display, the measured indicators are quite accurate and well perceived by the user, moreover, most electronic devices are distinguished by wide functionality, and some even have IP 67 protection.
Methods for making calls
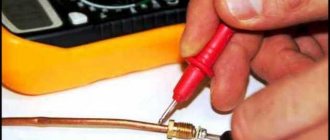
There are many examples of electrical network breakdowns, to identify which it is necessary to use a dialer. A break in the line can be either in the wire powering the household appliance or in hidden wiring. You can detect a break using a multimeter using simple steps.
- As an example, we will check the cord from a computer monitor, which has three cores.
Network cable
Set the multimeter to resistance measurement mode. Then you lean the first probe against one of the contacts of the plug, and insert the second one in turn into each slot of the connector at the other end of the wire. The multimeter display should show a figure of about 2.5 ohms; if the value reaches 10 ohms, then this wire contains a break. The connector that shows zero does not belong to the powered contact on the plug.
- A method for checking hidden wiring. Set the diode continuity function on your multimeter. Now you need to go to the switchboard with the machines. Using an indicator screwdriver, you need to find the phase, having first turned on all the machines. Mark the found phase with electrical tape.
Next, you need to define zero. Set the device to check voltage, and the regulator to 750V. Place one probe against the phase, and with the second probe all the remaining cables until one of them gives a reading of 220. Also mark the found wire. In this way you should find all the remaining pairs.
Distribution panel
To ring each conductor, it must be disconnected from the power supply (disconnected from the machine). Set the multimeter to ring and connect the probes to each other. You will see zeros on the display. Having opened the probes, touch them to the conductor pair. The entire wire will show zero resistance. By ringing the remaining pairs of wires, you can determine which line the break occurred on.
Parameters to measure
The multitester allows you not only to find out what voltage is in the outlet, but also to make the following types of measurements:
- indicator of alternating and direct voltage and current;
- electrical resistance;
- capacity;
- temperature;
- frequency;
- characteristics of diodes and transistors.
Measurements allow you to obtain a large amount of necessary information. For example, by checking the voltage in a battery, you can draw a conclusion about the remaining working life of it. Another example: a new lamp does not light, and after checking the voltage it turns out that the problem is in the wiring. A multimeter will also help in situations where you need to make sure that the electricity is really turned off in the entire apartment (during electrical installation work).
What causes current leakage in a car?
The most typical causes of current leakage are:
- Old batteries that have exhausted their service life.
- Violations of electrical wiring insulation.
- Oxidation of battery electrodes.
- Oxidation and dirt on terminal blocks.
- Incorrect installation of additional equipment.
Towards the end of its life cycle, the battery significantly loses its capacity. It charges and discharges noticeably faster. The oxidation processes of the plates in the banks not only reduce the battery capacity, but also reduce the internal resistance, which leads to an increase in the self-discharge current, and sometimes to a short circuit and failure of the battery bank. Self-discharge is also affected by the quality of the electrolyte.
If the wiring insulation is damaged, dirt and moisture can enter where the wire is exposed, which can lead to unwanted leaks. In addition, exposed wiring can create a short circuit. At best, this will lead to the blowing of the fuse for this circuit, and at worst, the device or device will fail.
When the electrodes oxidize, a layer of zinc sulfate is released on them, which creates additional resistance and reduces the amount of charging current supplied to the battery.
Accumulated dirt and moisture on the terminals contributes to the appearance of leakage currents in these places.
When carrying out repair work or installing additional non-standard equipment or systems, inept actions lead to an excessive increase in current consumption, and sometimes damage to the devices.
Checking voltage with a load fork
The load fork is considered a slightly outdated tool today. You can meet it more often at service stations than at private car owners. Nevertheless, such a check turns out to be the most accurate and professional.
A load fork is a specific tool that allows you to accurately determine the level of battery malfunction. It combines a multimeter and a load resistor.
- the device is connected to the battery terminals, and a short circuit current occurs. This is a kind of imitation of the operation of the starter. When there is no load, the battery produces 12.7 Volts, with a load - much less;
- Next you need to read the instrument readings. They will show what level the charge will be at the moment the owner starts the car.
Another nuance that needs to be taken into account when measuring in this way: it is advisable to check the voltage at a battery temperature of 20-25 degrees and not do it very often. Otherwise, you may lose a large portion of the capacity.
This method is reliable and reliable. Its only disadvantage is that the load fork is practically not found in the average garage of the average car enthusiast. For such car owners, it is worth thinking about how to check the car battery voltage with a multimeter.
Recommendations
Comments 70
In general, I don’t trust purchased probes made from the body of a cigarette lighter plug... I have my own “eternal” probe scheme, which has never failed. two diodes, two LEDs, two resistors, and a 4-6 volt battery from an autonomous siren
About the oxidized and destroyed wire inside the insulation:
Only with light bulbs can the field assembly in the module be burned. You have to be careful with them.
Not everyone in the comments admired it, I immediately said that he was bullshit and gave an example that because of the fuse block only 10V was coming to the pump, and this crap would show that there is voltage.
I meant the overwhelming majority, those who are not in the subject.
I completely agree with every word you wrote.
Among the instruments, the auto electrician did not see a 220 V 80-100 W light bulb with a break in one wire for diagnosing starters to determine the point of short circuit (brush assembly, etc.) to ground. Is this option available?
There were no problems with the starters, or with their diagnostics. And I didn’t know this method, can you tell me more?
An excellent sample, I’ve already erased about thirty of them)) I use them as a consumable. One minus: 24V batteries explode, they don’t last long. You just need to approach any testing by a tester headlong.
Each tool has its place in the work. You need a multimeter, a tester, an LED, and a postulograph.
How to use multimeters: DT830B, DT832, DT838, DT9205A
In this case, they begin checking devices that are not included in the standard equipment of the car, and places where wiring is part of moving mechanical components.
Expert opinion
Viktor Pavlovich Strebizh, lighting and electrical expert
Any questions ask me, I will help!
Experienced craftsmen identify areas with a drop in current, focusing on the readings of a multimeter with the fuses removed one by one. If there is something you don’t understand, write to me!
How to use an analog multitester
The analog tester uses a general indicator to display the measured readings. On the scale behind the arrow there are several divisions: for volts, amperes and ohms.
The tester works on the principle of converting measured data into electricity, which creates a magnetic field, which in turn moves the needle. In this case, switching of input connectors and control of operating modes of the circuit is realized using a multifunction switch with buttons. A similar “handle” is also provided on digital versions.
Instructions for use of the analog tester
Let's look at how to use a dial multimeter and set it up to work:
- Check the batteries using a special mode.
- Perform a zero calibration. For these purposes, there is a tuning resistor, the handle of which is located on the front panel. It is also used when moving from one range to another. For example, changing the position from 10 Ohm to 10 Mohm, the spread is up to 25% of the scale length.
- Set AC or DC voltage. (The device contains a diode rectifier, since the magnetic head of the dial indicator functions only with direct current).
- Activate the shunt, which helps measure resistance over wide ranges on the sensing pointer mechanism.
- To select a measurement value, you must connect the device to the correct connectors, and you must observe the switching. If you do not follow all the rules for connecting to each section of the circuit where the current strength is different, the multimeter will fail.
- The connection between the device and the circuit is carried out using probes or clamps similar to crocodiles, which are named accordingly.
Important! During operation, do not touch exposed contacts with bare hands, even if the voltage seems safe.
Tips and tricks
- When using an analog (pointer) multimeter, it must be placed on a flat surface and any vibrations should be avoided near the device. Otherwise, its indicators will give an error.
- Never leave the measuring device switched on; its battery will quickly drain. If the multimeter does not have an OFF button, then you need to set the position for measuring voltage.
- Try not to touch the ends of the probes with your hands; if they become dirty, there will be an error in the readings.
- Before performing any actions with a multimeter, count each step without haste. If you make a mistake, your measurements may remain incomplete due to device failure.
Now you know how to use a multimeter correctly, but never neglect its settings, accordingly setting it to the desired indicators. With the help of such devices you can easily make friends with electricity. Good luck with your troubleshooting in electrical networks.
Expert opinion
Viktor Pavlovich Strebizh, lighting and electrical expert
Any questions ask me, I will help!
It is clear that the phase cannot be connected to the grounding contacts of the socket; therefore, it is in one of the working holes. If there is something you don’t understand, write to me!
Car electrical wiring repair
You can check and restore the car's electrical wiring yourself or at a car service center. After identifying faulty areas where there is damage to the wires, a short circuit or a break, they are soldered or completely replaced. Conventional twisting followed by crimping is not a full-fledged repair, but only a temporary measure - take this into account if you do not have the opportunity to solder the break points.
Wires are selected with the same characteristics as the existing damaged ones (resistance, metal). You should not install too long wires with a “reserve”; twisted open wiring under the influence of negative factors (temperature changes, moisture, dirt) is destroyed faster - this can lead to a short circuit. When replacing wiring harnesses with connectors, make sure that the contact groups are completely free of oxidation before work.
Mounting blocks located in the engine compartment are also considered a vulnerable element of a car's electrical system. Due to the destructive effects of temperature and moisture changes, damage to the protective coating and subsequent defects in tracks, connectors for connecting wiring harnesses, relays, and capacitors are possible. Repair of mounting blocks, consisting of circuit boards, fuses and electrical components, includes soldering to restore tracks and coating with a special protective varnish, as well as replacement of faulty elements and wiring, connectors, cleaning contact groups from dirt and oxidation.
Determines whether oxygen remains in the exhaust gases. Before taking measurements, also inspect it - it may be damaged and a multimeter will not be needed at all. Then the element just needs to be replaced.
If everything is in order, measure the voltage and resistance as with the ABS sensor. The algorithm is the same. Start the car and watch the device. After start-up, the numbers 0.1-02 volts will appear on the screen. When the car warms up, the device will show up to 0.9 volts. If you didn’t notice that the indicator has changed, the sensor is most likely faulty.
If the voltage test is successful, find out the resistance readings. The norm ranges from 10 to 40 ohms.