Quite often a situation may arise when the number of sockets in an apartment, or in a separate room, becomes insufficient to use all the necessary electrical appliances. You have to use extension cords, which creates some inconvenience. Or connect devices to the network one by one. This leads to a lot of time wasted. It's no surprise that many people wonder: how to add an additional outlet in an apartment?
If the wiring is quite old and is in unsatisfactory technical condition, then it is advisable to replace it entirely. To do this, new wiring is laid with the number of electrical outlets required for convenient use. It is advisable to combine this option with major renovation of an apartment or private house. Since a complete replacement of wiring entails a violation of the integrity of the walls, and, accordingly, their further restoration.
How to add an outlet in an apartment
A cheaper and faster option would be to add one or more outlets in the apartment without completely replacing the wiring. This option is relevant if renovations in the apartment are not planned in the near future, and also if the electrical wiring in the apartment is in good condition, or has recently been replaced. Of course, it is advisable to think about the number of electrical outlets and their locations in the apartment before starting renovations. However, if the moment has already been missed, you need to decide how to connect an additional outlet in the apartment
How to place a cable and socket on the wall
When installing additional sockets in an apartment, first of all you need to decide what type of socket will be used - external or internal installation, that is, surface-mounted or built-in. The same applies to the cable from the outlet to the electrical wiring section that already has power. Because there is a hidden or open way to install the cable.
Hidden wiring and built-in socket
It’s up to you to decide which option for installing the socket and laying the cable. A built-in socket and hidden wiring naturally looks like the most successful option from an aesthetic point of view. However, as mentioned above, in most cases this option entails quite expensive repairs. It will be necessary to groove the wall and make a hole for the mounting box. In this case, the integrity of the wall will be compromised and its finishing coating will be damaged.
Exposed wiring and overhead sockets
Installing the cable in an open way (outside the wall), as well as installing surface-mounted sockets, will allow you to complete the work with the least labor costs, as well as minimize the amount of dust and dirt. This method will allow you to preserve the finishing coating of the wall on which you plan to install the outlet and lay the cable.
Open wiring installation: minimum costs and work
The disadvantage of this method is that the added section of wiring will be visible, which does not look very neat. There are several ways to solve this problem. For example, if possible, lay a section of wiring, hiding it behind the interior elements of the room. This will no longer be noticeable, and may be an acceptable option. Also, a fairly simple solution is to place the cable under the baseboard - this does not entail large-scale repair work, and in itself is a fairly economical option.
How to add an outlet in an apartment with plasterboard walls
In the case where the walls in the apartment are finished with plasterboard, the installation of hidden electrical wiring elements is greatly simplified. To install a socket in this case, you will need to select an empty opening between the profiles mounted on the wall and make a hole for the mounting box. If the socket is located under the distribution box, then an additional section of cable can be laid in the void between the profiles. Or stretch the wire down, and lay the wire below in the cable channel or inside the plinth, which is structurally designed for laying the cable.
You can lay the wiring unnoticed by running it inside the baseboard
There are many options for installing wiring - it all depends on the specific conditions in the apartment. The final choice, as always, is yours.
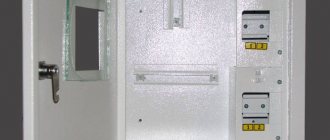
Construction and connection of a distribution board with automatic machines.
Of course, anyone would be intimidated by so many wires when opening the front cover. But believe me, everything is very simple here.
We will analyze everything in order, and at the end we will draw a general wiring diagram. Let's start from top to bottom.
Zero block.
“Zero” it is called because the zero wire
, coming from
the main machine
.
As a rule, the neutral core has a larger cross-section
and is connected under the first screw.
There is also a grounding wire coming to the “zero block”, but it is not visible in the photo - it is not connected because my house belongs to the old housing stock, although it was built in the mid-90s.
Remember. The “zero block” collects all the zeros from the wires that are laid around the apartment. The grounding is located here, but on a separate plate, and is not physically connected to zero in any way.
Let's deal with phase conductors.
The phase conductor coming from the main machine is connected to the input of the first machine
, and
by jumpers
to the inputs of all automatic switchboards.
But from the outputs of all machines, the phase is distributed to the distribution boxes of each room.
As an example, I show how it was done for me. The first four machines go to lighting, the second four machines go to sockets, and the last three go to split systems and a storage tank. They are not needed at the moment and are therefore turned off. See how convenient everything is.
How to choose an outlet
There are many types of sockets, differing in design and purpose .
Design and purpose of sockets
For use in apartments and private houses, it is recommended to use several types:
- Simple without grounding (Type C 1a) Suitable for operation of simple devices, in operating mode withstands voltage up to 250 W at direct current 10A or alternating current up to 16A
- With two contacts on the sides for grounding (Type C 2a) Suitable for connecting heating columns, boilers, washing machines, microwave ovens, pumps and other household appliances. Power parameters are comparable to previous ones
- Equipped with pin format grounding (Type C 3a) Suitable for connecting more powerful electrical household appliances. Characteristics - the same as C2a
- Type C5 - old-style sockets that can withstand only 6A
- Euro sockets with a protruding body and widely spaced holes for the plug . (Type C 6) are suitable for devices with the same plugs.
Selecting a socket based on installation method
According to the installation method, sockets with external and internal fixation are distinguished. Often the power point is made in the form of a double or a block consisting of several outlets. Exterior - often used in old houses, retro interiors. For safety reasons, it is laid under metal pipes to prevent the wiring from coming into contact with the wall surface. Provides for additional plumbing work. In order not to disturb the visual perception of the retro style, you can install an additional socket next to the main one on one dielectric substrate.
External fixation sockets with open wiring are often used in retro interiors
Choose an outlet according to the style, hiding the wires behind the cover so as not to disturb the overall picture. When using a hidden socket, all wiring is hidden inside the wall - the cable is laid in special grooves - grooves, and the socket with a socket is mounted in a recess specially drilled for this purpose.
Video: How to connect a household outlet
Types of DIN rails
DIN rail is a special metal profile (steel, AL, Cu), which is used as a generally accepted fastening device for installation and dismantling (if necessary) of plug sockets, electric meters, differentiated machines, circuit breakers and other electrical devices.
The rail was named DIN in honor of the German Institute for Standardization, where it was developed. This generalized standard is a basic document that is referenced in the manufacture of electrical devices in almost all countries of the world.
DIN rails are standardized in size and have holes or notches for fastening the product or dividing it to obtain a certain length.
- Rack type Ω. This is a frequently used fastening structure, resembling the letter Ω in a side section. Many modular devices, including panel sockets, are mounted on a TN 35 rail, where 35 mm is the width of the rail strip. To fasten the terminals, similar strips of reduced overall dimensions are used.
- Rail type C. Products in this category are C-shaped. They are widely used for fastening electrical installation products intended for connecting wires (terminal blocks).
- Rail type G. The profile of this product resembles the letter G in appearance. The main area of application is fastening hardware clamps.
Cable selection
To avoid overheating of the wiring and its subsequent failure, it is necessary to observe certain requirements when choosing a cable. For installation in an apartment, a two-core or three-core wire is used. A two-core wire consists of two wires - zero and phase; grounding is not used in this case. The three-core wire allows for grounding. Grounding increases the safety of using electrical wiring and also reduces the risk of electric shock. You can use grounding when adding an outlet in an apartment only if there is a grounding conductor in the area from which you plan to connect a new section of cable.
A two-core wire consists of two cores - zero and phase
Cable material and diameter
Also, when choosing a cable, it is necessary to take into account the diameter of its cross-section and the material from which it is made. In apartments and residential buildings, according to fire safety requirements, it is advisable to use copper cable. Compared to aluminum, copper overheats less and can withstand greater loads. The diameter of the cable used in apartments can be from 1.5 to 3 square millimeters, however, according to the table of long-term permissible current loads for electrical household appliances with a total power of 2 to 4 kW, it is advisable to use a cable with a cross-section of 2.5 square millimeters.
Connecting from an existing outlet
Let's look at one of the easiest ways to add an outlet in an apartment - connect to an existing outlet. This method involves connecting a cable to a new additional outlet from another outlet already in the room. This method can be used when connecting a new outlet only if you do not plan to use high-power electrical appliances. As a rule, in this case a cable with a cross-section of 1.5-2 square meters is supplied. mm, suitable for the use of household electrical appliances with a power not exceeding 2 kW. The use of more powerful electrical appliances can lead to overheating of the contacts, cable failure and poor connection quality.
Total load calculation
In this case, the load must be calculated in such a way that, together with the load of the existing outlet, the total load does not exceed the permissible for the cable and other elements of the electrical wiring laid to this outlet. That is, using this method, you can connect one outlet from another if the total load of both outlets does not exceed the maximum for a given section of the cable. In addition, in this case, you must remember that when connecting a new socket from an existing one, a current equal to the total load of both sockets will flow through the contact terminals of the first socket. That is why the total load of both outlets must not be allowed to exceed the permissible value for one (first) outlet.
Let's say, for example, that the total load of two outlets is 20 A, then for a cable with a cross-section of 2.5 square meters. mm, this load will be lower than the rated load. However, for the socket from which the connection is made, the permissible current is no more than 16 A, therefore this load will be excessive and there is a high probability that the socket will quickly fail if both sockets are used simultaneously.
Connection from distribution box
Another connection method is to connect an additional outlet from the nearest junction box. Before connecting an additional outlet from an existing distribution box, you need to make sure that the section of the electrical cable feeding this box has sufficient load capacity to connect the new outlet.
Example of total load calculation
For example, we need to connect an outlet designed for a load of 10 A. Two outlets with a total capacity of 14 A are already connected to the selected distribution box. The cable leading from the distribution panel to the distribution box we have selected has a cross-section of 4 mm square. The circuit breaker installed to protect this section of the network is designed for a rated current of 16 A.
If you add an additional socket, then the total load of the three sockets will be equal to 24 A. For the wire that supplies power to this junction box from the panel, such a load is permissible. That is, this option for connecting the outlet is acceptable. However, you need to understand that the circuit breaker installed to protect this section of the network will need to be replaced from 16 A to 25 A when the load on this section of the wiring increases. In this case, the circuit breaker will protect the wiring section from overload. However, the outlets are not fully protected, since the current rating for each outlet is 16 A, and the current rating for the circuit breaker is 25 A.
The use of LED strips in apartments and houses
Direct connection from the main distribution panel
The next method involves connecting a new outlet from the main distribution panel of the apartment. This method can be used to connect high-power electrical appliances. And also, if the load capacity of the electrical wiring section or the entire wiring in the apartment as a whole does not allow connecting an additional outlet using one of the methods proposed above.
Advantages of connecting from the main distribution panel
The obvious advantage of connecting an additional socket from the distribution panel is high reliability. This is due, first of all, to the lack of intermediate contact connections. In addition, this method is characterized by a high degree of protection. Because to protect this area, an individual circuit breaker is installed, selected taking into account all permissible parameters for all elements of this network.
It’s clear how to add an outlet in an apartment. However, in all these cases, the required cable cross-section for the new point must be observed. Typically, a cable with a cross-section of 2.5 mm is selected to power outlets in an apartment. sq. However, if you plan to use high-power electrical appliances (directly connected from the panel), then sections of 2.5 mm.sq. may not be enough. Then it makes sense to choose a cable with a larger cross-section.
Creating a loop
Connecting sockets and connecting them is a job for a professional. If you do it without sufficient experience, you endanger your home. Due to the dishonesty of some performers, you cannot blindly trust the hired person - you need to at least know in general terms how to properly connect an outlet and how to connect two outlets. This will allow you to monitor the progress of the task.
The simplest connection is to run pieces of wire (jumpers) from one contact of the socket to a similar contact of the next one. This method is not the best. It is used by inexperienced electricians. Due to connecting the socket to the socket in this way, the terminal of the first device suffers - the entire load passes through it. Because of this, the part fades over time.
To properly connect 2 or more devices, you need to connect the wires in each socket as follows:
- They start from the last cell of the block, and connect the main cable to it. Each of the wires (phase, neutral and ground) is inserted into a special PPE cap and into it are two pieces of the same color. One is connected to the contact group, the other is a jumper, which is brought out into the next glass.
- Subsequent cells follow a similar pattern. The wired jumper is the power cable through which current will be transmitted.
Connecting two or more access points in this way guarantees a longer service life of the entire unit, since the main load passes through the cap connecting the wires.
General rules
When you have chosen one of the methods for connecting an additional outlet. And having also determined its location in the apartment, preparatory work can begin. It must be remembered that wiring and installation of a new socket are carried out only after the network has been completely de-energized. This is done by turning off the machine or traffic jams. To make sure that the network is completely de-energized, you need to use a special indicator. Ideally, you can use two indicators at once. This will help you get error-free results and avoid unwanted consequences.
What to do if a person is electrocuted. First necessary aid to an injured person
It must be remembered that laying electrical wiring and installing a new socket is carried out only after the network is completely de-energized by turning off the machine
If you decide to use a hidden method of laying electrical wiring and installing a socket in a hidden way, then you need to prepare the groove and space for the mounting box for an additional socket. In the case of using the open cable laying method, cable ducts for the new cable are installed, and fasteners are installed to secure the overhead socket.
We remember safety, convenience and aesthetics
It must be remembered that before starting work on installing a new section of cable and an additional socket, you must make sure that the existing cable of another electrical wiring line does not pass through the selected location for laying the wiring and installing the socket. It is also worth considering the convenience of the location of the additional socket and the new cable, so that in the future, if necessary, installing any interior elements on the wall will not interfere with the new socket or so as not to damage the mounted cable.
It is most convenient to place sockets at a height of 0.5-1 m from the floor, but not lower than 30 cm from the baseboard. It is most important to place one outlet for every 6 - 8 square meters of housing.
Block diagram of electrical wiring in the room. Improved. With grounding bus "PE".
Nowadays, in modern new buildings, residual current devices ( RCDs)
, as well as the “
PE
” grounding bus, to which the housings of household equipment are connected via Euro sockets.
This bus is formed in the transformer substation and runs through all the common distribution boards of the house along with the power cable. And from the common switchboard it enters each living space and is connected with a third wire to sockets and to lamp housings. As a rule, this is a yellow wire with a green stripe
.
Now, after the meter, a residual current device such as an RCD
.
If a conventional circuit breaker trips only at high load currents or short-circuit currents, the RCD trips when a
ground leakage current Moreover, this current is no more than 30mA.
For example. For unknown reasons, a washing machine or refrigerator has potential on its body. When you touch the body of a machine or refrigerator, a current will flow through you to the “ground” and “hit” you - but the machine will not work, since the leakage to the body and your touch, in terms of force, do not constitute a short circuit current or a large load current .
If there is an RCD, then when the current passing through you exceeds the threshold of 30 mA, the automatic RCD will work and turn off the voltage, and you will not have time to feel anything.
Socket installation procedure
There is a certain procedure for adding an outlet in an apartment:
- Turn off the power supply, de-energize the room where construction and installation work is being carried out. Use a special indicator to make sure that everything is done correctly.
- Remove the cover from the socket.
- Remove the device by releasing the retaining contacts.
- Connect the wiring to the new outlet.
- Make sure that the wire is not crushed by the limiter; if necessary, enlarge the hole in the wall or in the socket box, adjusting it to the size of the cable.
- Install the new socket in place.
- Make a hole in the cover for the cable.
- Screw the lid into place.
- Run the wiring down to the baseboard, or route it to the desired point, attaching it to the wall in increments of 30–40 cm.
If you have minimal knowledge and the necessary tools, you can add an outlet in the apartment yourself
Having figured out how to add an outlet in an apartment, we recommend that you adhere to safety rules. And also comply with the requirements for the arrangement of the electrical network. This way you can create a reliable system with a long service life. If you have minimal knowledge and the necessary tools, you can do all the work yourself with your own hands.
Electrical wiring diagram. Old fund.
Using one room as an example, let’s look at the operation and wiring diagram of the electrical wiring.
From the main machine, “phase” and “zero” come to the distribution panel, in which the phase is connected to the input of the first machine, and zero to the “zero block”.
Lighting.
The machine with number 1 is designed for lighting. From the output of the machine, the phase conductor enters the distribution box, where at the point ( 1
) connects to one end of the wire coming from the bottom contact of the switch.
From the top contact of the switch, the phase at point ( 2
) is connected to the other end of the wire coming from the lamp.
From the “zero block” the zero core enters the distribution box, where at the point (3
) connects to the second core of the wire coming from the light bulb. And now if you close the contact of the switch, the light bulb will light up.
Preparing tools
Installation of the shield is not complete without power tools. The wires in the walls are laid in grooves, to form which they take a wall chaser or a grinder with a circle on the stone. Small volumes are made with a chisel and hammer.
The cabinet is attached to a concrete or brick wall with dowels, so you will need a hammer drill and drills with pobedit tips. On wooden surfaces, a drill is used, and the screws are tightened with a screwdriver.
A multimeter is needed to determine the electrical parameters of the network and individual devices. They measure electric current, DC and AC voltage, and resistance. A multimeter is used to test fuses, input devices and other devices.
Which method is used most often?
If the owners of the house are sure that no one will come to search them, then they will not additionally mask the left socket or equip the wiring with a starter. You can even make more than one left socket, and run electricity for the whole house past the meter - for this, the cable is inserted before and after it. A switch is placed at the first point and when the circuit going to the meter opens, it will not wind.
The methods for installing left sockets discussed above are the most difficult for energy inspectors to detect, and all other methods are simplified variations of those listed.
Types of protective automation
What kind of lighting do you prefer?
Built-in Chandelier
The machine can operate in manual mode or be triggered when a short circuit occurs in the line. The switching device can be electronic or mechanical; it turns the electric current on and off when an abnormal current indicator occurs.
RCD is a protective device for breaking the circuit when a person touches live parts. The device monitors the leakage current that appears in this case. Protects against fire that occurs when electric current leaks through a faulty wire sheath.
The difavtomat combines an RCD device and a circuit breaker in a box, saving space in the distribution panel. The joint kit is more expensive and does not allow you to see the reason for the automatic blackout. There are models with a flag indicating the cause of the malfunction.
Choice for home and apartment
Based on the number of phases, an RCD is selected depending on the type of line - for single-phase they install the appropriate device, for 380 V they buy a three-phase one.
They produce RCDs with rated current values of 16, 25, 40, 63 A. Such indicators indicate the amount of current that the module will pass without turning off. The RCD is not equipped with overcurrent protection (overload, short circuit), so it is combined with a circuit breaker. The parameter is indicated on the back of the instrument housing.
Expert opinion
Viktor Pavlovich Strebizh, lighting and electrical expert
Any questions ask me, I will help!
A DIN rail is provided for mounting automatic breakers, while there are places on the metal strip where these devices are placed using special clamps. If there is something you don’t understand, write to me!