Electrician in the house
Encyclopedia about electricity from A to Z
Masters catalog
Find the best master or company in your city
We change the wiring in a Khrushchev building
The old wiring diagram in the Khrushchev building is not capable of handling modern loads. And in many cases its service life has already expired. Therefore, its complete replacement during apartment renovation is the only right decision.
And following our advice, you can change it without any problems without involving professionals. And what is very important, your wiring will comply with all necessary norms and standards and will not lead to a fire.
- Calculation of wiring and selection of apartment power supply circuit Calculation of electrical wiring
- Choosing an apartment power plan
- Hidden wiring installation
Why does a Khrushchev apartment need to replace the electrical wiring: three main reasons
As a rule, people think about the condition of electrical wiring only when problems arise. But if you live in a Khrushchev-era building, you shouldn’t expect any problems. We need to get down to business as quickly as possible. Because these houses are, in principle, very old. Most of them are more than half a century old. And the main reasons to urgently get down to business, in particular, are the following:
- Insulation that has become unusable . If we talk about cables in PVC insulation, their service life is no more than 25 years. But in Soviet times, such “long-lasting” isolation was not yet known. Rubber insulation was widely used back then. Moreover, its durability was half that of PVC insulation.
- Availability of aluminum cores. Due to the specific properties of aluminum, it was prohibited from being used in household electrical wiring. Moreover, this ban has been in effect for almost two decades.
- Significantly increased power of household electrical equipment . When designing Khrushchev apartments, the developers proceeded from the fact that the only appliances residents would have at their disposal were radios, televisions, refrigerators and irons. As a result, the appropriate cable cross-section was selected. That is, one that is completely insufficient at the present time.
If your apartment still uses aluminum wires, remember that their contact connections require regular tightening. And it’s better to do this at least annually!
The reasons listed above are quite sufficient motivation to change the electrical wiring in your Khrushchev without delay. Moreover, it is better to use the VVGng-LS cable and the like.
Lighting system wire cross-section
Surely, you yourself understand that lighting fixtures place the least amount of stress on apartment electrical wiring. Therefore, a wire cross-section of 1.5 mm2 is quite sufficient for a standard apartment in an apartment building. However, when laying the wiring, you should be absolutely sure that the total load of each lighting group does not exceed 3.5 kW. Due to the traditionally low load, all apartment lighting, as a rule, is reduced to one group, served by a 1.5 mm2 cable.
A wire cross-section of 1.5 mm2 is quite sufficient for wiring that supplies power to lighting fixtures
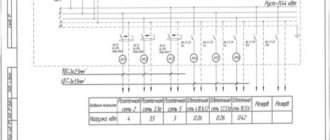
So, to summarize, I’ll just remind you of the bare numbers. Most often, the cross-section of wires in a city apartment is:
- input cable – 3×10 mm2 (single-phase network), 5×2.5 mm2 (three-phase network);
- electric stove (hob) – 3×6 mm2 (single-phase network), 5×2.5 mm2 (three-phase network);
- rosette groups – 3×2.5 mm2;
- lighting devices – 3×1.5 mm2.
However, I must emphasize the phrase “most often” that I used. If you initially plan to install very powerful devices in your apartment, then before laying the electrical wiring you should make the necessary calculations so as not to make a mistake in choosing cables of the required cross-section. The best option is to contact a professional electrician.
In which structural elements of Khrushchev can you look for wiring?
Khrushchevka is one of the types of panel houses. Wiring in such houses, as a rule, is laid through special channels that are located inside the panels. Moreover, these channels are not made during construction. They are provided for by the design of the slabs themselves. A typical arrangement of such channels can be seen in the following figure:
If you look closely at the diagram above, you will notice that the arrangement of the channels does not meet modern requirements. That is, there is no question of the currently required verticality and horizontality: some of the canals are arranged obliquely.
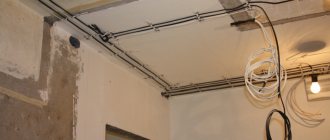
But the wiring in the Khrushchev could be laid not only in intra-panel channels. It could be placed, in particular, in beams located under the ceiling. That is, in those protruding structures that sometimes existed at the junction of the walls and the ceiling slab.
However, in addition to wiring, you should also find distribution boxes. Because without them, wiring is almost unthinkable. Some boxes may be open. They protrude slightly above the wall surface and are covered with a plastic cover. But there are also closed boxes, that is, plastered.
If you don’t notice any protruding boxes, you’ll have to look for hidden ones. That is, you will need to remove the wallpaper. Moreover, you will even have to tap the wall along the entire ceiling corner. The presence of a junction box will tell you the typical sound of emptiness. Once the box is found, the plaster hiding it is usually broken open.
A similar search is carried out in the ceiling slab. Because it also has channels for laying wiring.
To make it easier for you to find channels and junction boxes, let us clarify the following points:
- the electrical diagram of apartments is usually determined by the number of rooms;
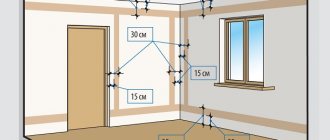
- each living room has from 2 to 4 sockets (their number is determined by the area of the room) and a lamp;
- if the room is small, that is, if its area does not exceed 10 m2, then there can only be one outlet.
Lifetime
Wiring does not last forever, so you should understand that it will need to be replaced again after a certain amount of time.
Aluminum wiring lasts no more than 20 years, and the service life of copper wiring is twice as long - 40 years. It is important to know! It is for this reason that when renovating a house, it is recommended to replace all aluminum wiring with copper, as it will last much longer
When constructing new buildings, aluminum wiring is no longer used, but is replaced in old ones. Replacing wiring in Khrushchev is mandatory, since these buildings were built more than half a century ago.
Khrushchev and some nuances of replacing old wiring
In principle, it is better to lay new wiring in the same channels where the old one was located. To make a replacement, it is enough to screw new ones to the old wires and just stretch them. This operation can be seen in detail in the following video:
If the cable cannot be pulled through, it is possible that there is a bricked-up junction box somewhere. That is, the cable is held in place by the plaster. If this happens, you will have to start searching for this box. When you manage to find it and break it, the line can be drawn without the slightest difficulty.
Open way
In this case, the wires go over the walls. But, of course, simply attaching them is not enough - it looks ugly and is extremely unsafe: the wires can overheat, there is a high risk of mechanical damage, and this is fraught with short circuits and fire. You can use a special plinth or boxes.
And if in the case of laying wiring in plaster, the plaster itself serves as an insulating material, then with the open method, “camouflage means” are used - cable channels, corrugated hoses, pipes, special skirting boards or baguettes.
Advantages:
- quick access to all wires, which means easy local repairs;
- the ability to change the layout of points;
- sometimes this option becomes part of the design solution.
Flaws:
Not everyone likes boxes on the walls, and you can’t do without them completely.
Options for laying new lines in Khrushchev
During the renovation of a Khrushchev building, apartment owners, as a rule, use the following options for laying new electrical wiring:
- By gender. If this method is chosen, then the electrical cables are laid under the screed. Moreover, they do this by first placing them in a corrugation. But this method has a rather significant drawback: if the cable fails, you have to break the tie.
- In the baseboards. Retail companies offer a fairly large selection of skirting boards that have a built-in cable channel. In principle, this installation option is good in that users can limit themselves to only a small vertical groove to the location of the new outlet.
- Under a suspended (stretch) ceiling or behind elements of plasterboard finishing . Moreover, as in the previous version, we can only talk about a limited number of vertical grooves. Necessary to power new sockets. However, in fact, this option is more like external wiring. Because the wire, laid in a corrugation, is simply attached to the surface of the corresponding structural element - the ceiling or wall.
Electrical wiring in the kitchen: design and installation rules
The kitchen is the main consumer of electricity in the apartment. Kitchen wiring provides power to household appliances: hoods, refrigerators, microwaves, bread makers, juicers. Ten years ago, kitchen life was managed with a minimum number of mechanized assistants. But modern kitchens are hard to imagine without electrical appliances. High-quality electrical wiring in the kitchen not only ensures their operation, but also prevents short circuits, wire fires, and damage to electrical appliances. How is reliable electrical wiring designed? And what needs to be taken into account when installing electrical elements - wires, sockets, switches?
Replacement of electrical wiring in Khrushchev: 5 main stages
Although the Khrushchev building differs greatly in its performance characteristics from other types of residential real estate, updating the electrical wiring in it has practically no special features. So that you can plan the upcoming work, we suggest following the following sequence of actions:
- Scheme development . To make it more convenient, it is better to carry out the diagram directly on the apartment plan. Directly on it you can mark the location of all elements of electrical equipment. Moreover, this approach will simplify the calculation of the number of sockets, lamps, switches, taking into account the required power.
- Calculation of the cross section of the cores . We have already written about how this is done earlier. Moreover, the wire connecting the electric meter to the junction box must be designed for the maximum load. Because through it power will be supplied to the entire set of residential premises and electrical appliances of the apartment. This point is especially important for multi-room apartments.
- Performing markup. It is perhaps quite clear that the markings allow you to determine the specific locations of lamps, sockets, and switches. Moreover, if there are markings, you can quite accurately calculate the length of the required cable. An estimate for electrical wiring and a purchase list can only be drawn up after the marking stage has been completed.
- Searching for old channels, laying new lines . We wrote above about how to find old channels, perhaps in sufficient detail. If there is a need to lay new lines, then gating may be required. Although, the volume of this operation can be significantly reduced if you resort to installing wiring in baseboards and behind finishing elements (behind plasterboard or behind a suspended ceiling).
- Wiring installation . Electrical installation work is usually completed by checking the circuits for short circuits. Moreover, it is necessary to check each section separately (from each distribution box to each switch, to each socket). At the final stage, the connection diagram for the apartment electrical distribution board is assembled.
Selection of materials
On the choice of materials for electrical wiring of a two-room apartment, you also need to give several recommendations.
To avoid twisting, soldering and other unreliable issues, all connections should be made through terminal blocks. The latter are conveniently located directly in the input panel (VShch), the dimensions of which should allow this.
It is even more convenient to place an electricity meter inside the entrance panel. In this case, there will be no electrical wiring elements on the wall of the apartment hallway, except for a neat panel door, which is also locked.
In addition to the beneficial aesthetic properties of this arrangement, it provides a reliable obstacle for children who may be interested in the electrical equipment of the apartment.
There is no need to worry about the brand of cable for electrical wiring. The main thing is that the diameter of the core is the required size.
It is even preferable to buy domestic products, VVG or PUNP, for example, due to their ease of use, unlike some imported models. In addition, Russian cable will cost less.
What electrical protection elements does any Khrushchev building need?
A particularly pressing issue for Khrushchev houses is grounding. Because in apartments of this type a two-wire electrical network, also called the TN-C system, has always been installed. But people now use much more electrical appliances. As a result, the risk of electric shock increases significantly.
However, there is one significant difficulty here, because changing the power supply circuits of houses on your own is generally strictly prohibited. Because of this, you often have to simply wait until the appropriate re-equipment is carried out by the management or supply company. To speed up the resolution of this issue, you can contact these organizations with a collective statement from the residents of the house.
While your Khrushchev-era building does not have grounding, you can install an RCD in the panel to provide protection from electrical shock in the event of a current leak.
We hope that thanks to the information presented in this article, you already have an idea of how to replace old wiring in a Khrushchev-era building. Moreover, you can do it with your own hands. However, if you do not have experience in electrical installation work, we recommend that you not take risks and contact a professional electrician who will do everything quite competently and safely for you.
Installation of distribution panel
In order to correctly replace the wiring in a panel Khrushchev building, you need to start by installing a new electrical panel. If in new buildings there is a special niche for them, equipped with a power cable, then in Khrushchev houses there is nothing like that. The panel in old houses is installed using a hinged method anywhere. In Soviet-era apartments, the wire can only be installed by drilling a hole and pulling the cable through it into the room.
The phase arrangement in the apartment panel is as follows: the upper part is the neutral terminals, in the center are the circuit breakers, and the ground is at the bottom. The access cable is connected according to the diagram - blue wire to the neutral terminal, yellow to ground, and white to the upper contact of the machine.
Expert advice
Here are some principles of work that help achieve results:
The bathroom switches go to the corridor.
- A separate project is being prepared for low-current systems. Complete protection against interference is provided by separate wiring of low-current and power lines.
- The more outlets, the better. In this case, you can do without extension cords.
- 0.8-1 meter from the floor is the height where installing switches will give optimal results.
- Sockets - at a height of 0.3-1 meter from the floor.
- The circuit is not complete without power points and installation sites for high-strength devices.
- Division into groups.
When repairs are being made, the diagram will become the main guideline, so they keep it with them.
One of the significant points is connecting the wires to each other. For this purpose, installation or distribution boxes are used. A direct version, with terminals and twisting, is also acceptable.
Using wallpaper and plaster to hide wires is a risky move. Otherwise, during repairs you will have to remove the cladding completely. Some electricians choose the option of installing mounting boxes for switches and sockets. Then the connections remain freely available. But cable consumption increases.
Heat shrinking is an option when connecting wires of one outlet line. Terminals with spring mechanisms help to mount lighting networks. There are other options:
- Traditional soldering.
- Crimping.
- Terminal blocks.
When the wires are connected and masked, the electrical installation work will be considered complete. A complete electrical panel has been created. You can change chandeliers or sockets or other similar details at any time. If the work is carried out correctly, then there should be no problems with access. Lighting fixtures and decorative elements are often installed after other stages have been completed.
The main thing is to remember safety rules when working with electricity. Then everything will be in order, and the system will have a long service life.
What is a scheme, how is it built and what is it like?
The concept of a wiring diagram is associated with the involvement of experienced specialists (designers), who draw clear lines of connection points only for them and the installers on standard sheets with stamps and signatures. This approach is correct, since the issue will initially be dealt with by professionals. But, given that you will have to pay a lot for their work, all this work can be done with your own hands, based on current recommendations.
Our readers recommend!
To save on electricity bills, our readers recommend the Electricity Saving Box. Monthly payments will be 30-50% less than they were before using the saver. It removes the reactive component from the network, resulting in a reduction in load and, as a consequence, current consumption. Electrical appliances consume less electricity and costs are reduced.
The electrical wiring plan for an apartment or private house should include five main types of circuits:
- Structural. This is a drawing or, more precisely, a schematic representation of the interconnections of key elements and power supply circuits from the panel, the entrance to the apartment and to the planned or existing connection points (household appliances). For greater information, pointer arrows are used, and the nominal characteristics of the elements (voltage, current, power) are also plotted;
- Functional. This is a graphical representation of the actual electrical connections between elements using the symbols adopted in state standards;
- Principled. This is the most detailed drawing applied to the apartment plan with the designation of all existing network elements from conductors to distribution points (sockets, switches) and consumers (household appliances). It provides the exact locations, dimensions of wiring, junction boxes, busbars for connecting with your own hands;
- Calculated. This is a separate connection diagram for electrical input panels. It displays the circuit breakers used (input, protective), as well as outgoing and incoming electrical wiring. It is the basis for dividing into groups - forming a single-line or group layout with your own hands. Each wire must have a designation of the brand, cross-section and number of cores, and the switch must have a rated operating current;
- Assembly room. This is an authentic display of all electrical, made by hand. The plan indicates the locations of the outputs, the direction of laying the electrical wiring cables, the location of the connecting terminals, and the characteristics of the conductors. In the practice of arranging electrical networks, installation is rarely used, especially if the work is carried out by a professional specialist.
Wiring types
There are three types of electrical wiring:
- Using distribution boxes : the electrical panel is located outside the apartment - on the site in the entrance. A counter with several machines is placed on the panel. From the panel the cable goes to the apartment. Each room has its own junction box. They are connected to the network in series. The general scheme looks like this:
- “Star” - the electrical point is located on a separate cable line and is connected directly to a separate circuit breaker in the panel. Unprofitable in terms of labor costs and monetary expenses for laying cables and wires to each element, purchasing a more powerful reader and a large number of machines
- “Loop” - this wiring method is similar to a “star”. The difference is that on a separate cable that comes from the shield there is not one element, but a group. The diagram looks like this:
Usually several types of wiring are used at once.
How to correctly calculate the load?
When developing a circuit, it is important to determine the maximum power consumption from all appliances in the house. To do this, you need to make a list of all energy-consuming devices and determine their load, summing it up
This list includes absolutely any systems and gadgets, for example, a hair dryer, vacuum cleaner, electric stove or floor heating system.
Related article: Choosing tiles for the bathroom: 5 tips from experienced ones
Then you need to multiply the resulting value by 0.9, since this coefficient takes into account the probability of simultaneous operation of absolutely all devices. Then the resulting number must be divided by the current network load.
Development
The scheme should take into account the need of the inhabitants of a one-room apartment to operate the necessary electrical appliances, electrical equipment, and high-quality lighting.
Sometimes it is necessary to provide for the presence of electric heating and the possibility of installing fire and security alarms.
The development of an electrical wiring diagram in a 1-room apartment can be entrusted to professional electrical engineers, but you can do it yourself using the recommendations given below.
The electrical wiring diagram can be superimposed on the apartment plan. It is recommended to use the symbols established by the ESKD (Unified System of Design Documentation) standards.
Preparatory activities
Selecting the main parameters of the electrical network of your apartment
- The choice of cross-section and material from which the electrical wiring in a one-room apartment will be made, and its layout largely depend on the type of installation and the total power of all connected devices. Therefore, first of all, we should draw up a plan for the location of sockets and the lighting network. In this case, you should be guided by the norms of the “Rules for the Construction of Electrical Installations” (PUE) and basic concepts of convenience.
- Installation of switches in the bathroom is prohibited
- It is prohibited to install sockets without RCD circuit breakers in the bathroom.
- Switches in rooms should be located near the door on the door handle side.
- Sockets in residential premises can be located based on their ease of use. In this case, the recommended values are a height of 0.3 to 1.8 meters.
- Switches are usually located at a height of 0.6 - 0.8 m.
- The next important step is choosing a wiring diagram. The method of open wiring in boxes or hidden wiring in walls can be used. Each of these methods has its own advantages and disadvantages. So the advantages of open wiring include:
- Possibility of installation without making repairs to the room. You simply install an additional box under the ceiling, into which the wiring is subsequently laid.
- Installation time is significantly reduced. So, with the right approach, all the wiring in a one-room apartment can be replaced literally in one day.
- Ease of carrying out repair work and subsequent installation of additional electrical receivers.
- But hidden wiring has several more advantages:
- According to the PUE, significantly lower requirements are imposed on hidden wiring. As a result, it is not always necessary to use additional protection against mechanical and thermal damage. And there is no need to buy additional boxes for it. Thanks to this, the issue price is significantly lower.
- Hidden wiring with the same wire cross-section has slightly higher tolerances for nominally permissible currents and overload currents. This is achieved due to better heat transfer performance.
- Hidden wiring does not spoil the appearance of your apartment at all and does not take up the already small space of the apartment.
- Based on all this, we can conclude that open wiring is chosen only in exceptional cases. For example, when the repair has already been completed, but they forgot to replace the wiring. Or when wall gating is extremely undesirable due to the dilapidation of the building. In other cases, the best option is, although more labor-intensive, the option of hidden wiring.
Calculation of the electrical network of a one-room apartment
- First of all, we need to calculate the rated load of all your electrical receivers. To do this, we use a simplified formula; where P is the rated power of electrical appliances, U is the rated voltage of the electrical network (for a single-phase network it is 220V), and I is the rated current of our electrical network.
- Based on this formula, an electrical appliance with a power of 1 kW consumes a current of 4.55 A. To simplify the calculation and create a certain reserve, we take it equal to 5A.
- When calculating your electrical network, take into account only realistically possible situations of its use with maximum load. You should not rely on the fact that you will connect four 2kW heaters in one room at once. After all, the probability of this is quite low. And the electrical wiring diagram in a one-room apartment will become significantly more complicated and will increase in price from such a calculation.
- Now let's start choosing the wire we need. This should be done in accordance with clause 1.3 of the PUE. But considering that our loads are not large and we do not need ultra-precise calculations, we make an approximate calculation. To do this, we assume that a cross-section of 1 mm2 copper wire has a carrying capacity of 10A, and an aluminum wire has a carrying capacity of 5A.
Note! With a more accurate calculation, taking into account such parameters as the type of insulation, installation method and ambient temperature, the throughput of the wire will most likely be slightly higher. But given our loads, this difference is not so significant and will not have a dramatic impact on the final result.
- The next defining point for us in the PUE is clause 6.2.2. It states that group internal power supply networks must be equipped with circuit breakers with a rated current of no higher than 25A. Based on this, we should divide the loads in the apartment in such a way as to divide them into groups of no more than 25A each.
Note! That to power the lighting network they usually form a group with a rated current of no higher than 16A. Moreover, according to clause 6.2.3 of the PUE, it should not contain more than 20 incandescent lamps or sockets at the same time. And multi-lamp chandeliers are considered as one consumer with the corresponding load.
- Typically, the electrical wiring plan for a one-room apartment can be completed by one or two such groups. After all, 5 kW is quite enough to power it, and division into groups is often done only for reasons of safety and convenience.
Household repair No. 1
Choose reliable craftsmen without intermediaries and save up to 40%!
- Fill out the application
- Receive offers with prices from masters
- Select performers by price and reviews
Post a task and find out prices
One of the stages of repair is laying an electrical network. This type of communication requires replacement over time. It is necessary to take into account a lot of nuances - design and draw up an electrical wiring diagram, choose methods of connecting circuits, type of wiring, comply with all fire safety conditions, etc. It is also necessary to remember that the electrical wiring diagram for different apartments, depending on the number and location of their rooms, will also have its own characteristics.