Installing an outlet network is a responsible operation. Not only comfort, but also safety depends on the quality of the work performed. Everyone remembers how in Soviet-built hotels and apartments, after the plug was removed, the socket fell out of the wall. In addition to the danger of touching live contacts, there was a risk of a short circuit: a metal socket box was in fact the only possible solution in those years. When the socket was skewed or loosened, the contacts often shorted against the steel casing. There is no need to describe the consequences: at best, the plugs burned out. And if a so-called “bug” is installed instead of fuses, then a fire is not far away.
The reason for the problem is simply simple. Cylindrical socket boxes with smooth walls inside could not hold the spacer mounts of the socket.
Today, metal boxes are practically not installed, at least in walls made of non-combustible materials. The only area of application is wooden houses. Only boxes made of materials that do not support combustion are mounted in walls made of timber or logs - ideally made of metal.
But modern metal socket boxes have a different design. The walls have concentric ribs that securely hold the spacer mounts for the sockets.
The boxes are installed in wooden walls just as easily as in concrete ones. Holes are drilled without gaps, the boxes are recessed into them, and fastened with self-tapping screws into the bottom.
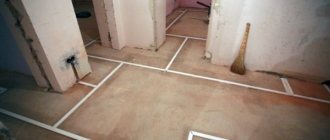
Of course, the power cable is also hidden in the metal; for this it is necessary to cut grooves in the wooden walls. This only applies to hidden installations.
What is a baseboard socket?
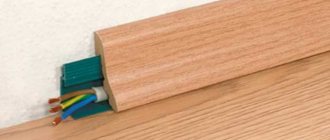
Socket installed on the baseboard
A socket on the baseboard is called a multibox, which is mounted directly to the wall border by inserting it into it or placing it in close proximity. An electrical installation element is used to increase power points in the house during renovations.
Externally, the electrical outlet is almost identical to the standard one. The only difference in the body of the device is that its lines exactly follow the bend of the baseboard in order to perfectly fit the socket into the curb.
Electrical in residential premises
- Electrical installation in the apartment
- Electrician in a one-room apartment
- Electrician in a two-room apartment
- Electrician in a three-room apartment
- Electrician in a four-room apartment
- Electrical installation at the dacha
- Electrical installation in a private house
- Electrical installation in a country house
- Electrical installation in a wooden house
- Electrics in a house made of SIP panels
- Electrical installation in the garage
- Electrical installation in a cottage
- Electrical installation in a townhouse
- Electrics in baths and saunas
- Electrics in the cabin
- Electrician in a panel house
- Electrician in a log house
- Electrician in a stone and brick house
- Replacement of electrics in Khrushchevka
- Replacement of electrics in "Stalinka"
- Replacing electrical wiring in a panel house
- Temporary power supply
- Installation of hidden electrical wiring
- Hidden wiring in a wooden house
Advantages and disadvantages
Installing a plinth with wiring takes less time than laying wires in grooves.
Plinth sockets have a number of positive aspects for the master:
- Using a multibox, you can place additional power points compactly and organically.
- Due to their low location relative to the floor, the sockets are not conspicuous, do not visually cut into a solid wall, and sometimes are completely hidden behind furniture.
- The rich color range of multiboxes gives the master the opportunity to choose the product exactly to match the color of the wall border.
Types of baseboard sockets - All wiring is securely hidden by the cable channel, does not lie on the floor and does not stretch along the walls.
- There is no risk of bumping into old cables in the wall when installing new ones - safety for the master.
- No dusty work.
- The ability to install an additional socket anywhere in the room without being bound to norms and standards when gating walls.
Baseboard sockets also have some disadvantages. These include:
- Moderate impact resistance. If there is frequent mechanical damage, the multibox may crack.
- Accessibility for children. In a house where there are children, it is better not to install such sockets or install them taking into account the placement of high furniture in order to block access to the power point.
- The negative impact of moisture on all wiring due to an accidental flood in the house or a bucket of water spilled directly on the outlet.
You can protect the power point from the baby or water using hard curtains.
What is it for
- A socket for a television cable or Ethernet is installed. In this case, the internal supply wire must bend along a sufficiently large radius. The standard depth is not enough, an increased planting depth is used: 61 mm
- A certain electronic circuit is mounted in the socket box, which is located in an additional volume. Or a non-standard socket or switch module is used. To do this, you need a simple elongated body.
The “extra” 15–20 mm is usually enough to accommodate additional modules. - Another option for using deep socket boxes is to double-purpose the box. Sometimes, to save material and give an aesthetic appearance to the finish, the technology of “invisible” junction boxes is used. To do this, use two-tier socket boxes (you can create such structures under switches).
On the lower “floor” the power cable is disconnected. That is, under the outlet there is a full-fledged distribution box. Of course, in this case the main cable is laid deeper than usual. And the upper tier is used for mounting sockets or switches. Between the cavities there may be a dielectric partition, which can be easily removed if repairs or easy access to the junction box are necessary.
Specifications
Corner socket for baseboard
To mount a socket in a baseboard, you should know its technical parameters:
- Dimensions - 55 x 22 mm or 70 x 22 mm.
- Voltage - 220-250 W.
- Number of phases – single-phase.
- Manufacturing material: plastic.
- Rated current - 16 A.
- Product type: single, double, triple.
There are floor and wall baseboard sockets. The first ones fit tightly to the wall border and the floor. The second ones grab the baseboard and the wall, but do not touch the base of the room.
Varieties
Currently, there are several main types of electrical installation devices for floors:
- simple sockets with a cover that protects the connector from moisture and dust getting inside;
- hatches - built-in structures, more complex and complex, a type of recessed device;
- columns - racks made of a rigid profile with a cavity for placing electrical installation devices inside;
- minicolumns.
Sockets are also divided according to other parameters:
- By color - white, gray, graphite, black, brown, with a pattern to match the finishing material.
- According to the material of manufacture - plastic and metal.
- By the number of connected plugs – from 1 to 12.
- By type of design - retractable, rotary, stationary, built-in devices.
Restrictions for installing sockets on baseboards
Baseboard power points are prohibited in wooden houses.
It is prohibited to install baseboard power points in the following cases:
- Laying wiring in wooden houses. Here, all cables are installed only in an open way, and sockets are used only overhead (external).
- The power point must be accessible at all times. Therefore, you should not install an outlet behind complex technical equipment (gas boilers, ovens, hobs, etc.).
The baseboard socket is installed only when the object is completely de-energized.
Material
Floor plinths for laying cables can be made of different materials. Most often, plastic, wood and aluminum are used for such structures. This determines the main operational characteristics of the plinth.
Plastic structures are mounted at the base of the floor. The cable channel in them is located in the center. Connectors can be routed outside the profile. For this purpose, special output sections are used. The profile rail has separators that allow for laying several types of wires inside the structure.
It is much less common to find wooden baseboards with a cable duct inside for sale. Most often, such products are created to order. Only one wire can be laid inside such a product. It must have a high insulation class. Otherwise, there is a high probability of the wiring catching fire during operation.
Aluminum baseboards are characterized by the greatest fire resistance. It can accommodate many different wires that have high power.
Installation principles
Grinder for cutting skirting boards
To carry out the work, the master will need:
- Perforator for forming holes for dowels.
- A hacksaw or grinder for cutting baseboards. The grinder makes a more even cut.
- A hammer equipped with a hammer.
- Tape measure/ruler and construction pencil.
- Side cutter for removing the braid from the cable.
- Screwdriver.
Also, to install hidden wiring, the master will have to prepare the following materials:
- Wall border (aka plinth), equipped with a cable channel. Its color and height can be arbitrary.
- End caps in the required quantity.
- Cable (three-core for grounding or two-wire - without it).
- Skirting socket (multibox).
It is advisable to take the cable and baseboard with a small margin.
Multibox
The socket box is a box with an adapter at the bottom.
This is a special skirting board that has cutouts for the profile of the wall border. It fits tightly on it. There are different modifications of profiles on sale, so you can choose any multibox for any skirting board.
More often, the cover plate is used to install a regular socket. But it can accommodate outputs for telephone, Internet cables, etc. The multibox is installed as simply and quickly as possible.
Cable channel
Despite the fact that PVC skirting boards often already have a built-in channel, some craftsmen prefer to use separate plastic U-shaped boxes for cable laying. Externally, the channels vary in depth and height, which allows you to lay from 2 to 5 wires in them simultaneously. The top of the box is closed with a decorative lid. The cable channel is laid under the baseboard (except for wooden or frame houses).
Sockets internal and external
Built-in power points are mounted in a multibox, and external ones are used in tandem with a cable channel when laying wiring in wooden houses. If the internal power point can be used on any walls except wood, then there are no restrictions on the use of an external outlet.
Recommendations for location and use
Although this type of electrical fittings has its drawbacks, which are understandable from the above reasons, the ease of installation and use of overhead sockets prevails. They can be installed by most residents without much difficulty.
But at the same time, you should pay attention to the correctness of the actions performed. First of all, it is recommended to think through the possible consequences associated with the installation of such sockets.
After all, they are located on a flat wall surface after the familiar interior has been created in the room. What will be visible is the removable decorative cover. It also performs a protective function. Therefore, it is recommended to choose a location for installation that will allow easy replacement of covers. For example, instead of a round shape, you can eventually put a rectangular one.
But only if the main part with the terminals on which the decorative part will be held allows this to be done. Any protrusion or object in the neighborhood, which did not interfere with the round shape in any way, will turn out to be an insurmountable obstacle for a rectangular lid. You will have to move the supporting structure to the side. There are wires connected to it, which will also need to be repositioned. In a word, problems out of the blue.
Features of installing baseboard sockets
Laying wires in a cable channel
There are a number of rules that should be followed when installing power points on a wall border:
- The plinth is fixed to a flat wall in increments of 0.5 m. If the panel has bends, the fastening spacing is reduced to eliminate the appearance of gaps between the curb and the wall.
- It is better to work with a hammer drill and install dowel-nails directly through the baseboard attached to the panel. This saves time.
- It is better to fill the cable channel with wires by 40%, but no more. Otherwise, overheating of the electrical wiring will occur.
- It is advisable to lay the cable freely, without tension. Sometimes, if the channel cross-section allows, even a small reserve is made.
- If the master installs ordinary overhead sockets close to the baseboard, a grinder is used to make a cutout right up to the box with the wires. This will make it easier to route the cable to the power point. And connecting the outlet to the curb will be neat.
It is better to carry out noisy work with a hammer drill on a weekday from 10:00 to 17:00 to minimize the level of discomfort for neighbors.
Fire safety
Most electrical cables are made of plastic, which raises questions about fire safety. If you don’t take into account the very cheap options on the market, all the rest are made of plastic, which does not support or propagate combustion. More serious material is used. From a fire safety point of view, such an electrical baseboard is an acceptable option.
Electrical safety is guaranteed subject to cable operating conditions
Well, to be sure of fire safety, also take cables with a spare cross-section and in non-flammable sheaths. And it is cables, not wires, when it comes to wiring. There is a difference and not only in price.
Installation of sockets
Depending on which power points will be used, the installation technique changes in some places.
Installation of baseboard sockets
Built-in baseboard socket block
To attach a baseboard with a cable channel to the wall, you need to do the work step by step in the following sequence:
- Remove the protective narrow cover covering the box from the top panel of the border. It is pryed off from the edge with a screwdriver.
- Apply the plinth to the wall and, in accordance with the markings (future location of the outlet), form an insert for the socket box.
- The plinth is secured with dowel nails to the wall.
- Install the multibox.
- Lay the cable and lead the wires to the outlet.
- All that remains is to connect them to the terminals.
Lastly, the top cover of the outlet, the decorative protective strip and the end caps are installed.
Mounting the power point on the wall
Installation of a baseboard socket
In this case, the wires are laid into the cable channels according to the instructions given above. But in the intended installation location of the socket, a small cutout is made on the back side of the baseboard to bring out the cable.
The overhead panel (multibox) is attached to the wall and wire strands are brought to its terminals.
All that remains is to fix the top decorative cover of the power point and place the plugs on the baseboard.
Cable channel on top of the baseboard
If you don’t want to lay the wires under the wall border or the wiring is installed in a wooden house, it’s better to just use a cable channel. The box is fixed parallel to the baseboard with dowel-nails. First, remove the top cover from the channel. After fixing the box, the wiring is laid in it and a protective panel is put on top.
The cable tails are connected to the wall socket.
Prefabricated structures
Almost all manufacturers of sockets and switches offer multi-case solutions made under one decorative panel.
How to install socket boxes in this case? If you install single boxes in a row, you can make a mistake of a few millimeters, and it will be impossible to secure a multi-place structure.
The stores offer various solutions:
- Socket box for double (or more) sockets in one volume.
The advantage of this solution is that the seats for the socket blocks or switches fit perfectly. After installing the socket box, you get a monolithic structure. The disadvantage is that when drilling holes in a concrete wall, more work is done - it is necessary to create an oval recess. In addition, if you install such a block in a thin partition (80–100 mm), you violate the strength of the wall. - Stacked structures. We can say that this is a standard solution for electrical installation. Almost all single socket boxes can be assembled into “garlands” of any number of modules. The main thing is that all elements are from the same manufacturer and from the same series.
- The advantage is that you simply buy a batch of such boxes, and then complete either single or five modules. In addition, the holes in the wall do not require large-scale modifications: it is enough to cut out the passages for the wires with a jumper. There is a drawback, although it is not significant. It is necessary to strictly maintain the horizontal line of the set screws, otherwise it will be difficult to adjust long blocks.
The shape of the boxes is not of fundamental importance. Round socket boxes are easier to install, since the holes for them are drilled with a conventional drill with a crown. However, square-shaped socket boxes are also in demand. If the wall material allows you to cut a rectangular hole without extra costs, install these boxes. They make it easier to accommodate long wires.
In terms of installing sockets or switches, there will be no difficulties. Seats are standard for both round and square shapes.