Many people have thought about the possibility of owning a source of renewable energy in their lives. The brilliant physicist Tesla, known for his unique inventions, who worked at the beginning of the last century, did not make his secrets widely public, leaving behind only hints of his discoveries. They say that in his experiments he managed to learn how to control gravity and teleport objects. It is also known about his work in the direction of obtaining energy from under space. It is possible that he managed to create a free energy generator.
A little about what electricity is
An atom creates two types of energy fields around itself. One is formed by circular rotation, the speed of which is close to the speed of light. This movement is familiar to us as a magnetic field. It spreads along the plane of rotation of the atom. Two other perturbations of space are observed along the axis of rotation. The latter cause the appearance of electric fields in bodies. The energy of particle rotation is the free energy of space. We do not make any expenses in order for it to appear - the energy was initially embedded by the universe in all particles of the material world. The task is to ensure that the vortexes of rotation of atoms in a physical body are formed into one, which can be extracted.
Electric current in a wire is nothing more than the rotation orientation of metal atoms in the direction of the current. But it is possible to orient the rotation axes of atoms perpendicular to the surface. This orientation is known as electric charge. However, the latter method involves the atoms of a substance only on its surface.
REPORT
ROOM Is it okay? ROOM ÑаÑÑ Ð³ÐµÐ½ÐµÑаÑоÑÑ Ñвободной ÑнеÑгии Ñ ÑѰмозаР¿Ð¸Ñкой. RESULTS ¼ виде, в коÑоÑом пÑебÑÐ²Ð°ÐµÑ ÑейÑаÑ.
RESULTS µ µ ¾Ð ´Ð½Ð¾Ð¹ ÑнеÑгии, пÑÐ¾Ð¸Ð·Ð¾Ð¹Ð´ÐµÑ ÑдивиÑÐµÐ»Ñ½Ð°Ñ Ð²Ð µÑÑ. RESULTS The благоÑоÑÑоÑниÑ. RESULTS RESULTS RESULTS. RESULTS. RESULTS µÑ белиÑÑи бега в колеÑе. ROOM ¿ÐµÑно ÑазмÑÑлÑÑÑ Ð½ÐµÑ.
RESPONDENCE, ASSURANCE Ñ" RESULTS. RESULTS е многиÑ, не имеÑÑÐ¸Ñ ÑÑого, вÑглÑÐ´Ð¸Ñ Ð· наÑиÑелÑно. Такой обÑаз жизни - пÑÑÑ Ð² никÑда. RESULTS дÑÑгиÑ. RESULTS the ÑÑ ÑеÑÑÑÑов, RESULTS
RESULTS SOUND. RESULTS RESULTS еÑгии . СÑема, Ñ Ñ Ð¿Ð¾Ð¼Ð¾ÑÑÑ ÐºÐ¾ÑоÑой ÑеловеÑеÑÑво ÑкиР½ÐµÑ многовековое ÑабÑÑво, Ñже запÑÑена. RESULTS.
The amazing is nearby
A free energy generator can be seen in the operation of a conventional transformer. The primary coil creates a magnetic field. Current appears in the secondary winding. If you achieve a transformer efficiency greater than 1, you can get a clear example of how self-powered free energy generators work.
Step-up transformers are also a clear example of a device that takes part of the energy from outside.
Superconductivity of materials can increase productivity, but so far no one has been able to create conditions for the degree of efficiency to exceed unity. In any case, there are no public statements of this kind.
RESULTS
RESULTS ROOM, ROOM RESULTS, RESULTS S. ROOM RESULTS ASSESSMENT. не вÑем.
Ð Ñ ÑеÑ, ÐºÐ¾Ð¼Ñ ÑеÑаÐ" довеÑиÑÑÑÑÑ, бÑаÐ" обÑзаÑеÐ""ÑÑÑÑÐ ²Ð¾ в Ñом, ÑÑо ÑекÑÐµÑ Ð·Ð°Ð¿ÑÑка ап¿¿Ð °ÑаÑа бÑÐ´ÐµÑ ÑоÑÑанÑн. RESULTS. Те, ÐºÐ¾Ð¼Ñ Ð¾Ð½ оÑкÑÑл ÑекÑеÑ, ÑоÑÑанÑÑÑ Ð² Ñайне з нание о Ñом, как запÑÑиÑÑ Ð³ÐµÐ½ÐµÑÐ°Ñ¾Ñ Ñвобод ной ÑнеÑгиР¸. OPTIONAL CONDITIONS RESULTS. RESULTS, RESULTS, RESULTS, RESULTS, RESEARCHES RESULTS I'm sorry.
Tesla Free Energy Generator
The world-famous physicist is rarely mentioned in textbooks on the subject. Although his discovery of alternating current is now used by all of humanity. He has over 800 registered invention patents. All the energy of the last century and today is based on his creative potential. Despite this, some of his work was hidden from the general public.
He participated in the development of modern electromagnetic weapons, being the director of Project Rainbow. The famous Philadelphia experiment, which teleported a large ship with its crew to an unimaginable distance, was his work. In 1900, a physicist from Serbia suddenly became rich. He sold some of his inventions for $15 million. The amount in those days was simply huge. Who acquired Tesla's secrets remains a mystery. After his death, all the diaries, which could have contained sold inventions, disappeared without a trace. The great inventor never revealed to the world how the free energy generator works and works. But perhaps there are people on the planet who have this secret.
RESULTS
RESULTS п¿ÑедмеÑÑ Ñп¿¾Ð¼Ð¸Ð½Ð°ÑÑ ÐºÑайне Ñедко. RESEARCH RESEARCH Ñ Ð¸ÑполÑзÑÐµÑ Ð²ÑÑ ÑеловеÑеÑÑво. RUR 800 RUR 800 RUR в на изобÑеÑениÑ. RESULTS ¸Ñ дней оÑнована на его ÑвоÑÑеÑком поÑÐµÐ½Ñ Ð¸Ð°Ð»Ðµ. RESULTS, RESULTS, RESPONSES, RESPONDENCES Ñокой обÑеÑÑвенноÑÑи.
ROOM "" ¼ пÑоекÑа “ " RESULTS RESULTS RESULTS ело. Ð 1900 "°ÑеÐ". 15 years ago ¸Ð¾Ð½Ð¾Ð² доллаÑов. СÑмма в Ñе вÑемена бÑла пÑоÑÑо огѾмна. RESPONSIVENESS, RESULTS, RESULTS. RESULTS ¾Ð³Ð»Ð¸ ÑодеÑжаÑÑ Ð¸ пÑоданнÑе изобÑеÑениÑ, пÑÐ ¾Ð¿Ð °Ð»Ð¸ беÑÑледно. ROOM RESULTS ной ÑнеÑгии. Ðо, возможно, на планеÑе еÑÑÑ Ð»Ñди, Ð¾Ð±Ð»Ð°Ð´Ð°Ñ Ñие ÑÑой Ñайной.
Hendershot Generator
Free energy may have revealed its secret to an American physicist. In 1928, he demonstrated to the general public a device that was immediately dubbed the Hendershot fuel-free generator. The first prototype only worked when the device was positioned correctly according to the Earth's magnetic field. Its power was small and amounted to 300 W. The scientist continued to work, improving the invention.
However, in 1961 his life was tragically cut short. The scientist’s killers were never punished, and the criminal proceedings themselves only confused the investigation. There were rumors that he was preparing to launch mass production of his model.
The device is so simple to implement that almost anyone can make it. Followers of the inventor recently posted online information on how to assemble Hendershot's Free Energy Generator. The instructions as a video tutorial clearly demonstrate the process of assembling the device. Using this information, you can assemble this unique device in 2.5 - 3 hours.
Does not work
Despite the step-by-step video tutorial, almost no one who has tried to do it can assemble and launch a free energy generator with their own hands. The reason is not in the hands, but in the fact that the scientist, having given people a diagram with a detailed indication of the parameters, forgot to mention several small details. Most likely, this was done deliberately to protect his invention.
The theory about the falsity of the invented generator is not without meaning. Many energy companies are working in this way to discredit scientific research into alternative energy sources. People who follow the wrong path will ultimately be disappointed. Many inquisitive minds, after unsuccessful attempts, rejected the very idea of free energy.
Vortex devices
Transistor generator
When talking about free sources of electricity, it is imperative to touch upon special systems capable of generating heat with an efficiency of more than 100%. This device refers to the previously mentioned Potapov generator.
Its action is based on the mutual vortex influence of coaxially acting liquid flows. The principle of its operation is well illustrated by the following figure (see photo below).
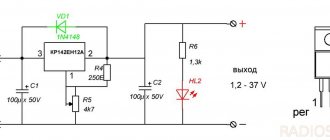
Potapov generator circuit
To create the required water pressure, a centrifugal pump is used, directing it through the pipe (2). As it moves in a spiral near the walls of the housing (1), the flow reaches the reflecting cone (4) and is then divided into two independent parts.
In this case, the heated external part of the flow returns back to the pump, and its internal component is reflected from the cone to form a smaller vortex. This new vortex flows through the internal cavity of the primary vortex formation, and then enters the outlet of the pipe (3) with the heating system connected to it.
Thus, heat transfer is carried out due to the exchange of vortex energies, and the complete absence of mechanical moving parts provides it with very high efficiency. It is quite difficult to make such a converter with your own hands, since not everyone has special equipment for boring metal.
Modern models of heat generators operating on this principle try to use the phenomenon of so-called “cavitation”. It refers to the process of formation of vaporous air bubbles in a liquid and their subsequent collapse. All this is accompanied by the rapid release of a significant amount of thermal substance.
What is Hendershot's secret?
Even during the lifetime of the author of the invention, followers who assembled the device according to his scheme could not launch it. Those who had the opportunity came to the inventor with a request to help launch the device. He didn't help everyone.
And from those whom he decided to trust, he made an obligation that the secret of launching the device would be kept. Hendershot had a good sense of people. Those to whom he revealed the secret keep secret the knowledge of how to start the free energy generator. The device's launch circuit has not yet been solved. Or those who succeeded also selfishly decided to keep the knowledge secret from others.
Acquisition of BTG Andrey Slobodyan
Securely hiding the diagram of his invention from prying eyes, Slobodyan actively sells it via the Internet. Those who can afford to purchase such a toy should remember: a breakdown of Slobodyan’s magnetic generator will leave them alone with the problem that has arisen. No one will repair the device, especially since it has such a big name and high cost. It will also be impossible to obtain intelligible explanations from the inventor. He is limited to sending a handwritten diagram and offers to deal with the defect himself. Moreover, Andrei Slobodyan’s BTG consists of many parts and is assembled abroad. Therefore, searching for the desired element may take time with no guarantee of results.
Magnetism
This unique property of metals makes it possible to assemble free energy generators on magnets. Permanent magnets generate a magnetic field of a certain direction. If they are positioned properly, the rotor can be made to rotate for a long time. However, permanent magnets have one big drawback - the magnetic field weakens greatly over time, that is, the magnet becomes demagnetized. Such a magnetic free energy generator can only serve a demonstration and advertising role.
There are especially many schemes online for assembling devices using neodymium magnets. They have a very strong magnetic field, but they are also expensive. All magnetic devices, the diagrams of which can be found on the Internet, fulfill their role as unobtrusive subliminal advertising. There is one goal - more neodymium magnets, good and different. With their popularity, the welfare of the manufacturer also grows.
Nevertheless, magnetic engines that generate energy from space have a right to exist. There are successful models, which will be discussed below.
Step-by-step assembly instructions
It is necessary to assemble a generator at home after a set of necessary radio components, power tools and materials has been prepared.
Stage 1 - preparation of radio components
To assemble a mechanical generator module with electromagnets, you will need a motor. To make a low-power generator, you can use an electric motor from an Oka, Volga washing machine, an Agidel pump, and others.
The current generated by the motor determines the choice of parts and components. To convert current from AC to DC, rectifier diodes are needed, for example, a high-power diode bridge of tens of amperes with a voltage of no more than 50 V. For DC polar capacitors, smoothing filters with the ability to equalize DC voltage ripple are important.
In order to make a homemade wind generator, you do not need great precision and highly specialized materials. The constructed sample operates at wind speeds from 9 to 10 m/s and provides a power of 800 W.
As an additional board with a USB port for connecting gadgets, a device is selected to convert the voltage to 1.5-20 V. Such a list of radio components is sufficient for a low-power generator with a voltage of up to two tens of volts. In the case of an asynchronous motor, you can connect mobile devices directly.
Stage 2 - preparation of tools and materials
As for power tools, you will need a grinder, the set of which includes cutting discs for metal, wood and a grinding disc (hard or sandpaper).
We recommend that you familiarize yourself with the rules for working with an angle grinder.
You also need an electric drill with metal drill bits. You may need a hammer drill with impact drills and concrete drill bits. Sometimes the hammer drill is equipped with an adapter with simple, conical drills and wood bits. A screwdriver with heads for an adapter-wrench and a head for nuts will also be useful.
Materials will be required to assemble the generator frame. They are chosen at their own discretion. This can be rolled pipes of different diameters, metal fittings, profiles, etc.
When assembling the generator structure, the craftsman should have screwdrivers of different diameters, pliers, a hammer, wrenches, etc. on hand
For connections, they stock up on fasteners - nuts, washers, screws, bolts. This is a universal set of equipment, after collecting which you can start making a generator set with your own hands.
Stage 3 - preparatory work
After preparing the tools and materials, preparatory work begins. They are necessary before assembling the generator because they include an initial calculation of the device’s power.
Power is calculated by connecting the motor to the network. The number of rotations issued will determine the power of the motor. Sometimes a tachometer is used for measurements, and 10% is added to the data obtained to compensate for the load (preventing the motor from overheating during use).
After the power is accurately calculated, the capacitor is selected according to the previously obtained engine power data.
After calculating the power, you need to select a capacitor. The device prevents engine overheating while the generator is running
At the end of the preparatory work, they consider grounding the future generator. This process helps to avoid traumatic situations and extend the operating life of the generator.
Stage 4 - study the star and triangle diagram
To assemble a 220 generator, you need analogue circuits of the production model - star or triangle.
In complex devices, a combined star-delta circuit is sometimes used. In a star connection, the ends are attached to a single point. The graphical view represents the divergence of phases from the center in different directions, as if the rays form a star. According to the triangle type scheme, the ends of one winding are attached to the beginning of the next one.
According to the star circuit, the electrical connection is made for each of the ends of the windings of one point, for a triangle - a series connection.
Stage 5 - assembly itself
Let's consider several options for assembling an electric generator.
Asynchronous generator assembly
The manufacture of an asynchronous generator does not require regrinding the rotor for neodymium magnets, therefore the device circuit is called reworking a finished asynchronous motor. In this option, there is no need to power the rotor winding; it is removed from the engine, and the rotor axis is machined for flat magnets.
According to the assembly diagram of an asynchronous generator, the power of the device reaches from 2 to 5 kilowatts with capacitor capacities from 28 to 138 microfarads. In order for the voltage to be static, a capacitance is required, depending on the planned load on the generator.
Assembly of the unit occurs in three stages. The first involves assembling one supporting structure, installing an engine with a gear-type drive in it.
The connection is made as follows: the end of the 1st winding is connected to the ends of the beginning of the 2nd winding. Next, the end of the 2nd winding is attached to the beginning of the 3rd winding. The end of the 3rd winding is connected to the beginning of the 1st winding
At the second stage, variable and non-polar capacitors are connected to the windings. The latter are connected according to a star circuit, when some of the ends are connected to the center of the body, and the rest are brought out separately.
Finally, the free winding ends are connected to the tops of the capacitor according to the triangle diagram.
We connect variable and non-polar capacitors to the windings, some of the ends of which are connected to the center of the case, others are brought out separately
Before the first launch, a new device is tested, for example, with an ordinary incandescent light bulb of two to three dozen watts. This is necessary to check the generator’s ability to provide uninterrupted voltage output of 3000 rpm.
Assembling a wood-burning generator
Let's look at the assembly of a wood-burning generator using a potbelly stove as an example. The assembly procedure is as follows: first, the radiator is placed on the walls of the potbelly stove so that the spikes point inward. Next, depending on the size of the radiator, Peltier elements are installed, to one of which another radiator is subsequently attached.
It is better to place such an installation in the shade, near an uninsulated wall of small thickness, which will ensure maximum cooling.
To start the generator, logs are set on fire using wood. When they flare up, they heat the walls of the stove, which force the Peltier element to produce maximum power. The generator is cooled by cold street air.
On our website we have detailed instructions for making a wood gas generator with your own hands.
Nuances of assembling a collector generator
A commutator generator is assembled according to the following scheme: first, a commutator-type motor is placed on a supporting frame or other structure.
Then a smoothing capacitor and a DC-inverter converter board are connected to the motor terminals. The capacitor must be DC current.
It is necessary to screw the cartridge to the engine axis, and secure the motor so that the cartridge is pressed tightly to the device. Next, the negative wire of the motor is connected to the negative from the battery, and the positive to the anodes of the diodes, the cathodes of the diodes to the positives of the batteries
The next step, if there is no USB port, is to connect it to the output from the DC board. You can connect mobile devices to such a generator.
The generator design is located on a bicycle frame or windmill.
We install a generator on a bicycle or windmill using fan parts. For ease of use, you can attach a weather vane shank
Instead of a commutator motor, you can install a stepper motor with higher efficiency and a service life of 10 years. It is preferable to choose models with a voltage of 12 V and a current of 1.8 to 4.2 amperes. In such motors there are from 2 to 4 windings, they are connected in series for a voltage of 24, 36, 48 V. If the motor is connected in parallel, then the output amperage is large. In this regard, it will be more difficult for the generator to accelerate to the required voltage.
In addition to these options, we have detailed instructions on our website for assembling a wind generator and a hydrogen generator.
Generator Bedini
American physicist and researcher John Bedini, our contemporary, invented an amazing device based on Tesla’s work.
He announced it back in 1974. The invention is capable of increasing the capacity of existing batteries by 2.5 times and can restore most of the non-working batteries that cannot be charged using the usual method. As the author himself says, radiant energy increases capacity and cleans the plates inside energy storage devices. It is typical that there is no heating at all during charging.
Still she exists
Bedini managed to establish mass production of almost eternal generators of radiant (free) energy. He succeeded, despite the fact that both the government and many energy companies, to put it mildly, did not like the scientist’s invention. Nevertheless, today anyone can buy it by ordering it on the author’s website. The cost of the device is a little over 1 thousand dollars. You can purchase a kit for self-assembly. In addition, the author does not attach mysticism and secrecy to his invention. The diagram is not a secret document, and the inventor himself has released step-by-step instructions that allow you to assemble a free energy generator with your own hands.
RESEARCH
RESULTS еÑÑ Ð² ÑабоÑе обÑÑного ÑÑанÑÑоÑмаÑоÑа. RESULTS. Ток поÑвлÑеÑÑÑ Ð²Ð¾ вÑоÑиÑной обмоÑке. RESULTS 1, 1, 1, 1, 2 CONTROL SMALLERY
RESPONSIBILITY ROOM ÑÑÑ ÑнеÑгии.
OPTIONS ÑÑиÑÑ Ð¿ÑоизводиÑеÐ"ÑноÑÑÑÑ, но ÑоздаÑÑ ÑÑÑÐ" RESULTS, ASSURANCE µÐ²ÑÑала единиÑÑ, пока Ð½Ð¸ÐºÐ¾Ð¼Ñ Ð½Ðµ Ñда валоÑÑÑ. RESULTS о Ñода не ÑÑÑеÑÑвÑеÑ.
"Vega"
Not long ago, the Ukrainian company, which specialized in the production and sale of wind generators, began selling Vega fuel-free generators, which generated electricity with a capacity of 10 kW without any external source. Literally in a matter of days, the sale was prohibited due to the lack of licensing of this type of generators. Despite this, it is impossible to ban the very existence of alternative sources. Recently, more and more people have appeared who want to break out of the tenacious embrace of energy dependence.
"Rега"
RESPONSIBILITY, CONTENTS CONTACT US RESULTS, RESPONSIBILITY ±ÐµÑÑопливнÑÑ Ð³ÐµÐ½ÐµÑаѾÑов «Ðега», коÑоÑÑе Ð²Ñ 10 rubles ºÐ°ÐºÐ¾Ð³Ð¾-лР¸Ð±Ð¾ иÑÑоÑника извне. RESULTS RESULTS - RESEARCHES s ². RESPONSIBILITY, RESPONSIBILITY ROOM RESULTS µÐ¹, желаÑÑÐ¸Ñ Ð²ÑваÑÑÑÑ Ð¸Ð· ÑÐµÐ¿ÐºÐ¸Ñ Ð¾Ð±ÑÑÑÐ ¸Ð¹ ÑнеÑгеÑиÑеÑкой завиÑимоÑÑи.
Battle for Earth
What will happen to the world if such a generator appears in every home? The answer is simple, as is the principle by which self-powered free energy generators operate. It will simply cease to exist in the form in which it exists now.
If on a planetary scale the consumption of electricity, which is provided by a free energy generator, begins, an amazing thing will happen. Financial hegemons will lose control over the world order and fall from the pedestals of their prosperity. Their primary task is to prevent us from becoming truly free citizens of planet Earth. They were very successful along this path. The life of a modern person resembles a squirrel race in a wheel. There is no time to stop, look around, or begin to slowly think.
If you stop, you will immediately fall out of the “clip” of those who are successful and receive rewards for their work. The reward is actually small, but compared to many who do not have it, it looks significant. This way of life is a road to nowhere. We burn not only our lives for the benefit of others. We are leaving our children an unenviable legacy in the form of a polluted atmosphere, water resources, and turning the Earth's surface into a landfill.
Therefore, everyone's freedom is in his hands. Now you have the knowledge that a free energy generator can exist and operate in the world. The scheme by which humanity will throw off centuries of slavery has already been launched. We are on the verge of great change.
Creating a device with your own hands
Obtaining electrical energy in huge quantities without consuming fuel is a tempting and quite feasible idea. The creation of such a device can be considered using the example of the Adams generator. For self-assembly you will need:
- Magnets. The larger the magnet, the more it affects the induction field, as well as the amount of energy generated. For a low-power generator, small pieces are suitable. It is desirable that the sizes be the same. For normal operation, 15 pieces are enough. The positive pole of one magnet must be installed opposite the positive pole of the other. If this condition is not met, then there will be no induction field.
- Copper wires.
- Two coils. You can get them from old engines or wind the wire yourself.
- Sheet steel for making the body.
- Bolts, washers, screws and nails. They are necessary for fastening small elements.
You may be interested in: Color coding of resistors and online calculator
First, the magnet must be secured to the base of the coil. This can be done by drilling a hole in it and then securing it with bolts. The wires on the coils should be 1.25 mm thick and have a layer of insulation. The coils should be mounted on a metal frame so that there are small gaps between the ends. This is required for free rotation of the main element.
At this stage, the device can already be used. It is quite simple to check the correct assembly: you should manually turn the magnets. If the structure is assembled correctly, voltage will arise at the ends of the winding.
This is the most primitive generator, powered by magnets. But based on such a scheme, it is possible to create a device that will be able to provide electricity to the entire house. You can also purchase ready-made devices from trusted manufacturers.