Always check the diagram on the switches! It is quite possible to install such products in the bedroom, for example, if you connect the main light to one key and the secondary light to the other. The main advantage of the product is the ability to turn it on or off from two, three or more points.
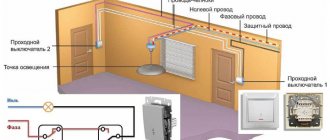
The classic scheme for connecting a pass-through switch from three places requires the use of two pass-through switches and one cross switch. Connection diagram for pass-through switch
In country houses, using a pass-through switch, you can control the lighting of staircases or flights from three places.
Otherwise, all this is fraught with electric shock when replacing the light source.
To do this, you will need two switches like the circuit described above plus one more, but with two groups of contacts. Wear protective insulated gloves that will protect against electric shock.
Now, in more detail, for convenience, let's take four common wire insulation colors: blue, brown and green. The lighting device is turned on when 2 switches are in the same position.
If your hallway or hallway is long enough, you can install a double or even triple pass-through switch. This is precisely why such switches differ from conventional ones, which allows installation to be carried out quickly and without errors.
Connection diagram for pass-through switches from 3 places
Why are pass-through switches needed?
Turning on the lights in a long, dark hallway can be quite inconvenient if there is only one switch located at the end of the room.
The most rational way is to install pass-through switches (another name is cross switches) on different sides of the room. This way you can turn the light on and off immediately after entering the corridor. This is especially true in the entrance of a building, where apartments are located in one line along a long landing, on stairwells, in offices, and industrial premises.
Another option for using this control scheme is a large bedroom with several beds. If you install pass-through switches at each bed, you can turn on the light bulb without getting up. Installation of such devices is justified in dachas, garden plots, and courtyards of private houses. You can turn on the light when leaving the house - after finishing your work, there is no need to walk in the dark.
Types of 3 point switch
Switches from three places are represented by two types of products: pass-through and cross. The latter cannot be used without the former. According to the principle of operation, crossovers are divided into:
- Keyboards.
- Rotary. A rotary mechanism is used to close the contacts. They come in a variety of designs and are more expensive than usual.
Taking into account installation, crossbars are divided into:
- Invoices. Installation is carried out on top of the wall; it does not require creating a recess in the wall to install the block. If finishing the room is not planned, then this option is ideal. But such models are not reliable enough, because they are susceptible to external factors;
- Built-in. Installed in the wall, suitable for wiring work in all types of buildings. A hole in the wall is pre-prepared to the size of the switch box.
Passage
Pass-through switch circuit
In a pass-through switch, unlike the classic model, three contacts and a mechanism are built in that combines their operation. The main advantage of the product is the ability to turn it on or off from two, three or more points. The second name for such a switch is “changeover” or “redundant”.
The design of a pass-through switch with two keys resembles two single-key switches independent of each other, but with six contacts. Externally, a walk-through switch cannot be distinguished from a regular switch if not for a special designation on it.
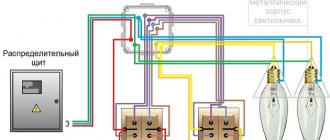
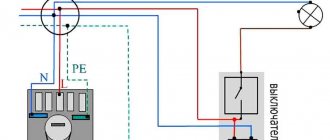
Connection diagram for the pass-through switch wires in the distribution box
Circuit without grounding conductor. Now the most important thing is to correctly assemble the circuit in the junction box. Four 3-core cables should go into it:
- power cable from lighting circuit breaker
- cable to switch No. 1
- cable to switch No. 2
- cable for lamp or chandelier
When connecting wires, it is most convenient to orient them by color. If you use a three-core VVG cable, then it has two most common color markings:
- white (gray) – phase
- blue – zero
- yellow green – earth
or second option:
- White gray)
- brown
- black
To choose a more correct phasing in the second case, follow the tips from the article “Color marking of wires. GOSTs and rules.”
- The assembly begins with neutral conductors. Connect the neutral conductor from the cable of the input machine and the neutral going to the lamp at one point using the terminals of the car.
- Next, you need to connect all the grounding conductors, if you have a grounding conductor. Similar to the neutral wires, you combine the “ground” from the input cable with the “ground” of the outgoing cable for lighting.
This wire is connected to the lamp body. - All that remains is to connect the phase conductors correctly and without errors. The phase from the input cable must be connected to the phase of the outgoing wire to the common terminal of the pass-through switch No. 1.
And connect the common wire from pass-through switch No. 2 with a separate wago clamp to the phase conductor of the lighting cable.
Having completed all these connections, all that remains is to connect the secondary (outgoing) conductors from switch No. 1 and No. 2 to each other. And it doesn’t matter at all how you connect them.
You can even mix up the colors. But it’s better to stick to the colors so as not to get confused in the future. At this point, you can consider the circuit fully assembled, apply voltage and check the lighting.
Kinds
Devices are divided into 2 types based on the mounting location:
Invoices
They are installed directly on the wall and can be used both in a hidden wiring system and when laying cables openly.
Domestic
Designed for installation in a socket box located in the wall. Connect only to internal wiring.
The latter are used as a more ergonomic option. The entire switch body is hidden inside the wall, and the decorative frame and keys are visible from the outside. Overhead models are easier to install because they do not require creating a recess in the wall.
They are used when carrying out major repairs with replacement of wiring is impractical. Both similar and different types of models can work in pairs.
Design and features of pass-through switches
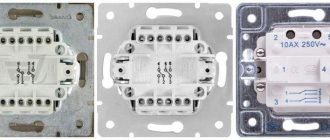
The external pass-through device does not differ from the standard one. The difference can only be noticed when examining the product from below - manufacturers apply triangles on the body, directed horizontally downwards. The second difference is 3 terminals with copper contacts. One is located on top, and two are located below. Also, the pass-through device is switched through a three-core VVG-ng or NYM cable with a cross-section of 1.5 mm².
Depending on the number of buttons, there are two-key, one-key and three-key modifications.
The difference between a pass-through and a regular switch.
In comparison with classic two-pole models, you need to connect the adapter according to the following principle:
- serial connection of switches;
- the phase does not open, but switches to the second line;
- There are more output contacts than input contacts.
The paired poles of the switches are located opposite each other.
Nuances of choice
Before purchasing a pass-through switch, you need to consider:
- Mounting method depends on the type of wiring. Overlays are installed on the surface using self-tapping dowels. Built-in - in socket boxes on spacer legs.
- Degree of protection - models with IP03 are suitable for a bedroom or corridor, for a bathroom - with IP04-IP05, for the street - with IP55.
- Type of contact terminals. Screws with pressure plates are reliable. Screwless spring ones are easier to install.
- Terminal markings - N (zero), L (phase) and ground (ground) are used. The letters I and O indicate the position of the buttons when turned on and off.
According to the type of control, the adapters can be keyboard, touch, or with remote control.
Connecting a pass-through switch
First of all, you need to correctly connect the switch itself in the socket box. Remove the key and the overhead frames.
When disassembled, you can easily see the three contact terminals.
The most important thing is to find the common one. On high-quality products, a diagram should be drawn on the reverse side. If you understand them, you can easily navigate through it.
If you have a budget model, or any electrical circuits are a bit of a mystery to you, then an ordinary Chinese tester in circuit continuity mode, or an indicator screwdriver with a battery, will come to the rescue.
Using the tester's probes, alternately touch all the contacts and look for the one on which the tester will “squeak” or show “0” at any position of the ON or OFF key. It's even easier to do this with an indicator screwdriver.
After you have found the common terminal, you need to connect the phase from the power cable to it. Connect the remaining two wires to the remaining terminals.
Moreover, which one goes where does not make a significant difference. The switch is assembled and secured in the socket box.
Do the same operation with the second switch:
- look for the common terminal
- connect the phase conductor to it, which will go to the light bulb
- connect two other wires to the remaining ones
Changeover switches - lighting control circuit from 3 places
But what if you want to control one lighting from three or more points. That is, there will be 3, 4, etc. switches in the circuit. It would seem that you need to take another pass-through switch and that’s it.
However, a switch with three terminals will no longer work here. Since there will be four connected wires in the junction box.
Here a changeover switch, or as it is also called a cross, cross, or intermediate switch, will come to your aid. Its key difference is that it has four exits - two from below and two from above.
And it is installed precisely in the gap between two passageways. Find in the junction box two secondary (not main) wires from the first and second pass-through switch.
Comments:
Veda
Who used this scheme? Has it worked for anyone?
Vassa
From an electrical point of view, nothing can fail here. Everything is clearly and correctly described. Another thing is that I have not seen devices of this type on sale. It’s quite possible they will be made to order, but I haven’t seen them in the store.
Oleg
Are there any other uses for these switches other than in a long hallway?
Slavon
It seems to me that this scheme is of little use in the corridor. A person usually needs to walk to the end of the corridor and then turn off the light. Most likely, such a circuit for connecting a pass-through switch is best used in the bedroom, where each side of the bed has its own switch to turn on/off the main lighting and another one is located at the entrance. In this case, you can turn the light on/off from all three points
Alex
I once reworked the work of an electrician clown, who tried to fit all the connections from such a switch into an ordinary socket box. As a result, the switch mounted in it squeezed all the wires. In general, I do not advise anyone to repeat this experience. Wiring for pass-through switches should only be done in the distribution box!
Andrey
With the help of pass-through (limit switches, 3-pin) switches, you can solve the switching on and off for only two posts (places). And if you need more than two on/off points, then you need: cross or intermediate (at least 4-pin, switches) switches.
ANDREY
The electrician threw three-core wires, I don’t know that four wires will be needed... Is there really a way to connect it so that the switch works as expected or will I have to look for other models?
Leave a comment Cancel reply
What features does the Legrand switch have and how can you connect it?
We make holes for sockets in concrete and tiles ourselves
How to select and connect a differential machine
Correct and convenient installation of sockets in the apartment
Application of the scheme
In long corridors, pass-through switches are often used. Pass-through models are designed for the convenience of supplying or removing voltage from lighting fixtures from different ends of the room. Most often this scheme is used:
- In a long corridor with exits from different rooms. One switch is placed at the exit, a second one in the middle, and a third one at the end.
- In the courtyards of country and private houses, dachas. Switching devices are installed at the exit from the house and outbuildings.
- In three-story apartment buildings. A device is placed on the ground floor to turn it on. You can turn off the lighting on the second and third floors.
- In a children's room with several beds. The solution provides for one device at the entrance and two next to the sleeping areas.
- Flights of stairs and landings of cottages outside the city. One device is mounted at the beginning of the stairs, switching off is carried out from the second floor or near the attic.
By using a pass-through switch, energy savings are ensured.
Installing a two-key block
When installing an electrical unit of this design, all work is carried out in the same way as installing a single-key device. Almost all two-key models do not require more space for installation and an additional socket box.
All preparatory work described for the example of installing a single-key device is used for installing two-key modules. The phase wire is taken away from the common phase wire, and at the output of each switch one core is attached, which are then led to the lighting fixtures.
Installing a three-key block
A three-key device is installed in a similar way, with the only difference being that the number of wires that will be directed from the switch to the lighting fixtures is 3.
Disadvantages of pass-through switches
One of the disadvantages of walk-through switches is the need to drill walls under them. Organizing a power line with a pass-through switch has several disadvantages:
- time and effort spent on wall slitting for hidden wiring;
- the need to connect the remote control via a regular key for models with motion sensors;
- unprofitability for an apartment due to cable grooves and installation of a DIN rail;
- difficulties with identifying terminals;
- lack of clarity of the “ON” and “OFF” positions.
Experts note that the devices are more suitable for country cottages, dachas, and the private sector than for an apartment.
A pass-through switch is convenient to use in rooms with several groups of lighting fixtures. The device provides comfortable light control and safe movement of people. Currently, the pass-through light switch circuit, controlled from three places, is not tied to the layout of a residential property.
Safety Tips
The power supply is turned off on the panel when operating any lighting devices.
- Use an indicator screwdriver to check the presence of current in the network.
- If the panel is on the landing, post a notice that work is underway and before manipulating the wire, check for the presence of current.
- Wear protective insulated gloves that will protect against electric shock.
- When chipping, protective clothing is used.
Pass-through and cross models are the best solution for organizing lighting in the house. A thoughtful and well-planned layout will ensure maximum comfort in the house. When choosing such devices, you should not save on existing models. Adjusting the light from several independent points means comfort and energy savings. Moreover, such devices will work longer than any motion sensors and cotton switches.
Connection errors
Many people make a mistake at the stage of searching and connecting the common terminal in the pass-through switch. Without checking the circuit, they naively believe that the common terminal is the one with only one contact.
They assemble a circuit in this way, and then for some reason the switches do not work correctly (they depend on each other).
Remember that on different switches the common contact can be anywhere!
And it is best to call it, what is called “live”, with a tester or an indicator screwdriver.
Most often, this problem is encountered when installing or replacing pass-through switches from different companies. If everything worked before, but after replacing one circuit the circuit stopped working, it means the wires were mixed up. But there may also be an option that the new switch is not pass-through at all. Also remember that the lighting inside the product cannot in any way affect the switching principle itself.
Another common mistake is incorrectly connecting crossovers. When both wires are placed from pass-through No. 1 to the upper contacts, and from No. 2 to the lower ones. Meanwhile, the cross switch has a completely different circuit and switching mechanism. And you need to connect the wires crosswise.
Example of lighting operation
- When you turn on key No. 1, the lamp lights up, electricity flows through the phase wire and is indicated by the letter L, and the flow of current is shown by the red line.
- Press the key back and the light goes out.
- We switch the adapter disconnector, the lamp lights up.
- Press the key again and the lamp turns off.
- When device No. 3 is turned on, the lamp lights up.
- Pressing again turns off the lamp.
Recommendation: if it is necessary to increase the number of control points for the luminaire, add the desired number of cross switches between the staircase switches.
Installation of two-key models
In order to regulate the intensity of lighting in a room, as well as for the convenience of turning on electric lighting in different rooms, two-key switch models are used.
Electrical elements are especially often used to regulate the number of switched-on lamps in chandeliers. Two-key models can be either for hidden installation or for open wiring.
The main installation steps for two-key models differ from the steps described above only in the presence of a 3-core wire. A phase wire is supplied along one of the cores, which is connected to the common contact of the switch. The other two are connected to the remaining terminals and are led separately to the lighting fixtures.
Necessary equipment and materials
- Switches
- Mounting box
- Electrical insulating tape
- Terminals
- Phillips and regular screwdrivers
- Installation knife
- Side cutters
- Pliers
- Wrenches
- Electric cable
If the room has already been wired and you need to install redundant switches, then you need to make grooves or open installation of cables. In order to make grooves you will need a hammer drill and a wall chaser. You also need alabaster. He will secure the corrugated pipe. In case of open installation, a distribution box is required; it is attached to the wall using a corrugated pipe.
Step-by-step installation instructions
- Disconnect power to the room.
- Determine where the wires are so as not to damage them.
- Designate the future location of the junction box.
- Install the mounting box.
- Laying electrical cables. It is better to take a 3 or 4 core cable. For changeover devices, a three-wire cable is required. Using one core, a phase supply or a lamp will be connected. Two cores are connected to intermediate wires. For a crossover device, you need a four-core cable - two wires for each switch. Two will lead to the first, and the remaining two will lead to the second.
The ends of all cables are led into the installation box and connected with terminals. And the zero goes to the lamp. To equip a pass-through switch with control from 3 places, you must have skills and an accurate connection diagram. Its presence makes it possible to install a correct and high-quality lighting system. And on its basis you can easily create more complex illumination schemes.
Cross disconnect principle
Diagram of three pass-through switches
For a diagram for connecting lighting from 3 places, a cross switch is often used. It looks like a single-key device in appearance, but there are 4 terminals inside. The device is called a crossover device because it switches two power lines.
The disconnector ensures simultaneous disconnection of switches No. 1 and No. 2. The connection of nodes is also carried out synchronously. The light comes on and goes off as the contacts move.
When organizing a larger number of points, the process of connecting parts inside the distribution box becomes more complicated.