Socket with on/off timer price
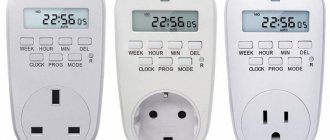
- Brennenstuhl Primera Line socket with weekly timer. Programmable weekly power switch. Maximum number of programs - up to 20. Features: operating mode - weekly, color silver housing, programming step - 1 min., summer and winter time, various combinations of daily repetitions, manual on / off, power 230 V / 16 A (max. 3680 W), mains power – directly from the mains + additional battery (emergency backup). Dimensions (L x H x H) 125 x 65 x 45 mm. Price 1200 rubles.
- Daily socket with feron timer. The daily programmable socket with a feron timer has several programs. Power 3500 W/16A, 230V, applicable for a standard 220-230 V network. Very simple and easy to use. Price 327 rubles.
Review – elektrostandard socket with video timer
To save electricity in the apartment, many people choose a device called a timer socket. With it, you can simply set the time when you need to turn off the lights, lights or other devices. The timer is an ideal solution for those who want to save energy.
Where can they be used?
Programmable sockets are designed for comfort and safety of use. Such models will allow you to fully control electrical appliances: home appliances, showers, computer equipment, and so on. Set on-off intervals, automating work and thereby saving energy in the house.
Such smart devices will be very useful to owners of agricultural farms or home terrariums, where the use of electronic and mechanical devices is extremely necessary. By adjusting the watering and lighting of greenhouses using devices, you can significantly save time and get a good harvest.
Electronic
Using the TM24 model as an example, let's look at how to set up an electronic socket with a timer.
When you turn it on for the first time, you must leave the device in the outlet for 12-14 hours to charge the built-in battery.
Button functions:
This programmer has the ability to configure twenty on and off programs.
As can be seen from the diagram - point 1, it is possible to install the program from Monday to Sunday. That is, it turned on and off at the same time. Setting up individual programs by day of the week from 2nd to 8th point. Combination of the program on weekdays from Monday to Friday, paragraph 9, or only on weekends (Saturday and Sunday), paragraph 10. For six days a week, point 11. Every other day, Monday, Wednesday, Friday, point 12. Tuesday, Thursday, Saturday, point 13. Three days in a row, points 14 and 15.
To start using the outlet, you must first set the current time. You must hold SET for 5 seconds until the day of the week flashes. Use the RIGHT or LEFT buttons to set the desired day. Pressing and holding SET again takes us to setting the clock. Using RIGHT or LEFT we set the desired time. We repeat the same procedure to set the minutes.
Now you can start setting up the program. You can do this as follows:
- Press and hold RIGHT until “1_ON” appears, this is the first timer.
- After this, press and hold SET until the days of the week flash, use the RIGHT or LEFT buttons to select the desired day or combination of days.
- Next, using SET, select the hours and RIGHT or LEFT the desired value, and so on with the minutes.
- Then we repeat the operation while holding RIGHT until the value “OFF_1” appears.
- We repeat the setting similar to the point above, set the day, hour and minutes.
- To exit programming mode, press CLK.
Press the MANUAL button to reset the current program settings to set new parameters. To force the timer to turn on or off, there is a “MANUAL” function, which has three modes: “MANUAL-OFF”, “MANUAL-ON”, “MANUAL-AUTO”. In OFF mode, the timer does not execute programs and is in the off state. In ON mode, the device is in the forced position, and in AUTO mode, programs are executed.
To simulate the presence of a person, there is an interesting RND button on the socket. This function has a floating advance timer that randomly varies from two minutes to half an hour. The time interval is processed taking into account the advance. The switching on of electrical appliances is not strictly tied to a specific minute, which can confuse thieves trying to find out whether people are at home or not.
Instructions for setting the parameters of an electronic socket are provided in the video below:
Setting up the remaining sockets with a timer is no different from the installation algorithm described in the example and should not cause difficulties. Do not forget to change the clock to winter and summer time for more correct operation of the device.
We hope our instructions were clear and useful for you. Now you know how to set up a socket with a mechanical and electronic timer!
It will be interesting to read:
- Setting up a motion sensor for lighting
- There are two phases in the socket - what to do?
- How to save energy in a private home
Setting up electronic devices
The process of setting up electronic models is more complex. Each device is equipped with an instruction manual, which provides the correct time setting scheme.
PHOTO: mcgrp.ru Before setting up, it is important to reset all existing programs
One of the most popular models on the market is the TE-15 digital timer, which is produced by several manufacturers. Its configuration scheme is as follows:
- After turning on, the first thing you need to do is press the reset button and wait until the built-in memory is completely cleared.
- Next, you need to set the current time and day of the week. The first indicator can look like “24” and “12”. The days of the week are named after the first letters of Latin words. The desired parameter is set using the “D+”, “H+” and “M+” buttons.
- The timer has 4 operating modes, which can be selected by pressing a similar key.
- To start programming, you need to press the “P” button and sequentially set the days of the week and the start time. The end of the program cycle will be pressing the “P” key again.
- The next step is to set the days of the week and the shutdown time; confirmation of the action is completed by pressing the “H+” button.
PHOTO: vlt-m.ru When installing such a device inside the panel, you will need the help of an electrician
The user has the opportunity to make adjustments to the settings if an error is made or if there is a simple need to make changes
It is very important to install the timer correctly, since this model is installed directly on the power cable
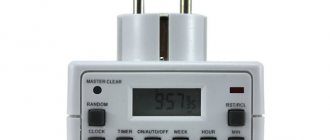
PHOTO: eelp.ru Model TE-15 - one of the popular options for mounting on a DIN rail PHOTO: i.simpalsmedia.com Masterclear - a convenient and simple model for installation in a socket
Setting the Masterclear timer according to the operating instructions
An equally popular model on the market is the Masterclear socket timer. It has a more understandable configuration algorithm, but you should be prepared that all the inscriptions are in English:
- Before starting work, the device must be charged, since it has a built-in battery to save settings. You also need to reset all previous settings by pressing the red recessed button under the display.
- Setting the time is carried out by holding the Clock key and successively pressing Hour (hours) and Minute (minutes). To change the time display format, use the Timer button.
- The days of the week are set in the same way: hold down the Clock button and select the desired period using the Week key.
- To program the on and off cycle, press the Timer button until ON appears on the screen. Next, the required time and days of the week are set.
- Setting the shutdown is done in the same way, but when you press Timer, the word OFF should light up on the screen.
- Exit from the programming menu is done using the Clock button.
PHOTO: image.dhgate.com Setting a timer is a way to save electricity consumption for any appliance
Watch this video on YouTube
Previous Landscaping How to choose the right film for a pond, taking into account the variety of types and characteristics of the coating Next DIY Homius10 things in the house that you only need to remember to clean once a year
Assortment available in stores
| Parameter | Description |
| Brand country | Germany |
| Level of protection from excessive humidity and dust penetration | IP 20 |
| Radio frequency | 433.92 Hz |
| Shortest switching period | 15 minutes |
| Passed current strength | 16 A |
| Power limit of connected electrical appliances | 3500 W |
| Maximum number of starts in 24 hours | 96 |
| Color | White |
| Weight | 150 g |
| Child lock | Present |
| Price | 150 rubles |
Sample model "GLANZEN TG-28 A"
Model "REV RITTER 67074 8":
| Parameter | Description |
| Brand country | Germany |
| Level of protection from excessive humidity and dust penetration | IP 20 |
| Shortest switching period | 30 minutes |
| Passed current strength | 16 A |
| Power limit of connected electrical appliances | 3680 W |
| Maximum number of starts in 24 hours | 48 |
| Colors | White with black or white with blue |
| Weight | 150 g |
| Child lock | Present |
| Price | 250 rubles |
Socket with daily timer “REV RITTER 67074 8”
Model "REV RITTER 66988 9":
| Parameter | Description |
| Brand country | Germany |
| Level of protection from excessive humidity and dust penetration | IP 44 |
| Shortest switching period | 30 minutes |
| Passed current strength | 16 A |
| Power limit of connected electrical appliances | 3500 W |
| Maximum number of starts in 24 hours | 48 |
| Color | Black |
| Weight | 500 g |
| Child lock | Present |
| Price | 380 rubles |
Sample model "REV RITTER 66988 9"
Model "BRENNENSTUHL 1506450":
| Parameter | Description |
| Level of protection from excessive humidity and dust penetration | IP 20 |
| Passed current strength | 16 A |
| Power limit of connected electrical appliances | 3500 |
| Color | Grey |
| Weight | 500 g |
| Price | 410 rubles |
Socket with daily timer “BRENNENSTUHL 1506450”
Model "ELECTRALINE 59502":
| Parameter | Description |
| Level of protection from excessive humidity and dust penetration | IP 44 |
| Shortest switching period | 30 minutes |
| Passed current strength | 16 A |
| Maximum number of starts in 24 hours | 96 |
| Color | White |
| Weight | 50 g |
| Child lock | Present |
| Price | 440 rubles |
Model "REV RITTER 67648 1":
| Parameter | Description |
| Brand country | Germany |
| Level of protection from excessive humidity and dust penetration | IP 44 |
| Radio frequency | 433.92 Hz |
| Shortest switching period | 15 minutes |
| Passed current strength | 16 A |
| Power limit of connected electrical appliances | 3680 W |
| Maximum number of starts in 24 hours | 96 |
| Color | White |
| Weight | 200 g |
| Child lock | Present |
| Price | 450 rubles |
Sample model "REV RITTER 67648 1"
Model "ELECTRALINE 59501":
| Parameter | Description |
| Level of protection from excessive humidity and dust penetration | IP 20 |
| Shortest switching period | 60 seconds |
| Radio frequency | 433.92 Hz |
| Passed current strength | 8 A |
| Power limit of connected electrical appliances | 3680 W |
| Maximum number of starts in 24 hours | 140 |
| Color | White |
| Weight | 50 g |
| Backup time | 100 hours |
| Price | 620 rubles |
Socket with weekly timer “ELECTRALINE 59501”
Model "REV RITTER 67073 1":
| Parameter | Description |
| Brand country | Germany |
| Level of protection from excessive humidity and dust penetration | IP 20 |
| Shortest switching period | 60 seconds |
| Radio frequency | 433.92 Hz |
| Passed current strength | 8 A |
| Power limit of connected electrical appliances | 1800 W |
| Maximum number of starts in 24 hours | 20 |
| Color | White |
| Weight | 150 g |
| Price | 660 rubles |
Socket with electronic timer “REV RITTER 67073 1”
Model "TDM SQ1506-0002":
| Parameter | Description |
| Level of protection from excessive humidity and dust penetration | IP 20 |
| Shortest switching period | 60 seconds |
| Radio frequency | 433.92 Hz |
| Passed current strength | 16 A |
| Color | White |
| Weight | 150 g |
| Price | 670 rubles |
Weekly socket “TDM SQ1506-0002”
Model "REV RITTER 66989 6":
| Parameter | Description |
| Brand country | Germany |
| Level of protection from excessive humidity and dust penetration | IP 20 |
| Shortest switching period | 60 seconds |
| Radio frequency | 433.92 Hz |
| Passed current strength | 8 A |
| Power limit of connected electrical appliances | 1800 W |
| Maximum number of starts in 24 hours | 20 |
| Color | White |
| Weight | 20 g |
| Child lock | Present |
| Price | 800 rubles |
Sample model "REV RITTER 66989 6"
Classification
According to the control method, smart home sockets are divided into:
- mechanical timers (time relays), which are programmed to turn on or off the load at specified intervals;
- sockets with an electronic control unit.
Mechanical and their programming
The operation of the simplest mechanically controlled sockets is similar to the operation of timers built into microwave ovens. The duration of the switched-on state of the socket is determined by the angle of rotation of the control handle. The built-in clock mechanism of the timer works out the set time and turns off the load. Irons, hobs, electric stoves, and other heating appliances are connected to the described type of sockets. Using such a simple device will save energy and prevent fire.
How to use a mechanical device
The industry also offers sockets with built-in mechanical cyclic timers. The current time is set on them and the time for turning on and off the electrical appliance is programmed.
There are smart sockets on sale that are adjusted to a daily or weekly cycle. With the help of such smart sockets, lighting is controlled, simulating the presence of the owners in an empty house. Heating appliances, air conditioners or water heaters are connected to them, which will turn on and off at the selected time and even on the desired day of the week. With the help of such sockets they control street lamps in a country house or in public utilities.
Electronic, automatic, digital: how to use correctly according to instructions
Smart sockets with electronic control units are very diverse, for example, they are designed as timers with a liquid crystal indicator and control buttons. The indicator displays the relay position (on or off), current consumption and wattmeter readings.
The difference between electronically controlled sockets and mechanical devices is the presence of an interface that controls electrical appliances remotely. Smart sockets with electronic filling can be controlled by:
- via infrared port;
- via bluetooth;
- via Wi-Fi;
- via built-in GSM, into which a telephone SIM card is inserted;
- over other radio channels with different types of communication protocols.
Sockets equipped with an IR receiver and a bluetooth module are controlled at a distance of up to several tens of meters. Moreover, in the first case, a remote control from any TV or other household appliance is suitable as a transmitter of control commands. The microchip built into the socket remembers commands received from the IR remote control when “training” the device.
Control via Wi-Fi or GSM allows you to implement the control function from almost anywhere in the world where there is Internet or cellular communication. In this case, you can send control commands and receive information about the state of the connected device, about the electricity consumed, and read the readings of built-in sensors, for example, the air temperature in the room.
A smartphone with an installed application is suitable for the control panel for GSM and Wi-Fi sockets. Manufacturers publish applications in the Google Play and App Stores. The owner of the outlet can download the necessary program there for free. The store you choose depends on the type of phone operating system. The applications have an intuitive interface and a large set of service functions that allow you to implement different load management algorithms.
Any complex system carries certain risks. For example, you cannot be 100% sure that when you leave home, you will turn off the forgotten iron. The phone that serves as a remote control may run out of battery, or “suddenly” run out of money in your account.
How to use sockets with a timer: recommendations for setting them up
All connectors of the same type with a timer have the same device. Therefore, the instructions for setting them up look approximately the same, regardless of the brand and model.
How to use sockets with a timer (mechanical or electronic):
- Electronic devices are configured using buttons located on the body (Timer, Day, Week, On, Off, Auto, Hours, Minutes). Each model comes with detailed instructions that describe this process.
- Sockets with a mechanical timer - to set up, you need to rotate the drum with markings that determine the time interval and cyclicity of the device.
Setting up a mechanical socket with a timer: operating instructions
Mechanical models have the simplest design. Therefore, there are usually no problems setting them up. All devices have a rotating drum with a dial. With its help, all parameters are set.
The easiest to use is a mechanical timer.
The setup process for most mechanical models is as follows:
First you need to carefully study the instructions that come with the device in the box. In it, the manufacturer informs users about the capabilities of the device and tells how to configure it correctly. It is necessary to set the mark on the timer connector to the current time
In this case, the regulator must be rotated very carefully so as not to break it in the process. Manufacturers recommend moving only clockwise
Thus, the likelihood of accidentally damaging the drum is virtually eliminated, which can significantly extend the service life of the product. Then you should set the time when the device will operate (turn off or, conversely, supply electricity to the device). The hour on the dial is divided into equal sections. Most models allow you to set a timer for at least 15 minutes.
After the response time has been set, you can plug the device to be monitored into a power outlet.
Setting up the Masterclear electronic timer: manufacturer's instructions
Masterclear is one of the most popular timing sockets. The high demand for products from this manufacturer is explained by the fact that the connectors have a more intuitive setup system compared to other companies.
Masterclear Dual Socket with On/Off Timer
How to set up a socket with an electronic type timer:
- In order for the specified settings to be saved in the device’s memory, it has a built-in battery. First you need to charge it.
- All previously installed settings must be reset. This is what the red button is for. Usually it is slightly recessed and located under the display.
- While holding down the “Clock” key, you need to set the time. Without releasing this button, press “Hour” to indicate the hour, and “Minute” to indicate the minutes. The Timer key allows you to change the format in which the time will be displayed.
- The days of the week are configured in the same way. While holding down the “Clock” key, the desired parameters are set using the “Week” button.
- To set up a cycle according to which the switching on and off will occur, press the “Timer” key until the message “ON” appears on the screen. After this, the required hours, minutes and days of the week are set.
- The shutdown function is configured in the same way. You just need to wait until the word “OFF” appears when you press the “Timer” button.
- To exit the settings menu, you need to press the “Clock” key.
You can use one of eight built-in programs to set the Masterclear timer
We create a time relay for 12 and 220 volts
Transistor and microcircuit timers operate at a voltage of 12 volts. For use with 220 volt loads, diode devices with a magnetic starter are installed.
To assemble a controller with a 220 volt output, stock up on:
- three resistances;
- four diodes (current more than 1 A and reverse voltage 400 V);
- capacitor with an indicator of 0.47 mF;
- thyristor;
- start button.
After pressing the button, the network closes and the capacitor begins to charge. The thyristor, which was open during charging, closes after charging the capacitor. As a result, the current supply stops and the equipment turns off.
The correction is carried out by choosing the resistance R3 and the power of the capacitor.
Manufacturing with diodes
To install a diode system, the necessary elements are:
- 3 resistors;
- 2 diodes rated for current 1 A;
- thyristor VT 151;
- starting device.
The switch and one contact of the diode bridge are connected to a 220 volt power supply. The second wire of the bridge is connected to the switch. The thyristor is connected to resistances of 200 and 1,500 Ohms and a diode. The second terminals of the diode and the 200th resistor are connected to the capacitor. A 4300 Ohm resistance is connected in parallel with the capacitor.
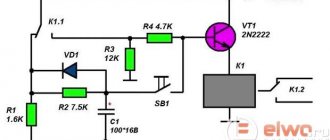
Using transistors
To assemble a circuit using transistors, you need to stock up on:
- capacitor;
- 2 transistors;
- three resistors (nominal 100 kOhm K1 and 2 models R2, R3);
- button.
After turning on the button, the capacitor is charged through resistors r2 and r3 and the emitter of the transistor. At the same time, the voltage across the resistance drops as the transistor opens. After the second transistor opens, the relay is activated.
As the capacitance is charged, the current drops, and with it the voltage across the resistance to the point at which the transistor closes and the relay is released. For a new start, the capacity must be completely discharged; this is done by pressing a button.
Chip-based creation
To create a system based on microcircuits you will need:
- 3 resistors;
- diode;
- TL431 chip;
- button;
- containers.
The relay contact is connected in parallel to the button to which the “+” of the power source is connected. The second relay contact is connected to a 100 Ohm resistor. The resistor is also connected to resistances.
The second and third pins of the microcircuit are connected to a 510 Ohm resistor and a diode, respectively. The last contact of the relay is also connected to the semiconductor, with the execution device. “–” of the power supply is connected to a 510 Ohm resistance.
Using ne555 timer
The simplest circuit to implement is the NE555 integrated timer, so this option is used in many electrical circuits. To install the time controller you will need:
- board 35x65;
- Sprint Layout program file;
- resistor;
- screw terminal blocks;
- spot soldering iron;
- transistor;
- diode.
The circuit is mounted on the board, the resistor is located on its surface or brought out by wires. The board has space for screw terminal blocks. After soldering the components, excess solder is removed and the contacts are checked. To protect the transistor, a diode is mounted in parallel with the relay. The device sets the response time. If you connect a relay to the output, you can adjust the load.
- the user presses a button;
- the circuit closes and voltage appears;
- The light comes on and the time countdown begins;
- After the set period has expired, the light goes out and the voltage becomes 0.
The user can adjust the operating interval of the clock mechanism within 0 - 4 minutes, with a capacitor - 10 minutes. The transistors used in the circuit are bipolar devices of low and medium power of the npn type.
The delay depends on the resistances and capacitor.
Multifunction devices
Multifunctional time controllers perform:
- counting down time in two versions simultaneously during one period;
- parallel counting of time periods continuously;
- countdown;
- stopwatch function;
- 2 autostart options (the first option after pressing the start button, the second – after applying current and expiration of the set period).
To operate the device, a memory block is installed in it, in which settings and subsequent changes are saved.
About the socket with a timer
A socket with an on/off timer is a device that represents a standard socket that is already familiar and familiar to every average person for connecting various devices to the electrical network. Inside the socket itself there is a relay that is responsible for the operation of the timer. It can be either mechanical or electronic.
In the first case, the user is given the opportunity to use the dial to adjust the time intervals of work, and in the second case, the built-in system, perhaps even with a digital display, should be used to set the days of the week, the current time, etc.
Flaws
There are also disadvantages:
- no built-in battery
There is no light in the apartment - the device settings are lost. For example, the water in the boiler may not warm up when you arrive home, but at a completely unexpected time for you.
- large error and dependence of the device response time on the input voltage level
The clock face may move forward or backward several minutes depending on whether the socket is overvolted or undervolted.
- due to the large dimensions, when connected to a carrying case or a double socket, the second socket becomes inaccessible
Instructions for setting up a mechanical socket with a timer -
You can choose a similar outlet for yourself and check out the current prices for them on Ali here.
What types of sockets are there with a timer?
Now we will take a closer look at what exactly smart sockets are. There are two main types with different types of control: mechanical and electronic.
Mechanical - the simplest sockets with a timer, the time in which is set using a special drum. Such models can operate automatically for a maximum of 24 hours, which is why they are also called daily. Mechanics, as you understand, do not provide the capabilities available to electronically controlled models. Therefore, here the on and off intervals are clearly cyclical: let’s say 10 minutes after 10 minutes, and there can be a certain number of such cycles, depending on the functionality of the model. There is no way to set parameters.
Electronic - this type of control gives much more opportunities to customize the automation. The most common models allow you to program actions ahead for a whole week. There are also more advanced models with a longer programmer life of a whole month or even more. Depending on the functionality, you can set the timer for any time on and off. Let’s say 1 hour in the morning, half an hour in the afternoon and 2 hours in the evening, so with different variations throughout the week. At the same time, some models of smart relays that work with a group of electrical appliances can control each element in the system separately, that is, turn on watering the lawn at a certain time, adjust lighting, activate pumps and much more.
Rating of popular models
Model E.Next e.control.t11
The leading places in the rankings are occupied by German devices from Theben. They have proven themselves to be reliable, durable and high-quality devices.
Theben Timer 26 is available in a regular and waterproof housing with IP44 rating. These are simple electrical sockets that signal the end of the cycle with a characteristic click. They are silent, made of durable and high-quality material. The disadvantages include the lack of light indication. The price of a regular device is 1,800 rubles, with protection against dust and moisture – 3,000 rubles.
The domestic model E.Next e.control.t11 has European quality, despite the low price of 400-500 rubles. Has minimal functionality. The maximum current is 16 A. Additional options are available for E.Next e.control.t14 with electronic control.
Budget devices include another domestic development, Feron TM22/61925. Costs about 700 rubles. The characteristics are not the most reliable; the seller’s warranty is only 14 days. The parameters are standard - 16 A, the presence of an electronic programmer for a week, an LCD display.
Electronic
Electronic sockets with a timer come in two types:
- daily allowance
- weekly
The daily allowance has the same principle as the mechanical allowance.
But weekly ones can be customized to suit your individual work schedule for all seven days, including weekends. Therefore, such sockets can be recommended to owners of country houses and people who often go on business trips. Electronic sockets are programmed for 140 on-off operations. There is a so-called presence function. Through it, the lighting in your apartment will turn on spontaneously throughout the day.
Most models have built-in batteries inside. They allow the clock mechanism of the socket to operate even without mains voltage. If the voltage suddenly disappears in your home, the previously set program is saved and the device works as if nothing had happened.
After purchasing a timer, immediately plug it into a power outlet. The batteries must be charged within 15 hours. Only after this the device is ready for use.
For the convenience of users, paired sockets are produced. One of which works constantly in normal mode, and the other through a timer. An example of such a design is the Expert E-TE model.
Its characteristics:
- minimum on-off time interval - 1 min
- number of timers – 10
- 24/7 programming system
- operating temperature – from minus 10 to plus 40 degrees
- degree of protection – IP20
In fact, timer sockets are programmable electronic switches.
Please note that electronic models have functions for changing winter and summer time. Therefore, when setting and setting the clock during a certain period of the year, be more careful.
Mechanical
The simplest ones are mechanical. They have plastic sectors around the perimeter of the dial. By clicking on them, you can set the desired operating time of the device.
Each sector segment is divided into 15 or 30 minutes (depending on the brand of outlet). Thanks to this, a maximum of 96 programs can be set per day.
Setting up a mechanical outlet
- set the checkbox to the current time on the socket
The timer rotates clockwise; it cannot be rotated in the opposite direction due to a mechanical limiter. You can break all the insides.
- press the plastic sectors for the period when the device should turn on and work
- turn on the socket and connect the plug of the equipment being configured through it
- the device is ready for use
There are mechanical sockets with a timer and a different type, similar to those found in washing machines. By turning the lever you set the timer for a certain shutdown time.
Mechanical type sockets can operate continuously without a timer; for this they have a lock button on the side.
The maximum power that can be connected through such devices reaches 3.5 kW. Some unscrupulous manufacturers exaggerate these data. Therefore, I do not recommend immediately connecting the maximum possible load. Especially considering the fact that they will work without your presence and supervision, and the contacts inside are not so thick.
It should be noted that mechanical sockets are only available in daily versions. This means that the same program will work the same way throughout the day. The next day the cycle will repeat.