Almost all residents of apartment buildings know how poorly the sound insulation of sockets is done. These areas of the room become a place for extraneous sounds from neighbors to penetrate. To improve the comfort of life, residents have to independently eliminate this shortcoming of the construction process.
Soundproofing can also be done to prevent the penetration of foreign odors, for example, tobacco smoke. This can be done in several ways, by moving the outlet to another location or laying soundproofing material. You can use an alternative method - use a surface-mounted socket, replacing the built-in one.
Additional insulation of sounds and noise in the apartment
Paying maximum attention to the soundproofing of walls, floors or ceilings, room owners simply forget about the process of soundproofing in the openings for sockets and switches. Meanwhile, such an oversight threatens to nullify all work on soundproofing housing. Why is it so necessary to install insulating materials in sockets and switches, at what stage can they be carried out, and is it worth doing it yourself? 5% of premises in new buildings have soundproofed sockets. Speaking of old panel houses, this figure is “0”.
Common mistakes
Soundproofing sockets is associated not only with increasing the comfort of housing, but also with ensuring safety when working with electrical wiring. Therefore, violations and errors in this case can lead to serious consequences. The main and dangerous errors are:
- Failure to comply with safety precautions when dismantling sockets.
- Use of polyurethane foam and other materials with low and fire-resistant properties.
- The absence of a solid gasket in the hole when using wet mixtures to soundproof the through hole and the presence of a socket in it on the opposite side of the wall.
- The use of conventional sealants that do not provide resistance to high temperatures and do not have soundproofing properties.
- Installing hidden sockets in walls with frame and frameless insulation without the use of soundproofing sockets and boxes can reduce the overall level of sound insulation.
Why do they do this?
Many apartments in high-rise buildings are built in such a way as to minimize the load of interior walls on the supporting structures of the house. Also, in order to save money, a through socket is often used for several rooms or apartments at once. In this case, isolation is not used, and, as a result, neighbors live in different rooms, but even know about each other’s conversation. In order to create comfortable conditions, as well as in view of other advantages, measures are taken to soundproof sockets, including.
Other advantages and objectives of soundproofing a wall socket connector:
- Preventing the smell and smoke from smoking from entering the apartment.
- Establishing the process of air microcirculation, which is important in rooms with centralized air outlets.
- Preventing insects from neighbors, spiders and cockroaches.
Causes
Let's start with the fact that when installing hidden electrical wiring and installing built-in electrical installation products, you drill holes with a crown.
In any case, this makes the wall thinner and leads to a deterioration in the soundproofing properties of the walls and partitions in the apartment. Particular discomfort is caused by poor sound insulation in the bedroom if this room borders on neighbors.
What are the reasons for strong audibility in high-rise buildings? In Khrushchev and panel houses of other years of construction, the design of the panels provides for the presence of channels for wires and through holes for installing sockets and switches. They are needed to speed up the construction process and reduce operations when performing electrical work.
For your information, the thickness of the slabs is usually 12-16 cm, which means that you have a permissible depth for installation of electrical installation products and sound insulation of 6-8 cm.
It so happens that there is a small window from your apartment to your neighbors - that’s where the sound comes from, and in bad cases the wind also blows, an unpleasant odor is heard, bacteria enters, and so on.
In private homes, problems arise with street noise - barking dogs, passing cars, etc. And the need to soundproof sockets arises when soundproofing walls and ceilings, in particular when subsequently covering the walls with plasterboard.
How to soundproof an outlet in an apartment with your own hands
You can carry out work on soundproofing a hole in the wall yourself in several ways:
- moving an already built-in socket;
- installation of an overhead socket or replacement with a new invoice;
- installation of a soundproofing layer without replacement or transfer.
The transfer method is carried out both in old residential buildings and in new buildings. Used when it is necessary to change the space or subsequent zoning during redevelopment. The transfer will improve ergonomics while increasing comfort. Since the sockets are different, the methods for soundproofing them differ.
Through
A socket that is installed in one wall between two rooms or apartments and has one hole is called through. Panel houses face this problem and conflicts often arise between neighbors. Therefore, it is important to soundproof the through socket and do it efficiently.
For example, using construction foam to blow in and secure a niche is impractical and ineffective for several reasons:
- foam has low sound absorption and sound insulation;
- the material is not resistant to high temperatures;
- the swollen foam will probably pass through the holes, getting to the neighbors, hardly anyone will like this;
- foam weakly eliminates drafts.
Therefore, the use of fiberglass, cement mortar or basalt cardboard will be much better.
To carry out the work, you should pay attention to glass wool, it is the most practical, and its soundproofing properties perfectly absorb sounds. When soundproofing an outlet with mineral wool, you should do the following manipulations:
- Cut a circle with a diameter of 50 mm, and it is worth calculating the diameter of the circle so that it is 2-3 mm. Wider than the hole being processed in the wall
- Press the circle of mineral wool tightly with your fingers, inserting it into the depth of the hole.
- If the gap between the neighboring rosette is less than 5 cm, take 10 mm of basalt cardboard, having previously cut out 2-4 circles from it.
- Next, work is carried out to install the socket box and socket.
Building slabs made of reinforced concrete for high-rise buildings are 12-15 cm thick. With a depth of immersion into the hole of 8 cm. Of these 8 cm, 4.5 will be filled by the installation box. This should be taken into account when filling the opening with soundproofing material.
Hidden with niche
If you need to soundproof a hidden outlet, you should decide on the option for its subsequent location. If you need to change the location, then noise insulation is carried out with transfer. Otherwise, no transfer.
When you need to replace a built-in outlet with a surface-mounted one, it is important to be patient. For the correct sequence of work, fill the recess in the wall with the solution, wait for it to dry, and only then install a new socket. If you want the new outlet to be hidden, you first need to make a groove at the base of the wall for the wiring and outlet.
The nature of the methods and materials used for soundproofing inter-apartment outlets is determined by the capabilities of the apartment owner: basalt materials, rolled materials, corrugated cardboard or mineral wool. The process of laying the material is similar to the algorithm given earlier.
Invoice
Installing an overhead socket allows you to hide most of it, including the wires, but a decorative cover without holes will be visible deep in the wall. Soundproofing work will help reduce noise by 70%.
To make a surface-mounted socket, you need to drill holes next to the existing ones, make a container in the wall according to the size and lay the wire, covering it with a special cover. An external socket is installed in houses with open wiring; it is an outdated option and is used more often for vintage style.
Sequence of work:
- de-energizing the socket;
- removing the box (socket box) from the previous nest;
- laying soundproofing material in the hole, preferably basalt wool, corrugated cardboard or plasterboard;
- installation of the socket box and socket in the previous place.
Safety precautions
Work with sockets involves electrical wiring and therefore, first of all, must be carried out in accordance with electrical safety requirements. To do this, the following steps must be performed:
- De-energize the apartment by turning off the electricity supply from the distribution panel or from the meter.
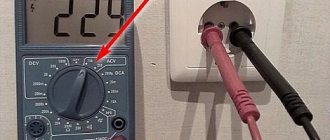
- Make sure the power is turned off using an indicator screwdriver or multimeter.
- Only after the instrument readings show no voltage can you begin to dismantle the outlet.
- After the socket box is removed and the wires are disconnected from the terminals, they must be carefully wrapped with electrical tape.
- When using wet construction soundproofing mixtures to prevent water ingress and short circuits, it is necessary to protect the neighbor's outlet. This can be done by installing a plastic gasket. To protect your outlet from moisture, you must wait until the mixture has completely dried before continuing to work.
- If possible, warn neighbors about the work if the hole is through. In this case, you can protect yourself if you use your neighbor’s outlet during installation work.
In general, it is advisable to have skills in handling electrical wiring or invite a specialist to carry out such work.
The best materials for do-it-yourself soundproofing a niche
To ensure maximum noise insulation from neighbors in the outlet, it is worth using materials that absorb the largest percentage of noise.
Based on the nature of sound absorption, materials are classified into porous, membrane, and perforated. According to appearance and technology - roll, tile or liquid. The sound insulation index Rw (or airborne noise) is an integral characteristic applied exclusively to the frequency range of about 100-3000 Hz. In addition, this range is designed to assess noise of a domestic nature: conversation, music, TV. It is noteworthy that the higher the airborne noise value, the higher the noise insulation of a particular type.
To choose the right material, you should pay attention to the degree of sound absorption:
- mineral wool and membrane materials – sound absorption 80-95%;
- cork covering – 70%;
- gypsum – 60%;
- corrugated cardboard in one layer - 40%, the more there are, the higher the sound insulation.
Basalt wool and cardboard
Mineral wool or thick cardboard are professional building materials that allow you to achieve a high degree of sound absorption. The quality of sound insulation will be high, and the expensive cost of the material is compensated by fire safety. A piece of basalt material is also cut out with a margin of 2-4 mm larger than the diameter of the socket. During installation, slightly compress the material from the edges, then insert it into the desired hole for the socket.
Plasterboard and gypsum fiber sheets
A simple and inexpensive option is to use drywall. To carry out the work, you will need the remainder of the previously used material, which was used to level, for example, walls or partitions. The material does not allow sounds, dust, dirt, or foreign odors to penetrate.
Membrane materials
Acoustic boards are among the materials that are most often used for soundproofing walls in music schools. Synthetic binders with fibrous fillers (in this case, glass mineral wool) have an average density of up to 140 kg/m3, covered with a decorative coating layer. They are also often used as finishing material for ceilings, lobbies or concert halls, and radio studios. Sound absorption coefficient - 50-2000 Hz with a thickness of 0.40-0.47 (tensile strength 0.3-0.4 MPa). Since such material is not sold in small quantities, it can be used to soundproof in case of residues when soundproofing a large area.
Loaded Vinyl
The soundproofing membrane, whose thickness is only 3 mm, is loaded vinyl, has excellent soundproofing properties, is easily attached to the surface, and replaces several centimeters, for example, of the same fiberglass. If you need to soundproof a thin partition wall between rooms or a through socket, then this material is most relevant.
Thermosound insulation (TSI) is also considered an effective material. It reduces acoustic sound by four times and vibration noise by 12 times.
Application of the solution
If you don’t have any of the above materials at hand, use the optimal soundproofing method - cement-sand mortar or
special soundproofing putty.
In this case, you will need to strengthen the base of the socket box, tighten the wires, and fill the resulting containers with liquid solution. After complete drying, finishing and decorative work is carried out.
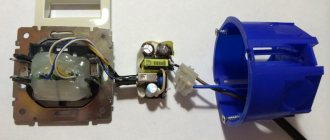
Special ready-to-use soundproofing socket boxes of the “SoundGuard” and “TichoBlock” types are sold. Such inserts are a rectangular or square-shaped frame of the socket box, which is made from multi-layer cardboard. This cellular cardboard is filled with quartz sand mixed with silicone filler.
Window.
Few people know that through the windows not only the noise of the street or traffic intersection, but also the sound from your neighbors’ home theater can penetrate into the apartment. If you replace old frames with modern metal-plastic structures, the problem will be solved very quickly. But sometimes minor edits to the old stuff can give a more effective result. It should also be noted that very often one can hear complaints that after dismantling a wooden window for metal-plastic ones, some types of extraneous noise become more audible. The reason for this is the so-called “masking effect”, which was created due to street noise.
Advice: To soundproof an old structure, first of all you should replace the glass, which was previously 4 mm thick with thicker, modern ones - 5-6 mm. Immediately after dismantling, coat the frame structure with transparent silicone sealant. The installed window must be strictly in size. Place the glass tightly into the silicone seam, then press it with glazing beads and remove any protruding excess.
It is very important to attach a special rubber seal around the entire perimeter of the sash, which has a section in the shape of the English letter “D”. Today on the construction market you can find a great variety of different seals for such purposes.
If, after the operations performed, the window sash closes with force, then it is better to seek recommendations from a carpenter, who will determine in which places the layer of wood needs to be removed.
Before installing metal-plastic windows, you need to understand that thicker double-glazed windows (3 glasses) do not provide higher sound insulation compared to standard single-chamber options with the same total glass thickness.
| Note. We advise you not to use drywall when leveling slopes, due to the fact that resonance phenomena in the air can reduce the noise insulation index of the window structure. It is correct to use cement mortar for these purposes. |
What materials cannot be used to soundproof sockets?
Experts are unanimous on one thing - the use of construction foam for soundproofing or fixing sockets is unacceptable.
Even fireproof foam cannot withstand temperatures exceeding 90 degrees.
In addition, you should not use ordinary corrugated cardboard for sound insulation, which is also a fire hazardous material.
Do not confuse corrugated basalt cardboard with regular cardboard. The latter ignites when shorted, creating a fire hazard in the house.
If they want to soundproof a room, homeowners forget about the need to insulate sockets that transmit noise and extraneous sounds from neighboring apartments. Therefore, when installing new outlets or repairing old ones, it is important to pay attention to the quality of the work. If necessary, you can take ready-made blocks for socket boxes, or carry out the work yourself using the most convenient materials.
Peculiarities
The use of reinforced concrete panels in construction requires the presence of holes and slots in them for laying cables and installing sockets, switches, etc. But the specifics of reinforced concrete do not allow such an installation to be performed with maximum accuracy. The result of this can be through holes in the walls, providing excellent passage through them not only for sounds, but also for foreign odors.
Of course, according to building codes it is necessary to soundproof such openings, but in practice this is done in only 5% of apartments. Therefore, in order to create adequate recreational conditions, it is advisable to take measures to soundproof the sockets. This can be done both during repairs and without it. The complexity of such work lies in the need to work with electrical wiring, which requires certain skills and compliance with safety precautions. To avoid serious consequences, it is better to trust such work to specialists.
Soundproof socket boxes
Ready-made soundproof socket boxes for 1-5 posts with a thickness of 35 mm or more are available for sale. Most socket boxes are made of non-combustible materials, and some come with Le Grand mounting boxes already built-in.
Material
Remember that even small cracks and holes can lead to a significant reduction in effect. Soundproofing sockets during renovation work allows you to eliminate “vulnerable” spots and achieve maximum acoustic comfort in your home!
If you need high-quality sound insulation and professional installation, please contact us! Our specialists will put together proven circuits that will reliably protect you from the noise of your neighbors. The visit of a specialist for measurements and consultation is free in Moscow and the region!
Walls
If you decide to soundproof the walls, then when choosing a soundproofing material and installation method, you need to take into account what kind of noise is bothering you, then, based on these conclusions, make a decision about soundproofers and the method of their installation.
Before you begin decorating your apartment with sound insulation yourself, you need to consult with specialists and craftsmen in this field, and then begin the work.
Insulating materials
Sound insulator – plasterboard. In itself it is a sound insulator, but for a more effective effect a structure 10 millimeters thick is made with a sound insulation gasket. The most important point here is that a gap of at least 4 centimeters must be left between the wall and the sheathing for filling with liquid fiberglass and mineral wool.
Soundproofing panels, which consist of several layers, they have the second name “sandwich” and their thickness ranges from 5.5 cm. They are very heavy and soundproofing from these materials is rarely used in apartments.
Sound insulator – mineral wool. The laying thickness starts from 40 cm and has good sound insulation properties. But at the same time, there is a significant drawback - in winter, condensation appears, which will lead to fungal formations and cotton wool is recommended for use outside the room.
Sound insulation – basalt wool is resistant to rot and has fire-fighting properties.
Cork sound insulation is a sheet of 0.8–1 cm, it is used as a decorative finish. It is precisely because of these properties that cork sheets are very popular among sound insulation, but do not forget that it not only absorbs noise, but also reflects it, so it is recommended to cover the walls with cork sound insulation on both sides.
Polystyrene foam is poor sound insulation, although many people think differently. In fact, this material perfectly retains heat, but not sound.
Might be interesting
Carrying out work
In order for soundproofing the walls in an apartment with your own hands to give the desired result, you need to prepare the surface strictly following the rules:
- fill all holes and cracks in the walls;
- Fill sockets and switches with fiberglass, foam rubber or foam plastic, then cover them with plaster;
- eliminate all seams between pipes;
- increase the thickness of floors using sound insulation.
The most effective is frame sound insulation; the material for it should be purchased in reserve so that it is enough for the entire surface, since if there is not enough soundproofing material when filling, then there will be no result.
Let's look at a step-by-step diagram for installing thin sound insulation or how to make frame sound insulation:
- In order to carry out high-quality soundproofing of the apartment, it is necessary to carry out the appropriate preparations, as mentioned above, and turn off the electricity.
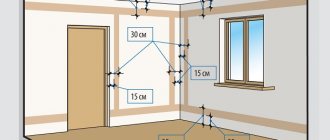
- The profile is installed according to the level in increments of 40 to 60 cm, retreating from the wall so that there is space left for laying the soundproofing layer.
- Sound insulation is placed closely and secured with special anchors.
- All joints are insulated with putty or polyurethane foam.
- The tightness of fastening of all metal profiles and sound insulation is checked.
- Plasterboard sheets are attached to the top of the laid sound insulation using self-tapping screws.
- The surface of the joints is puttied and covered with a decorative coating. Such coatings include: wallpaper, paint, decorative plaster, etc.
Preparatory stage
It is possible to provide effective and reliable protection from sounds only if inexpensive sound insulation of the walls in the apartment is carried out in accordance with all requirements. If constant sounds come from the wall, then you need to work with the side surfaces, on top, then on the ceiling, and the floor below is noiseless. The best insulation option is to treat all surfaces, but such work requires a significant investment. It doesn’t matter whether one wall or all surfaces are being prepared, only by following the recommendations can you get the expected effect.
The preparatory process begins with sealing cracks and chips. In most cases, it is through cracks in the walls that sounds come into the room, so their treatment is a mandatory process. Also an important stage of preparation is the processing of sockets and switches. The holes are treated with soundproofing material. The main requirement for preparing sockets and switches is to adhere to safety precautions. Budget soundproofing in an apartment is possible if all requirements and rules are met.
The next stage of preparation is soundproofing heating and water pipes. Those points where the pipes come into contact with the wall must be treated with foam or a special elastic sealant. After all the preparatory processes have been carried out, economical sound insulation for the walls is installed.
Soundproofing of joints, windows and doors
Soundproofing of joints between slabs is carried out using conventional putty mixtures. All detected cracks and defects must first be widened using a screwdriver or chisel. Then the cracks are cleaned of dust and sand, primed and covered with putty. When the putty mixture has dried, the surface of the joints is covered with acrylic sealant.
Modern double-glazed windows with triple glazing technology protect well from noise from the street. All gaps between the wall and the glass unit must be carefully insulated with polyurethane foam. If the window has lost its seal, it should be re-foamed and sealant applied. If necessary, PVC platbands and flashings are installed.
The doorway is insulated around the entire perimeter with special rubber gaskets. The space between the opening and the door frame must be sealed with a cement-based solution.
Multi-level ceiling with a bend, a niche and a cornice
Hello to all specialists. Here I found in the wilds of the Internet one ceiling option that I’m crazy about. Here he is:
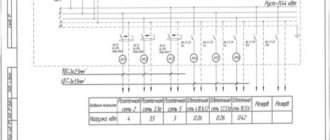
I made a tentative drawing based on my room dimensions:
in a circle looking down M1-M3 - lamps in a semicircle looking down P1-P3 - lamps in a line looking down. 1) Because According to the drawing, on the left there will be a niche of 15 cm, and the center of the main circle is located in the center of the room, then to eliminate antisymmetry, I made another linear level on the right of 16 cm. How correct will this be from a design point of view? 2) Red, blue and green colors the lines show the trajectories on which the lamps will lie. 3) The dotted black trajectory of the circle shows the eaves side. - And here is the main question: