For many years now we have been using conventional incandescent lamps to illuminate our homes, apartments, offices or industrial plants. However, every day electricity prices are rapidly rising, which forces us to give preference to more energy-efficient devices that have high efficiency, long service life and are capable of creating the necessary luminous flux at minimal cost. These devices include 220-volt LED lamps, the advantages of which we will try to fully reveal in this article.
Attention! This publication provides examples of circuits powered by a life-threatening voltage of 220V. Only persons with the necessary education and permits are allowed to assemble and test such circuits!
The simplest scheme
A 220 V LED lamp is one of the types of lighting lamps in which the luminous flux is created by converting electrical energy into luminous flux using an LED crystal. To operate LEDs from a stationary household 220 V network, you need to assemble the simplest circuit shown in the figure below.
The circuit of a 220-volt LED lamp consists of an alternating voltage source of 220–240 V, a rectifier bridge for converting alternating current into direct current, a limiting capacitor C1, a capacitor for smoothing ripples C2 and LEDs connected in series from 1 to 80 pieces.
Principle of operation
When an alternating voltage of 220 V of variable frequency (50 Hz) is supplied to the LED lamp driver, it passes through the current-limiting capacitor C1 to a rectifier bridge assembled from 4 diodes.
After this, at the output of the bridge we receive a constant rectified voltage required for the operation of the LEDs. However, to obtain a continuous light output, it is necessary to add an electrolytic capacitor C2 to the driver to smooth out the ripples that occur when rectifying the alternating voltage.
Looking at the design of a 220-volt LED lamp, we see that there are resistances R1 and R2. Resistor R2 is used to discharge the capacitor to protect against breakdown when the power is turned off, and R1 is used to limit the current supplied to the LED bridge when turned on.
The most common mistakes in connecting a chandelier
Errors during installation and connection occur not only among novice electricians; even among experienced specialists, it often happens that the chandelier does not shine at all the way it should. These mistakes are typical and banal.
Incorrect connection of double switch
This is the most common mistake, which consists in connecting the incoming phase wire to one of the output contacts of the switch. With such a connection scheme, the chandelier cannot function normally, since one section of the lamps turns on only if voltage is applied to the other section. That is, if the incoming phase is connected to the left contact of the switch, when the left key is pressed, the phase enters the distribution box through the lower input contact and turns on one section of the lamps. The next time you press the right key, another section is turned on. But when you open the left key, all sections are turned off.
When the left key is pressed, it is impossible to turn on the right key.
The reason for the dependence of the right key on the left is that initially the phase entered through the input contact of the left key switch, and the left key, when turned off, breaks the phase in both sections at once.
To eliminate this error, you should swap the connections of the incoming and outgoing phases of the switch.
Instead of a phase wire, a neutral wire passes through the switch
According to the rules of electrical installations, there is a procedure for connecting a switch that closes and opens the circuit by breaking the phase. How does it look on the diagram? The neutral wire, bypassing the switch, is laid from the distribution box directly to the neutral wire of the ceiling lamp. The phase wire from the junction box passes through the switch key, which breaks the circuit.
However, in practice, sometimes an incorrect connection occurs: it is not the phase wire that passes through the switch, but the neutral wire. That is, when the switch key is turned off, the electrical wiring remains energized, despite the fact that the lighting is not on. This is fraught with the possibility of electric shock when replacing a lamp, if you accidentally touch the exposed parts of the chandelier shade, or if the insulation of the wire is broken.
Therefore, if possible, it is advisable to eliminate such a connection error.
This violation of the connection diagram can be detected using a voltage indicator, which, when the switch is in the “off” state, shows the presence of a phase on the ceiling wires.
Incorrect connection diagram for the neutral wire of the chandelier
This error is the reason that only part of the light bulbs in the chandelier turn on normally, the rest either shine weakly or do not turn on at all. As previously discussed, if there are three wires, the phase wires are each connected to a separate section of light bulbs, while the neutral wire is common to all light bulbs, which are all connected to it in parallel. If you mix up the wires and connect the interconnected light bulbs, say, of the first section to zero instead of the phase, and connect all the light bulbs of both sections to the phase (instead of zero), then when you press the first key in the first section, the light bulbs will turn on, since they go there at the same time both zero and phase. When you press the second key in the second section, the light bulbs will not light, since both incoming wires will be phase, and in order for the light bulb to shine, a phase with zero must be supplied to it at the same time.
Circuit with active current limiter
In this version of the circuit, the current-limiting element is resistance R1. Such a circuit will have a power factor or cos φ close to unity, unlike previous options with a current-limiting capacitor, which are a reactive load. The disadvantage of this option is the need to dissipate a significant amount of heat on resistor R1.
To discharge the residual voltage of capacitor C1 to zero, resistor R2 is used in the circuit.
Connecting a chandelier to a double switch
This connection method is used when connecting a three-arm chandelier or a ceiling lamp with more than three lamps. This type of chandelier allows you to regulate the level of illumination in the room and, moreover, allows you to save on energy bills. If you want to install a chandelier of this particular modification, when purchasing, pay attention to the number of wires coming out of it: there must be at least two phase wires, not counting the ground and neutral wires.
Your home electrical wiring should also be done accordingly: three wires from a double switch are connected to the chandelier mounting point. One of the wires is a neutral wire, the other two are phase wires passing through different keys in the switch.
The connection diagram for a chandelier with a double switch allows you to step by step adjust the level of illumination in the room.
- Divide the wires from the chandelier lamps into two sections.
- From each section, connect one twist to the neutral wire.
- Connect the two remaining twists separately to the phase wires.
As a result, with this connection you will get three different lighting modes.
Installation of LED lamps for 220V AC circuits
LED light bulbs consist of the following components:
- Base (E27, E14, E40 and so on) for screwing into the socket of a lamp, sconce or chandelier;
- Dielectric gasket between the base and the housing;
- A driver on which a circuit is assembled to convert alternating voltage into a constant voltage of the required value;
- A radiator that serves to remove heat from the LEDs;
- A printed circuit board onto which LEDs are soldered (sizes SMD5050, SMD3528, and so on);
- Resistors (chips) to protect LEDs from pulsating current;
- Light diffuser to create a uniform light flux.
Compliance with safety rules when connecting a chandelier
Working with live parts always involves a certain amount of risk. Connecting a chandelier to a home is no exception, and the work is done at height. To protect yourself and others during electrical installation work, you must follow the following safety rules:
- Carefully study the instructions for connecting the chandelier.
- The power tools used in the work must be in good working order, especially with regard to the insulating parts of the tools.
- Equipment for climbing to heights - stepladders and other devices - check for reliability and stability of the structure.
- Before starting work, stop the power supply by turning off the circuit breakers in the electrical panel.
Published by ProspektGroup on 07/09/2017 07/09/2017
When purchasing LED luminaires for private or enterprise use, questions often arise about how to connect them to an existing network.
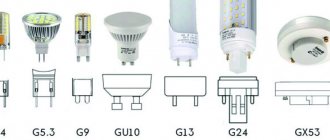
Similar lamps from three manufacturers may differ in connection from each other, namely, have different sets of connecting elements. All LED lamps are divided into 7 types:
> office – built into the ceiling of the “Armstrong” or “grigliato” type; > downlight – round recessed luminaires; > track - lamps on a busbar; > wall and ceiling lamps ; > industrial ; > outdoor – with installation on a console (pipe); > spotlights .
Each type of LED lamp has its own distinctive features and performance characteristics, in which the connecting terminal plays an important role. Let's look at the most popular types of terminal blocks used in the production of LED lamps . We will supplement each of the points with pictures and connection diagrams.
How to connect 220 volt LED lamps
The biggest trick when connecting 220 V LED lamps is that there is no trick. The connection is exactly the same as you did with incandescent lamps or compact fluorescent lamps (CFLs). To do this: turn off the power to the base, and then screw the lamp into it. When installing, never touch the metal parts of the lamp: remember that sometimes careless electricians can pass zero through the switch instead of a phase. In this case, phase voltage will never be removed from the base.
Manufacturers have released LED analogues of all previously produced types of lamps with a variety of sockets: E27, E14, GU5.3 and so on. The installation principle for them remains the same.
If you bought an LED light bulb designed for 12 or 24 Volts, then you cannot do without a power supply. The light sources are connected in parallel: all the “pluses” of the light bulbs together to the positive output of the power supply, and all the “minuses” together to the “minus” of the power supply.
In this case, it is important to maintain polarity (“plus” to “plus”, “minus” to “minus”), since the LEDs will only emit light if the polarity is correct! Some products may fail if polarity is reversed.
Attention! Do not confuse a DC power supply (power supply) with a transformer. The transformer produces an alternating voltage output, while the power source produces a constant voltage.
For example, you have furniture lighting in the kitchen, wardrobe or other place, made up of 4 halogen lamps with a power of 40 W and a voltage of 12 V, powered from a transformer. You decide to replace these lamps with 4 LED lamps of 4–5 W each.
Attention! In this case, it is necessary to replace the previously used transformer with a 12 V DC source with a power of at least 16–20 W.
Sometimes such LED lamps for spotlights are in most cases equipped with a power supply at the factory. When purchasing such lamps, you should also consider purchasing a power source.
Precautionary measures
When connecting LED lamps yourself, you should take basic precautions. The basic safety rule is to carry out work only after turning off the power supply to the premises. To do this, you need to turn off the corresponding “machine” in the electrical panel.
Before starting installation, be sure to check that there is no 220V voltage on the wires using a special indicator. For greater safety, use dielectric rubber gloves. If an external inspection reveals a mechanical defect in the lighting device, then you should not use it due to a possible breakdown of the electrical insulation.
It is better to carry out work at heights with the help of a strong stepladder, rather than a dubious chair/stool with wobbly legs.
After completing the installation operations, we recommend checking the correctness of the implemented circuit and the reliability of all connections. Incorrect connections lead to a short circuit in the electrical network. Therefore, attention and attention again!
How to make a simple LED light bulb
In order to assemble an LED lamp, we need an old fluorescent lamp, or rather its base with a base, a long piece of 12 V LED strip,
and an empty aluminum 330 ml can
To power such a lamp, you will need a 12 V DC source of such a size that it can fit inside the can without any problems.
So, now the production itself:
- Wrap the ribbon around the jar as shown in the picture.
- Solder the wires from the LED strip to the output of the power supply (PS).
- Solder the IP input with wires to the base of the lamp base.
- Securely secure the source itself inside the jar, having previously cut a hole large enough to allow the power source to pass inside.
- Glue the can with tape to the base of the body with the base and the lamp is ready.
Of course, such a lamp is not a masterpiece of design art, but it is made with your own hands!
Installation tools
During the installation process, you will need high-quality tools and materials. It is necessary to prepare pliers, wire cutters (side cutters), a regular and indicator screwdriver with well-insulated handles.
Wago clamp-type terminal connectors are optimally suited for interwire connections. Standard plastic screw terminal blocks will cost a little less.
A roll of insulating tape will probably come in handy. To strip the cores from the insulation, it is better to purchase a specialized device - a stripper.
The main malfunctions of 220 volt LED lamps
Based on many years of experience, if a 220 V LED lamp does not light, then the reasons may be as follows:
Failure of LEDs
Since in an LED lamp all the LEDs are connected in series, if at least one of them goes out, the entire lamp stops lighting due to an open circuit. In most cases, LEDs in 220 lamps are used in 2 sizes: SMD5050 and SMD3528.
To eliminate this reason, you need to find the failed LED and replace it with another one, or install a jumper (it is better not to abuse jumpers - as they can increase the current through the LEDs in some circuits). When solving the problem using the second method, the luminous flux will decrease slightly, but the light bulb will begin to shine again.
To find a damaged LED, we need a low current power supply (20 mA) or a multimeter.
To do this, we apply “+” to the anode and “–” to the cathode. If the LED does not light up, it means it is faulty. Thus, you need to check each of the lamp LEDs. Also, a failed LED can be identified visually; it looks something like this:
The cause of this failure in most cases is the lack of any protection for the LED.
Failure of the diode bridge
In most cases, with such a malfunction, the main reason is a manufacturing defect. And in this case, the LEDs often “fly out”. To solve this problem, you need to replace the diode bridge (or bridge diodes) and check all the LEDs.
To check the diode bridge you need a multimeter. It is necessary to apply an alternating voltage of 220 V to the bridge input and check the voltage at the output. If it remains variable at the output, then the diode bridge has failed.
If the diode bridge is assembled on separate diodes, they can be unsoldered one by one and checked with a device. A diode must pass current in only one direction. If it does not pass current at all or does pass it when a positive half-wave is applied to the cathode, then it is out of order and requires replacement.
Poor soldering of lead ends
In this case, we will need a multimeter. You need to understand the circuit of the LED lamp and then check all the points, starting with the input voltage of 220 V and ending with the LED outputs. Based on experience, this problem is inherent in cheap LED lamps and to eliminate it, it is enough to additionally solder all the parts and components with a soldering iron.
If the number of wires in the chandelier and on the ceiling do not match
It may turn out that the chandelier you purchased has three wires, but there are only two wires on the ceiling where the chandelier is mounted, and the switch, accordingly, is single. Or vice versa. The algorithm for connecting a three-arm chandelier to a single switch looks like this:
- Connect the neutral wire of the chandelier to the neutral wire on the ceiling.
- In the terminal block of the chandelier, install a jumper between the phase wires or clamp them in one terminal and connect them to the phase wire on the ceiling.
With this connection scheme, it will no longer be possible to regulate the light level.
In the opposite situation, when the home electrical wiring has three wires (two phase and one neutral) and a double switch, and the chandelier has only two wires, the connection is made in the following sequence:
- Using a voltage indicator, you need to determine the neutral wire and connect it to any of the wires on the chandelier.
- Clamp the other two wires (phase) into one terminal, or install a jumper.
ATTENTION: In such a situation, you should definitely check all three wires with an indicator so as not to accidentally short-circuit the network if the third wire is not phase, but neutral. This, unfortunately, also happens.
Where to buy a lamp
You can resolve the issue as quickly as possible in the nearest specialized store. The optimal option, in terms of price-quality ratio, remains purchasing from the AliExpress online store. Mandatory long waits for parcels from China are a thing of the past, because now many goods are in intermediate warehouses in destination countries: for example, when ordering, you can select the “Delivery from the Russian Federation” option:
| Nieuwe MR16 GU5.3 High Power LED Flood Light 6W 9W 12W | LED lamp Ampoule, E14, E27, GU10 | LED lamp with Bluetooth, E27, E14, GU10, RGB |
| LED spotlight E27, GU10, E14 | LED lamp for home | LED chandelier with a unique design |
Connecting a chandelier to a single switch
The easiest way to connect a chandelier. The wires of the home electrical wiring and the wires of the lamp are connected in pairs to each other.
- Connect the neutral wire of the chandelier with the neutral wire from the junction box.
- The phase wire from the distribution box must first be connected to the switch and routed under its button. Connect it to the phase wire of the chandelier.
When connecting wires, the most reliable and safe option is to use screw terminals. However, in practice, twisted connections are often isolated with special caps. We strongly do not recommend using PVC tape for insulation; after time, due to its drying out, the quality of the insulation can deteriorate significantly, which can cause a short circuit and is fraught with unpleasant consequences.