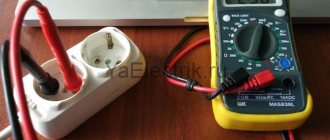
For a modern car, energy consumption even with the ignition off is normal. But if the owner of the equipment discovers that the new battery is discharged after just a few days, and sometimes even the next morning, it is recommended that he measure the current leakage in the car with a multimeter. This will allow you to establish the presence of a problem and begin to discover its causes and solve them.
What is current leakage and why is it harmful?
Current leakage is an unplanned and uncompensated discharge of a vehicle battery.
Depending on the intensity and period of action, it may have virtually no effect on the performance of the car, or it may lead to complete consumption of the battery capacity, when it will be impossible to start the engine. However, not all leaks need to be repaired. Some devices consume a small amount of current when turned off, which is necessary to maintain their functionality. The only danger is high leakage currents, at which the battery discharges within a few days or even hours.
Simple ways to find leaks
A routine visual inspection may give unexpected results. All kinds of chafing and destruction of insulation on wires are not difficult to find.
You need to inspect not only the external wires; if possible, check the contact blocks and wiring harnesses inside the electric stove, washing machine or boiler.
Then you need to narrow your search area. This can be done if you have a competently laid out input panel: machines and RCDs are divided into consumption groups and premises. By sequentially disconnecting one or another group, you will be able to understand on which line the faulty electrical appliance is connected.
After determining the connection line, disconnect potentially dangerous electrical installations from the network one by one and observe the behavior of the RCD.
If this does not produce results, we will use available technical means. To understand how to find a current leak, you do not need to have a specialized education. All processes are described in the school physics course. When you are not confident in your basic knowledge of electrical engineering, it is better to use the services of professional electricians.
- An indicator screwdriver is an almost ideal (although not accurate from a measurement point of view) search device. The principle of its operation is precisely based on the operation of leakage currents. It is enough to find a piece of metal without paint and touch it with a measuring contact. The surface of plumbing fixtures can become an ideal conductor of electricity from a boiler or washing machine.
It is necessary to turn on all electrical appliances in operating mode and go through a pre-drawn plan (so as not to forget anything), touching all potentially problem areas. - Household multimeter (with a measurement range in tens of megohms). The calculation here is simple: according to the PUE (Electrical Installation Rules), insulation resistance ensures safety at a value of more than 20 MOhm.
Important: This standard corresponds to supply voltages up to 1000 V.
If the resistance is less than the set value, leakage and potential breakdown to the housing is possible.
How to correctly measure the insulation resistance in an electrical installation?
- disconnect the electrical appliance from the power supply;
- we set the operating mode of the measuring device to the MOhm position, the range is tens of units;
- securely fasten one measuring probe to the contacts of the power plug (one at a time);
- We apply the second probe to the unpainted parts of the body of the electrical appliance.
Important: During measurement, do not touch the contacts and exposed parts of the housing with your hands. Otherwise, distortions can be introduced into the measured value.
The principle of connecting current consumers to the on-board network
Electric current will flow through the conductor only if the electrical circuit is closed. Electricity consumption should be normal - battery terminal “plus” - consumer - terminal “minus”, and the circuit should not be broken. As an example, we gave the simplest scheme. In your car, consumers are connected to a circuit whose complexity is several times higher. Therefore, it will be difficult for a non-professional auto electrician to understand all the nuances.
How to check for current leakage in a car? Refer to the image above. On it you can see that there is a single “minus” between the lamp and terminal 85 of the relay; it is usually connected to ground (body).
In this case, a switch is installed on the positive wire, breaking the circuit. When the switch contacts close, electricity flows through the relay coil, which is connected to pins 85 and 86. Due to the electromagnetic field, the coil begins to close the 87th and 30th contacts, and the electric current flows through the lamps.
The described scheme is standard for most vehicles. However, usually the circuit is opened by an additional switch - the ignition switch, and the fuse is embedded in the positive wire. To make it more convenient, one or two mounting blocks combine relays with fuses. Knowing this, you won't be shocked when you see a lot of wiring harnesses. You can also, by dividing a huge number of connected circuits into mini-circuits, check for current leakage in a car using clamps.
Some car devices are combined into common networks. Imagine that this is one consumer, but simply expanded in space. Is a current leak detected in the car after checking? The reason is that different circuits are connected to each other or to the “ground” of the machine due to the fact that the wiring insulation has become unusable. Leakage can also occur due to electric current “bridges” that appear due to dirt.
How to find an energy consumer?
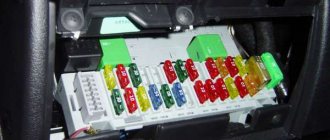
Further search for current leakage in the car is carried out using the fuse box (usually installed under the hood near the windshield). The procedure is as follows:
- Leave the ammeter connected to the battery terminals and remove the fuse box cover.
- Alternately pulling out the fuses from their sockets, monitor the readings on the multimeter display. If the manipulation does not produce results and the current value remains the same, insert the element back into the socket and move on to the next one.
- When you notice a drop in current to normal, find out which electrical appliances are “hanging” on the circuit of the pulled fuse. Look for the “culprit” using the method of elimination, checking each consumer separately.
Several consumers are powered directly from the battery, bypassing the fuse box. This includes the electronic engine control unit, starter and generator. If manipulations with fuse links do not bring results and the display readings have not changed, proceed to checking the electric generator:
- Disconnect the positive battery terminal.
- Unscrew the power wire from the generator and wrap the exposed end with any dielectric (you can use a rag) to avoid a short circuit.
- Connect a multimeter to the battery open circuit and check the current value. If the diode bridge in the generator fails, consumption will drop to normal.
Typically, a broken alternator diode causes a large current draw, measured in amperes. The loaded winding acts as an electromagnet, which can be easily checked using a metal key attached to the unit pulley. If the key is pulled, the electric generator is probably faulty and is wasting battery power.
In a similar way, you can measure current leakage in other directly connected circuits. Look at the electrical diagram of the car and disconnect the wires one by one, bypassing the fuse box. If for various reasons the multimeter is missing, try to solve the problem in the following ways:
- carefully inspect the inside of the car for a burning light in the glove compartment or trunk;
- try with your hand the glass with built-in electric heaters;
- check if the seats are heating up;
- Turn off the burglar alarm and stereo amplifier completely.
When faced with current leakage and battery discharge, remember what non-standard equipment you happened to install on your car in recent days. The reason probably lies in the incorrect connection of the device.
Why the battery runs out - the main causes of leakage
The main reason for increased battery discharge is a malfunction of electrical equipment. Moreover, the malfunction may not be obvious. A starter with broken bearings can turn, but consume increased current. A severely discharged battery simply does not have time to replenish energy during a trip, and after several starts the battery is completely discharged.
A faulty security system or music center can do its job perfectly well, but consume several times more energy than, as they say, according to the state. Such a malfunction is especially unpleasant in a security system that has been operating in a parking lot for a long time.
Well, the most serious problem will be current leakage. If it is relatively small, say half an ampere, then it will be compensated by the generator during the trip. But when the ignition is turned off, the problem will really manifest itself - in the morning in a parking lot you may not be able to start the engine.
Important! There is current leakage in almost any car, but this value has its own standards (see section below), and if we meet these standards, then everything is in order.
What causes current leakage? There aren't many reasons. For example, poor car design. On some older VAZ models, in particular the VAZ 2110, the leakage current is initially high. It is not for nothing that the owners of this car, when parked for a long time, remove the tip from the battery terminal or install a ground switch and use it.
Next, wear and tear on electrical wiring and equipment. If the car is old, then the electrical equipment seems to work, but even when turned off it consumes energy. The pads become clogged with dust, the wires crack and become oily, and the insulation wears out.
Non-standard equipment can also cause excessive leakage if it is installed by a non-specialist and poorly thought out. For example, the navigator can continue to calculate its location, maintaining contact with satellites even when the ignition is turned off. Music systems, recorders and other similar service equipment may also not work correctly, continuing to consume energy even when the ignition is turned off and in the absence of the owner.
Expert opinionAlexey BartoshSpecialist in repair and maintenance of electrical equipment and industrial electronics. Ask a question From here we conclude: if our battery noticeably runs out even after not being parked for a very long time, then there is no need to run to the store for a new one or get into the generator. First you need to find out if increased current leakage is to blame for this problem.
What to do after discovering a leak
- Since it is unsafe to use an electrical appliance that has leakage current, the fault is eliminated. Wiring with damaged insulation must be replaced; simply wrapping it with electrical tape is a temporary measure.
- If the cause of the insulation failure was a fastening element (a pinched metal clamp), the installation method must be changed.
- If leakage is detected in the contact groups, it is enough to eliminate the cause of the increased humidity.
- If the reason for the violation of the integrity of the insulation is vibration (for example, the wire of a refrigerator or washing machine), it is necessary to rearrange the electrical appliance.
After eliminating the problems and causes of insulation failure, it is necessary to re-measure the leakage current immediately after the work. Then, on problematic electrical appliances, measurements are carried out regularly, at least once a month.
Additional signs
If you don’t have a multimeter at hand, the presence of current leakage can be assessed visually at night. To do this, you need to turn off the ignition and all electrical equipment, open the hood, close the car, without arming the car alarm.
Next, you need to disconnect the positive terminal of the battery and wait about five minutes. After this, you need to connect the battery terminal. If a large spark is generated when the terminal is connected, there is most likely a leak.
Note: there will be a spark in any case, since during the connection of the terminal the emergency lighting and alarm may temporarily turn on.
Such a check can be done if there is a main sign of current leakage: battery discharge after a short stay. It is considered critical if a fairly fresh battery is discharged after one week of parking. It is not always possible to check this, since the car is in constant use.
Video - how to measure leakage current in a car with a multimeter:
Another sign is the presence of extraneous noise, crackling, buzzing, or sparking in the car when the electrical equipment is turned off.
The presence of foreign odors with a taste of smoke when getting into the car in the morning after parking is a serious sign of a malfunction. If there is a large current leak in a car, then, according to the laws of conservation of energy, it can manifest itself in the form of mechanical, thermal or light energy.
Unfortunately, using these methods is almost impossible to find the true cause. You need to use a multimeter. Auto electricians identify the causes and eliminate current leakage in a car as complex repair work.
Worth knowing
Most often, the cause of battery leakage is incorrect connection of consumers. The leader in this regard is rightfully the multimedia system. It is the negligent attitude to connecting the radio that in most cases becomes the cause of battery discharge. Although, to tell the truth, the key to the solution may be a much more banal breakdown. For example, short-circuiting the trunk light limit switch, as a result of which the light will remain on constantly. Now you know how to check current leakage on a car using a multimeter, the video will help you get a visual representation of all the steps in diagnosing a fault.
Diagnostics and standard battery leakage current
There are devices in the car that consume current regularly. These include:
- Watch:
- ECU memory;
- Immobilizer;
- Signaling.
Their functioning requires constant nutrition. After a reboot, the volatile memory starts working again, remembering the current installation functions. The vehicle is protected from the moment it is parked. All of these devices require current, which means it is possible to consume a small amount of energy on a regular basis.
Since current is used to operate many volatile devices, it should be indicated that there is a leakage rate. It is a constant value, which is calculated by summing the consumption volume of each device. If the constant consumers in a car are the clock, alarm system, and audio system, then the sum of their current consumption will be 1mA+20mA+3mA, respectively. When adding the current values for all devices operating constantly, a total sum is obtained in the range of 50–80 mA.
When compared to a headlight bulb, which consumes about 500 mA, a current leakage rate of 50 mA cannot affect battery discharge.
To determine the rate of current leakage in your own car, you should carry out diagnostics. This is done by measuring current consumption. When a consumption value is detected that is greater than normal, it becomes necessary to troubleshoot electrical equipment or the on-board network.
Causes and consequences
First you need to understand what a car battery is. Like any other battery, it is a chemical current source that has an electrical capacity, the value of which is usually printed on the battery label. It is measured in ampere hours (Ah).
Battery capacity is measured in ampere-hours and shows how much current the car battery will be discharged with.
In fact, capacity determines the amount of electrical energy that a fully charged battery can deliver. Leakage current represents the current drawn from the battery. Let's say we have a serious short circuit in the car wiring, and the leakage current is 1 A. Then the 77 Ah battery given as an example will be discharged in 77 hours.
The main problem is that the battery is deeply discharged. When receiving energy from the battery, the sulfuric acid included in the electrolyte is gradually converted into lead salts. Up to a certain point, this process is reversible, since a similar thing happens when the battery is charged. But if the voltage in the cells drops below a certain level, the electrolyte forms insoluble compounds that settle on the plates in the form of crystals.
These crystals will never recover, but will reduce the working surface of the plates, leading to an increase in the internal resistance of the battery, and, therefore, a decrease in its capacity. In the end, you will have to buy a new battery. A dangerous discharge is considered to be a voltage below 10.5 V at the battery terminals. If you bring your car battery home to charge and notice lower voltage, it's time to sound the alarm and deal with the leak immediately!
In addition, leaks caused by short circuits or melted wiring insulation at sufficiently high currents can lead not only to battery damage, but also to fire. Indeed, a new car battery is capable of delivering hundreds of amperes over a short period of time, which, according to the laws of physics, can lead to melting and ignition in a few minutes.
The electrical system of a car is a complex of complex electronic systems interconnected
After considering all the unpleasant consequences of leakage current, it is worth understanding its causes. Previously, in the days of carburetor cars with a minimum of electronics, the normal leakage current was considered to be its complete absence. In those cars there was simply nothing to draw current from the battery when the ignition was turned off.
Today everything has changed: any car is simply crammed with various electronics. These can be either standard devices or installed later by the driver. And although all modern electronics, accompanied by a friendly march of environmentalists with slogans about energy saving, support special “sleep” or standby modes with very low energy consumption, a certain amount of current is consumed by duty circuits. Therefore, small leakage current values (up to 70 mA) are the norm.
Also interesting: Niva VAZ 21213 engine: characteristics, malfunctions and tuning
From the factory equipment in a car, the following devices normally constantly consume a certain amount of energy:
- Diodes in the generator rectifier (20-45 mA);
- Radio tape recorder (up to 5 mA);
- Alarm (10-50 mA);
- Various switching devices based on relays or semiconductors, on-board engine computer (up to 10 mA).
The maximum permissible current values for serviceable equipment are indicated in parentheses. Faulty components can dramatically increase their consumption. We will talk about identifying and eliminating such components in the last part, but for now here is a list of additional devices installed by drivers, which can often add another hundred milliamps to the leak:
- Non-standard radio;
- Additional amplifiers and active subwoofers;
- Anti-theft or second alarm;
- DVR or radar detector;
- GPS navigator;
- Any USB powered equipment connected to the cigarette lighter.
How to find a leak
Leakage may be caused by an unauthorized consumer or a short circuit in the circuit. The search begins with non-standard devices and electronic components. Unlike factory wiring, newly installed equipment can be powered by wires laid in the first available location. If you want to quickly place everything, the master does not pay attention to the fact that the wiring may lie near the motor. During operation, the unit generates heat that acts on the insulating layer of the wires. As a result, melted areas appear.
When cables are located near metal places that are constantly in contact, chafing can occur. The integrity of the wiring is compromised, leading to a short circuit.
Therefore, after preliminary diagnostics using a multimeter, it is worth visually inspecting individual areas and elements of equipment placed after purchasing the machine. Often, alarm limit switches are placed where the doors touch. Look for burned, corroded or damaged areas. If these are not found, then it is worth moving on to the stage of in-depth diagnostics.
Ohm's Law to the rescue!
The second way is to determine the current strength and calculate consumption using the formula, Ohm's law. Take a multimeter and turn on the dialing or resistance measurement mode. We measure the resistance R ten. Now we can calculate the current that can pass through the A ten system. To solve the formula, you also need to know the voltage, and it is 220 volts in the home network.
After the current is found, the power of the device can be determined. To do this, we multiply amperes by volts.
You can learn more about how to use a multimeter in our article!
What threatens a high leakage current on a car?
The most common (though not the worst) problem due to excessive current leakage in a car is a battery that discharges quickly and frequently. This is usually noticed when the battery has served for several years and is no longer capable of storing much energy. The excessive leakage current may have appeared on the machine much earlier. However, while the battery is “young and vigorous”, its reserves are enough for many days of consumption of several milliamps. The old battery has fewer ampere hours than the new one, so it runs out quickly.
For a new battery, large leakage currents are also far from useful. There will be a constant load, much or not - it doesn’t matter whether it drains the battery. And starter batteries retain their service life the longer, the more time they remain in a fully (or almost) charged state. If every single day the battery drains first a little, and then up to half, and so on, it will be possible to start the engine in the morning, but the battery life will quickly decrease. The plates will begin to sulfate, the capacity will gradually decrease, and goodbye to the new battery a couple of years after purchase.
More serious problems can arise when current leakage in the car is caused by short circuits, insulation damage and water ingress. In such cases, heating of conductors or parts of electrical equipment is possible. And this already threatens spontaneous combustion. And the worst thing is that because of this, the car often catches fire at night when no one is around. Accordingly, no one takes timely measures, as a result of which the car burns out to a bare body.
This, of course, does not happen all the time. But even less terrible problems, for example, when a new battery is discharged, are unpleasant and indicate a malfunction. This means that you need to know about the possible causes of current leakage.
How does discharge affect the battery?
If now many people thought - “Whatever, morning discharges don’t scare me, I’ll charge my battery and continue riding! Well, if it runs out of charge, what’s the big deal?”
But there is a terrible thing - this is called a deep discharge of the battery , even a new battery will simply fail after several such discharges. This is because ordinary acid batteries have an electrolyte made of distilled water and sulfuric acid, and when discharged, sulfuric acid settles as salts on the plates, covering the working surface. The salts crystallize so strongly that they no longer dissolve - the operation of the battery will be impaired! The capacity will drop by two to three times and you will no longer be able to start the engine, because the starting current will also decrease.
In general, deep discharges should not be allowed, especially with acid versions of the battery (there are also AGM and GEL technologies, but they are a little different)! This is a kind of axiom.
Now let's start talking about current leakage, for starters, the normal value.
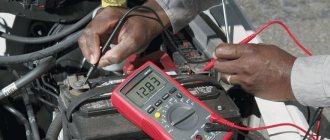
Measuring current leakage in a car with a multimeter
Now let's look at the most important thing - how to measure current leakage in a car. All you need for this is absolutely any multimeter. When taking measurements, it is extremely important to adhere to safety rules. Otherwise, you can burn the multimeter, get injured, and damage the car’s electronics.
The verification algorithm is as follows:
- Open the hood and lock the button, which sends a signal to the security system to open it.
- Put the car in park mode - turn off everything except what would normally remain in standby mode. For example, an alarm system, a video recorder, and so on.
- Remove the negative terminal from the battery. Contrary to popular belief, you can also shoot plus. However, disconnecting the “mass” is more correct and 100% safe.
- Set the multimeter to current measurement mode in the range of up to 10 A. Reposition the positive probe on the device accordingly. Never attempt to measure leakage current on a vehicle using the low range on the multimeter (up to 200 mA). When the terminal is connected, there will be a current surge that the fuse in the measuring device may not withstand.
- Attach one multimeter probe to the removed negative clamp, and the second to the battery terminal from which this clamp was removed. This type of connection is called an open circuit. When you removed the terminal, you broke the circuit, and now you connected a multimeter into the gap.
- If the security alarm is reset as a result of disconnecting the battery from the on-board network, turn it on again.
- Wait a while. In some cases, there is no need to wait - the leakage current can be detected immediately. In cars packed with electronics, it is necessary to give time for all systems to go into standby mode. In rare cases you have to wait up to 5 minutes. If you don't pay attention to this, you can panic for no reason.
- When the multimeter readings are level, record them. This is the current leak in your car.
- Under no circumstances turn on anything while taking measurements! Even a light load is switched on with a current surge, which can lead to a blown fuse in the multimeter.
- Moreover, do not try to start the engine when there is a multimeter in the open circuit!!! It is designed for only 10 amperes, and while the starter is operating, a current of 100 - 200 A will flow through the circuit.
Then all that remains is to compare the obtained indicators with the standards described above. In general, if the multimeter reads less than 0.12 A (120 mA), then there is no cause for concern. If the current leakage is greater than this figure, then you should start looking for the cause.
Other reasons for battery discharge
What to do if the driver measures the current consumption and it does not exceed the norm? As mentioned above, difficult starting after a long period of parking may not be caused by leakage currents. Some of the most common causes of this problem may include:
- High battery self-discharge.
- Generator malfunction.
Testing the battery for self-discharge
To determine the condition of the battery, you need to remove it from the car and wipe it clean with a rag soaked first in a solution of baking soda, then in water.
If the battery is serviceable, you need to check the density and electrolyte level in each section (there are only 6 of them). The battery is then fully charged by the mains charger to normal voltage (12.7 V without load). We recommend: Selecting a car battery according to parameters
All that remains is to leave the unconnected battery for several days and then measure the voltage at the terminals again. If the voltage loss is more than 0.2 V, then the problem is in the battery. You will have to buy a new battery or try to restore the damaged one, at least temporarily, by contacting the appropriate specialists. If the battery “holds”, then either the problem has been eliminated (for example, water was added to semi-dry jars), or the problem is different.
Determining the source
To determine the source of the leak, it is necessary to turn off standard and non-standard devices and instruments one by one, analyzing the readings of a multimeter operating in ammeter mode. Checking current leakage in a car with a multimeter will be completed as soon as the device detects acceptable current readings of one of the disconnected devices. Do not forget to carefully examine the condition of the wiring and insulation. It is also worth determining the performance of the generator in order to exclude current leaks due to its defects.
If the voltmeter readings do not exceed 12.8 V, the generator should be repaired or replaced, since the battery is not receiving charging from it.
Current testing
To begin with, we determine what kind of current flows in the circuit - alternating or direct. The choice of the socket for the black probe, from the “10 A” or “VΩmA” options, is made after specifying the approximate parameters in Amperes. The procedure is largely identical to the one discussed above. If, after connecting to the connector with the maximum current value, the display shows a significantly lower value, place the plug in another socket. When re-displaying smaller parameters, we stop at the range with a lower amperage.
It is important to remember that the connection of the device in the circuit in this case is also carried out exclusively in parallel.
FAQ
What is the normal leakage current in a car?
There is a current leak in almost every car, and the rate will depend on the amount of additionally installed electronics, which can consume energy even in standby mode, as well as the power supply characteristics of the on-board network. Therefore 0.05 Ampere
– this is the norm for a modern car. And in some cases, even 70 mA is also acceptable.
What is the leakage current through the alarm?
In operating mode, the security device consumes up to 200 mA of current, depending on its complexity, the number of sensors and the connection method. current through the alarm – 20-30 mA
this is normal, the main thing is that consumption decreases to this level 5-10 minutes after turning it on. The problem areas are considered to be the limit switches of the hood and trunk doors, as well as the communication module (oxides appear on the board).
What is the leakage current through the radio?
On a car with a properly connected 1 din radio, the leakage does not exceed 0.01A
or
0.02A
if it is 2 din. The main problem is connecting the power wire (red) and the wire responsible for saving the settings (yellow in one twist) and directly to the battery. Only the yellow “memory” wire should receive constant power. Also, the leakage current through the radio, as in the case of the alarm system, when the ignition is completely turned off, should decrease after 10 minutes of rest.How to measure leakage current?
You can measure the leakage current with a multimeter or a current clamp (allows you to measure the leakage current without contact) by first setting the car alarm and waiting 10-15 minutes since there are ECUs that do not go into sleep mode immediately. To measure leakage current with a multimeter
It is necessary to connect in series to the power supply circuit of the on-board network, before the negative terminal on the battery.
First, you need to set the DC current measurement mode to 10A when the tester is turned on. Then, having removed the negative terminal from the negative terminal on the battery, connect one of its probes to the negative terminal of the car, and the second (red) to the negative terminal of the battery. Current leakage will be displayed on the dial. When measuring leakage current with clamps
, you need to set the DC current measurement on the device, and the conductor being measured, maybe the entire twist going to the negative terminal of the battery, or from individual consumers, is placed in the clamp ring after turning off the ignition completely. On the display you can immediately see the current consumption of the car’s electronics at rest.
Leakage from battery when ignition is off
If the ignition is turned off, the engine does not work and the battery does not recharge. All energy accumulated during movement is spent on powering consumers - heating windows, operating the media center, lighting. The more consumers that are not turned off, the faster the battery discharges. Therefore, all devices must be turned off during long periods of inactivity.
However, if the circuit of a TV, sound system, or air conditioner is incorrectly assembled, there may be a leakage current. Often the mistake that leads to a drop in battery voltage is putting these devices into sleep mode rather than turning them off completely. Checking for leaks with a multimeter will reveal the problem.
Oxidized wiring contacts lead to the occurrence of parasitic currents. The reason is resistance, which contributes to heating of the wires. In this case, stray currents are not the main thing - you can get a fire. Worn electrical wiring with twists and poor insulation has the same consequences.
However, the battery itself loses capacity over time and the rate of self-discharge increases. If there is no large current leakage, but the battery is discharged, then you need to check its suitability.
Parallel connection measurements
With a parallel connection, several branches originate at a certain point in the electrical circuit and all end together at another section. In this case, the total current strength is equal to the sum of the current values on all branches:
I = I1 + I2 + … + In
Multitester measurement technology - how to measure direct and alternating current with a multimeter:
- installing a probe with a black cable into the corresponding color-coded connector on the measuring device;
- installing a probe with a red cable into the tester connector marked “A”;
- switching the toggle switch when measuring alternating current to the “AC” position, and for direct current measurements – to the “DC” position.
Series and parallel connection of batteries
In an electrical circuit with a parallel connection, the device shows the same current strength on each branch, so all the obtained values are summed up.
The measurement limits are set so that they are obviously higher than the expected current strength in the electrical circuit being tested, which will prevent the multimeter from burning out.
How to measure voltage
Having figured out what kind of current movement occurs, where, you can begin the direct measurement process:
- voltage in the socket;
- accumulators, batteries.
Let's look at the sequence of actions for each of them.
Measuring voltage in a socket
Having taken a multimeter and connected the wires to it according to the technology given above, all that remains is to take a few simple steps:
- set its value to the “Alternating voltage” item. An icon of the letter "V" with a small sine wave above it. Or in some cases - “ACV”;
- find out the approximate current strength of your outlet (in most cases, if you check the voltage, it will be 220 Volts in a standard network);
- set an approximate range based on the previous value. It is advisable not to make large runs, otherwise there is a possibility of getting an incorrect result. The reference point is 700-750V.
- connect the second ends of the terminals to the socket, feel the wire inside with them. With alternating current there is no difference in the location of the poles (plus/minus), so you don’t have to think about it and place them at any hole.
This way you can measure the voltage in the socket with a multimeter and get the correct answer displayed on the device’s display.
Instructions for measuring DC voltage in a battery or battery
To check the voltage with a multimeter, for direct current batteries, the circuit will be a little similar to alternating current:
- select the device that needs to be diagnosed for voltage;
- on the device, select the icon responsible for direct current;
- All batteries have their own limits, their data is located on the case. Study the information carefully;
- set the required limits on the multimeter;
- connect the plugs to the measuring device (as indicated earlier);
- the second ends of the wires are connected to the battery terminals: the black probe to the minus, the red probe to the plus of the source that currently needs to be measured;
- keep the wire and battery in the installed position until the numbers on the screen stop increasing;
- after that, the last highest value will appear on the multimeter monitor, and it will be correct, indicating the corresponding energy reserve.
Functional elements of a multimeter
Modern manufacturers produce various models of multimeters. Digital instruments with various additional functions, which are considered more accurate, are widely popular. An error of up to those percentages is considered normal. The lower the deviation indicator, the more reliable the test check.
Even the simplest electrical measuring device is capable of determining the most standard values - current, voltage and resistance. More expensive multimeters are equipped with special sensors for measuring temperature. Also, using such a hand tool, capacitance, intervals between pulses, frequency and inductance are determined.
Among the functional capabilities of the multimeter are:
- Recognition of disturbances in the operation of an electrical circuit. The device is capable of detecting the resistance value, which has fallen below the required scale, using a sound signal - “diagnosis”.
- Checking semiconductor elements. Using a multimeter, you can check diodes, transistors or thyristors, namely their serviceability.
- Many advanced models are equipped with displays that receive a signal and can carry out the necessary calculations.
The most popular additional features are:
- recording of the detected value by the device - push-button or automatic;
- illumination of indicators on the screen;
- power failure counter;
- reboot indicator;
- automatic detection of measurement boundaries.
In professional models, the minimum accuracy error is established. Sometimes digital processing ability is used. The necessary maximum parameters are fixed in the working memory, with the help of which the device calculates the average value.
Also on the front side of the multimeter there is a “continuity” icon and a knob for switching ranges
Almost all multimeters have catchy symbols that display the functional elements of the device:
- “DCA” – direct current measurement;
- “Ω” – resistance icon;
- “ACV” – constant voltage indicator;
- “DCV” is a designation for alternating voltage.
Some electrical measuring devices have two indicators at once - digital and dial. To make it easier to work with the device, two measuring scales are used, which allow you to measure in different values.