Home » Equipment » Warm floor
A warm floor is a specially constructed heating system that has its own advantages. One of the available options uses an electrical cable. Current flows directly through it, which emits heat.
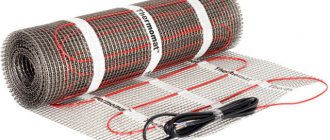
Wire for heated floor
If selected/installed correctly, the room temperature becomes high. What suggests installing such heating as the main one. Especially if there are appropriate resources.
Determination of thermal load
Before preparing materials for installing underfloor heating, you need to calculate how much heat to supply to a particular room.
This calculation is usually carried out according to the specific characteristic - the amount of heat released per unit volume or area of the room. The power of the heating system is calculated through the area in cases where the height of the ceilings of the home does not reach 3 m. The method gives the most accurate result in rooms with ceilings of 2.6-2.8 m. The calculation procedure is as follows:
- After measuring the dimensions of the room, calculate the area in square meters.
- Multiply the found quadrature by the value of the specific thermal characteristic (basic - 100 W/m²).
- Apply the regional correction factor to the resulting power.
Specific heat consumption indicators for different rooms
Rooms located in different parts of the house are cooled differently - corner rooms lose more heat than middle rooms. Hence the recommendation: take the value of the specific characteristic depending on the type of room:
- for rooms located inside the building or having one external wall with a window - the base value is 0.1 kW/m²;
- corner rooms (2 external fences and one light opening) – 0.12 kW/m²;
- the same corner rooms, but with two windows - 0.13 kW/m².
Apply the correction factor depending on your region of residence. For a cottage built in the southern regions, the coefficient value will be 0.7-0.8, in the northern regions - 1.5-2.0.
Calculation of heat consumption by volume of a dwelling is carried out in a similar way: the cubic capacity of the room is determined by measurements, multiplied by the specific characteristic. The basic value for interior spaces is 35 W/m3, corner rooms are 40 and 45 W/m3, respectively.
Which cable is better, two-core or single-core?
The difference between a single-core and a two-core cable is as follows:
- The need to install a thermostat. The self-regulating cable does not require installation of a temperature sensor and regulator. In this case, heating is carried out in separate areas.
- Presence of an electromagnetic field. Some types of single-core cables have high-quality Teflon coating. The protective layer effectively reduces radiation levels. Other types of single-core wire create an electromagnetic field of greater intensity, so they are recommended for use in walk-through rooms, hallways, balconies, baths, saunas, etc. With warm two-core floors, radiation is completely absent, which makes it completely safe for use in residential premises: bedrooms, children's rooms, etc.
Some manufacturers, in an effort to reduce the cost of self-regulating heated floors, change the internal structure, leaving only the heating matrix and minimal insulation. The correct method for choosing a self-regulating cable is associated with the need to determine whether the cable has external insulation and a copper shielding layer. The presence is indicated by the markings CT, CF, CR.
Self-regulating system
Self-regulating wire has the best technical parameters. Its composition and mode of operation are completely different from the principle of operation of the cables described above. This wire contains two conductive cores that are in contact with a matrix made of a special polymer material. Due to this semiconductor device, heating is regulated. When the temperature rises, the conductivity of the semiconductor decreases, thereby reducing the heat transfer power. On the outside, the matrix is covered with insulating materials; between them there is a special shielding braid.
A cable like this will last you long enough not to think about repairing it.
For a more accurate understanding, it is worth describing in more detail the principle of operation of such a wire:
- When the room temperature drops, the polymer material in the middle of the cable contracts. This gives a boost to the electricity flowing through the cable, resulting in increased heat transfer.
- When the temperature in the room drops, a reverse reaction occurs, which provokes a decrease in current strength. As a result, the amount of heat generated decreases.
Self-regulating floor heating cable is very popular. This is explained by the many advantages of this type of device over analogues:
- the ability to independently change the heating strength, reacting to the level of room temperature;
- stable multi-layer protection against mechanical impact;
- the unique design of the cable provides protection against overheating, automatically extending the life of the heating element;
- does not require frequent repairs.
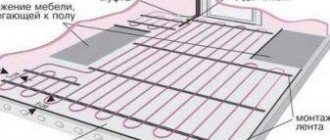
The technical parameters of the electric heater make it possible to use this type of cable in different rooms without taking into account the characteristics of the floor covering and areas where furniture is located. Each section of the structure operates independently, independently reacting to external influences and maintaining the temperature specified by the user.
If, under the influence of pressure that may be exerted by household appliances or furniture, the temperature reaches a maximum, the area of the overloaded cable will turn off on its own. At the same time, the remaining sections of the circuit will continue to operate.
When the disabled area cools down, it will again maintain the required temperature. Self-regulating wires are often chosen for living spaces; they are placed under laminate, parquet or tiles.
Calculation example
Let's consider how to calculate the power of the engineering system that needs to be installed in the kitchen of an apartment located on the first floor of a five-story building.
Let’s say the kitchen area is 20 m2 (the width and length of the room are 4 and 5 m, respectively). An electric heated floor will act as the main heat source.
First of all, you need to make a furniture layout diagram on paper. According to the diagram, it is necessary to calculate how much space will be occupied by kitchen furniture and heavy equipment. A standard refrigerator occupies approximately 0.4 m2. As for kitchen furniture, which is usually 60 cm wide, to calculate its area you need to multiply the width by the length. We get: 0.6*5=3 m2.
You should also take into account the fact that the engineering system cannot be laid close to the walls. There should be a gap of at least 5 cm, but it is better to leave 7-8 cm free
It turns out that about 0.8 m2 will be used for indentations.
As a result of these simple mathematical calculations, we determined that the area over which the heating element can be laid is about 15 m2.
Now you can calculate this parameter. To do this, multiply the area, which is 15 m2, by 180 W. The main heat source should be 2700 W. Accordingly, you should purchase a cable with a power of at least 2.5 kW.
If the engineering system will act as an additional source, then it will be enough to purchase a cable with a power of 2 kW (15m2 * 140 W). By analogy, you can calculate the required power of the engineering system for each room.
Table of approximate power of electrical appliances
To independently calculate power consumption, the voltage value and source strength are important.
Power indicators (P) in this case are calculated by multiplying the current strength with the mains voltage indicator.
Average power of the most common energy-dependent household appliances
| Device | Power, kWt) |
| Water heating equipment | 1,2-1,5 |
| DVD player | 0,3 |
| Pump equipment | 0,25 |
| Video recorder | 0,04 |
| Grill | 1,2-2,0 |
| Halogen light source | 0,1 |
| Drill | 0,15-0,8 |
| Razor | 7.0 W |
| CD player | 7.0 W |
| Mobile phone charger | 0,025 |
| Oven | 1,0-2,0 |
| Air conditioner | 1,0-3,0 |
| Record player | 0,01-0,03 |
| Game console | 0,01-0,03 |
| Coffee maker | 0,6-1,5 |
| Incandescent lamp | 0,02-0,25 |
| Fluorescent gas-discharge light sources | 0,25-0,6 |
| Freezer | 0,7 |
| Microwave | 1,5-2,0 |
| Table fan | 0,042 |
| Music Center | 0,05-0,5 |
| Heater | 1,0-2,4 |
| Laptop | 0,08 |
| Personal Computer | 0,28-0,75 |
| Soldering iron | 0,025-0,12 |
| Vacuum cleaner | 0,4-2,0 |
| Printer | 0,35 |
| Scanner | 0,015-0,1 |
| Mixer | 0,18 |
| Heat fan | 1,5 |
| Washing machine | 4,0 |
| Iron | 0,25-2,0 |
| Toaster | 0,6-1,5 |
| Hairdryer | 1,0 |
| Fax | 0,6 |
| TV | 0,07-0,2 |
| Fridge | 0,15-0,6 |
| Electric jigsaw | 0,4-0,8 |
| Electric heater | 0,2 |
| Electric kettle | 1,0-2,5 |
| Electric stove | 1,1-6,0 |
| Energy saving light source | 0,08-0,1 |
Approximate power indicators of a volatile device are represented by the product of current and voltage, so the standard simple formula P = I × V is used for calculations.
Positive qualities of infrared heated floors
Modern infrared floor designs have a number of undoubted advantages. First of all, they are distinguished by simplicity and speed of installation. On average, no more than two hours are spent on installing floors. They do not require a screed device. These floors can easily be installed under carpet, linoleum or laminate. The thickness of the film is only 3 mm, therefore, it does not affect the height of the room at all and does not reduce its volume. The film coating material is highly reliable.
Compared to other types of underfloor heating, infrared design allows for significant energy savings. In addition, there are many positive physical properties. Infrared floors help ionize the air and eliminate various unpleasant odors. They have absolutely no effect on air humidity and do not dry it out.
This type of heated floors can be used as the main or additional source of heating for houses and apartments. In the first case, the film coverage is at least 60-70% of the total area of the room. With additional heating, any area is covered, on average this value is 30-50%. Infrared floors are installed in passage corridors throughout the entire area, provided there is no furniture. In rooms with furniture, the film is installed as needed, in free places.
Calculation of cable footage and laying pitch
To determine the length of the heating conductor, it is necessary to take into account some features:
- Manufacturers offer cables of fixed length with different powers (from 9 to 20 W per 1 linear meter);
- so that the heater can give off heat and not burn out in the floor, the circuit cannot be laid under stationary furniture and appliances without legs;
- for installation in the bathroom or on the balcony, the cable conductor is taken with a margin of 15-20%.
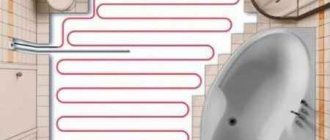
Resistive cable installation diagram in the bathroom
Having determined the need for thermal energy to heat a specific room, make a calculation of the electric heated floor according to the instructions:
- Select a cable from the catalog, focusing on the previously obtained thermal power and adding a margin of 15%. Record the total length of the conductor.
- Draw a scale plan of the room on paper.
- Place furniture and household appliances in the sketch that are close to the floor and interfere with normal heat exchange. Observe the actual dimensions of cabinets, washing machines and other equipment.
- Subtract the area occupied by furniture from the total square footage. The task is to place the heating conductor selected from the catalog on a free area.
- Divide the remaining area by the length of the cable heater - get the laying step in meters.
Layout rules in residential and auxiliary premises are different. For example, in the living room or bedroom, the first heating line is moved away from the furniture at a distance of 10 cm. In the bathroom or on the balcony, the cable is laid close to cabinets and plumbing so that your feet do not feel the temperature difference on the floor. Be sure to take this nuance into account when planning. The specialist will tell you more in the video:
Since heating mats are sold in strips of mesh (rolls), the laying step does not have to be counted. But keep in mind another point: the heat transfer of 1 m² of mat is limited, and the power cannot be increased. But to reduce it is no problem, just cut the mesh between the conductors and move the cables apart.
An example of calculating a warm electric floor in a bedroom of 18 m² with a heat consumption of 2.16 kW:
- Since cable heating is planned to be combined with a radiator system, the thermal power is divided in half - 2.16 / 2 = 1.08 kW per floor circuit.
- We select a two-core DEVIsafe 20T cable with a power density of 20 W/m. Taking into account the reserve, we take a ready-made conductor 60 m long with a heat transfer of 1.2 kW.
- Stationary furniture occupies 3 m² of bedroom area. 15 m² remains, then the laying step will be 15 / 60 = 0.25 m.
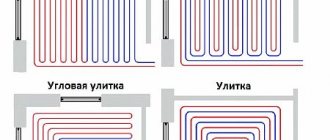
Possible cable layouts
Thermomat 130 1.5 sq.m.
| Manufacturer: | Thermo |
| Model: | TVK-130 |
| View: | heating mat |
| Power: | 190 W |
| Heating area: | 1.5 m2 |
| Installation type: | into a layer of tile adhesive |
for comparison
old price 8,113 rub.
RUB 7,302
Product added to cart
| Photo | Name | Price per piece | Quantity | Price |
| Thermomat 130 1.5 sq.m. | 7,302 rub. | < 1 > | 7,302 7,302 rub. |
There are 0 items in the cart worth 0 rub.
Go to cart
Buy
Availability
Go to the full catalog of THERMO heating mats
Subtleties you need to know about
The typical diagram by which power is calculated gives an objective result only if the room is properly insulated. Thermal insulation means not only the laying of roll materials under heated floors, but also the installation of double-glazed windows on the windows.
Therefore, before installing the system, it is necessary to thermally insulate the room. This will prevent unwanted heat loss. Particular care should be taken to insulate rooms that are located on the ground or have a basement.
You need to choose thermal insulation based on the selected engineering system. Only foil thermal insulation can be installed under infrared floors. Otherwise, part of the heat will go to heating the rough foundation or the neighbor’s ceiling.
Another very important point that is worth paying attention to is the step of laying the heating element. If you have infrared floors or heating mats in front of you, then you can skip this point
They are a roll material, the basis of which is a special mesh or film. The heating element is attached to this base.
If you opted for cheaper cable systems, then the cable will have to be laid manually. In this case, the installation step will have to be determined independently. You don’t have to bother and do everything by eye. But in this case, the system may not work efficiently. And it will be quite difficult and expensive to redo everything.
Let's look at how to determine the laying pitch of a heating cable using the example described above. The power of an electric heated floor should be 2700 W. The cable length in this case should be about 130 meters. To calculate the installation pitch, you need to multiply the usable area of the room by 100, and divide the resulting number by the length of the heating cable. We get: 15*100/130=11.5 cm. This is the laying step.
To simplify installation work, you can purchase a special mesh onto which you can pre-attach the heating cable. If the cable is not fixed during installation, it will move. As a result, the laying step between turns will change. As a result, uneven heating of the base.
Calculating power for an engineering system is quite simple
It is important to correctly insulate the room, choose insulation for the base that is compatible with the engineering system and competently approach the issue of arranging heavy furniture under which the heating cable cannot be placed
https://youtube.com/watch?v=J8GJC6lEL-c
Forged swing metal gates
Forged structures are decorations for barriers made of metal. Despite the huge number of models of modern devices that provide unimpeded entry into the territory of a personal plot, it is the swing design that is in high demand and deserved trust of owners of private houses located within the city or beyond.
Swing gates
It is swing structures that are installed in most cases. Such devices can be:
- Completely transparent, made from individual rods bent into an intricate pattern.
- Partially or completely deaf, not allowing strangers to see what is behind the openwork fence.
Advantages and disadvantages
To achieve this goal, craftsmen create structures in two ways:
- cold forging;
- hot.
Cold forging Hot forging
The main advantages of forged gate leaves are a high level of strength and resistance to mechanical damage. During the work, specialists carry out calculations with particular accuracy of the level of load on the supporting structure
It is also important that such products:
- universal;
- exclusive;
- can have any shape;
- compatible with all building materials that were used in the construction of the fence.
However, there are also certain disadvantages that make you think about the extent of the need for work related to the installation and installation of openwork gates. Among them:
- Heavy weight.
- The need for careful preparation and high-quality installation of supports that will have to withstand significant weight.
Despite all the existing difficulties, installing gates attracts many homeowners due to the opportunity to create various compositions, decorate the entrance to the territory not only with simple drawings, but also with complex ornaments, equip the structure with automation, install video surveillance and an intercom system.
Installation methods
The heating cable must ultimately be covered on all sides with mortar/tile adhesive; this can be achieved in three ways:
Fill
. The most correct way in my opinion. It consists of pouring a 1-2 cm mini-screed over the mounted cable. The resulting screed will be suitable for any floor covering. To implement this option, when pouring the main screed, you should provide a couple of centimeters of height in places where there will be a warm floor. For work, mixtures are used that allow such thin layers to be poured. If the screed is initially poured at one level and raising the floor level is unacceptable, then this method is not suitable.
Glue layer
. When the tiles are laid, and in addition to everything else, it is permissible to raise the level of the subfloor by 1-2 cm (do not forget, the tiles themselves will add at least 1 cm), the tiles are placed on top of the cable on a thick layer of glue. This option should be considered last, because there will be a significant difference at the border of the warm zone.
Grilling
. The most difficult and tedious method, however, when raising the screed level is unacceptable, is the most correct. First you need to mark the lines where the heating cable will go. You also need to take into account the groove for the corrugation with a temperature sensor and the coupling with the cold connecting cable. After marking, you need to attach some kind of thread/rope to the lines to check the length of the grooves. You need to be sure that the entire cable will fit into the future groove, otherwise you need to change the markings.
After gating, the dust is carefully removed and the surface is primed. The wire is laid in a groove; the depth of the groove should allow 3-5 mm of caulking solution to be applied over the cable.
The temperature sensor in the corrugation is also mounted in the groove; the corrugation must be plugged at the end (wrap it with electrical tape). The end of the corrugation should be placed between the heating conductors, not far from the edge of the heating zone (but not on the edge). The optimal distance of the temperature sensor is 30-50 cm from the edge, deep into the warm area.
When the wire is laid, the grooves are sealed with tile adhesive or a self-leveling floor mixture. If you plan to lay linoleum, it would be a good idea to apply a finishing layer of 1-2 mm of self-leveling floor.
Floors should be checked or used no earlier than a month after completion of all wet processes with the floor (pouring, laying tiles). Switching on earlier will not damage the cable itself, but may cause the solution/adhesive to crack.
Conclusion
- Heating cable is recommended for use with heated floors. The most preferred method of application is a direct heating system or "thin floor".
- Among all the variety of heating cables, it is best in terms of price-quality ratio to use a two-core resistive cable.
- The selection of the required cable with the required power density, its length and laying pitch are obtained as a result of calculations.
- Changing the length of a resistive cable section (except for a zonal cable) is unacceptable.
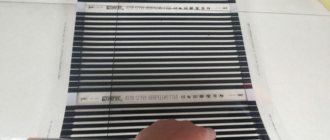
About film heaters
Calculating the amount of infrared film is much simpler and comes down to selecting a heating material based on size and specific heat transfer:
- Calculate the room's need for thermal energy (section one of this publication).
- Sketch the layout of a room with stationary furniture. Calculate the size and square footage of the free area.
- Film heated floors are laid out at a distance of 15-20 cm from the walls. Draw these stripes on the sketch and subtract their dimensions from the free area.
- The last task is to place an infrared film of the required total power on the remaining area. Select rolls of the desired width and heat transfer from the manufacturer’s catalog.
Keep in mind that thermal film can only be cut across, guided by special lines (interval - 250 mm). Adjacent canvases can be laid end to end or with a calculated interval, but not overlapping. For the bedroom from our example, the amount of film is calculated as follows:
- The required heat transfer of the floor circuit is 1.08 kW. If you take a product with a heat output of 130 W/m², you will need 1080 / 130 = 8.3 m² of film heater. Taking into account the reserve - 9 m².
- The roll width is 0.5 m. To collect 9 squares, you need to take a film 18 m long.
- Since there is 15 m² of free space in the bedroom, this type of heater is quite suitable.
Scarecrow
If you need to scare away birds, you should make a device from compact discs. They need to be secured to a hoop and attached to the board.
Installation
To install an IR film floor, you need to perform a series of sequential steps:
- First of all, it is necessary to develop a project and make all the necessary calculations.
- Get all the necessary materials and tools.
- Install the IR floor.
- Start the system and check operation.
- Carry out a clean finish.
Area calculation
The main distinguishing property of infrared film flooring is that it is not installed under furniture. Therefore, when calculating the amount of material that will be required and choosing the location for placing the film, you need to subtract the area where the film will not be laid.
When calculating the heated area, keep in mind that the IR film is laid at a distance of 100 mm or more to any vertical surface.
Once the size of the required area has been identified, the next step is to calculate the power.
| Film power | 150 W/m² | 220 W/m² |
| Main source of heating | At least 95% of the area | At least 70% of the area |
| Additional heating source | At least 60% of the area | At least 40% of the area |
| Flooring type | laminate, linoleum, carpet | parquet, carpet |
Energy consumption calculation
The amount of money spent on infrared floor heating is calculated based on the electricity tariff in your area.
Installing a thermostat can reduce the cost of infrared heated floors by approximately 35%.
Power calculation
If the area of the room that is planned to be heated with a film floor is very large, several sets of IR film will be needed to install such a system. In such a situation, you need to sum up their power.
Using several sets of IR film Ptot = P1+P2+…+Pi Using part of the set Ptot = 1.10*L
where, Ptotal is the total power of the film floor, W; P1…Pi is the power of a separate set of film, W; L is the length of the infrared film used during installation, m; 1.10 is the conversion factor for the power of the film floor.
Calculation of the number of thermostats
The main purpose of a thermostat for infrared heated floors is to regulate the degree of heating.
If you connect several sets of film flooring at once, then you need several thermostats at once, since the power consumed by the heated floor is summed up.
It is recommended to install the thermostat at a height of 15-20 cm, above the level of the final coating.
It is better to place the thermostat on a wall that is perpendicular to the direction of the stripes.
There are two connection methods:
- Zoning and connecting each zone to a separate thermostat.
- Connect a solid state relay or magnetic starter. You cannot make such a connection yourself; this requires the knowledge and skills of an electrician.
Warmstad 1.5 sq.m.
| Manufacturer: | Warmstad |
| View: | heating mat |
| Power: | 220 W |
| Heating area: | 1.5 m2 |
| Installation type: | into a layer of tile adhesive |
for comparison
RUB 2,907
Product added to cart
| Photo | Name | Price per piece | Quantity | Price |
| Warmstad 1.5 sq.m. | 2,907 rub. | < 1 > | 2,907 2,907 rub. |
There are 0 items in the cart worth 0 rub.
Go to cart
Buy
Availability
Go to the full catalog of WARMSTAD heating mats
Warm floor cable or mat
The choice primarily depends on whether you will do the installation yourself or plan to invite specialists. Easier to install heating mats. To lay cable floors, work will be required to make a screed, connect to the power supply system, etc.
It will be necessary to take into account that the heat transfer of the mats is slightly lower than that of the cable; therefore, more electricity will be required.
If you plan to invite professional installers, it is recommended to use a self-regulating shielded heating cable for floor heating. The high cost will pay off due to the long service life and the absence of harmful effects of the electromagnetic field on humans.
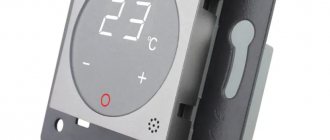
Thermostats
Thermoregulator (thermostat) is a device designed to control the heating system. Allows each user to control the heating temperature level, reducing or increasing it at will.
In the modern market, accessories of this type are offered in a wide range by various brands. The cost of devices largely depends on. The cheapest models are made by China; in the middle price segment, products from Belarusian and Russian enterprises predominate, and the highest prices are asked for products from Danish, Finnish and Swedish brands.
Another cost component is the type of thermoregulatory device. Simple and unpretentious devices with a minimal set of functions will cost the client significantly less than ultra-modern programmable models with an extensive package of capabilities and a memory base that allows you to set the desired heating mode for 3-7 days.
The third pricing factor is the management method. Today, mechanical, wireless, push-button and touch-sensitive thermostats are available for sale. The more complex and sophisticated the design of the device, the more money you will have to pay for it. You can find a mechanic for a fairly budget price, but a modern touch-screen version with the ability to program the system on/off several days in advance will cost a tidy sum.
Before purchasing a thermostat, the user must clearly decide which functions of the device will be used regularly and only then make a choice. There is no point in overpaying for unclaimed features.
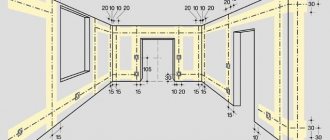
Step-by-step installation plan
So, installation of a heating cable consists of several stages:
- Preparing the base. A cement-sand screed, the thickness of which is at least 3 cm, must be poured onto the subfloor. To lay the wire connecting the thermostat to the system, you will have to drill a channel whose diameter is 2 cm.
- Installation of heat-reflecting substrate.
- Laying the reinforcing mesh to which the cable will be attached. If this step is omitted, the wire will need to be secured to the mounting tape. We must not forget that the product does not fit under furniture.
- Laying the wire.
- Installation of heat sensor. It is placed in a special corrugated tube and placed in a pre-made groove.
- Pouring cement screed. It should have a small thickness, only 4 cm. After the thermal cable is hidden under the solution, it is necessary to check its performance: ohmic resistance and insulation resistance. Laying the flooring can be done only after the solution has dried thoroughly - no earlier than a month.
Step-by-step technology for cable heated floors
These are all the features of choosing and installing a heating cable for a heated floor. In any case, before work you need to consider all the nuances of installation. And finally, a video of the installation with detailed comments:
Sensors
Thermal sensor (external or internal) is a small communication device necessary for the full functioning of underfloor heating equipment. It reads the air temperature level in the room, records the degree of heating of the floors themselves and sends the information to the thermostat processor.
- Internal temperature sensors are mounted in the floor structure, directly between the turns of the heating electric cable. Designed to control the heating of the floor system.
- External devices are most often located in the thermostat itself and monitor the air temperature in the living room.
In underfloor heating used as an auxiliary heating system, only internal temperature sensors are usually installed. If the equipment is the main and only type of heating available in an apartment or house, then the issue of ambient air temperature becomes extremely important. Therefore, it is necessary to install additional external sensors.
When cable heated floors are placed under laminate flooring, wooden parquet or any other material susceptible to overheating, there is an urgent need for an increased temperature control system. In this case, both types of sensors must be installed.
Rules for laying IR heated floors
You need to follow a few simple rules for installing infrared heated floors:
- The first line of film should be located at a distance of at least 100 mm to the wall and no further than 400 mm.
- The pitch of the film cutting line is 250 mm; the film cannot be cut in other places.
- The distance between adjacent film strips should be 10 mm or higher.
- The permissible length of the floor strip is 8 m.
Under laminate
When laying film heated floors under laminate, follow the rules:
- To prevent infrared film from overheating, it must be distributed in areas where there is no furniture.
- In order for the room to be heated with maximum efficiency, the film floor must cover at least 70% of the area.
Installation diagram of IR heated floors for various types of finishing floor coverings
Next you need to draw a plan for the location of the heating elements. On paper, reflect the locations of the furniture and heating film.
Laying is done on a surface that has been leveled beforehand.
The concrete screed should not have any differences. To prevent heat from escaping from the thermal film through the floor slabs into neighboring apartments, a thermal insulating substrate (polypropylene) must be laid on the floor, the thickness of which is 3-4 mm and covered with foil on one side.
Thermal insulation strips are secured with thermal insulation tape, and they also need to be carefully trimmed around the perimeter of the room.
The heating film can only be cut in the places marked on it. They are highlighted with a dotted line and a scissors symbol.
If you cut the film diagonally, you will simply ruin it.
The distance of the film from the wall should be 10 cm.
The heating film strips are laid on the substrate one next to the other with a gap of at least 5 mm, but not more than 1 cm.
You cannot bend the heating element at an angle of 90 degrees or more, as it will stop functioning.
Connection diagram for IR heated floor
In places where the thermal film is cut and the conductive busbars are cut, it is necessary to install bitumen insulation, which is included in the heated floor kit. The contact must be installed in the center of the end of the conductive busbar and pressed well with pliers. Using a sharp knife, it is necessary to strip the current-carrying wires by 5-8 mm and clamp them with pliers in the contact terminal, then the entire contact is insulated with bitumen insulation. The infrared heated floor is connected in parallel with copper stranded wires with a cross-section of at least 1.5 mm². It is also recommended to install a temperature sensor so that the automatic floor heating works correctly.
At a distance of 20-25 cm from the wall on which you will install the thermostat, use a hammer drill to perform a groove. Place the temperature sensor into the hole formed under the heating film.
In order for the sensor to show the correct temperature, it must be placed on a heat-insulating substrate.
After all the above manipulations, the thermostat is connected.
Upon completion of installation, check the functioning of the IR heated floor. All thermal films should heat up when turned on. Only after making sure can you lay the laminate on heating elements.
Under linoleum
Laying under linoleum is similar, but has its own characteristics:
- At the first stage, prepare the base, because... The floor can only be installed on a flat and stable surface.
- The mats can be cut into 25 cm pieces. The edge is insulated with a special tape. The gap to the heating system pipes should be 30 cm.
- The film must be laid with the copper bars facing up; overlapping joints is strictly prohibited. The remaining steps are carried out in accordance with the instructions. A prerequisite for high-quality heating is the connection of a thermostat.
- Then linoleum is laid. In small rooms, the coating is laid and left for a couple of days, after which the edges are pressed against the baseboards.
There are different ways to install linoleum
When carrying out work, take into account the fact whether it will be necessary to disassemble and move the system in the future, and also pay attention to the technical characteristics of heated floors
As you can see, infrared film heated floors are an excellent option for a heating system, and its installation is not that complicated. Therefore, everything can be done with your own hands.
IQ Floor Mat 1.5 sq.m.
| Manufacturer: | IQ WATT |
| View: | heating mat |
| Power: | 225 W |
| Heating area: | 1.5 m2 |
| Installation type: | into a layer of tile adhesive |
for comparison
RUB 6,580
Product added to cart
| Photo | Name | Price per piece | Quantity | Price |
| IQ Floor Mat 1.5 sq.m. | 6,580 rub. | < 1 > | 6,580 6,580 rub. |
There are 0 items in the cart worth 0 rub.
Go to cart
Buy
Availability
Go to the full catalog of IQWATT heating mats
You can get advice, additional information about heating mats and choose a heated floor for tiles in our online store, by calling +78.0 or in one of our stores in your city.