01/24/2017 master
Fluorescent light bulbs are very often used today as light sources. They have many positive aspects that make them indispensable both in the lighting system of an industrial facility and in home lighting.
Fluorescent lamps
But due to the structural features, such light sources can fail. In such a situation, you do not need to immediately send the lamp for recycling, but you can try to fix it yourself. To do this, you need to check the starter of the lamp for functionality. After all, it is in this detail that the reasons for the malfunction of the fluorescent lamp often lie.
Starter device for fluorescent lamps
The design of this element is quite simple. Each model produced by a specific manufacturer has its own technical characteristics. This should be taken into account when choosing lamps. The starter is a glass cylinder containing an inert gas. It can be a mixture of helium and hydrogen or neon. Fixed metal electrodes are soldered into the cylinder. Their conclusions pass through the sockets.
The cylinder is located inside a plastic or metal case with a hole on top. The most popular material for making the case is plastic. A special impregnation allows such a housing to cope with high temperatures. Any starter for fluorescent lamps has only two legs (contacts).
If you remove the structure from the body, you can see the flask itself. You can also see that some element is connected parallel to the electrodes of the flask - this is a capacitor. Its capacity is about 0.003-0.1 microfarads. The capacitor is designed to perform two functions at once:
The capacitor reduces the voltage pulse that is formed when the electrodes open and increases its duration.
Due to parallel connection with the electrodes, the capacitor reduces the likelihood of their welding (sticking). A similar phenomenon can occur during the process of opening the electrodes due to the formation of an electric arc. The capacitor extinguishes the arc in the shortest possible time.
Expert opinion
Viktor Pavlovich Strebizh, lighting and electrical expert
Any questions ask me, I will help!
As a stand, you can take a ready-made lamp and replace its standard parts with tested parts, or you can assemble a simple circuit. If there is something you don’t understand, write to me!
Starter classification
Starters are classified according to the following parameters:
- Power;
- Voltage.
Parameters to consider when choosing a starter:
- Operating temperature;
- Capacitor type;
- Rated voltage;
- Price.
According to the connection method, starters can be:
- For single connection;
- For serial connection to a network with a voltage of 220/240 V or a single connection to a network with a voltage of 110/130 V.
The connection to the network is determined by the way the lamps are connected, whether it is single-lamp or two-lamp. With the first connection method, the lamp and choke are switched on in series, the starter – in parallel. With a two-lamp connection, two lamps and one choke are connected in series, and a separate starter is turned on for each lamp.
Why is a starter needed in fluorescent lamps?
This element is the main one in the design of fluorescent lamps. Without it, electromagnetic ballasts will not be able to function. The main purpose of the starter is to start the mechanism and ignite the inert gas located in the gas-discharge flask. The starter works like a switch - it opens and closes an electrical circuit.
The installation of a starter is dictated by the need to perform two important functions:
- - circuit closure. Allows you to heat the lamp electrodes, thereby facilitating the ignition process;
- - chain break. Occurs immediately after heating the electrodes. As a result of the opening, an increased voltage pulse is formed, which causes breakdown of the gas gap of the flask.
The choke plays the role of a stabilizer and transformer. It maintains the required current of the lamp filaments, creates a voltage pulse necessary for breakdown of the lamp and stabilizes the arc burning process.
Verification methods
It is advisable to use instruments to diagnose the condition, but if they are not available, the assessment of the condition can be done without them.
Without tester
You can check the choke of a fluorescent lamp without a tester and other devices (at least an indicator screwdriver). But the reliability of these methods is limited.
- First of all, this is the behavior of the lamp . If, when voltage is applied, it flashes, but does not reach a steady glow, then there is a reason to check the inductor (although there may be other reasons, including a malfunction of the lamp itself). If there is a break in the coil, there will be no blinking - the circuit will not show any signs of life at all.
- Visual inspection . If there is blackening, swelling, or traces of local overheating on the throttle body - all this is a reason to doubt the serviceability of the device. It must be replaced or diagnosed using instruments.
- Installation in a known-good lamp instead of a standard one . If after replacement the lighting fixture stops working, then the problem is in the throttle. Or, conversely, install a known-good choke into a non-working lamp. If the problem is resolved, then the problem has been found.
You can assemble a stand for testing ballast elements. This makes sense if you have to maintain the lighting system of a building, office, workshop, etc., built using fluorescent lamps. As a stand, you can take a ready-made lamp and replace its standard parts with tested ones, or you can assemble a simple circuit. It uses a regular 220 volt incandescent lamp.
To check the choke of a fluorescent lamp, the properties of the inductive reactance of the choke coil are used. Various situations are possible:
- the lamp is lit at full intensity - the inductor is working, its reactance limits the current in the series circuit;
- the lamp burns at full brightness - there is an interturn short circuit, the inductance of the coil is small, the reactive component of the resistance is close to zero;
- The lamp does not light - there is a break inside the throttle.
It will not be possible to check elements of electronic ballasts (EPG) on such a stand. It works on a different principle.
If a choke with a breakdown on the body is tested, then when power is applied, mains voltage will be present on its body. The ballast elements must be connected when the voltage is off. Take precautions when serving food.
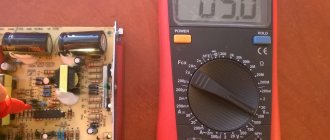
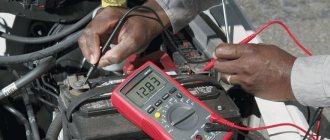
Using a multimeter
The multimeter provides greater opportunities for checking ballast elements and the reliability of such testing is higher.
On a cliff
To check for an open circuit, a multimeter in resistance measurement mode (or audio testing) must be connected to the ballast terminals. If the device is working properly, the tester will show a resistance of several tens of ohms (depending on the type of inductor, for most common models it is about 55..60 ohms).
Expert opinion
Viktor Pavlovich Strebizh, lighting and electrical expert
Any questions ask me, I will help!
If you check the choke of a fluorescent lamp with a multimeter, you can find either its working condition, in which the measured active resistance corresponds to its passport data, or you can encounter inconsistencies. If there is something you don’t understand, write to me!
Incandescent lamp
The first step in checking a 12 volt or 220 volt incandescent lamp or any other voltage is a visual inspection. If it is clearly visible that the tungsten filament inside the lamp is broken, then no further inspection steps are required.
If the filament is intact, the incandescent lamp must undergo tests to determine its suitability.
Method 1. Screw the lamp being tested into another lighting fixture with a similar base. The lamp is on, which means there is a problem with the lamp itself. Doesn't light up doesn't mean it's faulty. It happens that in a seemingly similar socket, when screwing in the lamp, the contacts do not close. If there are no more places where the light bulb test can be done, then another method is needed.
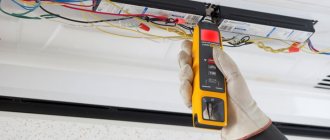
Method 2. Use a special tool. When visiting large hypermarkets or hardware stores, you have probably seen a device for checking light bulbs. The buyer or seller himself applies the lamp base to the corresponding connector of the tester, and a sound signal occurs. This indicates that the lamp is working properly. Typically, such testers are equipped with connectors not only for conventional lamps, but also for fluorescent and halogen lamps.
It makes no sense to purchase such a device at home for rare testing cases, but you can use the proposed principle. To do this you will need an indicator screwdriver. The multifunctional indicator screwdriver (hereinafter referred to as the MIO) runs on a regular coin cell battery, which is located inside the case.
Using MIO, verification is carried out as follows:
- take the light bulb in your hand, touching the thread on the base;
- take the MIO in the other hand;
- touch the central contact of the lamp with the MIO rod;
- the thumb of the hand with the MIO touches its end.
As a result, the circuit is closed. When the light bulb is working properly, the LED inside the MIO lights up. The entire check takes a matter of seconds. However, if the lamp being tested is low-power and the coil resistance is high enough, the LED may not light up. Then method number 3 will help you.
Method 3. Call with a multimeter.
What is a multimeter?
This is a compact portable device with which electrical measurements are made. The device is convenient for identifying damage in the network, electrical appliances and tools, checking the charge level of a battery of any power (from a regular battery to a car battery), and determining the network voltage level.
There are two main types of multimeter: analog and digital. If electricity is not related to your professional activity, then for household needs it is enough to purchase the simplest version of a multimeter.
The existing switch knob on the device allows you to select the measurement mode. Our case is called the “continuity” mode, and is often combined with the resistance measurement mode.
Test sequence
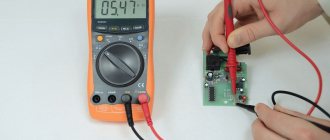
So how to check a light bulb with a multimeter?
- Switch the device to the “dialing” mode;
- Check the integrity of the device circuit by short-circuiting the probes to each other;
- Place the light bulb next to the device on the surface;
- Take any of the probes of the device and touch it to the central contact of the light bulb;
- Take another probe and apply it to the side contact of the light bulb.
The device will beep when the lamp is working properly. But here are the same features as in the previous method: the sound signal may not work. Then all that remains is to check the light bulb by measuring the resistance.
Check by measuring resistance
This need also arises when factory markings are erased. To check with a tester, the device is switched to “resistance” mode. The sequence of actions is similar to the previous check. Only in the end result there is no signal.
We are interested in the indicators reflected on the display (digital) or indicated by the arrow of the (analog) device. There is a clear correspondence between the data and the power of a light bulb with an E14, E27 base.
| Resistance, Ohm | 25-28 | 35-40 | 45-50 | 60-65 | 90-100 | 150 |
| Power, W | 150 | 100 | 75 | 60 | 40 | 25 |
As we can see, the lower the resistance, the greater the power. If the resistance approaches infinity, then the lamp is faulty.
Why do fluorescent lamps burn out?
Considering gas-discharge lamps, one cannot help but mention their similarity with traditional incandescent lamps (IFL). As in LN, the glow is created by heating spiral tungsten electrodes. Long and intensive use leads to overheating, contact wear and failure.
In LDS, the elements are coated with a layer of active alkali metal. This solution allows you to extend the life of the lamp and reduce the negative impact of high temperatures. This stabilizes the discharge between the electrodes, which helps maintain integrity.
However, the coating does not last forever and is sensitive to frequent switching on and off. Gradually, the metal crumbles, and the tungsten electrodes begin to contact each other. The discharge passing through them heats the material and leads to final burnout. This can be seen on old bulbs: small darkened areas of phosphor near the contacts.
What kind of lighting do you prefer?
Built-in Chandelier
During operation, it is important to monitor the integrity of the flask. If there is damage, burnout will not take long to occur
If an orange glow is observed at the edges of the flask, it means air is getting inside through the hole. It is impossible to repair the element, only replace it.
Expert opinion
Viktor Pavlovich Strebizh, lighting and electrical expert
Any questions ask me, I will help!
Depending on the size of the device, a daytime fluorescent lamp costs from 40 rubles to 1 thousand or more for industrial models. If there is something you don’t understand, write to me!
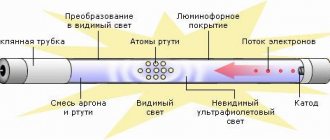
Principle of operation
The principle of operation of a fluorescent lamp is equivalent to gas-discharge light sources and is energy-saving. The air is evacuated from the glass flask and an inert gas with a drop of 30 mg of mercury is placed. Spiral electrodes reminiscent of an incandescent filament are built into opposite sides. These electrodes are soldered on both sides to two contact legs placed in dielectric plates. The inside of the tube is coated with a layer of phosphor. The length, diameter and shape of the flask can be different, but the internal structure does not change.
Structure of a fluorescent lamp
The LL is switched on using ballasts - electromagnetic or electronic. Electromagnetic ballasts (EMPRA) include the main element - a choke.
Electromechanical throttle
This is a ballast resistance in the form of an inductor with a metal core, connected in series with the LDS. The choke maintains the uniformity of the discharge and adjusts the current if necessary. The moment the lamp is turned on, the inductor restrains the starting current until the spiral filaments heat up, then produces a peak voltage from self-induction, which lights the lamp.
Diagram of a fluorescent lamp with electronic ballasts
Note! The choke restrains the current in the system when turned on, preventing the spiral filaments in the tube from overheating and burning out.
Requirements for ballast resistance:
- minimal power loss;
- small weight and size;
- absence of hum;
- the heating temperature is not higher than 600 degrees Celsius.
Another significant element of the electronic ballast is the glow discharge starter.
Glow starter
When the lamp is turned on, a current discharge occurs in the starter, heating the bimetallic contacts. They close, increasing the current in the lamp circuit, which leads to heating of the electrodes. Next, the bimetallic contact of the starter cools down and opens the circuit. At this moment, the ballast (choke) emits a high-voltage pulse to the electrodes. An arc discharge occurs between them, causing ultraviolet radiation. This causes the phosphor on the surface of the flask to glow in the human-visible spectrum.
A fluorescent lamp with an electromagnetic choke operates in two modes: ignition and glow.
Electronic ballasts (EPG) are used in new generation luminaires, extending the service life of the lamp and increasing efficiency. In the glow mode, the voltage level on the electrodes allows the LL to operate with burnt-out spirals, which is impossible with electronic ballasts. The electronic ballast circuit excludes the use of starters.
Electronic ballast connection diagram
Electronic ballasts are quite expensive and difficult to repair on your own, so electromechanical chokes are widely used.
Electronic ballast
Important! The lamp with electronic ballast operates in four modes: on, preheating, ignition and combustion.
How to check a fluorescent lamp with a multimeter if it does not work
- The device does not turn on - the cause of such a malfunction may be the loss of functionality of the lamp or breakage of wires, circuits and contacts. It is necessary to replace the lamp; if this does not help, you should look for the cause in the connections and wires; perhaps there is a circuit break somewhere.
- The lamp begins to blink, but does not light up until it glows steadily - This is due to a short circuit in the wires or between the contacts. It is necessary to check the insulation and replace the wires if necessary. If this does not help, the lamp itself may need to be replaced.
- A dim glow on both or one end of the device - this happens due to a violation of the seal of the flask. Such a device must be replaced; it cannot be repaired.
- Darkening of the ends and complete shutdown during operation - the cause of this phenomenon may be a faulty ballast. You should completely replace it and test the device again.
- Cyclic dimming and ignition of the lamp - most often the cause of this malfunction is the starter. It should be replaced, as in the case of a broken ballast.
- Burnout and blackening of the ends during switching on - this happens when the incoming voltage does not correspond to the rated voltage. The ballast resistance cannot withstand the increased load, and the lamp immediately burns out. It could also be due to a faulty ballast. In this case, the ballast is also replaced with a new one.
Integrity of spiral electrodes
When problems occur, there are often reasons that are not always visible to the naked eye. In this case, you need to ring the product with a multimeter or check it with an indicator. Its switch must be set to the position that measures resistance. The range is the smallest of all possible. The probes touch the pins and look at the display. If the spiral is torn or burnt, the display shows 0, if it is intact, the numbers 3-16 Ohm. Torn or burnt nichrome thread cannot be restored; the product must be replaced.
Luminescents: how the device works
All daytime luminescent products are divided according to shades and brightness levels into:
Yellowish ones are suitable for home use. They soothe and do not cause irritation. For the office they choose warm ones - they are suitable for painstaking work. For industrial and public institutions - cold, stimulating the organs of vision, stimulating the nerve endings.
The “cold” lamp stimulates and irritates, installed, for example, in hospitals
Structurally, the product consists of a glass bulb of different shapes (round, oval, shaped).
The flask is coated with phosphor - this is a chemical solution that increases light output.
During installation, you may need a hidden wiring detector.
- electric current, using a choke, acts on the spiral electrodes;
- the electrodes heat up quickly (in 2-3 seconds);
- the electrodes heat the mercury, which begins to evaporate;
- mercury gas (vapor) is formed inside the flask;
- the gas stimulates the phosphor;
- the fluorescent light bulb “lights up”.
In order for the current to act on the electrodes with the required force, a choke element is required. It promotes the “ignition” of the spiral electrodes. Looks like an induction coil with a core.
Current affects the part. Voltage accumulates there and is transmitted to the spiral electrodes.
To prevent the fluorescent lamp from overheating, there is a starter inside. It is a neon light bulb. It is necessary to open the circuit and turn off the flow of current when the spiral-electrodes have become sufficiently hot. The process happens automatically.
The fluorescent lamp starter ensures timely opening of the electrical circuit
Any daytime fluorescent structure must be certified and licensed. This is indicated on the packaging. Before purchasing, it is advisable to ask the seller about the availability of documentation for the device. They indicate the type, expiration date, information about the permission to use the product.
Measuring capacitance without a tester
If you don’t have a tester, you can check the capacitor by building a simple measuring device with your own hands. It consists of a light bulb and two wires. This device will need to touch the legs of the capacitor. If a spark passes between the legs, this means that the capacitor is working.
Despite all their shortcomings, today fluorescent lamps are the optimal type of lighting. Their advantages include both a long service life and minimal load on the electrical network of the illuminated room.
And in the event of breakdowns of fluorescent lamps, you can easily find their cause if you know how to use the simplest instruments - testers or multimeters. Using these devices, you can identify a specific faulty part of the lamp (starter, inductor or capacitor), after which it can be successfully replaced.
Fluorescent light bulbs are very often used today as light sources. They have many positive aspects that make them indispensable both in the lighting system of an industrial facility and in home lighting.
But due to the structural features, such light sources can fail. In such a situation, you do not need to immediately send the lamp for recycling, but you can try to fix it yourself. To do this, you need to check the starter of the lamp for functionality. After all, it is in this detail that the reasons for the malfunction of the fluorescent lamp often lie.
Faults in the electronic ballast
In modern LLs, electronic ballasts (EPG) are used more. To check it, take the same known-good device with similar parameters and connect it in accordance with the diagram to the lamp being tested. If the lamp works normally, then the cause of the malfunction is in the unit.
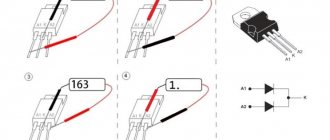
Don't rush to throw away the old unit. It is quite possible that the fuse has just blown (figure below - number 1). It is replaced with a similar one, with the same diameter, fusible wire or insert.
If the fuse is working, use a multimeter to check all resistors, capacitors and other parts in the circuit.
When the filaments barely glow, this is most often due to a breakdown of the capacitor between them (number 2 in the figure). It is replaced with a similar one, but with an operating voltage of about 2 kV. On cheap ballasts, capacitors of only 250-400 V often fail.
Transistors (number 3 in the figure) may fail due to voltage surges. When operating a welding machine or other powerful load, it is better to turn off the LL. It is easy to find a replacement using an analogue, the designation of which is found in the tables, or take a used ballast.
The decoding of the first letters of foreign manufacturers is of an advertising nature, which creates difficulties in determining the interchangeability of lamps.
After replacing each radio component, the functionality of the electronic ballast is checked by connecting it in series with a 40 W incandescent lamp.
Without a load, the pulsed electronic ballast device quickly fails. Therefore, in circuits with electronic ballast, special attention should be paid to the absence of contact faults.
Therefore, before turning on the LL, it is necessary to ensure the reliability of the electrical circuit contacts.
A switching power supply for a used energy-saving lamp may well be suitable even for a large LL. You need to remove the plastic base and correctly connect the contacts of the bulb to the filaments of the tube.
When installing electronic ballasts from another lamp, the power of the power supplies should be close in value.
It is not always possible to find the same device for the built-in ceiling lights with 4 lamps to replace the power supply.
Electronic ballast is especially afraid when phase and zero are confused.
Checking the fluorescent lamp choke (with and without a multimeter)
Fluorescent lamps often become unusable due to filament burnout. You can restore a second life to such a lamp using an unconventional starting scheme, repeatedly tested by folk craftsmen.
Expert opinion
Viktor Pavlovich Strebizh, lighting and electrical expert
Any questions ask me, I will help!
A more detailed check will consist of testing each element separately, but this one will take much more effort and will require you to have certain knowledge in this area. If there is something you don’t understand, write to me!
Checking the lamp
During its operation, a fluorescent lamp may fail. At the same time, you can check its component elements of the electrical circuit and fix the breakdown yourself. To do this you will need to use a multimeter or tester. To correctly check the starter of a fluorescent lamp, you must first know the version of the electrical circuit used for it.
In addition, it is necessary to dismantle or simply remove the fluorescent lamp from the ceiling or wall. After this, you can check all the important elements of the electrical circuit.
Two options
Let's consider both options for checking the electrical circuits given above. In this case, the verification method in both cases will be identical.
Note! In order to check the functionality of the starter for a fluorescent lamp, you can use any measuring instrument (tester, multimeter, etc.).
The following measuring instruments are most often used for checking:
- oometer It must be set to the position for the required resistance range to be measured;
- string type tester;
Tester for verification
- multimeter
Many experts recommend using a more advanced and versatile measuring device - a multimeter. In this case, diagnostics of the lamp (choke, etc.) should be carried out exclusively in a passive way. This means that the lighting installation cannot be connected to an external voltage source. To check a fluorescent lamp, you must carry out the following manipulations:
- put the lighting fixture on the table;
- we connect two probes of the measuring device to the wire terminals;
- measure the total resistance.
Checking a fluorescent lamp with a multimeter
But if there is a starter in the circuit, it will be impossible to check the total resistance in this way, since it will break the electrical circuit. In this regard, in both options it is necessary to do the following:
- remove the starter from its electric cartridge;
- We close the contacts of the starter and the electric cartridge.
Only after this can you check the lamp for the total resistance parameter. Please remember that when switched off, this part has open electrodes. Due to this, it is impossible to check its functionality. It can only be replaced with a backup one, which will have the same power. Note! A faulty starter, just like other broken parts, cannot be repaired. They need to be thrown away immediately and replaced with working ones.
Why does not it work?
Important: Dispose of fluorescent lamps correctly. Don't just throw them in the trash.
The luminescent structure may break, mercury will leak out, creating a threat to the health of households and neighbors. Disposal is carried out by special companies. If there is none in your locality, at least place the used product in several plastic bags and tie them tightly.
Most often (40 cases out of 100) starters break. This is a fragile part that can be replaced. Starters are sold in specialty stores or on online marketplaces.
The throttle “burns out” less often (in 10 cases out of 100). It also needs to be replaced in the same way as the starter. An unpleasant “burnt” smell will indicate such a breakdown. The element fails due to a winding break or excessive heating, which indicates a defective product.
Sometimes the cause of lamp inductor failure is a manufacturing defect.
The cost of a daytime fluorescent lamp (depending on the size of the device) is from 40 rubles to 1 thousand or more (industrial models).
How to check a fluorescent lamp with a tester
If an orange glow is observed at the edges of the flask, it means air is getting inside through the hole. It is impossible to repair the element, only replace it.
Expert opinion
Viktor Pavlovich Strebizh, lighting and electrical expert
Any questions ask me, I will help!
The lamp begins to blink, but does not light up until it glows stable. This is due to a short circuit in the wires or between the contacts. If there is something you don’t understand, write to me!
Is it worth repairing energy-saving lamps?
The decision of whether or not to repair a lamp largely depends on the number of faulty light sources. If we are talking about a single burnt out light bulb, you should not bother with the labor-intensive repair process. When there are a lot of lamps, repairs make economic sense. From parts of several lamps, it is possible to assemble one that will be operational. It is known from practice that to assemble one light bulb you will need parts from 3-4 damaged light sources.
When deciding to repair a lamp, you should think about the upcoming costs. You will have to spend money on buying parts (if they cannot be taken from light bulbs that have burned out), on a trip to the store or to the market. In addition, the process of searching for reasons is quite labor-intensive, so time should also be taken into account.
How to check a fluorescent lamp with a tester?
- electronic ballasts do not cause flickering of the LDS during its operation and do not create extraneous noise;
- a circuit based on electronic elements consumes less energy, weighs lighter and is more compact;
- the possibility of implementing a circuit that produces a “hot start”, in this case the cathodes of the LDS are preheated. Thanks to this switching mode, the service life of the source is significantly extended;
- The electronic ballast does not require a starter, since it is itself responsible for generating the voltage levels necessary for starting and operation.
Product prices
Philips-S-10
The cost of the starter depends on the quality of the electrodes and the brand.
Example from Belgorod:
- Philips S10 costs 18 rubles, and with the same characteristics, but Chinese TDM - 4 rubles. At the same time, the seller does not hide the fact that the electrodes of the cheap option are aluminum and does not provide a guarantee for the device.
- Starter TDM S2 aluminum - 3.90, and copper contact - 5.5 rubles. At the same time, Philips will cost 27 rubles.
From these examples it is clear that the difference in price between a good and an incomprehensible starter is noticeable, but the service life is also different.
Is it possible to check with a multimeter at home?
The easiest way to check is to use a similar lamp, install a fluorescent lamp in it and then connect it to the network. But there is not always a device with the same type of cartridge for replacement. In addition, the screw threads of the base and the socket may not match, and as a result, the electrical contacts simply will not close.
In this case, a very common measuring device, a multimeter, comes in handy at home. Among its modes you can find a “continuity test”, which easily determines the integrity of the electrical circuit.
- the appropriate mode is selected;
- the first probe is placed on the central contact, and the second on the side;
- readings are taken from the device.
The second mode often used for diagnostics is “resistance”. During the test, probes are also used and the initial values are compared with those detected by the multimeter. A small error in measurements may occur due to weak contact with the probes.
Multimeter
The starter is the most frequently broken element of fluorescent lamps. This happens due to the constant operation of the starter under conditions of serious temperature changes.
To check the starter, its housing must be disassembled, and then the capacitor and lamp must be inspected. The capacitor should not have swelling on its surface. The lamp should not have noticeable blackening. If the lamp and capacitor do not have the above damage, then you can connect the starter to the multimeter.
To do this, the multimeter must be switched to ohmmeter mode with the highest resistance measurement limit. If measurements show a resistance of less than 2 MΩ, then this means that the starter capacitor has a large current leakage. If the multimeter shows a faulty starter, it must be replaced. In this case, the problem of the lamp malfunction will be solved.
How to check a ballast choke without a multimeter
Without special measuring instruments, a faulty ballast may be indicated by the fire snake effect. You can visually observe it inside the lamp.
What does this mean? And this means, first of all, that there is an excess of the maximum permissible current. Because of this, the charge lost stability.
The lamp may also glow intermittently or flicker. If the ballast breaks down, the lamp will not light up the first time.
As a result, the starter will constantly start and stop, start and stop. From such frequent starts, blackening appears near the spirals at the ends of the lamp.
Another way to check without measuring instruments and a multimeter is with a test light. Its power should be approximately the same as the power of the throttle itself.
Connect it in series according to the following diagram with the ballast and watch how it lights up.
Expert opinion
Viktor Pavlovich Strebizh, lighting and electrical expert
Any questions ask me, I will help!
This device is part of the electromagnetic control equipment and, when working together with the choke, ensures the start of the process of forming a glow discharge in the LDS bulb when an alternating mains voltage is applied to the contacts of the lamp. If there is something you don’t understand, write to me!
Designation and marking
The markings of domestic and foreign manufacturers differ from each other. According to GOST current in the Russian Federation, the numbers (letters) of the marking correspond to:
- 1st – 60/90/120 – power of the connected lamp;
- 2nd – “C” – informs that this is a “starter”;
- 3rd – 220/127 – lamp supply voltage.
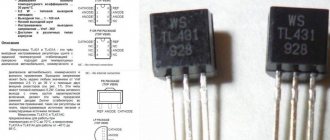
For foreign analogues, for lamps with a power from 4.0 to 80.0 W and a voltage of 220 V, the designations used are S10, FS-U, ST111, and for lamps with a voltage of 127 V and a power of up to 22 W – S2, FS-2, ST151.
Electronic ballasts for compact LDS
Relatively recently, fluorescent energy-saving lamps, adapted for standard sockets for simple incandescent lamps - E27, E14, E40, have become widely used in everyday life. In these devices, the electronic ballasts are located inside the socket, so repairing these electronic ballasts is theoretically possible, but in practice it is easier to buy a new lamp.
The photo shows an example of such an OSRAM lamp with a power of 21 watts. It should be noted that at present, the position of this innovative technology is gradually being occupied by similar lamps with LED sources. Semiconductor technology, constantly improving, makes it possible to quickly achieve prices for LDS, the cost of which remains practically unchanged.
OSRAM lamp with E27 base
Troubleshooting and Troubleshooting
It is best to check a fluorescent lamp (lamp) if you have a working analogue. It is necessary to provide convenient access to all its components. In this way, you can correctly analyze the malfunction and give recommendations for elimination, even if you repair it yourself. We'll tell you how to check a fluorescent lamp at home.
Integrity of electrode spirals
The electrode spirals are located inside the gas-filled LDS tube and during production are soldered to the legs of the lamp bases. They are located in the end parts of the flask. Thus, using a multimeter in resistance measurement mode, you can ring a fluorescent lamp.
Faults in the electronic ballast
If a malfunction occurs, the user can check the serviceability of the LDS by replacing it, not forgetting to “de-energize” the circuit before doing this. When replacing, use only the recommended lamp. Information about it is contained on the product body. In case of failure, the only option left is to repair the electronic ballast by specialists from the workshop.
How to check the choke of a fluorescent lamp?
The inductor is an inductor coil wound on a ferromagnetic core with a large magnetic permeability. It is an integral part of electromagnetic switchgear equipment (EMPPA).
At the stage of turning on the LDS, it, together with the starter, ensures heating of the cathodes and then creates a high-voltage pulse (up to 1000 V) to create a glow discharge in the flask due to its inherent electromotive force (EMF) self-induction.
After the starter is turned off, the inductor uses its inductive reactance to maintain the discharge current through the LDS at the level necessary for constant and stable ionization of the gas-mercury mixture used in the flask. The magnitude of the inductance is such that the resistance of the inductor for alternating current protects the electrode spirals from overheating and burnout.
You can check the serviceability of the fluorescent lamp inductor by measuring the resistance using an ohmmeter. It is part of the electrician's combined instrument.
If you check the choke of a fluorescent lamp with a multimeter, you can find either its working condition, in which the measured active resistance corresponds to its passport data, or you can encounter inconsistencies. After analyzing them, we can draw a conclusion about the nature of the detected defect.
Checking the serviceability of the fluorescent lamp and throttle
To check for breakdown on the body, you need to connect one tester probe to the device body, the other to the ballast terminal (then to another).
Expert opinion
Viktor Pavlovich Strebizh, lighting and electrical expert
Any questions ask me, I will help!
To check for breakdown on the body, you need to connect one tester probe to the device body, the other to the ballast terminal, then to the other. If there is something you don’t understand, write to me!
Features of choice
Advantages and disadvantages
Advantages of using modern starters:
- Environmental Safety;
- Extending the service life of lamps;
- Durability;
- Simplicity and ease of installation.
It is important to remember the disadvantages, and these are:
- Low reliability;
- Voltage dependent;
- Variation in the response time of electrode contacts.
Technical requirements
All technical means, equipment and components must comply with technical conditions and rules. Thus, the following regulatory documents apply to starters:
- GOST 8799-90 “Starters for tubular fluorescent lamps. Technical conditions";
- GOST R IEC 60155-99 “Glow discharge starters for fluorescent lamps.”