Modern technologies for installing underfloor heating systems are now actively used in the housing and social sphere. Thanks to them, you can achieve the most comfortable indoor microclimate without spending unnecessary money on heating. They can use electricity or liquid as a coolant, and the design of the circuits can not only be designed during construction, but also make the old house warmer and more comfortable.
Connecting a heated floor
Connecting a heated floor is the topic of our publication today. We will talk about the two most popular ways of arranging them: water , operating from a gas boiler - this is an option for private houses, and electric cable , which is also suitable for an apartment.
Which to choose?
Many people choose water heated floors because their operation has virtually no electricity consumption, which means they can save a lot. This type of underfloor heating is connected to the general heating system, but it must be taken into account that gas consumption increases, so it is advisable to have your own boiler room. Savings become noticeable only when heating large areas.
Cable electric underfloor heating consists of wires that release heat when heated. The cables are double insulated and connected using couplings that are reliable and airtight. Thanks to this, such warm floors can also be installed in rooms with high humidity.
Cable electric heated floors have an affordable price compared to their competitors. But its installation requires a cement screed, which increases the height of the floor. For unheated rooms, including balconies, the power of the product should be high, but for corridors and bathrooms it is enough for this figure to average 130 watts.
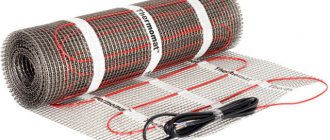
Heating mats are the same wires, but attached to a special mesh. This mesh is made from fiberglass; the product is sold in rolls. Minimats combine perfectly with tiles and are recommended for installation in the kitchen, bathroom and hallway.
An infrared electric heated floor does not require a concrete screed. It is suitable for both laminate and carpet. It will take only two hours to install it, and there is no need to wait for the screed or glue to dry.
The main feature of such a warm floor is the absence of dirt and dust, which is typical for other varieties. Installation on walls and ceilings is not excluded. But, unfortunately, this new product is not cheap.
An important role when choosing a heated floor is played by the condition - whether the heated floor is the only way to heat the room or is used as an addition to the main one. Under the second condition, all of the above options are suitable.
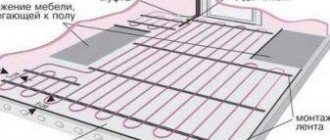
If the heated floor is the only source of heating, then you need to take into account that for maximum effect the heating system must cover up to 70 percent of the entire surface. In this case, it is not necessary to lay heated floors under large furniture. When choosing a cable system, the wires are laid as close to each other as possible, thereby achieving maximum heating.
To summarize, it can be noted that only electric heated floors can be installed in the apartment. Moreover, they are suitable not only for “dry” rooms, but also for balconies, saunas and bathrooms. Since the heating elements do not depend on central heating, the electric heated floor can also be turned on in the summer. This heated floor is easy to install and adjust and will last for several decades.
Cable underfloor heating involves further pouring a cement screed; when using roll heating systems, a screed is not needed, but it is desirable that the base is level.
By the way, infrared heated floors are not suitable for tiles, since the tiles are laid on glue, and it will not be able to bond to the base of the heated floor. You can get out of this situation by using plasterboard or glass-magnesium as an additional layer, then it is possible to lay tiles on an infrared heated floor.
For linoleum and carpet, the ideal option would be to use infrared heated floors, since its thickness is less than that of its competitors, and accordingly, this achieves the maximum effect of thermal conductivity.
Water heated floors are suitable for country cottages with a room area of over 60 square meters. m. But such a system needs preventative maintenance and a separate boiler room. The components are not cheap, so installing a water heated floor will cost a pretty penny.
Advantages and disadvantages
Advantages and disadvantages of water heated floors:
- efficiency, the ability to provide a comfortable microclimate in residential or office premises;
- safety, lack of power supply and problems associated with it;
- high thermal inertia allows you to endure a short-term stop in coolant circulation with virtually no losses;
- installation in a screed or laying under sheet flooring is allowed (“wet” and “dry” methods);
- economical mode of use. The initial costs are slightly higher than with electric systems, but then you only have to pay for fuel;
- the ability to smoothly and finely adjust the temperature.
- Without a coolant, a water heated floor is useless. You must have a source of hot water (usually your own boiler);
- there is a danger of leaks, which is why the installation of water systems is prohibited in apartment buildings (more precisely, in the rooms under which living quarters are located);
- in winter, the coolant may freeze in the hinges, which will cause them to rupture. When the water thaws, serious repairs will have to be made.
The disadvantages of water heated floors are quite serious. They limit its scope of application to private homes or offices located on the lower floors. However, the efficiency and accuracy of adjustment make water systems very popular and in demand.
Why is there not a lot of TP in the house?
It should be noted that if you decide on water heated floors, there is little point in limiting their area. Let's say, do them only in two bathrooms and a hallway (the area of the TP will be about 20 m²). The best solution would be to install water heating wherever tiles are planned (usually hallways, halls, kitchens, pantries, and even living rooms, heated basement), and, if possible, in other rooms of the house, even bedrooms.
There are a number of reasons for this:
- A slight increase in price for a comfortable home. When implementing a water heated floor, even in a small area if there are radiators in the heating system, you will have to make a mixing unit with adjustment and pumps, buy a manifold and tie it with shut-off valves and pipes. Whether this mixing unit will work on 10 m² or 100 m² TP does not play a significant role. And the cost in both cases will be almost the same, because the shut-off valves, mixing valves and circulation pumps will be the same. Yes, the TP collector will, say, not have 2-3 circuits, but 10, but it will cost not 3-5 times more, but 2 times more.
- The screed will still be all over the floor. If you install heated floors only in some of the rooms within the floor, you still face the question of pouring screeds over the entire area of the house (floor). This is necessary so that you do not have steps and thresholds between rooms: this is inconvenient, unsafe, and simply ugly. There is no difference when pouring floors over a floor slab, insulation on a slab, or over insulation with warm pipes - it will cost the same (the price is based on the area of pouring). But then it will be very difficult to remodel and add water heating in other places in the future, and more often than not, it will be simply impossible.
- Insulation of the ground floor floor. This immediately raises the question of insulating floors in those rooms where, although there is no water heating, it is necessary to insulate them. This applies to ceilings above basements and floors on the ground. In all houses this is necessary to reduce heat loss.
Thus, the difference in money when increasing the heating area will be determined only by the cost of the pipe for the heated floor and the cost of its installation.
Direct connection diagram
You have a boiler, after which all safety fittings + a circulation pump are installed. In some wall-mounted boiler versions, the pump is initially built into its body.
For floor-standing units you will have to install it separately. From this boiler, the water is first directed to the distribution manifold, and then disperses through the loops. After which, having completed the passage, it returns through the return line to the heat generator.
Specification of materials and equipment using the example of Valtec
With this scheme, the boiler is directly adjusted to the desired temperature of the TPs themselves. You don't have any additional radiators or radiators here.
What are the main features worth paying attention to here? Firstly, with such a direct connection, it is advisable to install a condensing boiler.
In such schemes, operation at relatively low temperatures is quite optimal for the condenser. In this mode it will achieve its highest efficiency.
If you use a regular gas boiler, you will soon say goodbye to your heat exchanger.
The second nuance concerns solid fuel boilers. When you have it installed, for direct connection to heated floors, you will also need a buffer tank.
It is needed to limit the temperature. It is very difficult to directly regulate the temperature with solid fuel boilers.
Self-installation of heated electric floors
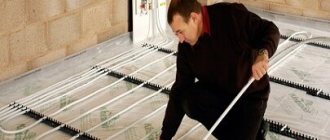
Installation of a heated floor begins with leveling the surface. If necessary, concrete work is carried out. Then a heat-reflecting film is laid. The strips of heat-insulating material are connected to each other with foil tape. Thermal film is laid out on top of the base in those places where it is necessary. If the heated floor is supplied in a roll, then it must be cut into sheets of the required sizes according to the marks applied.
Now we attach the contact clips to the film. They need to be installed and clamped with pliers onto a copper strip, with the smooth side of the clamp facing inward (see instructions). The cutting line of the copper strip must be insulated with short bitumen insulation (supplied).
Now we lay out the film on the floor (only a predetermined part of the area). The main thing is to do it correctly - with the copper conductor down. We fasten strips or pieces of thermal film with masking tape to the backing. Try to think through everything in advance so that there are fewer cuts to the film.
How to install a thermostat
Now it's time to install a heated floor thermostat. Consider its location so that it is convenient to use. You can make it as a stationary device (like a socket or switch) or connect it to an already installed outlet.
The warm electric floor film is connected to the network in parallel. The delivery set includes a diagram for connecting the wires to the film. Read it carefully and act according to the instructions. It is advisable to hide all wires in grooves or in the baseboard. Be sure to insulate the thermal film using insulating materials, which are also included in the kit.
Connecting a heated floor sensor
For the heated floor sensor, you need to prepare a place in advance near the installation site of the thermostat. To do this, you may have to make a small depression in the base or insulating material. The sensor is mounted on a black strip of thermal film.
Before laying the flooring, be sure to check the functionality of the heated floor. Touch each strip of thermal film or each segment and, if necessary, correct errors in installation. If everything is fine, you can start laying tiles, laminate or other flooring.
Project development
The HTP design stage begins with deciding whether the system will be the only source of heat or whether radiators will be additionally installed in the premises. If installation of batteries is not intended, all circuits are connected directly to the boiler, without installing a distribution unit. With this scheme, the temperature on the boiler is set to 45 degrees, and the coolant flows directly into the pipes.
When combining floor pipes and radiators, installation of a mixing unit is mandatory. For the batteries to work, the coolant must be heated to 70 degrees, and for a heated floor this is too high a temperature. In the mixing unit, the coolant will cool before being supplied to the pipes.
Before installation begins, a detailed design for the placement of collector units and mixers is drawn up. Craftsmen recommend placing them in the center of the entire system so that the length of the pipes in all rooms is the same. This will help you make precise adjustments.
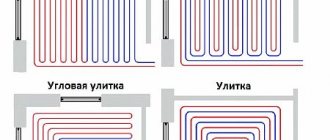
The next design stage is sketching a pipe laying diagram. There are 2 options:
- For small rooms (less than 10 sq/m) - parallel laying in a “snake” pattern in increments of 20 – 30 cm.
- In large areas (from 15 sq/m) - in a spiral. This method is more labor-intensive, but ensures uniform heating of the pipes over the entire area. Snake installation in large rooms can lead to broken pipes due to excessive bending and uneven heating in different corners of the room.
Spiral laying option
For rooms from 10 to 15 square meters, both installation schemes are suitable. The pitch between the pipes can be increased to 35 cm if additional radiators are to be installed.
If the room is large, divide it into several circuits. They must be the same size, the difference is allowed within 15 meters. If there is good thermal insulation, the standard step is 15 cm.
Standard formula for determining contour size:
- The heated area in squares is divided by the laying step in meters.
- The size of the curls and the distance to the collector are added to the result.
Expert opinion
Grebnev Vadim Savelievich
Heating system installer
When preparing the calculation and pipe laying diagram, hydraulic resistance is taken into account. It depends on the number of turns: the more there are, the higher the resistance. Please note that each circuit connected to the collector must have the same resistance.
How to choose a manifold and pipes
More often, users choose inexpensive collector models. But if there is no need to save money, then it is better to buy a model with servos and mixing units. Such devices allow you to automatically regulate the degree of heating of the water entering the pipes
A mandatory attribute of the manifold is an air vent valve and a drain valve for emergency situations. For the device to work normally, you can configure all valves once according to the required parameters.
To install the collector you will also need a cabinet. The best option is to use ready-made cabinets that are assembled and tested in the factory.
In this case, you only need to select the required number of collector groups, the power of the circulation pump and the mixing unit, if necessary. The cabinet is mounted in the wall and the heating circuit from the common riser and the circulation circuits of the heated floor are connected to it.
The standard option is to install the cabinet in the wall
The only drawback of using a ready-made manifold cabinet is its relatively high price, but when it comes to increased reliability and safety, it makes no sense to save.
For a rough estimate of the required number of pipes, you can proceed from the calculation of 5 linear meters of pipe per 1 square meter of floor. Polymer pipes made of cross-linked polyethylene are optimal in terms of price and quality ratio. They are lightweight, easy to install and have a service life of at least 50 years. Metal ones last longer, but they are more expensive and more difficult to install.
Preparing the base
The area for laying pipes must be perfectly level, with a height difference at the location of one circuit of no more than 6 mm. A concrete screed is used as the base. A layer of insulation is laid on it.
Extruded polystyrene foam is often used for the base.
Experts advise using extruded polystyrene foam - the degree of thermal conductivity is low and mechanical strength is high. This material is not exposed to moisture and does not absorb it. This type of gasket is produced in slabs measuring 50 by 1000 mm or 600 by 1250 mm, and with a thickness of 20, 30, 50, 80 and 100 mm. The product is equipped with snap grooves, this will allow for a strong connection.
Expert opinion
Grebnev Vadim Savelievich
Heating system installer
Expanded polystyrene sheets with a foil layer should not be used. There is no significant benefit from it, since the reflective property does not work in an opaque environment. In addition, the cement mixture is alkaline, it will very quickly corrode the foil.
Profile polystyrene mats are highly plastic, equipped with special bosses, and pipes are laid between them. Also, the bosses serve as a retainer for the heating elements. In them, the contour is attached in increments of 50 mm. The use of mats greatly simplifies the installation process, but they are more expensive than polystyrene foam insulation. The thickness of the slabs is from 1 to 3 mm, and the sizes are 500 by 1000 or 600 by 1200 mm.
If there is a heated room under the floor, a layer 3-5 mm thick is sufficient. If the room below is cold, the layer is increased to at least 20 mm. If this is the first floor and there is soil below the floor, the insulation layer should be 70-80 mm.
Along the perimeter of the room, the walls are taped with damper tape. It serves to compensate for the thermal expansion of the screed. If expansion is not taken into account, the screed may crack or swell. The height of the tape usually does not exceed 10 cm. It must be glued to the wall. After filling the screed, the excess is cut off.
After laying the thermal insulation, draw the contours of the pipes on the surface. This will facilitate the installation process and help identify design errors in advance.
Pipe installation
The most suitable base for laying pipes is a special mounting mesh made of metal or plastic with 100 mm cells. It is spread on thermal insulation, pipes are pulled from above, along pre-designated contours, and secured with wire or plastic clamps.
The advantage of using mesh is additional reinforcement of the base for laying pipes. The disadvantages include the complication of the installation process. But the end result eliminates this drawback.
Pipes can also be laid on polystyrene mats. They are specially designed for water heated floors. The mats are a kind of mats with protrusions on the front side in which pipes are fixed. Economically, this is a more expensive method, but installation on mats is much easier and faster. In addition, polystyrene serves as additional insulation.
During installation, try not to step on the pipes or drop heavy objects on them. Even microscopic damage can cause leakage when pressure is applied. Cut the pipe only after it is completely on the floor and back to the manifold. Don't skimp on stretching the material. Savings will lead to leaks in the future.
Expert opinion
Grebnev Vadim Savelievich
Heating system installer
If you choose snake installation, place the beginning of the pipe at the coldest wall or at a window. This will help avoid uneven heating. When laying in a spiral, this condition does not need to be observed. In any case, heating will be uniform.
Connection
The most common way to connect a water heated floor is a distribution unit. Its goal is to increase pressure, implement temperature regulation and uniformly supply coolant to several circuits. There are different devices - with manual or automatic adjustment.
Connecting the system involves connecting both ends of the pipe to the manifold distribution with clamp fittings. Using a collector, the heated floor is connected to the main heating system or to a specially equipped boiler.
When choosing a heating boiler, it is important to take into account its power; it should equal the power of all areas of the floor with a small margin. The boilers have an inlet and outlet for water, which are equipped with shut-off valves.
Also, to circulate the coolant, it is necessary to install a pump. Most often it is included with the boiler. But if you plan to heat a large area, you will need to install an additional pump.
After connecting the pipes, you can fill the system with coolant. The manifold responsible for supplying the coolant is equipped with a ball valve; water is connected to it. And a pressure testing pump is connected to one of the outputs connected to the heated floor circuit.
The system filling process is as follows:
- Close all channels except one. Open all air vents at the same time.
- Supply water. Using the drain hose, monitor the degree of cleanliness and air exit from the system.
- When all the air is out and the water comes out completely clean, close the drain valve.
- After this, shut off the filled system. If there are several circuits, perform the actions for each one.
- After flushing and filling all circuits, close the tap.
Expert opinion
Grebnev Vadim Savelievich
Heating system installer
Upon completion of the procedure, there should be no air in the pipes, and the water should flow perfectly clean.
Hydraulic tests
Concrete can be poured only after a test run of the system. Fill the pipes with coolant at high pressure and maximum temperature. Make sure all pipes are filled and heated evenly.
The next stage is crimping. To carry this out you will need a special pump.
Procedure:
- Bring the pressure to 5 bar and wait until it drops to 3 bar.
- Then bring it up to 5 bar again. Repeat the cycle 4 – 5 times. At the same time, inspect the circuits for leaks.
- At a pressure of 2 bar, leave the system running for 12 hours. If the pressure does not drop, proceed with the finishing tests:
- Set the maximum temperature and turn on the circulation pumps to achieve maximum pressure. If the system has radiators, set the mixing unit regulators to the operating marks.
- Wait for the entire system to warm up completely, including batteries (if any).
- Make sure that all circuits and radiators are heated evenly.
- Leave the heating running for a day. If the condition does not change, you can turn off the boiler and begin concreting the pipes.
When pressure rises in the pipes, they try to straighten out. If their fixation is not secure, then unpleasant surprises will arise during testing. After filling the pipes with concrete, there is no need to worry about this.
Bay screed
Pipes that have cooled to 25 degrees can be concreted. Use a special mixture to prepare the solution. It has the best thermal conductivity coefficient and will ensure uniform heating. The thickness of the concrete layer for living rooms is 20 mm, in utility rooms - 40 mm.
There are special requirements for screed mortar. The surface will be subject to mechanical and temperature stress, which can lead to deformation. Therefore, plasticizers and fiber are added to the cement-sand mixture.
Plasticizers will give the solution elasticity and increase mobility. This is important for free penetration of concrete between the pipes. Fiber will increase the strength of the base and, in addition, will prevent the formation of cracks in the screed. Polypropylene and basalt fibers are intended for warm water floors. The standard fiber rate per square meter is 500 grams.
The solution is mixed mechanically. Before pouring pipes, the surface is cleaned of dust. The concrete screed must be poured in one step, without interruptions in work. 4 hours after concreting, cover the floor with film to ensure that the solution strengthens evenly and prevents premature evaporation of moisture.
Expert opinion
Grebnev Vadim Savelievich
Heating system installer
Do not turn on the heating and do not lay the finishing coating until the concrete has completely hardened. This will take at least 28 days.
Finish coating
It is recommended to use porcelain stoneware or tiles as a finishing material for a water heated floor. Laminate, linoleum or carpet are acceptable only if there is a corresponding marking on the packaging.
System Features
This type of underfloor heating (IR) is a film combined with carbon paste, which heats the floor and room using infrared radiation. And this type quickly gained popularity due to its advantages, including:
- Easy to install.
- Possibility of arrangement under any covering.
- Durability.
- Safety for humans.
- Fire safety.
And this is not all the advantages of the system. And among the disadvantages, I usually highlight only the relatively high cost, as well as minor harm from radiation (in case of incorrect selection).
Also, when purchasing, you should consider some nuances:
- Infrared film does not fit in areas where furniture or decorative elements are placed.
- The layout of the film and electrical wiring is outlined in advance.
- It is also taken into account that the location where the temperature sensor is supposed to be located should be free of drafts and other factors that locally change the temperature.
Nuances of choosing a finishing coating
The best floor covering for a “warm floor” system is ceramic tiles (or porcelain stoneware). It has sufficient strength and does not emit harmful substances when heated.
The only disadvantage of ceramics – the coldness to the touch – disappears, so the combination of warm floors/tiles is ideal for the kitchen, bathroom or balcony.
The tiles will be laid on a pre-prepared base - a leveled concrete screed, so a thin layer of tile adhesive is sufficient for fixing
If you plan to decorate the interior with practical linoleum or beautiful carpet, then when choosing coatings, be sure to pay attention to the markings: products intended for heated floors are marked with the appropriate sign.
Types and characteristics of boilers
There are many options for connecting heated floors to boilers. They are divided into gas, electric, solid fuel, diesel, and combined.
Electrical
An electric boiler is the most expensive source of heating the coolant, but, at the same time, the easiest to maintain. Water is heated using heating elements or using induction.
Solid fuel
Such boiler models are considered the most economical in our time, because for their operation you can use all materials that burn. These include waste wood, coal or full-fledged firewood. It is profitable and convenient, no matter how you look at it. Their only drawback is the need to control the filling of the firebox, although modern boiler designs allow the fire to burn for a long time without human presence.
Diesel
This design may seem even more profitable to many than a gas boiler, because the source of heat is burning diesel fuel. It is advantageous because it is autonomous and uses natural gas. It can function on its own for a long time, without human intervention.
Combined
This design pleases with the ability to switch from one type of fuel to another. It can have either two fireboxes or one. To change fuel types, you just need to replace the burner. These heating options are useful for homes where there may be temporary problems with fuel supply.
Gas
Of course, the most common type of boilers is gas. They are the most economical and practical, because gas has the lowest cost and efficiency is the highest. A gas boiler produces heat by burning natural gas or its less popular type - propane. Such designs do not have special devices, however, new models have appeared that include a function called “warm floor”. Turning it on leads to a decrease in power, which is ineffective. Visually, the boiler looks like a small bedside table or hanging cabinet. It is very convenient for connecting a warm water floor in a room.
There are different types of boilers, which differ in many ways.
Floor-standing
Such boilers are installed using the standard method. Modern designs are small in size, which is very good, because they do not take up much space. Can be used to heat houses of large and small areas
Also, unlike wall-mounted boilers, they do not create unnecessary load on the surface of the walls, which is important for frame buildings
Wall mounted
They are attached to the walls, which must be strong, because the weight of the boiler is rather large. They are used for heating not very large houses with an area of up to two hundred square meters. There are models designed for larger areas, but here you will need more powerful fasteners.
Boilers can also be double-circuit or single-circuit.
Single-circuit
Only one heating line is serviced. They are considered the most economical because they use little fuel, that is, gas.
Dual-circuit
They serve both to power the heating system and to heat water, which can be used for needs in the kitchen and bathroom. However, the water will not be as hot as from boilers or geysers. The disadvantage is that the device will not work in two modes at the same time. If you connect DHW, the heating automatically turns off.
Heat transfer materials also differ.
Steel
Steel is the cheapest and simplest material. It is short-lived: cracks quickly appear on it, because it is susceptible to corrosion. Modern developers are trying to eliminate these defects by applying different coatings.
Unlike other boilers, they have many advantages. They combine the properties of both cast iron and steel materials.
Cast iron
They have an anti-corrosion coating, while the distinguishing feature of any cast iron material is fragility, and boilers are no exception. Therefore, you must carefully ensure that the heating is uniform. This will prevent the boiler from cracking.
Copper
Copper is used for wall-mounted models, because boilers made from this material are lightweight. Such materials are not subject to corrosion and have low inertia, which makes it possible to quickly regulate the temperature.
How to fit a “pie” into a room with low thresholds
Almost all homeowners who decide to install underfloor heating in a habitable house or city apartment face this problem. The essence of the issue: the height of the thresholds of entrance or interior doors is not enough to install a full-fledged “pie” of warm water floors with screed (see drawing below).
Let us analyze the composition of a monolithic heating circuit located on an interfloor or basement floor:
- Waterproofing - bitumen coating, more often - polyethylene film.
- Insulation – extruded polystyrene foam with a minimum thickness of 30 mm or polystyrene foam 5 cm.
- Damper tape around the perimeter of the room.
- A heating pipe (usually metal-plastic or cross-linked polyethylene with a diameter of 16 x 2 mm), laid in a snail or snake pattern.
- Cement-sand screed 8.5 cm thick.
- Floor covering (sometimes a vapor barrier layer is placed underneath it). The thickness depends on the material, laminate and linoleum will take up to 1 cm, ceramic tiles with an adhesive mixture will take about 20 mm.
The traditional surface heating scheme is made without reinforcement
An important nuance. If a monolithic heated floor is installed above the ground, the thickness of the insulation increases to at least 100 mm of polystyrene foam or 60 mm of extruded foam. The density of both materials is 35 kg/m³.
In total, the total height of the “pie” with a laminate coating will be 85 + 30 + 10 = 125 mm. No normal owner envisages such high thresholds. How to solve the problem and implement underfloor heating in a similar situation:
- Dismantle the existing screed to the very foundation - the ground or floor slab.
This is what multifoil looks like - a durable material with closed air chambers - Instead of a heat-insulating polystyrene layer, use multifoil up to 1 cm thick.
- Reduce the power of the tie to 60 mm. The structure will have to be reinforced with masonry or road mesh with dimensions of 150 x 150 x 4 and 100 x 100 x 5 mm, respectively.
- Use flooring systems - “dry” heated floors installed in wooden houses without screed. The total thickness of the “pie” is 6-10 cm.
- Heat the flooring with electric carbon film instead of a water pipe system.
Reference. The only room in the apartment where the thresholds remain high is the balcony and loggia. There is no need to reinvent the wheel; usually the monolith fits freely along with thermal insulation.
Overlay surface heating system, laid using a dry method.
Some home-grown craftsmen do not lay insulation at all or reduce the thickness of the screed to 4 cm. In the first case, half of the generated heat will go into the basement, the ground or to the neighbors below; in the second, the monolith expanding from heating will soon crack.
An expert will tell you in more detail and clearly in the video how best to make a heated floor in an apartment building:
Possible causes of failure
The passage of current to the heating system is carried out through a thermostat, the main function of which is to turn the floor on and off, and to regulate the strength of its heating. As soon as it reaches the set temperature, the thermostat turns off, which also happens when the coating is overheated.
What can cause weak floor heating or a complete lack of heat?
Typically, the most common culprits are:
- The thermostat, so you need to start checking with it. To verify that it is faulty, you should dismantle the device, first turning off the light, and check it with a multimeter.
- If the floor is cable, then the cause of the breakdown may be its breakage. This happens either during installation or by some mechanical influence, for example, with a drill during repairs. The cable is checked by measuring its resistance and insulation. If the data exceeds the data sheet readings by more than 5%, it means it is damaged or there is a break in it. In an infrared system, rapid deterioration of the film is possible due to insufficiently dense coating. If, for example, thin linoleum was laid, then even a woman’s heel can push through the film floor.
- The temperature sensor can also cause a malfunction. If the base does not warm up to full capacity, then it simply does not turn off and the floor works non-stop around the clock, which leads to high energy costs. On the other hand, if the temperature sensor is too close to the heating elements, it will quickly heat up and turn off, and the floor will not reach the desired temperature.
Read below on how to repair an electric heated floor.
To avoid damage to the heated floor, a number of nuances should be taken into account when installing it:
- When calculating the size of the heating elements, you need to take into account the area of the room not occupied by furniture. This is due to the fact that underfloor heating elements are not recommended to be laid under bulky interior items due to possible overheating of the system and its failure.
- The purchase of floor heating elements should be carried out taking into account their required dimensions, since cutting cables during installation can lead to breakdown of the system due to a decrease in its strength.
- The heating cable should not be placed on a dirty floor. Before installation work begins, it must be thoroughly cleaned.
- When laying a heated floor, it is not recommended to walk on it to avoid breaking the heating elements with hard shoe soles.
- The temperature sensor should be installed so that when repairing the thermostat, this part of the system is easily accessible. It is recommended to place the sensor in a corrugated tube.
- There should be no voids around the heating element; they can cause the cable to overheat and fail.
- During the installation of a heated floor, it is recommended to make a diagram of it on paper indicating the dimensions. It may be required during repair work and will allow you to avoid touching the cable or pipe of the system when working with cement screed.
- After laying the wire, it should be checked by measuring the resistance. The heated floor cannot be turned on until the screed has completely dried.
The electrical resistance of the floor must correspond to its passport value specified in the documentation included with the kit. Resistance measurements should be performed before and after installation of the system.
Connection from central heating
According to the legislation of the Russian Federation, the Republic of Belarus, Ukraine and other countries of the former USSR, unauthorized intervention in the centralized heat supply system is prohibited. Simply put, for connecting additional heating devices and heated floors, you face a large fine and an order to dismantle the extra heaters.
Note. Similar measures and responsibility are provided for connecting the transformer substations to the centralized hot water supply (DHW) network.
How is an unauthorized connection from centralized heating detected:
- neighboring apartments receive less heat, residents begin to write complaints, a commission from the management company identifies your modernization;
- due to pressure surges or poor-quality installation, a breakthrough and flooding of the lower apartment occurs;
Leaking connection inside a concrete monolith - responsible persons note a large difference in the readings of the common house meter and apartment heat energy meters;
- if you connect the heated floor circuits in series with the batteries, the hydraulic resistance of the entire branch increases, the flow decreases, and the apartments along this riser become colder.
Some “cunning people” advise connecting the TP loops through a plate heat exchanger in order to isolate the circuits from the central heating. The catch: the hydraulic resistance of the network will not increase and a pipe break will not cause serious flooding, but the amount of heat removed will still increase.
How to do underfloor heating legally:
- Contact the heating supply organization with an application and obtain permission.
- Together with the permit, obtain technical specifications for installation and connection of floor circuits.
- Develop and approve the project.
- Install the system yourself and put it into operation.
It must be admitted that the vast majority of applicants are rejected at the application stage. An exception is made for residents of new buildings with individual connection of apartment heating to distribution risers. But if you decide, at your own peril and risk, to embed heating circuits into the heating network, proceed to study the next section.
Electric floors and their varieties
Depending on the heater used, electrically heated floors are divided into 2 categories: with a heating element in the form of a cable and with infrared.
According to the production method, they are divided into 4 types:
- Heating cable. It can be single- or 2-core, including self-regulating.
- Heating mats. It is a cable on a mounting grid.
- Film. Polymer flexible sheets with a built-in infrared heating element.
- Rod. Consists of carbon rods connected in series.
A warm electric floor is calculated based on the size of the part of the room free from furnishings. It is not recommended to install heating elements under furniture due to the excess load on the system in these areas. The floor power is chosen based on 0.1 kW/m² on average. This indicator differs for different rooms.
Before starting work, it is important to calculate the step with which the cable will then be laid out. To do this, find the quotient of the area planned for laying the heating system in m², multiplied by 100 and divided by the length of the section in m, taken from the passport
If there is no alternative source of heat in the house other than a warm floor, the area occupied by the system must be at least 70% of the area of the room as a whole
The following article will introduce you to the arguments and criteria for choosing the best option for you personally for installing a heated floor, which we recommend that you read.
Water heated floor installation
The heated water floor has a multi-layer complex structure, each layer has its own function. Consists of: base, hydro and thermal layer, reinforcing product, heating element and concrete screed.
A substrate is placed on the screed on which the floor covering is mounted; it must have a special symbol indicating the possibility of laying it on warm systems.
The junction of the walls and the screed, as well as the boundaries of the water circuit, should be laid with damper tape, this will help compensate for the expansion of concrete with temperature changes.
More often, independent installation of this heating structure is carried out using the “wet” method, that is, by pouring a cement-concrete screed. But “dry” installation is possible; it is used in houses with wooden floors.
Insertion into a one-pipe system with an additional pump
This connection option even has its own special name - “Leningradka”. Its use requires installation of a pump and self-assembly of the mixing unit.
In order for the finished system to function without interruption, it will be necessary to take into account the compliance of its parameters with the following requirements:
- the distribution line in internal diameter corresponds to DN25 or more;
- no more than 5 radiators are placed on the ring;
- the heated floor loop is connected to the return pipeline after the batteries;
- the return and supply insertion points are located at a distance of more than 30 cm from each other;
- the degree of heating of the circuit is regulated by a mixing valve (three-way, simplified design).
Layout drawing for underfloor heating and single-pipe heating with radiators
In this system, a valve is necessary to prepare water at the required temperature, and a pump is necessary to move the coolant through the circuit.
There is almost no practical use of such a scheme, since it functions unstably, and the radiators lose balance due to changes in water flow caused by the operation of the pump. Date: September 25, 2022
Three-way valve
The device is installed at the point with the highest temperature (on the supply pipe). The VTP connection diagram in practice looks like this:
Feed line
Boiler → 70 °C → Three-way mixer → Circulation pump → 45 °C → Warm floor
After the pump, a temperature sensor is installed on the supply pipe. It determines the degree of heating of the incoming water. Next comes the thermostatic valve.
How to make warm floors in a wooden house with your own hands
Many people choose environmentally friendly materials and build wooden houses. This solution allows you to create cozy housing with an excellent microclimate and natural air exchange. But the question often arises about whether it is possible to make warm floor in a wooden house and, if so, how to implement it with your own hands?
On the logs
The logs are laid at a distance of 60 cm and securely attached to the base. It is convenient to do this on galvanized supports, which are first placed and secured to the base, and then the logs are fixed to them. A subfloor is attached to the bottom of the joists; it is needed to lay thermal insulation materials.
After creating the subfloor, a waterproofing film and a layer of thermal insulation are laid on it. Usually mineral slabs are used; a thickness of 10 cm is sufficient. Boards or strips of chipboard are laid on the slabs, taking into account the layout of pipes or cables.
READ Make your own microwave shelf
As a heat reflector, you can purchase special plates or make them from galvanized iron; they are attached to the chipboard with nails and bent so that a plastic pipe fits.
When laying the pipe, it should not protrude above the floor level, otherwise it will interfere with the installation of the finishing material, so the thickness of the chipboard or boards should exceed the diameter of the pipe. After laying the pipes, the surface is covered with sheets of plywood and a finishing coating is laid on it.
Only moisture-resistant plywood is used, and its thickness must be at least 10 mm. The seams can be filled with sealant, or you can leave them like that. After this, they begin laying the finishing coating.
Selecting a circuit laying scheme and its installation
When choosing an installation scheme and calculating the pitch, you should take into account that the liquid cools down as it passes through the circuit, so installation must be done from the outer walls. This will help protect the heated room from cold air entering.
The level of heating of the room depends on the layout of the heating element:
- “snake” is the easiest way for self-installation, the degree of heating decreases gradually;
- “snail” - the process is more complicated, but the room with internal walls is heated evenly.
When installing a warm water structure, the calculation data and installation diagram are taken into account. The standard laying step is 15 cm, and contours longer than 100 meters must be divided into several. In addition, each room should have a separate circuit.
Couplings or fittings are installed only when eliminating breaks or carrying out repair work on heated floors.
In addition, when preparing the calculation and diagram, the hydraulic resistance is taken into account; it depends on the number of turns; the more there are, the higher the resistance. Each circuit connected to the manifold must have the same given value.
Making a collector with your own hands
If you decide to assemble a homemade manifold for underfloor heating, you should have some experience and understanding of the design of heating systems. First of all, it is necessary to familiarize yourself with the principle of operation and the task of the collectors, and then carry out competent calculations and actual manufacturing.
Without regulation
A manifold for underfloor heating without regulation allows you to create a cheap version of the distribution system. It does not use any control devices, and the coolant flows are distributed depending on the hydraulic characteristics of the system. Despite the cost, this option should not be used, since it is not convenient to use and can create difficulties in the future.
Diagram of circuits with coolant liquid
When designing a water floor connection diagram, the location of the heating circuits must be calculated (for more details: “Length of the water heated floor circuit: calculation rules”). They should not be located in the room where stationary equipment is planned to be installed. The two main circuit connection schemes that ensure the functioning of a heated water floor are considered to be “snake” and “snail” (also called “spiral”). Experts recommend using the second method in regions with cold climates, since then the flooring heats up more evenly and is not subject to deformation due to significant temperature fluctuations. Features of connecting a combined heating system, detailed video:
What can a collector be made from?
Standard manifolds for heated floors supplied to the market are made of different materials: polypropylene, steel, and various alloys. Metal elements are most widespread due to their quality, strength and reliability.
Separate combs are available with different numbers of polypropylene bends, which can be stacked with each other to create manifolds of different sizes. The same applies to brass elements.
If the task is to install a manifold for a heated floor not made from factory elements, you can use pieces of pipes, tees and other elements of the heating supply network. Large-diameter steel pipes into which pipes are cut to connect pipelines are suitable. There are also options for using polypropylene tees, which are connected to each other using pipe scraps. As a result of this action, a comb of the desired size and characteristics is obtained.
READ Do-it-yourself outdoor BBQ oven made of brick
How to connect
If you have not worked with plumbing before, then you should not take on such work - there are too many serious consequences if you make mistakes. Moreover, heated floors can be made from different materials, which require special tools to work with. If you are confident in your abilities, then you can act according to the instructions that we will now provide. We will connect the circuit already built into the screed to a two-pipe heating system. For this we need:
- A regular tap that we will install for supply.
It will, if necessary, disconnect the heated floor from the system. Radiator tap "male-male" - We will install an RTL valve on the return line, the operating principle of which we described earlier.
It will be equipped with a thermal head that measures the temperature of the water in the circuit. Do not confuse it with a radiator head, which measures the heating of the air in the room. RTL valve for return
Table 1. Connecting heated floors.
| Steps, photo | Description |
| Step 1 - pipe outlets | We turn off the heating taps to stop the circulation of coolant in the system. After it has cooled, if it was hot, cut the pipes with special scissors. There are different ones for each type of pipe. In our example, the master works with reinforced polypropylene - all connections are made by hot soldering. The pipes are cut into tees, from which two outlets are made upward. As you can see, from the return pipe the master laid a multi-joint elbow to carefully bypass the upper pipe, and on the supply he limited himself to a tee with a thread for the tap. |
| Step 2 - Install the Mounting Clip | Before soldering the bend from the elbow, he made a vertical level marking, along which he screwed a clip-retainer for the plastic pipe |
| Next, the bend is attached to the elbow using a soldering iron, as shown in the photo above. After that, it is fixed in the clip, and you get a precisely drawn thread into which we will screw the tap. |
| We install both taps, tightening all connections securely. We use only sanitary flax as a sealant. There can be no talk of any fum tape. Advice! On the RTL tap there is a mark indicating the direction of movement of the coolant in the form of an arrow - be sure to check this point during installation. |
| PEX leads with internal thread for return and external thread for supply are mounted on the terminals of the plastic pipes of the heated floor circuit so that they can be connected to the taps. These conclusions are made at the same level as the conclusions on the heating pipes. |
| Step 6 - Connector | Next, we screw the connecting corrugated stainless steel hose (inlet) onto the nuts - we connected the return line. We proceed in the same way with the coolant supply tap. |
| Step 7 – Installation of the thermal head | We screw the thermal head to the RTL tap. In our example, the master uses equipment from the Austrian company Herz, which can regulate the temperature within 25-60 degrees Celsius. |
Prices for heating cable and components
Heating cable and accessories
This concludes our article. Do it right, do it wisely, and the result will always please you.