Parts of this category are used in various electrical circuits. Excessive loads during operation provoke various damages. This publication talks about how to test a resistor with a multimeter. Additional recommendations will help you perform the necessary actions correctly even without relevant experience.
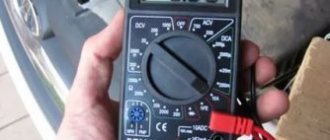
If necessary, the check can be done without dismantling the part
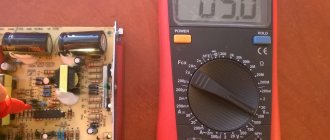
Types of Multimeters
To clarify the value of electrical resistance, the current in the circuit is measured while maintaining a calibrated voltage. The change is recorded by an inductive or other sensor. Data is displayed on a dial indicator or display using an analog or digital method of information transmission.
The second method is a comparison of two currents (measured and reference). As in the first example, analog and digital data processing (transfer, display) technologies are used. Depending on the modification, to configure the modes use:
- buttons;
- rotary switch;
- nests
Modern instruments offer automatic range adjustment
A typical test of a resistor with a multimeter is performed according to the following algorithm:
- disconnect the power supply of the electrical circuit;
- visually determine the faulty element;
- using desoldering, the resistor is removed;
- connect the probes according to the diagram established by the manufacturer of the measuring device;
- set the regulator to the range with the maximum (assumed) resistance (Ohm);
- perform measurements and check the performance of the part.
Below we discuss important nuances that are taken into account when reproducing individual verification technologies.
What may be useful
A resistor is a reliable part. Usually it does not fail if the device was operated correctly: it was not exposed to heat, moisture, or other conditions unpleasant for the circuits. To save time, testing circuit elements begins not with a specific resistor, since it rarely fails, but with other radio components. For example, semiconductors or inductors burn out more often, so it is recommended to start testing with them. This will help save time.
There is no order in which certain schemes should be checked. You can start with any element that seems suspicious to you or is closer. Resistors may have certain deviations from the nominal value. You need to know them: usually these parameters are indicated by the manufacturer. The smaller the deviation, the more accurately the part is made, which means its cost will be higher .
Although it is quite easy to test a resistor with a multimeter, you should know the following:
- Before starting to work with the device, carefully read the instructions for it; manufacturers often improve multimeters, change their functionality and controls;
- find out the technical characteristics of the multimeter;
- check if the settings are correct;
- Check the condition of the batteries.
The actual value of the element's resistance may differ significantly from the declared value, for example, the permissible deviation up or down can be up to 10%.
In order to find out the initial data of the part being tested, it is recommended to use the diagram supplied with the device. If the multimeter readings differ greatly from those expected for the resistor being tested, then most likely you have either a faulty device or a resistor whose resistance is an extreme form of deviation from the norm. The resistance of the resistor is applied to its body. If it says 150 ohms, but your multimeter shows 165, don't be alarmed. This is a normal discrepancy in data, since the characteristic has acceptable deviations.
Types of faults
How to test a zener diode with a multimeter
Causes of damage:
- strong current;
- heat;
- hit;
- humidity;
- aggressive chemical environment.
With a sufficiently strong impact, the resistive layer is destroyed, which completely eliminates the electric current in the corresponding circuit. Partial damage changes the technical characteristics of the product.
A “malfunction” can be called a manufacturing defect. In this embodiment, the resistor value does not correspond to the parameters of the electrical circuit. Using a multimeter, check the actual value. If necessary, install a high-quality replacement.
Color designation
Now color marking has been adopted, representing from three to six rings of different colors (see Fig. 2). There is no need to see this as the machinations of enemies, since this method allows you to set the denomination even on a heavily damaged part. And this is a significant factor, given that modern household electrical appliances are not equipped with circuit diagrams.
Rice. 2. Example of color marking
Information on decoding this designation on components is easy to find on the Internet, so it makes no sense to present it within the framework of this article. There are also many calculator programs (including online) that allow you to obtain the necessary information.
Signs of damage
How to check battery capacity with a multimeter
You can find out which product is faulty with a simple visual check. Severe thermal (mechanical) damage is detected fairly quickly during inspection. To simplify the task, use additional lighting devices and a magnifying glass. Preliminary disassembly of the structure ensures free access.
Faulty items
For your information. Adjacent burnt parts are able to maintain good functional condition.
During prolonged use, the heating resistor damages its appearance and the varnish coating of the printed circuit board. Such defects are not necessarily accompanied by a malfunction. Checking the resistor using a multimeter will help you draw the correct conclusion.
Visual inspection
Violation of the normal operating mode causes overheating of the part, therefore, in most cases, the problematic element can be identified by its appearance. This can be either a change in the color of the case or its complete or partial destruction. In such cases, it is necessary to replace the burnt element.
Figure 4. A clear example of how a resistor can burn out
Pay attention to the photo above, the component clearly needs to be replaced, while the neighboring parts “2” and “3” may be working, but they need to be checked.
Resistor characteristics
Connecting an LED through a resistor and calculating it
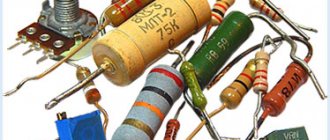
This category offers a wide range of different products. Fixed resistors are produced with a certain electrical resistance, which is maintained with a certain accuracy in the operating temperature range. Each product is designed for a specific power.
Features of some modifications are given below:
- the electrical resistance of variables and tuning resistors is controlled by a mechanical drive;
- in posistors and varistors, operating parameters are adjusted by changing temperature and voltage, respectively;
- precision - produced with an accuracy of thousandths of a percent of the nominal value;
- high-voltage – designed for installation in circuits with U>10 kV;
- high-frequency ones are characterized by minimal reactive components, which allows the use of parts in paths with a frequency of > 100 MHz.
The list clearly demonstrates the need to use different techniques in appropriate situations. The simplest technologies are presented in detail below. With their help, you can check a constant (variable) resistor installed in standard equipment. This assumes the absence of high voltage (>1 kV) and microwave signals.
How to measure resistance when the value is unknown
Setting the highest threshold when measuring resistance is not so important. In ohmmeter mode, you can select any range. If the device displays “1”, which means infinite charge, the threshold must be increased until the desired result is displayed on the screen. In this simple way, the presence or absence of a denomination becomes completely unimportant.
Analog multimeters are ideal test equipment for measuring resistance. They are relatively cheap and offer a fairly good level of accuracy and overall performance. They typically provide a level of accuracy that is more than sufficient for most jobs.
Checking resistors for compliance with ratings
If you disassemble an old Soviet telephone, the main parameters of the parts can be easily determined by the alphanumeric markings. It is easy to decipher the following typical designations:
- “280ohm” – electrical resistance 280 Ohm;
- “1%” – the corresponding tolerance as a percentage;
- “MLT-2” – 2 W resistor.
A significant drawback of this solution is difficult (impossible) identification if the surface is severely damaged. To accommodate technical information, a fairly large area is required, which contradicts modern trends in miniaturization.
The problem is solved by marking with transverse colored stripes
Resistors created according to the SMD standard are marked with numbers. Example of decoding “203”:
- 20 – resistance in kOhm;
- 3 – 10 to the third power.
Examples from practice of measuring resistance of products
In theory, everything is usually clear, but in practice questions often arise that can best be answered by examples of checking the most common products with an ohmmeter.
Checking incandescent lamps
The incandescent light bulb in a lamp or car on-board devices has stopped shining, how can I find out the reason? The switch, electrical socket or wiring may be faulty. Using the tester, any incandescent lamp from a home lamp or car headlight, filament of fluorescent lamps and energy-saving lamps can be easily checked. To check, just set the device switch to the minimum resistance measurement position and touch the ends of the probes to the terminals of the light bulb base.
The resistance of the light bulb filament was 51 Ohms, which indicates its serviceability. If the thread were broken, the device would show infinite resistance. The resistance of a 220 V halogen light bulb with a power of 50 watts when illuminated is about 968 Ohms, and a 12 volt car light bulb with a power of 100 watts is about 1.44 Ohms.
It is worth noting that the resistance of an incandescent lamp filament in a cold state (when the light bulb is not lit) is several times less than in a warm state. This is due to the physical property of tungsten. Its resistance increases nonlinearly with heating. Therefore, incandescent lamps usually burn out the moment they are turned on.
Unfortunately, LED and energy-saving lamps cannot be checked with a multimeter without disassembling them, since the supply voltage from the base terminals is supplied to the driver diode bridge.
Using an online calculator, you can independently calculate the resistance of any incandescent light bulb or heating element, for example, a heating element, or an electric soldering iron.
Checking sound-reproducing headphones
It happens with headphones in one of the emitters, or in both at once, the sound is distorted, periodically disappears or is absent. There are two possible options: either the headphones or the device from which the signal is received are faulty. Using an ohmmeter, it is easy to find the cause of their breakdown and repair the headphones.
To check the headphones, you need to connect the ends of the probes to their connector. Typically, headphones are connected to the equipment using a 3.5 mm jack connector, shown in the photo.
One end of the probe touches the common terminal, and the other, in turn, touches the terminals of the right and left channels. The resistance should be the same and be about 40 ohms. Usually, the resistance is indicated in the passport for headphones.
If the resistance of the channels is very different, then there may be a short circuit or a broken wire in the wires. It is easy to verify this; just connect the ends of the probes to the terminals of the right and left channels. The resistance should be twice that of one earphone, that is, already 80 Ohms. In practice, the total resistance of series-connected emitters is measured.
If the resistance changes when the conductors move during measurements, it means that the wire is frayed in some place. Usually the wires fray where they exit the Jack or emitters.
To localize the location of the wire break, during measurements it is necessary to bend the wire locally, fixing the rest of it. Based on the instability of the ohmmeter readings, you will determine the location of the defect. If it’s a Jack, then you need to purchase a detachable connector, bite off the old one with a section of bad wire and solder the wire to the contacts of the new Jack.
If the break is located at the entrance to the headphones, then you need to disassemble them, remove the defective part of the wire, strip the ends and solder them to the same contacts to which the wires were soldered before. In the website article “How to solder with a soldering iron” you can learn about the art of soldering.
How to check a resistor with a multimeter without desoldering on the board
Without dismantling, these parts can be checked at relatively low nominal values of electrical resistance (80-120 Ohms). It is assumed that in this range the influence of other circuit elements can be neglected. In fact, the possibility of measurements without significant distortion should be clarified.
If the shunt circuits do not provide the required accuracy, you will have to remove at least one leg. An alternative solution is to cut the PCB track. Subsequently, the corresponding damage is repaired.
The publication shows how to ring a resistor using different techniques. The optimal option is chosen taking into account:
- level of damage;
- features of multimeters;
- working conditions.
In any case, measures should be taken to prevent distortion of the measured parameters. Careful handling of the soldering iron and auxiliary tools will help maintain the integrity of serviceable parts.
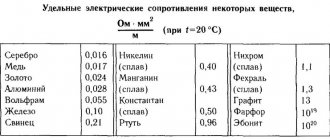
Using tables
Modern circuits may not include a resistor value at all. To find out the initial data, you need to use a table with the characteristics of common resistances. On the board, the element may have its own designation, for example, R18. You need to find a position in the table with a similar letter and number value. There you will see the type of resistor, its nominal resistance, deviations that are considered acceptable. The color marking on the body of the part helps, so it is advisable to learn how to use it.
Please note that if the Ohm limit is set, your own body may influence the inaccuracy of the result. To avoid this problem, do not touch the metal parts of the circuit and probes of the device when working.
The multimeter handles should be made of plastic; in addition, they can be wrapped with electrical tape.
Knowing how to use a multimeter correctly, you can easily check the serviceability of any radio component, and spend only a couple of minutes on it.