With the onset of cold weather, you remembered that somewhere in the pantry there must be an electric convector, which perfectly complemented the central heating last winter. When plugged into the network, the device shows no signs of life, although there is current in the network? This means that the reason why the convector does not want to heat the room is hidden inside the device. Don’t rush to call a specialist - it’s quite possible to repair a convector yourself.
Vacuum manifolds
Vacuum heating collectors
The design of the individual parts of the vacuum manifold is reminiscent of the operation of a thermos. Solar heat easily passes through the transparent surface of the bulb into the copper rod located inside. A vacuum is created between the layers of the tube. This structure helps retain up to 96% of accumulated heat.
Advantages of vacuum installations:
- high heating temperature;
- stable and reliable design;
- ease of installation;
- good performance in summer and winter;
- minor heat loss.
Minuses:
- high price;
- installation is carried out at a specific angle of inclination of the collector;
- After snow has fallen, the system must be cleaned.
In some countries, solar collectors are the main part of the communications of every home. This applies to southern countries and is characterized by a mild, sunny climate.
Solar heating system design
A solar heating system can do more than just heat a home. Since some regions experience a large number of sunny days a year, this allows the use of this type of heating to obtain a high-quality hot water supply system in the house, which will be used for domestic needs.
If we take this into account, we can confidently say that such solar installations will be more economical, even despite the high price of the collector and auxiliary equipment. In addition to heating radiators and hot water supply, you can use auxiliary elements such as heated floors and heated towel rails
Installation process
Dimensions of the in-floor convection heater and the niche for it.
If you want to install an in-floor convector yourself, we recommend that you think about the location for its installation during the construction stage of the building - this will make it easier to organize a niche of suitable depth. Moreover, the niche itself should be 1-1.5 cm larger (on each side) than the metal box of the device. At the same time, you need to make sure that the upper part, where the decorative grille will be located, is on the same level as the future floor covering.
We recommend that you first choose an in-floor convector, and only then work on the floors, so that you have the dimensions of the box in your hands
Please note that we will pour the final screed after installing the heating device. Once the niche is ready, you can begin installing the equipment
We fasten the in-floor convector box using the included fasteners. We check the correct installation using a building level - the heater should be located evenly in the niche, without distortions. Further installation involves connecting to a heating system or electrical network - for this, plastic pipes, flexible hoses or metal pipes of suitable diameter are used
Once the niche is ready, you can begin installing the equipment. We fasten the in-floor convector box using the included fasteners. We check the correct installation using a building level - the heater should be located evenly in the niche, without distortions. Further installation involves connecting to a heating system or electrical network - for this, plastic pipes, flexible hoses or metal pipes of suitable diameter are used.
If you are installing a water convector, provide thin, shallow niches for laying pipes/hoses. When installing an electrical appliance, we recommend laying the connecting wires in cable ducts or pipes so that they can be replaced without problems. We recommend wrapping supply pipes with coolant in thermal insulation.
The radiator pipes will also be covered with screed.
At the next stage, we fill in the concrete screed - our DIY installation of the in-floor convector is nearing completion. The result of this stage should be a subfloor, with a metal box protruding slightly from it. Next, we complete the final leveling of the floor and begin laying the floor covering. At the last stage, we place a decorative grille over the box - it is best to choose it in the same tone as the color of the floors.
Do-it-yourself installation of in-floor convectors is complicated by the fact that you need to choose the correct dimensions of the niche so that the metal body of the device is located at the correct depth. Recommendations on this issue can be found in technical data sheets. The worst thing is if you have to carry out the installation in a house that has already been built - it is not a fact that it will be possible to make a niche in the subfloor, as this may affect its strength. In this case, it will be necessary to increase the height of the subfloor in all rooms.
Choosing your unit
What should we teach you about choice, dear reader, if you yourself know perfectly well the standard set of conditions?
Desires must correspond to possibilities - no one has yet canceled this rule.
Experts advise paying attention to the brand of the product and the obligatory visual “fitting” of the future purchase to suit your interior and the size of the room - you will not be happy with an inexpensive purchase if you notice that the floor heating convector (aka mobile) is too small and does not have the necessary power in order to heat the room efficiently. And here, don’t carry it with you – it won’t help and won’t warm you up. Power, design, installation method, energy consumption - everything should suit you in your newly acquired heat source
And then you will be happy with your purchase and feel comfortable in your home.
Power, design, installation method, energy consumption - everything should suit you in your newly acquired heat source. And then you will be happy with your purchase and feel comfortable in your home.
Tweet
Fence for a summer residence: which one to choose?
Custom-made furniture according to individual sizes
Roller blinds for plastic windows, photo in the interior
(Visited 377 times, 1 visits today)
Installation and piping of batteries in the floor
The difficulty of installing an in-floor convector with your own hands is that its grille is flush with the floor covering
Therefore, it is extremely important to accurately align the heat exchanger trough with the water level. At the same time, it is necessary that it stands rigidly, because people will walk on the grate. Installation is carried out in a cut-out niche, a screed is poured around the perimeter
Filling nuances:
Installation is carried out in a cut-out niche; a screed is poured around the perimeter. Filling nuances:
- stick damper tape around the perimeter of the body;
- Do not remove the grate until the solution has completely hardened.
The convector grille must be level with the floor.
The damper tape compensates for thermal expansion of the screed and dampens possible vibrations from fan operation
It is extremely important that the grille is inserted into its seat. During hardening, the screed may deform the trough and the grate will no longer fit there at all. The case has holes for several connection options, which mainly depends on the position of the radiator relative to the circuit
In principle, the simplest piping option is to install conventional ball valves on the supply and return. Ideally, faucet handles should face down so that they are not visible through the grille. Also, in some convectors there is not enough trough height to install shut-off valves with the handles up
The case has holes for several connection options, which mainly depend on the position of the radiator relative to the circuit. In principle, the simplest piping option is to install conventional ball valves on the supply and return. Ideally, faucet handles should face down so that they are not visible through the grille. Also, some convectors do not have enough trough height to install shut-off valves with the handles up.
Here we compared pipes for heating a private house.
The piping method described above is not suitable if you have a long heating system with several branches of different lengths. In this case, for proper operation of the circuit, balancing will be required, and for this there must be a balancing valve on the radiator return. In addition, ball valves do not make it possible to regulate the degree of heating of the battery, which is very useful. Therefore, you need to install a thermostatic valve on the supply, preferably in tandem with a thermal head or servo drive.
Troubleshooting
As you can see, there is nothing complicated in the design of a gas convector. Due to its simplicity, this equipment serves for a long time and with high quality. But sometimes it happens that incomprehensible interruptions arise in its work. If you notice that the flame burns unevenly or is difficult to ignite at all, the problem is often a clogged nozzle.
Simply put, the hole through which the gas escapes becomes clogged with soot or other contaminants. In this case, you can easily clean it yourself. All you need for this is a thin needle. Use it to carefully clean the hole.
Very important: before starting work, be sure to shut off the supply of blue fuel to the equipment. For this purpose, a special tap is provided on the supply pipe.
It is absolutely forbidden to work with the device when gas enters it!
If after cleaning the problem does not disappear, then the most reasonable option for further action would be to call a specialist from a specialized organization. Remember that gas equipment has a high fire hazard. All more or less serious work with it should be carried out only by craftsmen who have the appropriate license.
If you decide to repair the gas convector yourself, but do something wrong, this is fraught not only with subsequent fines from the gas service, but also with the possibility of a fire. You should not take such responsibility upon yourself; be sure to invite specialists to troubleshoot serious problems. Good luck and a warm home!
Equipment startup and performance check
- Open the gas valve and check the system joints for leaks.
- After checking, you can turn on the convector. For the first time, you need to hold the start button for 1 minute and wait until the gas penetrates the combustion chamber.
- Do you see the burner lit? Now you can adjust the operation of the convector.
Important: installation of a gas convector in a wooden house is absolutely safe, because fire hazardous parts are located in the inside of the heater. To summarize, we note: despite the fact that a gas heater is not a very popular heating device, it can be used to create a comfortable temperature in dachas and country houses. The unit quickly and efficiently heats the air in the room, and at the same time is much more economical than an electric radiator
Another obvious advantage is the ability to connect to a gas cylinder. One dubious circumstance can be considered that the gas convector heats only one room, and not the whole house, unlike a gas boiler connected to the heating system.
We hope that the article was useful and helped resolve the problem!
Difference from radiator
To make a choice between two types of heaters, you need to know the difference between a convector and a radiator. We already know the structure and operating principle of the first device. Now let's examine the radiator.
Design and principle of operation
A radiator is a hollow metal structure filled with coolant. In electric models this is mineral oil, in central heating systems it is water. But we are only interested in oil (electric) radiators.
A heating element is located inside the cavity. First, it heats up itself, then it transfers heat to the oil, which shares thermal energy with the body. Only then does the air, touching the heated metal, become warm, and it floats up. Here we are also talking about convection, but the heating path is too long and expensive.
How to repair a breakdown?
So, to make it clearer to you how to proceed, we will provide step-by-step instructions:
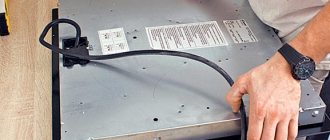
- Unplug the convector from the outlet.
- Give access to the temperature regulator and switch.
- In the event that the convector does not work at all, i.e. The indicators do not even light up when turned on, then check whether the voltage is reaching the terminals through the cord. To do this, use a multimeter. If there is no voltage, check it at the outlet, as well as the integrity of the cable itself. We talked about how to check the voltage in an outlet in the corresponding article. If the outlet has 220, but there is no cord on the cores, replace the cord or find the location of the damage and repair it.
- If the power supply is suitable, but the electric convector does not turn on, the next stage of repair will be checking the button. In 70% of cases, the malfunction lies precisely in this (contacts burn out). To check, first disconnect the heater from the network, then use a multimeter to ring the button. In the on position there should be a short circuit, in the off position there should be a high resistance, indicating an open circuit. If this is not the case in your case, change the button or try to clean the contacts. The video below will provide a technology for repairing a convector button.
- Next, you need to ring the thermostat with a tester. A working temperature controller should show little or no resistance on the multimeter display.
- If the thermostat is in good working order, then you need to go further along the circuit and make sure that all contacts are securely connected to the connectors.
- Having reached the heating element, you need to ring it too. Very often the reason that an electric convector does not work is the failure of the heating element. We talked about how to ring a heating element with a multimeter in the corresponding article. A failed heating element cannot be repaired and will have to be replaced.
- The next stage of repair will be checking the thermal fuses. Proceed by analogy with step 5.
- Well, the last reason why an electric convection heater may turn on, but not heat up or stop working altogether is a malfunction of the sensors, including rollover protection. By analogy, they need to be checked and, if not, replaced.
- If the circuit contains electronics (for example, an electronic thermostat, as in the photo below), it is unlikely that without the appropriate skills you will be able to repair the electric heater yourself. In this case, we recommend that you seek the help of a specialist.
Finally, we recommend watching useful videos on the topic:
That's all I wanted to tell you about how to repair a convector with your own hands at home. We hope the tips provided helped you solve the problem!
It will be interesting to read:
- How to make an electric heater
- Iron repair at home
- Comparison of fan heaters and convectors
Criteria for selecting the required materials
Since a homemade device is assembled from units that have already been used, first of all it is necessary to assess the condition of the pipes
Particular attention will need to be paid to their walls. Their thickness should be several millimeters
If corrosion occurs, it is undesirable to use such pipes or be sure to eliminate all defects before use. All rust will need to be thoroughly removed from the metal with a brush, and then covered with an anti-corrosion compound so that the problem does not arise in the future during operation.
If a heating device is connected to an apartment or garage, then all components must be of absolutely high quality, since such systems are exposed to pressure of a large number of atmospheres. If the wall is damaged, it will not withstand the load and will eventually burst, which will lead to loss of coolant and breakdown of the entire unit.
For production, pipes with a diameter of approximately 12 cm are usually used. Sheet metal of the appropriate size is used to plug the ends.
To make bypass channels and fittings, you will need to use pipes of a smaller diameter, which can eventually be connected to the heating system. The threads on the fittings are pre-cut, for this reason the appropriate equipment is required - a “drill” (for creating external threads) and a tap (for cutting internal threads).
A DIY oil radiator can be made portable. In this case, small pipes will be used, and oil will be used as the coolant. Heating elements are used instead of heating elements. The choice of this component depends on the area of the room that needs to be heated. Home craftsmen often install an additional thermostat on such a device, which periodically turns the heating element on and off.
For good fastening to the wall, you will also need strong hooks that can support the weight of the resulting unit. To create a more aesthetic appearance, they can be purchased in the store. But if you don’t want to spend additional money, then strong reinforcement bars that need to be fixed in the wall are also suitable. It is advisable to first paint the hooks in the same color that was used to paint the heating device - this way the fittings will become invisible.
How to repair an electric convector?
Electric heater device
So, first, let’s look at the design of an electric convection heater so that you understand what will have to be checked and repaired. The heater consists of a cord with a plug plugged into an outlet, an on/off button, a thermostat and a heating element (heating element). In addition, the circuit may contain a thermal fuse that protects against overheating, as well as a tilt sensor that will turn off the power and save from fire if the mobile convector is tipped over. Also, some models may have a special sensor installed to protect against the penetration of foreign objects into the housing.
We've sorted out the design, now let's move on to the basics of repairing an electric heater with our own hands.
How to repair a breakdown?
So, to make it clearer to you how to proceed, we will provide step-by-step instructions:
- Unplug the convector from the outlet.
- Give access to the temperature regulator and switch.
- In the event that the convector does not work at all, i.e. The indicators do not even light up when turned on, then check whether the voltage is reaching the terminals through the cord. To do this, use a multimeter. If there is no voltage, check it at the outlet, as well as the integrity of the cable itself. We talked about how to check the voltage in an outlet in the corresponding article. If the outlet has 220, but there is no cord on the cores, replace the cord or find the location of the damage and repair it.
- If the power supply is suitable, but the electric convector does not turn on, the next stage of repair will be checking the button. In 70% of cases, the malfunction lies precisely in this (contacts burn out). To check, first disconnect the heater from the network, then use a multimeter to ring the button. In the on position there should be a short circuit, in the off position there should be a high resistance, indicating an open circuit. If this is not the case in your case, change the button or try to clean the contacts. The video below will provide a technology for repairing a convector button.
- Next, you need to ring the thermostat with a tester. A working temperature controller should show little or no resistance on the multimeter display.
- If the thermostat is in good working order, then you need to go further along the circuit and make sure that all contacts are securely connected to the connectors.
- Having reached the heating element, you need to ring it too. Very often the reason that an electric convector does not work is the failure of the heating element. We talked about how to ring a heating element with a multimeter in the corresponding article. A failed heating element cannot be repaired and will have to be replaced.
- The next stage of repair will be checking the thermal fuses. Proceed by analogy with step 5.
- Well, the last reason why an electric convection heater may turn on, but not heat up or stop working altogether is a malfunction of the sensors, including rollover protection. By analogy, they need to be checked and, if not, replaced.
- If the circuit contains electronics (for example, an electronic thermostat, as in the photo below), it is unlikely that without the appropriate skills you will be able to repair the electric heater yourself. In this case, we recommend that you seek the help of a specialist.
Finally, we recommend watching useful videos on the topic:
What to do if the button does not work
Major breakdowns of electric convectors
What to do if the button does not work
Major breakdowns of electric convectors
Checking internal connections
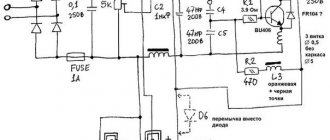
Before opening the convector, you need to read the operating instructions, find a detailed diagram and study it carefully. The design of the convector is quite simple, and you can understand it without technical education.
First, you need to check the power button, if it is working, then move on: remove the front panel of the device to open access to the internal device. Visually check all the wires approaching the terminals - look for signs of burning or loosening in the tightening of the fastening screws that secure the mounting wires. If you find a screw that has become loose due to a broken thread, replace it with a new one and tighten it. We remove the detected scale, clean the wire connection area by disassembling the connection. This operation must be approached thoroughly: clean the washers and the exposed part of the wire with sandpaper, then reassemble everything, tightening the screw firmly.
Then we check the temperature regulator using a multimeter. In electric convectors of different models, it is this mechanical switch that can break.
Rational use
A similar issue should be addressed at the design stage of heating systems.
Attention should be paid to the correct calculation of the required floor thickness taking into account the installation of the convector. It should be taken into account that at the place where the convector is installed, it may be necessary to strengthen the strength of the ceiling. Do not forget that the performance of the convector directly depends on the depth
Do not forget that the performance of the convector directly depends on the depth.
When designing a heating system, you need to correctly place the supply pipe and return pipe, and also provide for draining water and pumping the system in case of air ingress
This is also important because in-floor convectors operate in a different plane, unlike traditional radiators
Such a convector also has a completely different resistance to coolant flow. Accordingly, before selecting a convector, it is necessary to perform a hydraulic calculation of the system and first select settings for thermostatic valves. Due to the imbalance of the system, heated water will not be able to enter the convector in sufficient volume, which is why the operation of the heating system will be ineffective.
Often, thermostatic valves with an integrated temperature sensor are installed on duct convectors, which provides the possibility of remote control.
Difference from radiator
To make a choice between two types of heaters, you need to know the difference between a convector and a radiator. We already know the structure and operating principle of the first device. Now let's examine the radiator.
Design and principle of operation
A radiator is a hollow metal structure filled with coolant. In electric models this is mineral oil, in central heating systems it is water. But we are only interested in oil (electric) radiators.
A heating element is located inside the cavity. First, it heats up itself, then it transfers heat to the oil, which shares thermal energy with the body. Only then does the air, touching the heated metal, become warm, and it floats up. Here we are also talking about convection, but the heating path is too long and expensive.
Installation of electric convectors
This type of convector, such as an electric one, is also excellent for heating rooms. Installation of heating convectors of this type can be done independently. To do this, you will need to perform the following steps in a certain sequence:
- First of all, you need to remove it from the packaging.
- It is necessary to remove the protective film from the convector panel.
- Next, you need to choose a place to install the convector.
Electric convector
When installing a heating convector with your own hands, you must consider the following recommendations:
Technical characteristics of water heating convectors
- The distance from the floor to the bottom of the convector must be no less than 20 cm.
- The distance from the walls should be no more than 25 cm, and from the ceiling no less than 55 cm.
- The distance from sockets must be at least 35 cm.
The electric convector must be installed as follows:
- The convector is turned over and support legs with wheels are fixed on it. In order to screw them on, you will need standard bolts.
- The convector turns on, and then the necessary modes and other parameters are set.
Advantages of converter devices
Such chimneys have many advantages, which have already been appreciated by many. These include:
- Easy installation. The convector is connected to a pipe on one side, and on the other to a chimney outlet leading outside.
- Safe operation. Through the main chimney, combustion products go outside without lingering indoors.
- Benefit. The room heats up very quickly, using very little energy.
- Some purchased models are equipped with the function of shutting off the chimney, due to which you can regulate the intensity of heat release.
- When a device is made of high-quality materials, there is no doubt about its durability.
DIY chimney heat exchanger:
The chimney-convector is a hollow metal structure that is connected to the outlet pipe of the boiler or combustion chamber of the furnace. Its function is to remove exhaust gases and fuel combustion products, as well as additional heating of the room through the use of secondary thermal energy.
The design can be easily done independently, using basic skills in working with a welding machine and having general knowledge and understanding of the principles of operation of furnace equipment.
A chimney-convector is a component of a stove or boiler heating system in a house or bathhouse, operating on the principle of convection.
Essentially, it is a coaxial pipe consisting of two pipes, one of which is located inside the other. The outer pipe serves as a convector and a protective casing that absorbs infrared radiation. The internal part of the structure serves to remove exhaust gases and combustion products, while the external part is intended to supply fresh air to maintain the combustion process in the combustion chamber.
The operation of such a chimney is based on the principle of convection: passing through the internal pipe, hot smoke, gas and water vapor heats the metal pipe.
The increased area of the metal casing, like a radiator, promotes heat exchange and heating of air as it passes through air pockets. Thanks to the large surface area of the metal, the convector effectively transfers internal heat to the air, thereby heating the room.
The main purpose of installing a chimney-convector is to increase the productivity of boiler or furnace equipment, as well as to save energy resources.
Elements for automating the operation of electric convectors
The use of electricity in the main operating circuit of the described convectors makes it convenient to include various electrical automation elements in their composition. The simplest option is to use a thermostatic device, which, when the set temperature is reached, breaks the power supply circuit of the convector, and when it cools down, turns it on again.
Since the on/off switch is controlled by a special contact plate, such a system does not maintain a precisely set temperature in the room.
However, there are practically unlimited possibilities for improving the control system of an electric convector, from connecting it with electronic room temperature sensors or electronic clocks to operate according to a given daily or weekly schedule, to integrating it with a home computer that has no restrictions on the complexity and accuracy of the program that controls the convector.
DIY convector installation
Today, electric convectors are one of the most popular types of heaters. This is due to a number of reasons. With its help, you can heat not only individual rooms of your house, but also the entire apartment. Installing a convector is a delicate process. This is why you should learn how to perform this process yourself.
In this article, we described in detail each stage of its installation. Thanks to this, you will learn how to install a convector yourself. We tried to make this process easier with video instructions.
Convector installation
Installing a convector on a wall consists of the following steps:
- First, unpack the device and turn it over on its back.
- Now you need to dismantle the fasteners.
- The bracket that you removed from the device should be leaned against the wall and the places of future fastenings should be marked with a marker.
- If your house has a wooden wall, then the installation of a wall convector is carried out using self-tapping screws. If the house has a concrete wall, you may need to drill holes using a hammer drill. Then you need to drive dowels into these holes and install the frame. Here is a photo where you can see how to install the convector frame. If you are interested, then you can read how to connect an electrode boiler.
- Now the convector should be placed on the installed bracket.
- Plug its power plug into a power outlet.
- Set the appropriate temperature. This can be done using a thermostat.
As you can see, the technology for installing an electric convector is quite simple. Even a beginner can complete this process. Below we will provide you with useful tips to make the installation process easier.
Preparing for heater repair
Before repairing the oil radiator, certain conditions must be created. This step will be the key to quality repairs. First of all, it is necessary to prepare the place where the equipment will be dismantled. The main condition for this is space and good lighting. Heater repairs can easily be carried out in a garage or a separate room.
Next, you need to prepare a set of tools for work and various devices. You will need the most ordinary tools, since the heater has a fairly simple structure. When performing repair work, you should have screwdrivers, pliers, wire cutters, a hammer and an awl on hand. In addition, you may need a soldering iron, a tester, lubricant and a clean rag. If the cause of the radiator failure is already known, then it is better to purchase a spare part in advance.