I welcome you, dear readers, to my website.
And today we will talk about how to make an electric carrier with a switch with your own hands. Agree with me that at home it is very difficult to do without an extension cord. I use this miracle of technology every day. My computer and all the other components for it are included in the carrier with a block of four sockets. However, I think it’s the same for many people. It’s unlikely that anyone at home has a place where there are three or four sockets at once.
And if the house is also undergoing renovation, then there is no way to do it without an extension cord. Since you will need to connect the power tool in any case. And if several people are doing the repairs, then carrying one socket will not be enough for them. You need to make an extension cord with several sockets at once. Because if people work in turns, it will take too much time.
You can, of course, take a simpler route, just go to any hardware store or market and buy several carriers at once. By the way, recently carriers in the form of a coil of wire wound on a reel have appeared on the market.
But such coils are not always convenient to carry with you, and besides, if you need to turn on something powerful, such as welding, then all this wire must be completely unwound from the reel.
Now imagine if you have 50 meters in a bay and all this wire is spread out around the house or apartment, or worse, in one room. It will simply be difficult for you to move without getting entangled in these networks.
Therefore, I suggest you make a carrier with your own hands using available materials. The price will be much cheaper than the store one, and the reliability will be no worse, and quite possibly even better.
Accessories for assembling an electric carrier.
In order to assemble a good and reliable carrier, you first need to decide what devices you will include in it, and calculate the total power.
But if there are no serious loads, then you can assemble the carrier using the simplest components.
Let's start with choosing a wire. If the total load of all devices does not exceed 2 kW, then for carrying you can use a wire with a cross-section of 1 mm2. And the socket and plug must withstand a current of 10 A.
Usually the manufacturer writes on the body of their products what voltage and current they are designed for, so I advise you to pay attention to this when purchasing.
If the load is about 3 kW, then you need to take a wire with a cross section of 1.5 mm2. And the socket and plug must withstand a load of 16 A.
If the load is within 5 kW, then the wire must have a cross-section of at least 2.5 mm2. But the current with such a load will be about 23 A. So you need to buy the appropriate type of plug and socket.
Now, as for the brand of wire. The fact is that carriers very often have to be twisted and untwisted, so I advise you to take only PVA wire.
The wire of this brand has a stranded core and good insulation, which makes it flexible and will last a long time. And wires with a monolithic core are not suitable for carrying.
List of materials for making the carrier yourself:
- Collapsible electrical plug (designed for the power you need);
- Socket or block of sockets (several sockets);
- Wire of the required length and appropriate cross-section;
- NShVI lugs for crimping stranded wires (although if you carry small loads, you can do without lugs).
Required tool:
- screwdriver;
- pliers;
- press jaws;
- knife or special device for stripping insulation from wires.
Preparatory work
Before you start making an extension cord, you should decide in what conditions it will be used. Don’t forget the power of connected devices.
After all, it depends on this which cable you should buy to make an extension cord.
Once you have decided on the desired requirements, you should prepare a list in which you indicate which components you need to assemble a high-quality extension cord.
Why can't two extension cords be connected together?
Statistics show an impressive figure: about 4,000 house fires are caused by improper use of baby carriers.
The most common problems are insulation damage, circuit overload, short circuit and improper operation. Connecting two extension cords together is an example of improper use of these accessories. Each year, approximately 50 people are killed and 270 injured as a result of these errors. And although it seems that connecting two extension cords to each other is the most correct and only solution, it is still not the best idea. The security of your home is much more expensive than the cost of carrying a longer cord. The main task of an extension cord is to transmit current over a distance equal to the length of the cable.
Once the two carriers are connected, the resistance increases. The cord overheats and the insulation becomes damaged, which may result in electric shock or fire. As the resistance increases, the voltage drops, causing the household appliance or power tool to not operate at full capacity. The solution is to buy an extension cord with a cord of suitable length.
Tools and materials needed for work
First you need to decide on the cross-section of the wire used as the cord. We recommend using copper wire.
If the extension cord will be connected to a grounded outlet, we recommend purchasing a three-core wire.
It is also worth deciding on the wire cross-section. A wire with a cross-section of 1.5 mm can withstand a load of up to 3.5 kilowatts.
If you plan to connect devices with a larger capacity, then it is advisable to use a wire with a cross-section of 2.5 mm. This wire can withstand loads of up to 5 kilowatts.
To make an extension cord that uses high power, we recommend finding tables on specialized forums or websites of cable manufacturers. They indicate the wire cross-section and the power for which they are designed.
You should carefully consider the choice of plug. If your sockets are of an old design, you should not purchase a Euro plug.
Try to decide on the number of outlets that will be required for the extension cord. It is not advisable to use a single outlet.
Of course, if necessary, you can connect a home-made extension cord with a factory-made version that has several outlets. But it is advisable to provide two or three sockets in the manufactured version.
When purchasing a block with sockets, try not to confuse it with the option that is used when working with open wiring. The back part of such pads very often falls out; there are no clamps to protect against the forks accidentally falling out of the socket.
Surge filter device
Depending on the configuration and price category of the surge protector, various components that are elements of certain types of protection can be installed in it. At this stage, we will get acquainted with the maximum configuration of the surge protector.
So, the “correct” surge filter should contain the following elements.
Power button
Supplies power to a group of outlets. The functionality is quite simple - simply turning on and off the voltage for all devices connected to the filter. It can combine the functions of a fuse, causing de-energization of sockets if necessary.
If you need a more flexible filter configuration, there are models with individual buttons for each outlet.
From a safety point of view, wide buttons that simultaneously open the linear and neutral conductors are considered the most correct. So the phase will never appear on the contacts when the button is disabled.
Fuse
The main task of the fuse is to protect the supply network from short circuits in consumer circuits, as well as to turn off devices when the rated power for which the network filter is designed is exceeded. The power and permissible current values are indicated on the information plate located on the device body.
The fuse consists of a bimetallic strip that breaks the power circuit when a predetermined temperature is exceeded, due to the flow of large currents through the circuits. You can restore the circuit after some time required to turn off the faulty device and cool the bimetallic plate by simply pressing the fuse button.
Varistor
The varistor performs the function of protection in the device against pulsed (short-term) overvoltage caused by interference or lightning discharges.
Physically, it is a variable resistor, the resistance of which changes sharply when a certain threshold voltage value is reached. Moreover, the higher the threshold voltage, the lower the resistance of the element. Thus, when a high voltage pulse passes, the varistor bypasses the circuit and causes the fuse to trip. In this case, as a rule, the element becomes unusable.
Capacitor
The main task of the capacitor is to cut off high-frequency interference that occurs between the phase and neutral conductors from the load and return it back to the network, since it is an excellent conductor of high-frequency signals.
As a rule, for protection, capacitors are used that are designed to operate with a supply voltage of up to 250 V and can “survive” a short-term surge of up to 2.5 kV. Typically, the capacitance of the capacitors used is in the range from 0.1 µF to 1 µF.
Throttle
From the electrical engineering course we know that as the frequency increases, the reactance of the inductor also increases. It is simply not capable of transmitting high-frequency interference, since it, as they say, “gets stuck” in it and is converted into heat. If the coil is wound on a ferrite core, then its ability to withstand high-frequency interference is only enhanced.
The properties of the inductor and capacitor are widely used in the fight against high-frequency interference, namely in LC filters, which are an inexpensive and fairly effective way to counter parasitic disturbances.
Due to its inductive reactance, the coil does not allow high-frequency interference to pass through to the filter sockets, but the capacitor conducts it well, returning it back to the network.
Extension cord manufacturing process
To assemble, you will need a sharp stripping knife, pliers, and a set of screwdrivers. After the preparatory work, you can begin the actual production of the extension cord.
We recommend starting assembly with the fork. To do this, remove the top insulation by 5-6 cm. After this, we clear the cores themselves of approximately 1 cm of insulation. We disassemble the plug and attach the bare wires directly to the plug.
The main point is not to confuse the grounding wire. The location of the phase and zero does not matter. After this, you should reassemble the plug in reverse order.
After this, you can begin installing the sockets on the extension cord. The housing is disassembled and the wires are attached inside the block. We pay special attention to grounding. After fixing the wires in the block, you should assemble the socket housing.
After final assembly of the entire extension cord, we recommend checking it with a multimeter. After checking, the work on manufacturing the extension cord can be considered completed.
If you plan to make a very long extension cord, we can recommend using a reel. In this case, using this extension cord will be most convenient.
You can use a certain amount of extension cord without the fear of getting tangled in an unnecessary part of the extension cord. Storing an extension cord on a reel is much more convenient than in a coil.
Source: electrikexpert.ru
Correct connection of the switch. At what height should the light switch be placed?
Before connecting the switch, you need to establish the level at which it will be located.
Sockets and switches can be installed at any height. During the Soviet period, sockets were located at table level, and switches were located quite high. Now the sockets are placed low. This is due to the large number of constantly connected devices and the reluctance to pass bundles of wires in plain sight. Switches also began to be mounted much lower, at a distance of about 1 m from the floor. Typically, this is to ensure that turning lights on and off in rooms is easy for short people. You can install the switch in the most convenient place for you.
How to make an extension cord with your own hands
In everyday life, situations quite often arise when the available sockets in an apartment or private house do not allow the use of any electrical appliances or household appliances. The main reason is their inconvenient location, so owners prefer to use an extension cord. In some cases, increased power outlets or a longer cord are required. In this case, home craftsmen make an extension cord with their own hands. A self-made extension cord will be much cheaper. If you have the skills to work with the tool, the entire procedure takes from 15 minutes to half an hour.
Step by step instructions
Installation and connection should be carried out in stages:
- decide on the lighting task that is assigned to the lighting fixture;
- buy the appropriate device;
- make precise markings of the source installation and cable routing;
- select a connection scheme;
- carry out the electrical wiring;
- install a lamp;
- connect the electrical wiring;
- perform a test run.
In some cases, it is necessary to groove the wall and install a switch.
Instead of difficult internal wiring, it is possible to lay the electrical cord in an open way. In this case, the wire is placed in a closed box. This method involves installing the switch externally.
We recommend watching the video:
The photo shows a kkkkkombo! Low-quality soldering that has fallen off (red arrow) and a melted switch lamella (blue arrow). Unfortunately, switches burn frequently, especially on powerful loads such as kettles and heaters.
For convenience, the manufacturer can add a switch. It’s convenient to have such a block of sockets on the table - you go away and turn off all electrical appliances with one click. But a switch is an additional contact group that can fail, especially if the supplier slipped the manufacturer a batch of low-quality switches. Regular repair of a faulty extension cord comes down to replacing the melted switch. Therefore, if you do not plan to use the switch, then it is better without it.
The manufacturer may also add a small automatic fuse that will trip if the current is too high. Since such protection is based on a bimetallic strip, the protection is very slow; in the event of a short circuit, the circuit breaker in the electrical panel usually trips. Theoretically, such a switch should operate during prolonged operation with a slight excess current, but IMHO, if the cross-section of the extension cord is comparable to the cross-section of the cable in the wall, and allows operation at the maximum current for the plug, then the protection is provided by the circuit breaker in the panel.
Surge filters are often called “pilots” thanks to the domestic manufacturer who sold their products under this brand. The manufacturer is still alive.
A surge protector is an extension cord, in the socket block of which there is a certain node that can be called a filter. This can be a simple varistor (a blue washer with two terminals, often mistaken for a capacitor), or a full-fledged filter with chokes, varistors, suppressors and even arresters. The need for a filter is a controversial issue; any switching power supply usually contains a similar filter. If you do not live in a country house or in a village with long overhead lines, there is no need to buy and overpay for a surge protector. The photo shows network “filters”. Only the pilot‑s in the photo above and the vektor solo below have something sane. For the rest, the “filter” is reduced to only one varistor.
Preparing to assemble the extension cord
Before making an extension cord, you first need to decide on its purpose. This will allow you to determine the possibility of connecting certain devices, as well as the maximum permissible power. These factors have a direct impact on the choice of cable cross-section and other components. It is recommended to select all parameters with a small margin, so that in the future there is the possibility of connecting more powerful electrical equipment.
First of all, you need to buy a wire that will be used as a cord. The best option is considered to be PVS copper wire, which is characterized by increased flexibility. If there is a grounding contact in the socket, the wire must be three-core, but if it is absent, a cable with two cores can be used. When purchasing, you should carefully study the product labeling. If the brand “PVA 3 x 1.5” is indicated, this means that the wire is three-core and the core cross-section is 1.5 mm. These parameters allow you to connect a load with a power of up to 3.5 kW. For a power of 5 kW, a cross-section of 2.5 mm will be required. The data for calculations can be taken in a special table, which will significantly speed up the solution to the question of how to make an extension cord with your own hands.
Correct understanding of the functions of the extension cord
This derivative word from the verb “extend”, which is used to name such a product often used in everyday life, can be interpreted in two ways - the network to the consumer is extended, or the power cord of the electrical appliance becomes longer.
A correct understanding of the functions of an extension cord lays the foundations for fire safety when connecting various consumers to portable sockets.
In news reports about various incidents, we very often heard that such and such an office burned down due to the fire of an extension cord overloaded with computers, printers and other office equipment.
How to assemble an electrical extension cord with your own hands
At the first stage, the top insulating layer is removed from both sides of the cable by approximately 5-7 cm, after which the ends of each core are stripped to 1 cm. Next, the plug is disassembled by unscrewing the fastening bolt. After this, you need to loosen the screws on the clamp that secures the cable inside the plug body. Then the stripped wires are connected to the two plug contacts.
The location of the conductors does not matter; the most important thing is to correctly connect the grounding contacts on sockets and plugs. After connecting the conductors, the plug is reassembled. At the final stage, the socket block is disassembled and two conductor cores are connected to the contacts. The third wire is connected to the ground pin, exactly the same as on the plug. Thus, both ground contacts are connected by a single wire.
If the core consists of many wires, then it is recommended to solder it or fix it with a tip. As a last resort, you can simply twist the wires using pliers. After all connections, the cable is fixed inside the housing and the final assembly of the unit is performed. The finished extension cord is checked by plugging it into a home electrical outlet or using a multimeter.
How to connect a single-key switch from an outlet
Often, in solving practical problems when connecting additional lamps or just light bulbs, the need arises to connect a switch from the outlet. You can do this in two ways:
- By connecting the phase from the socket and the neutral to the ground from the distribution box, when the lamp is close to the latter.
- Connecting phase, neutral and ground from the socket when the light bulb is far from the source and pulling wires across the entire apartment is impractical.
Interesting! Ultimately, it is up to the owner to decide which option to choose. However, it should be taken into account that if the outlet is constantly loaded with powerful devices, then its contacts can quickly weaken. Over time, this will lead to deterioration of the lighting device's power supply. The mechanism of sequential actions for connection for both versions is no different (except for the connected power) from when the socket outlet is already connected and in operation, and is given below.
How to properly use a homemade extension cord
When using a homemade extension cord, several mandatory requirements must be met.
- There should not be any damage on the cable, and if it does appear, it must be insulated. Isolation is performed when the extension cord is unplugged from the outlet.
- If a plug or socket fails, it must be replaced. They should be protected from moisture and avoid excessive overloads.
- When operating at maximum loads, the cable must be completely unwound to avoid overheating.
What switches are used?
A single-pole product is used to de-energize a group of lamps, and is installed in any small room with one group of lamps.
A double switch is a product that allows you to perform closing and breaking actions with two groups of lighting fixtures. Let's say two types of lighting are designed in one of the rooms: main and spotlights. In this case, control must be carried out separately. One key regulates the lighting of the main line, and the second – additional. In addition, there are options with two different luminous flux powers.
A three-key switch can control three groups of lamps. Typically, this option is suitable for installation in a corridor, when it is necessary to control lighting from one place in three rooms at once (kitchen, bathroom and toilet).
Properly connected cables are so important that it could not be more important, since the issue concerns electrical safety. Ask about this to people who have inadvertently touched this dangerous place. It's like being born again. It’s good when you can get away with shock and avoid a short circuit.
Before starting installation, you should prepare the tool and think about what technology to use. As an example, we can offer step-by-step instructions.
Safe socket, simple circuit with a secret
Hello everybody! I bring to your attention a “test stand” for craftsmen and electricians. This simple device will be useful not only for the novice DIYer, but also for an experienced electrician who often has to repair faulty electrical appliances. The essence of this homemade product is to prevent short circuits in the home electrical network when testing new electrical homemade products or when repairing faulty electrical appliances. Let me give you a simple example. Let’s say they brought you a faulty vacuum cleaner, but what the fault is is not yet clear. It will not be possible to measure the load resistance with a simple tester, since the motor has a winding that is checked with a special device and not all craftsmen have these. You plug a faulty vacuum cleaner into the outlet and the good thing is that nothing will happen, but if there is a short circuit in your vacuum cleaner, the consequences can be very different from a simple circuit breaker tripping to your electrical wiring failing and, worst of all, a fire. According to statistics, a very large number of fires occur precisely from poor electrical wiring and faulty electrical appliances. Making this homemade product will not take much time and money, and in return it is almost completely safe.
First, we prepare a base on which we can attach all the parts of the stand, namely two sockets, a machine and a wire with a plug. You can choose any suitable material, in this case I took a piece of plywood 18mm thick with dimensions of 25 by 6.5 centimeters.
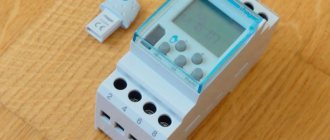
We attach a DIN rail to the prepared base as in the photo. You need to step back from the top as much as is needed to install the machines and secure the wire.
The circuit breaker can be installed double or two single, as in the photo, with a rated current of 6 or 10 amperes, although this is not essential. In this scheme, the machine plays a secondary role - as additional protection and as a regular switch.
We connect the electrical wire with a plug to the machine and fix it to the base using self-tapping screws and a tin clamp.
Installation of switches and sockets in one housing. Connection
Some of the main parts of electrical wiring in any room are lighting devices, switches, and sockets. Therefore, when carrying out repair work in an apartment or in a newly built building, you need to know how to install electrical circuits and connect them. Some of the listed devices can be combined into one housing or box for ease of installation and use.
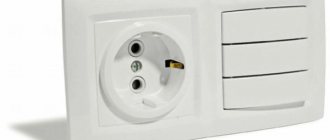
Nowadays, in order to save electrical wires, as well as wall surface area, manufacturers of some devices have begun to combine several devices in one housing. A popular design of this type has become a box containing a switch and socket. Installing switches together with a socket allows you to achieve the greatest efficiency and practicality of using such devices.
Types and features
Now there are several options for schematic diagrams for connecting electrical devices such as switches and sockets to combine them in one housing. Previously, such options were not widespread, and the wiring of switches and sockets was connected in junction boxes without taking into account the combination of these devices in one housing.
Now you can use this option if there is not enough space for their separate installation, since you can purchase the corresponding combined structures in the retail chain.
Advantages of separately connecting the above devices:
- You can buy a switch or a single socket at a low price and connect it together in one box.
- Simple installation of switches and sockets allows you to do all the work yourself.
- The separate arrangement increases the safety of using the switch, as well as the socket, since the wires are laid separately, eliminating the possibility of a short circuit.
of joint blocks have become popular . The connection diagram has been greatly simplified. This can be explained by the absence of the need to install two separate cables to the switch and socket.
Advantages
- The unit can be easily moved to other locations, without laying separate cables.
- There is no need to mark the wall surface separately for each device, since they are in one place.
- Can be used outside and inside buildings, as there are versions with high-quality protection from external influences.
- Ease of use on any surface materials.
A serious disadvantage of a joint block is that it is impossible to replace, for example, a faulty socket separately in this block. To do this, you will have to replace the entire unit assembly. Innovative models of combined blocks are produced with switches having from one to three keys.
Installation of switches and sockets
To install a combined box with electrical devices, you will need some tools and materials, as well as following simple recommendations.
Materials and tools
- Electric drill, hammer drill.
- Crowns for making seats and mounting device housings.
- Several screwdrivers with different tips, insulated cores and handles.
- Pliers.
- Side cutters.
- Terminal connectors.
- Self-tapping screws.
- Dowels.
- Insulating tape.
- Heat-shrink tubing.
- Alabaster.
Preparatory operations for any type of installation are mainly reduced to standard work carried out before installing and connecting electrical devices.
- First you need to turn off the power supply. To do this, in the distribution board you need to turn off the circuit breakers or other switching devices that supply voltage to the network where you are installing the devices.
- Next, markings are made on the surface of the wall.
- Using crowns of the required size, holes are drilled for mounting the boxes.
- A niche is hollowed out if the wiring is planned to be of a hidden type.
- On the body of the combined box, the plugs for the holes for the power cable are removed.
- Cables and wires are laid and secured according to the connection diagrams (if there are no wires laid).
- The box is fixed to the wall using fasteners.
This completes the main preparatory work. Next, we will look at how switches and sockets are installed according to different connection schemes in one box.
Connecting an outlet via a switch
The simplest way to connect an outlet that will be connected using a switch, and located in the same box with a switch that has one key, is to connect the wires in the junction box according to a certain diagram. To do this, it is advisable to follow the recommendations:
- Overhead structures of combined blocks are mainly mounted for open wiring, for example, on wooden walls.
- The distribution box should have six wires going into it: two wires each from the switchboard, switch and socket. Each pair is a phase and a zero. In some buildings, the third residential conductor is grounded.
- First, determine the phase from the distribution board and turn off the power.
- The phase wire is connected to the switch terminal, the insulated ends are twisted, wrapped with electrical tape, or insulated with heat shrink tubing or a plastic tip.
- The neutral conductor is connected to one of the socket terminals.
- The two insulated ends of the wires that are left unused are twisted together and insulated in the manner described above.
- According to this scheme, the work looks like this: the phase will flow to the socket only when the switch is turned on. This is used when the outlet is rarely used, or if electrical devices that need to be turned off and on frequently will be connected to the outlet.
This is a simple workflow. It is effective when plugged into an outlet, for example, as an extension cord for lighting the room being repaired. The lighting will be turned off with a one-key switch.
Connecting an independent outlet and installing switches in one box
New combined units with a switch and socket operating independently of each other have become especially popular. Installing switches and sockets using this option, a certain procedure is recommended:
Electrics for girls
Our knights don't always care about the little things. And, even in your free time from saving the world, you can’t approach them at any moment with another minor “sadness.” Therefore, it’s good to be able to do something with your own hands. For example... an extension cord.
You don’t need much to create it: a cord, a plug and a socket.
The cross-section of the wire determines how powerful an electrical appliance can be plugged into this extension cord. If you take 2.5 mm, then almost any home appliance. If 0.5 mm, as in the photo, then a maximum of 1500 W.
How does an electrical outlet work?
So, let's take a look at what's inside.
And inside it’s not at all difficult or scary. There are only two terminals for connecting the wire (three if you have a ground connection).
How does an electrical plug work?
Now let's open the plug body.
Also two contact screws, a sealing sleeve-clamp so that the wire does not pull out of the plug. This is an old style plug, they are still produced and sold. In it, you need to seal the wire with a ring on the terminals. New forks are much simpler; there is no need to make a ring.
Step-by-step manufacturing of an extension cord
Remove the top insulation from the cord. We strip each wire of insulation by approximately 7 mm for the socket and 1 cm for the plug.
Now is the most difficult moment. I know. that 99% of men won’t bother with this. But I will tell you how to properly prepare the cord. The ends of the wire must be tinned with solder. For this we need a soldering iron.
Now connect the cord to the socket and plug.
We carefully lay the wire inside and close the case. Our extension cord is ready for use.
Switch on cord
Sometimes it is necessary to install a switch so as not to constantly pull the plug out of the socket. There is nothing complicated about this either.
Step-by-step installation of the switch on the cord
Unplug the electrical appliance from the outlet. Open the switch housing.
We strip the top layer of cord insulation to a length less than the length of the switch.
We leave one of the veins intact, and cut the second one exactly in the center.
The cut sides need to be cleaned to 5-7 mm and tinned.
Secure it to the switch terminals, carefully lay the wires inside and close the housing. Our table lamp (sconce, floor lamp) now has a switch.
Simple, isn't it? Have you repaired plugs or switches yourself?
Did you like the article? Subscribe to the channel to stay up to date with the most interesting materials
Installation features
block
It will not be difficult to install a combined unit without the involvement of a professional electrician, since connecting modern models requires a minimum of wires.
The installation process will have only a few features that need to be taken into account:
- You need to prepare the necessary tools in advance ; you won’t need many of them: an electric drill with a drill core; several screwdrivers of different sizes; pliers and wire cutters.
- To ensure safety during work , make sure that the handles of all tools are insulated.
- Some modern varieties are designed for external installation, that is, when installing them, you can completely avoid drilling holes in the wall surface.
- You can choose a variety with an increased level of protection from environmental conditions ; such models can be installed not only indoors, but also outdoors. Such devices also have an additional element in the design in the form of a special lid that helps prevent liquid from getting inside the device.
- All modern types of blocks are suitable for installation in walls made of any material and regardless of the type of finish.
Rough burlap as fashionable and cozy curtains
Today, more and more often, fashion designers choose burlap curtains for window decoration. This accessory perfectly complements interiors in rustic, Provence, country, classic, Scandinavian and eco-style. Burlap curtains are truly a godsend for those who want to transform a room without a large investment.
Due to the fact that burlap is a rather dense material, it will not be possible to form beautiful folds on the curtains and make draperies. From this fabric you can make curtains of the simplest cut.
Almost any room can be decorated with long burlap curtains in the form of a rectangular fabric.
The kitchen can be decorated with curtains in the “Cafe” style with a lambrequin.
Burlap curtains can be hung with eyelets. It is not only convenient, but also very beautiful.
Curtains made of burlap with easy assembly are suitable for the Provence style.
Roman curtains made of burlap will ideally complement a Scandinavian-style interior.
For a classic style, rectangular burlap fabrics with or without tiebacks are suitable.
Short burlap curtains with cute accessories, such as bows, will help you decorate your house in a rustic style.
To make burlap curtains more interesting, you can combine the coarse fabric with lighter materials in contrasting colors.
Did you like the article? Subscribe to the channel to stay up to date with the most interesting materials
Now let's look at a real example of assembling a carrier.
Let’s say you need to make a carrying case, which will include a heater with a power of 1.5 kW, sometimes a drill with a power of 0.85 kW will be turned on, or some other small thing: a phone charger, a portable lamp, a soldering iron, and maybe something else. If you calculate the total power of all these devices, it will be no more than 3 kW. Based on this, I will take PVS wire 3 * 1.5 mm 2, it will be enough. There will even be a power reserve.
I’ll make a small digression and explain a little what these numbers mean - 3 * 1.5 mm 2.
3 – the first digit always indicates the number of cores in the wire. It is advisable to take a three-core wire for carrying, since in addition to phase and zero, we will also have grounding.
1.5 mm 2 is the cross-section of one core. It happens that in a wire or cable several cores have one cross-section, and one or more wires have a different cross-section.
Let's return to our assembly. In the store we buy a socket or block of sockets with a grounding contact. If our load is 3 kW, then the current will be approximately 13.6 A. Therefore, we buy sockets that can withstand 16 A. We also take a plug for 16 A, and it is imperative that it has a grounding contact.
Let's start assembling the carrier.
We have all the necessary materials and tools. First you need to disassemble the fork. Most plugs have a screw type connection. If you take and simply clamp a stripped stranded core with a screw, a significant part of the wires will be damaged.
As a result, the area of the contact connection may decrease, which can subsequently lead to heating and various breakdowns. Starting from the banal burnout of the wire, and ending with the complete failure of the plug.
Therefore, we will use special tips for crimping NShVI.
First you need to strip the wire. Carefully remove the top insulation, and then strip the wires to the length required for crimping with lugs. For stripping, it is best to use a special knife.
But if you don’t have one, then you can use any knife. By the way, I would not recommend stripping the wires with a stationery knife, as it cuts the wires. But it is very suitable for removing top insulation.
Now we crimp the wires, and you can start assembling the plug. Typically, all plugs are equipped with a special clamp to secure the wire. We clamp the outer insulation of the wire with a clamp and connect the wires to the contacts of the plug.
Attention. I want to explain to you why it is necessary to secure the wire with a clamp. The fact is that many people, when turning off a carrier or other electrical appliances, pull not by the plug, but by the cable. And thus the contact connection of the core with the plug contact may be damaged. Or the wire may even pull out.
Now we connect the wire to a socket or socket block. To do this, let's disassemble it. The grounding wire, in the same way as in the case of the plug, is pressed into the NKI tip. If this is not the case, then simply twist the core into a ring and connect it to the grounding contact. We connect the remaining two wires to the corresponding terminals.
Now, to close the cover of the socket block, we need to make a special recess for the wire. Carefully cut it out, then lay the wire, close the lid and screw it on.
To make everything clearer, watch the video.
And in this video, a person makes a carry without explanation.
In principle, everything, the carrier is ready and can be used. But you and I can improve it and insert a button into it.
Houses for cats: good ideas that provide maximum comfort for pets
When one of the family members is a charming purr, the question of his comfortable stay in the apartment becomes relevant. Some decide to build a comfortable house for their beloved cat, others limit themselves to a bed, and there are those who prefer to equip a full-fledged cat complex. Much in this case depends on the availability of materials, imagination and free space. Everything is used: from ordinary packaging cardboard and thread to old furniture and suitcases. If desired, even without special expenses, it is easy to create a full-fledged original house.
How to connect a switch. How to connect a switch to a light bulb
To connect the light bulb to the switch you will need:
- switch
- electrical wire
- distribution boxes
- electric indicator screwdriver
- wire cutters and pliers
- insulating tape
- fastener
- socket box
- hammer drill
The diagram for connecting the switch to the light bulb is as follows: all the wires in the apartment, as well as the wires coming from the switch and the lamp, must be connected to the junction box. The working conductor of the network is connected to the working conductor of the light bulb through a switch so that one wire of the socket is connected to the neutral conductor of the network, and the second to the conductor of the wire that comes from the switch.
The diagram for connecting a light bulb to a switch is quite simple. By following this diagram, the switch will be connected correctly.
Advantages of an extension cord with a switch
Extension cords have different numbers of sockets and unequal wire lengths. In addition, they also differ in the presence or absence of a switch.
In order to insert the button inside the socket block, you need to make a hole between the socket connectors, according to the dimensions of our switch. Electric baby carriers with a switch have some advantages.
Advantages of an extension cord with a switch:
- The ability to disconnect electrical appliances from the network without removing the plug from the socket;
- Saving time in identifying the cause of a malfunction in electrical appliances.
If there is a switch on the carrying cord, then you will be spared the need to pull out the plugs of devices connected to it. In this case, it will be enough to press the switch button. Sometimes it happens that, having connected an instrument to a power carrier, you see that it does not work. Finding the cause takes a lot of time. To quickly identify the cause, you need to install a button with a light indication into the carrier. This button is designed for 220V voltage. When the carrier is energized, it will be visible visually, which means that everything is in order with the power supply. The cause of the malfunction should be looked for elsewhere. Also, with this button, during a break in work, the power tools will be completely de-energized.
How to choose a good garage lamp
Conventional incandescent lamps consume a lot of energy and have to be changed frequently. In addition, the case heats up quickly and such lamps are completely unsuitable for carrying. Another story is modern LEDs and fluorescent lamps. The question is which option to choose for carrying.
Fluorescent lamps - advantages and disadvantages
The power consumption is low, the operating life is long, but by the end of the service the luminous flux becomes extremely low, almost doubled. Flickering and decreased light levels cause severe eye strain when working in the garage, so it is not advisable to use such carriers all the time. They are good when carrying is needed exclusively for one-time work.
Since all these lamps contain mercury components, it is not advisable to use them for a carrying lamp.
Gas-filled lamps
They consume a little electricity, five times less than incandescent lamps, but the brightness quickly decreases. Service life is three years. It is better to choose such lamps to replace conventional incandescent lamps, when it is easier to create normal light in the garage than to bother with wires and carriers.
LEDs
Choose LEDs with warm white light for your garage; base E27, G13 is the most economical and convenient option.
Lamps that are optimally used for carrying and options for stationary lighting:
- if you need to make the light normal. throughout the garage, then choose LED lamps M-40/42 (passage). This is an analogue of fluorescent lamps with IP65 protection. These lamps are resistant to dirty work in the garage - dust and moisture. Power – 40 W;
- For carrying, you need to select LEDs with a lighting angle that can be adjusted (up to 75 degrees). The power supply for such light bulbs is from a 24V unit;
- Line Light diodes with a power of 14W do not heat up quickly and provide optimal local illumination;
- A strip of diodes for emergency lighting can also be powered from a battery (12V). Choose a warm white spectrum, such a strip (60 LEDs) consumes only 4.8 W;
- When carrying an LED light bulb, it is better to use a “corn” type light bulb with white light;
- fluorescent lamps Osram 4000k at 40W in combination with Epra at 57W (at 40W there will be little illumination) - the light is simply super for painting and inspection pits.
Another story - a clothespin flashlight. And your hands are free, and you don’t have to fuss with lighting angles and wires.
We offer several options for simple and effective designs of portable lamps for the garage.