Built-in boxes always look great, but they are impossible to use in many situations because you need to make a large hole in the wall.
Among the main types of boxes for circuit breakers, there are a huge number of options. We will highlight several main functions and features that are worth looking at when choosing:
- Steel boxes that provide additional protection.
- There may be a lock on the structure, thanks to which you can restrict access to the machines that are located there.
- Protection degree IP 40 is available for many products. But, these values can be changed depending on need.
- Plastic boxes are the most common. There are several reasons for this: they have a beautiful appearance, are affordable, and there are no questions about functionality.
- Remember that in some boxes a DIN rail is pre-installed; if it is not there, you will have to purchase it yourself. We recommend purchasing it together with it, as it greatly simplifies the installation process.
Note! If you choose plastic boxes, they should not spread fire. This may cause a serious fire.
Electrical panel for a garage - how to make it yourself?
For garages, electrical panel assemblies are required with a firmly fixed filling. There should be no sparking contacts under voltage. This is one of the important conditions for a reliable device for DIY garages with meters. Guaranteed that there will be no fire due to a short circuit.
Expert opinion
Viktor Pavlovich Strebizh, lighting and electrical expert
Any questions ask me, I will help!
If you have mechanical machines and a compressor for inflating tires in your garage, then show their location on the diagram, because separate lines from individual machines will need to be connected to these current collectors. If there is something you don’t understand, write to me!
What should be in the shield
Read about how to connect electricity from a pole to a house here.
In some apartment buildings, meters are located in boxes on the staircases. In this case, the cabinet is needed only for RCDs and automatic machines. In other houses it is located in the apartment. When upgrading the electrical network, you will have to buy a cabinet so that the meter can fit in there, too, or buy a separate box for the meter with an input machine.
A simple electrical circuit diagram for a small house or apartment
One example of a panel layout for a small circuit - for 6 machines
The stabilizer is installed on one or several groups and is turned on after the RCD and before the group circuit breakers. Since this is a rather large device, it won’t be possible to install it in a panel, but you can install it next to it.
When assembling an electrical panel yourself, you will need to purchase the cabinet itself, as well as rails (called DIN rails or DIN rails) on which circuit breakers, RCDs and switches are attached. When installing the slats, check with a level that they are horizontal: there will be no problems with fastening the machines.
All machines must be connected to each other. This can be done using conductors - connecting their inputs in series, or using a ready-made connecting comb. A comb is more reliable, although it costs more, but if you take into account the time that you will spend connecting all the machines, it is unlikely that a few tens of rubles are of such fundamental importance.
Connecting comb for circuit breakers in an electrical panel: will speed up the self-assembly process
Scheme for several groups
It is very advisable to install protective devices on each of the inputs that go to powerful household appliances (more than 2.5 kW, and even a hair dryer can have such power). Together with a stabilizer, they will create normal conditions for the operation of electronics.
Assembly diagrams for three-phase electrical panels
For a private house on two floors, a three-phase electrical panel will be large
What kind of lighting do you prefer?
Built-in Chandelier
A pair, automatic + RCD, can replace a differential automatic. This makes the circuit simpler, more reliable, easier to read and change (provided it is connected via a cross-module). It also saves space in the shield, which is also important. But such a scheme is three times more expensive, since there are many differentials, and they cost more than a pair of automatic + RCD.
The need for a cross-module for three-phase switchboards
To make the assembly of the 380 V switchboard easier and to make it possible to reconnect one or more circuit breakers to another phase, a three-phase cross-module is installed after the meter. This is a device that has three inputs - for three phases, and several outputs with the same phases (the number of outputs depends on the model).
To make the assembly of the 380 V switchboard clear and easy to maintain, it is better to use cross-modules
Assembly of a 380 V switchboard only on automatic machines
As has already been said more than once, if each group or individual powerful consumer has its own difavtomat installed, the whole task is to correctly distribute them between the phases so that there is no phase imbalance. An example of such a shield for an apartment is shown in the figure below.
With this scheme everything is clear. The first machine worked - there was a problem with the lighting in the hall, the fourth one worked - there was a problem with the sockets in the kitchen. Everything is clear and understandable. But such a scheme for a private house turns out to be too expensive, so you have to get smart, dividing all the lines into groups.
With two RCDs
You can divide the entire load into two groups and install two powerful three-phase RCDs at the input. In this case, there should be two buses near each group: neutral and ground. After each RCD, its own cross-module is installed, to which the phases are connected and the line circuit breakers are connected to the outputs.
The advantages of this scheme: the price is not too high, the cabinet is relatively small in size, it is easy to switch one or two consumers within the same group if necessary.
An example of the layout of a 380 V electrical panel with two RCDs
- Three-phase RCDs are expensive. In case of failure, the costs will be significant.
- To transfer consumers from one group to another, you will have to pull wires - for the uninitiated this is difficult.
- When one of the machines is triggered, half of the consumers remain de-energized. Since many lines are connected to each RCD, the process of searching for the culprit of the trip is lengthy, because you will have to first turn off everything, then gradually add one at a time. The line on which the protection will work again will be damaged.
- Additional buses have appeared, you need to label them, which of them go to the first group, which to the second, and not to confuse them during installation. To prevent the wires of different buses from getting mixed up during maintenance, it is better to hang a tag on each one.
- It is impossible to assemble groups so that on one RCD there are only “wet” rooms, on the other only “dry” ones. And in general, in order to more or less even out the load, you will have to rack your brains.
Do-it-yourself wiring in the garage - from diagram to installation
Solutions for how to assemble an electrical panel depend on the power of the electrical network, the purpose of the electrical appliances that will be included in it, and their number. The panel must accommodate all devices that will make it possible to supply or interrupt the supply of voltage to a particular device connected to the network.
Expert opinion
Viktor Pavlovich Strebizh, lighting and electrical expert
Any questions ask me, I will help!
As a rule, all electrical equipment in a regular garage consists of two or three circuit breakers for lighting the garage itself, a pit, a cellar and two differential circuit breakers for socket groups. If there is something you don’t understand, write to me!
Making a wiring diagram
To properly create a wiring diagram, make a list of electrical appliances that you plan to use in the garage. The number of lamps and their location must be taken into account.
If the garage is used only for parking and minor car repairs, then there is no need for a large number of sockets and lamps, but you also don’t need to save much. Above the workbench or near the entrance, you can install several sockets and a two-key switch so that you can divide the lighting lines into groups.
A multi-use garage should have good lighting and plenty of conveniently located outlets. It is also necessary to ensure safe lighting of the inspection pit.
Load distribution algorithm across three phases
As already mentioned, it is necessary to collect the entire single-phase load and distribute it evenly between the phases. Moreover, the trick is to select everything so that powerful devices connected to one phase do not cause an overload shutdown. This is possible if the total power of the operating devices is no more than the nominal value, or if these devices do not operate simultaneously.
A 380 V apartment panel may not be very large
General principles of load grouping for automatic machines
Make a plan for a three-phase electrical panel - distribute the load between three phases
To make it easier to form groups, make a list of lines and the load on them. The room, line name and power of the connected load must be indicated. Looking at this table, following the rules described above, you assemble groups. At the same time, you must also ensure that the load is distributed more or less evenly.
Checking groups
After you have sketched out the groups on paper, check them. Sit down and think about what will happen if each of the machines works, how catastrophic the consequences will be for each room.
You can assemble a 380 V switchboard for a private home with your own hands, but you must first figure out how to distribute the load
For example, if in a two-story cottage you connect all the sockets of the first floor and the lighting of the second to one machine, and the lighting of the first, the sockets of the second to another, and the equipment to the third, then when any of the machines is triggered the situation will be terrible.
This is how we lose situations with each machine being turned off. It is advisable that there be either working sockets in the room or that they be in the adjacent one. Then, if necessary, it will be possible to connect equipment and lighting.
Selection of machines
The machines are selected depending on the expected load on each line. To calculate its rating, you need to add up the maximum power of all expected consumers on the line in watts and divide by 220 Volts, we get the approximate current. It is also worth providing some current reserve so that at the moment of starting or turning on the machines do not knock out.
For example, we have 20 lamps of 100 Watt in our lighting line, which means the load on the lighting line will be 2000 Watt or 2 kW. This means the current flowing in this line will be equal to 2000/2200 = 9 Amperes. A 16 Amp machine will be optimal.
Typically, 10-16 Ampere circuit breakers are used for lighting lines, and 25 Ampere circuit breakers for sockets.
But in each specific case you need to calculate it relative to the planned load; you should not take too large a reserve (more than 2 times), this reduces the reliability of protection.
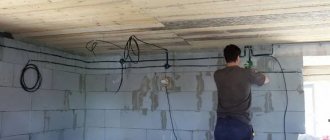
Internal wiring
When the electrical box is installed, you can begin the technical processes of installing internal wiring. The work is carried out exactly according to the parameters specified in the pre-prepared diagram. The electrical wire is of the required cross-section. It is allowed to use aluminum or copper wires.
Installation work on internal wiring is performed only with homogeneous wire. The use of copper and aluminum wires will cause corrosion at the connection points. Contact will be lost.
- On solid brick and block walls, a recessed wiring method is used. Using a grinder, grooves of the required depth are cut, wires are laid, and the top is sealed with cement or plaster mortar. The installation operation is easy to do with your own hands.
- Laying on wood is carried out in a different way. The electrical wire is hidden in special plastic boxes, which are attached to wooden planes with self-tapping screws. Sockets and switches use a special design that is easily attached to wooden wall structures.
- Electrical wiring is laid across metal using insulating fastening devices, usually with a cable. But you can also do it with wires if this is not available. Insulators supporting cables are attached to metal structures with special self-tapping screws with rubber dielectrics.
- If garages have combined wall planes, for example, one wall is made of blocks, the rest are made of wood, then the wiring methods recommended for wood or brick are used on dissimilar structures.
Sometimes the owner of a “motorhome” decides to supply energy directly to the machine, located away from the walls. Powering the equipment is allowed by underground cable supply. In this case, it is hidden under the floor in additional insulation: a polyethylene or metal pipe. The work is done with their own hands.
Expert opinion
Viktor Pavlovich Strebizh, lighting and electrical expert
Any questions ask me, I will help!
It is very advisable to install protective devices on each of the inputs that go to powerful household appliances of more than 2.5 kW, and even a hair dryer can have such power. If there is something you don’t understand, write to me!
Cable selection
Copper cable is used for installing household electrical wiring. Aluminum cable is practically no longer used due to the fact that it can withstand less load and has less strength.
The cable is selected depending on the planned load at the rate of 1 mm2
for every 10 Amperes of current.
As a rule, copper cable with a cross-section of 1.5 mm2 is used for lighting, and 2.5 mm2 for sockets.
The cable can also be flexible and rigid; this characteristic does not affect its conductivity in any way, so choose the one that is more convenient for you to work with.
The number of cores in the cable is determined by the presence of grounding. If you are installing electrical wiring with grounding, then you will need a three-core cable, but if without grounding, then a two-core cable.
Finishing worries
The electrical panel for the garage was installed according to the instructions with your own hands. Its assembly does not cause any complaints or comments from the supervisory energy service. Internal wiring was done by hand. It is hidden in the walls. The installation of sockets and switches, lamps, inlets in machines and other equipment was carried out flawlessly.
You can rest, but something is bothering you. Concern calls for another inspection of the electrical panel for the garage. Is everything connected there as required by the circuit diagram? How the contacts are sublimated, the grounding is arranged. Before working on the electrical network, you need to make sure once again that the work on assembling the electrical panel for the garage with your own hands with a meter has been done correctly
For garages, electrical panel assemblies are required with a firmly fixed filling. There should be no sparking contacts under voltage. This is one of the important conditions for a reliable device for DIY garages with meters. Guaranteed that there will be no fire due to a short circuit.
Why install an electrical panel in the garage
Electrical panel for the garage
When installing and registering the device, the garage becomes a room that needs to be fully equipped in order to optimize its functionality. When choosing equipment, the layout and area of the room must be thought out in advance. This is due to the fact that these factors determine the volume of electricity consumed. For maximum comfort, the room is divided into several zones:
- The main part intended for storing the car.
- An additional area designed for storing tools, as well as placing a working area and a repair pit.
Many car owners carry out tire fitting and other repairs themselves, therefore, adequate lighting in the room is required. To carry out a large number of works, the installation of a high-quality shield is required.
Rules for installing wiring for utility rooms
Often, permanent garage buildings are equipped with pits for inspecting cars and basements. Therefore, before you do electrical wiring in the garage, familiarize yourself with some of the nuances and rules specifically for these rooms.
To ensure safe operation of the lighting wiring in the inspection pit and basement, it must be powered using a 220/36 V step-down transformer. Due to the fact that these rooms are deep and damp, the transformer itself should be located at the entrance gate to the garage or near the distribution panel .
In dry basements, 220 V voltage can be used for lighting, but the connection must be made through a differential circuit breaker or RCD.
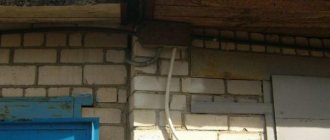
Lighting wiring in the garage for the basement and inspection room is carried out in an open way along the surfaces of the ceilings and walls; the use of pipes or electrical boxes made of plastic is allowed.
The basement and inspection pit must be connected from the distribution panel by two independent lines. It is prohibited to install switching devices in them. If absolutely necessary, then in dry inspection pits and basements it is allowed to install sockets and switches with a protection class of at least IP 44.
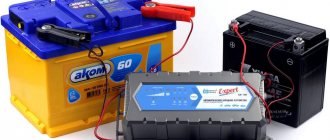
The inspection pit has cramped dimensions, so make niches for mounting lamps. When this is not possible, use lamps with a protective grille. When using portable additional lights, connect them using a step-down transformer (36 V) or a car battery (12 V).
Expert opinion
Viktor Pavlovich Strebizh, lighting and electrical expert
Any questions ask me, I will help!
When using portable additional lamps, connect them using a 36 V step-down transformer or a 12 V car battery. If something is not clear to you, write to me!
Wiring
The wires are laid in a corrugated cable duct along the walls or ceiling. You can read more about wire laying methods in this article.
According to safety requirements, corrugations or cable ducts must be laid on concrete or brick walls, and if the wires are laid on a wooden wall or ceiling, then a strip of sheet metal must be nailed where the wall touches the cable. This rule also applies to the installation locations of socket panels, switches and other electrical wiring elements.
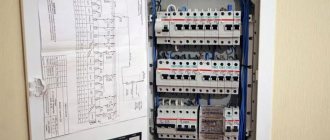
Main elements of the distribution panel
How to properly assemble a distribution panel in a garage? Most often, car and garage owners simplify the circuit and make do with only circuit breakers, neglecting other protection elements. Yes, it is much cheaper, but not always justified. It is desirable that the following main elements be mounted in the shield:
- Circuit breakers. Their installation is mandatory, as this is the main protection against short circuits and overloads. If you have a very old garage with one light bulb in the center and one socket, you can get by with just an introductory machine. But for modern garages this is no longer enough, since you often have to use various power tools, heating systems, chargers and starting devices.
In the diagram, outgoing circuit breakers are located after the metering device.
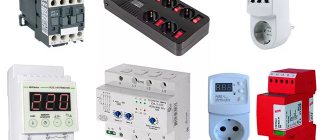
- Residual current devices (RCDs), which are connected together with ordinary circuit breakers, or differential circuit breakers. Their main purpose is to protect people from leakage currents that occur in the event of damage to the insulation of electrical wiring. The installation of such protective elements is especially important if you have to work with an electrified tool in a basement or inspection pit, where the environment has high humidity.
- Relay for voltage control. In garage cooperatives there are a lot of craftsmen who make something from morning to evening. Not always among them are only first-class professionals; there are also those who have “crazy hands,” which is why electrical faults often occur in garages. For example, if the zero is broken in a three-phase circuit, increased voltage will appear, which in turn can lead to the burning of motors and lighting lamps. A relay that controls the voltage in such a situation will automatically de-energize your circuit and save the equipment.
- Surge suppressors. They are installed if the garage is powered from an overhead power line. During a thunderstorm, the line can be struck by lightning. The arresters installed on the overhead line must extinguish the incoming potential, but the residual value can still affect the wiring. In this case, limiters will save the circuit; they will divert the increased potential to the ground circuit. These protective elements are installed between the input machine and the meter. If there are no limiters, when a thunderstorm approaches, turn off the input circuit breaker in the garage.
Safety precautions before starting work
Before you begin installing an electrical panel, you need to familiarize yourself with safety precautions, which will significantly reduce the risk of injury from electric shock. When working with the electrical network, adhere to the following rules:
- Mandatory check of the electrical panel for damage and other defects. All electrical appliances are designed to be used with care. Therefore, before use, check the integrity of the insulating elements and the housing. A shield with defects cannot be used, as it can be very dangerous.
- Cleaning the room from water containers. Electrical equipment should not be near liquid, as it conducts current well. Also, do not operate devices with wet hands.
- Read the instructions. Before working with any electrical appliance, you should read its instructions, which describe the main features of its use.
- Do not touch heating radiators and electrical panels at the same time.
- Experts do not advise overloading the electrical panel and connecting many devices to it, as this will lead to network overload and short circuit.
Purpose of electrical distribution panel
The main purpose of the equipment installed in the panel:
- distribution of electricity received from the public network;
- control of electrical flows in the home network;
- emergency shutdown of all devices from the power supply;
- converting voltage and directing it to the desired group of devices;
- measurement and accounting of power consumption.
The main task, the solution of which is assigned to the input devices fixed in the panel, is to ensure the safe use of electricity. 36 V is safe, therefore, a step-down transformer must be installed in the electrical panel intended for the garage, which will create conditions for using the lighting “carrying”.
When designing a network operating from 0.38 kV, it is necessary to provide for connecting a grounding line to the panel.
How to assemble an electrical panel with your own hands: installation of machines, RCDs, installation, connection, photo video
Therefore, before you get a garage with electricity, you should study the basic safety requirements, as well as technological methods of electrical installation work, the violation of which also has a very bad effect on safety .
Expert opinion
Viktor Pavlovich Strebizh, lighting and electrical expert
Any questions ask me, I will help!
The cross-section of the wires supplying and discharging energy must be sufficient to transmit the required power, and the wires themselves must be covered with reliable insulation. If there is something you don’t understand, write to me!
Main elements of the distribution panel
- The phase wire makes the connection between the third connection point of the meter and the first (upper left) terminal of the RCD. The blue wire connects the fourth socket of the meter and the third (upper right) contact of the RCD.
- The phase conductor is used to connect, respectively, the second (lower left) contact of the RCD with the upper contact of the single-pole circuit breaker. The blue “zero” wire connects the fourth (lower right) terminal of the RCD to the contact “0” bracket
- Lay jumpers between the upper contacts of the breakers.