Wind turbines are a promising alternative to traditional energy. Wind energy, converted into electricity, promises to be cheap, easy to produce and low-cost. And if we take into account the bills that come in now for electricity, then in order to save money, it’s worth trying to build your own wind generator, don’t you agree?
There are real examples of creating installations that generate a decent amount of energy. Nevertheless, the capabilities of wind turbines are still significantly ahead of competitors that can withstand the traditional method of generating electricity.
We have presented a guide, following which you can assemble a wind generator from a car generator with your own hands. The article offered for your attention discusses in detail the common mistakes that are made when designing wind turbines. For clarity, the article is accompanied by thematic photo and video materials.
About homemade windmills for home
Particular interest in wind energy is manifested at the household level. This is understandable if you glance at the next bill for consumed energy. Therefore, all kinds of craftsmen are becoming more active, using all the possibilities of obtaining electricity inexpensively.
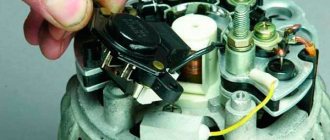
One of these possibilities, quite real, is closely related to a windmill from a car generator. A ready-made device - a car generator - just needs to be equipped with correctly made blades in order to be able to remove some value of electrical energy from the generator terminals.
True, it will work effectively only if there is windy weather.
An example from the practice of domestic use of wind generators. A well-developed and quite effective practical windmill design. A three-bladed propeller is installed, which is rare for household devices
The use of virtually any automobile generator is acceptable for constructing a windmill. But they usually try to choose a powerful model for the job, capable of delivering high currents. Here, the design of generators from trucks, large passenger buses, tractors, etc. is at the peak of popularity.
In addition to the generator, to manufacture a windmill you will need a number of components:
- two- or three-blade propeller;
- car battery;
- electrical cable;
- mast, support elements, fasteners.
The design of the propeller with two or three blades is considered the most optimal for a classic wind generator. But a household project is often far from an engineering classic. Therefore, most often they try to select ready-made screws for a home structure.
An impeller from a car fan that will be used as a propeller for a home wind turbine. Lightness and large useful area for air force allow the use of such options
This, for example, could be an impeller from an external unit of a split air conditioning system or from a fan of the same car. But when you want to follow the traditions of constructing wind generators, you will have to build the windmill propeller from start to finish with your own hands.
Before deciding to assemble and install a wind generator, it is worth assessing the climatic data of the site and calculating the payback. The information in this very interesting article, which we recommend you read, will provide significant assistance in this regard.
How to make a rotor
When manufacturing a wind generator, it is necessary to take into account that the rotor of a car generator is equipped with an electromagnetic excitation winding. If you do everything yourself, its design can be simplified. You can remove the collector and rewind the stator windings, which will transform the unit into a low-speed one. It is recommended to remake the iron rotor.
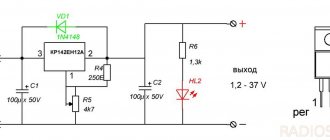
Diagram of a rotor with winding for a homemade windmill
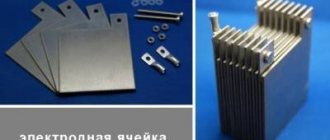
A non-magnetic aluminum attachment must be machined onto the rotor shaft. A special bandage made of steel pipe is installed on it. This must be done with a little tension. Markings are made on the surface of the bandage and rectangles of neodymium magnets are installed using superglue, adhering to the alternating poles. Epoxy resin is poured between these elements, which allows you to level the surface.
Such a wind generator will generate sufficient energy only at a rotation speed of 6000 rpm. To make it productive at 600 rpm, it is necessary to increase the stator winding five times. At the same time, it is necessary to reduce the cross-section of the drive itself.
In order for the windmill to work more efficiently, it is necessary to use a homemade windmill generator using neodymium magnets. They are glued to the unit with a slight distortion, which prevents sticking. The blades of this windmill must be large. To reduce the magnetic field, it is recommended to sort out the stator plates, align them, and then put them back together.
Analysis of design errors
Assembling a wind generator at home with your own hands is, of course, not an infallible task. Even in the designs of industrial wind turbines, engineers make mistakes. But they learn from mistakes, as evidenced by well-established household structures.
So, among the errors in the design of household wind generators, such a detail often appears as the absence of a braking module in the design of the generator. The standard version of such devices (automotive or tractor) does not provide such a part. This means that the generator needs to be modified.
However, not every “designer” wants to deal with this delicate matter. Many people ignore this detail, hoping for “maybe.” As a result, in strong winds the propeller spins to incredibly high speeds. The generator bearings cannot withstand it and break the seats of the aluminum covers. The rotor becomes wedged.
Destroyed wind generator due to design flaws. Errors in the design and installation of such structures lead to serious consequences.
The same issue relates to the defect associated with the lack of a weather vane rotation limiter. Often this component is simply forgotten to be installed and remembered only when wind currents begin to spin the “cockerel” around its axis, like the spinning top in the program “What? Where? When?". The result is disastrous.
The minimum damage is kinking and breaking of the electrical cable, and in severe cases, destruction of the entire structure.
Another notable assembly error was the incorrect calculation of the center of gravity point on the base of the weather vane. In this case, the device may function normally for some time. But over time, a misalignment forms on the bearing assembly, freedom of rotation is limited, and the efficiency of the structure in terms of energy output decreases sharply.
You will learn how to correctly calculate a wind generator from our article.
Often, they try to directly power the battery with the current received from the generator. Very soon they begin to wonder why the battery does not hold a charge or they discover a breakdown of 2-3 cans.
This is a banal and natural mistake, since in any case, the battery must be charged under conditions of certain currents and voltages. Here we need control of this process.
For home craftsmen interested in the topic of assembling a wind generator, we suggest that you familiarize yourself with another original option. This article describes the manufacture of a generating unit from waste washing machine parts.
DIY wind wheel
DIY rotary wind generator
The blades are made of plastic or duralumin pipe, the diameter of which is 20% of the footage. A meter pipe with a diameter of 20 cm is cut lengthwise into 4 equal parts. A wing is made from one part, followed by the next ones, using it as a template. The edges of the blades are rounded and ground to remove burrs. The blades are attached to an old circular saw blade, grinding off its teeth and drilling holes for installation.
Segmented blades are typically used for incompressible media. The air profile must have a complex shape to ensure high performance. The main work is performed by the outer ends of the blades. Craftsmen make them with stiletto heels, since the internal part near the rotor does not work. The figure below shows such a design where the blades are welded to round steel rods.
View of a four-blade wind wheel
The wind wheel is installed horizontally on a tripod and balanced by sharpening the blades until the structure is balanced. They must rotate in the same plane with a skew of no more than 2 mm.
Conclusions and useful video on the topic
Even an ordinary electric screwdriver can become a windmill if you know the basics of a wind generator.
Interest in wind generators is not decreasing. On the contrary, this option for producing electrical energy is increasingly being considered at the level of country property owners.
Obviously, if you combine several types of energy at once - wind, solar, hydro turbines or nuclear power plants, such a combination can provide an economic effect. In this case, the user’s risk of being left without electricity is reduced to zero.
Would you like to tell us about how you assembled a windmill with your own hands to provide electricity to your dacha? Would you like to share useful information not mentioned in the article? Please write comments in the block below, share your impressions, technical nuances known only to you and photos on the topic of the article.
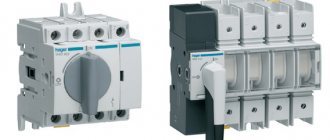
Wind generator design
There is a huge variety of types of wind generators and drawings for their manufacture. But any design includes the following mandatory elements:
- generator;
- blades;
- storage battery;
- mast;
- the electronic unit.
Having some skills, you can make a wind generator with your own hands.
In addition, you need to think through the control and distribution system of electricity in advance and draw an installation diagram.
Manufacturing stages
To change the design of an asynchronous motor, do the following.
- Disassemble the motor and remove the rotor.
- Remove the plates from the rotor armature. Trim them to a depth of 2 mm.
- Make grooves up to 5 mm deep for the magnets.
- Mark a strip of tin for the magnets. They should be equally spaced from each other - this will prevent unnecessary loss of power from the installation.
- Attach them to this strip of tin with superglue. Secure the strip with magnets to the anchor.
- Fill the space between the magnets with cold welding or epoxy glue.
- Remove burrs and irregularities on the rotor using sandpaper.
- Check - and replace if necessary - engine bearings and bolts.
Assemble the motor-generator. The device is ready for further installation. To check the device, clamp its shaft in the chuck of a drill or screwdriver and accelerate to 1000 rpm.
With a smaller value, the error lies in the uneven alternation of magnets at any point in the circle of rotation of the armature.
To assemble the wind turbine, do the following.
- From a PVC pipe with a diameter of 11-16 cm, cut out identical pieces, corresponding in length to the future blades.
- On each segment, draw an arbitrary line and step back from it on both sides by 22 mm. Accordingly, the width of one blade will reach 44 mm. Repeat the same action for the opposite end of the segment.
- Connect the extreme points directly to one side of the center line.
- Draw the outline of the future blade on the other side.
- Cut out the resulting blade and round its free end by sharpening. Repeat the above steps for the remaining blades.
- Attach the blades to the hub using a bushing adapter. Bolts with nuts and spring washers are suitable as fasteners. The width of each blade along its entire length ranges from 44 to 88 mm.
This is enough for the wind to spin the impeller at a speed of 3 m/s. The resulting structure must be balanced - proper balancing will prevent the formation of dead spots that slow down the generator when the propeller rotates.
The motor-generator with an installed impeller can be placed in a protective sleeve, protecting it from precipitation. Remaining dry in any weather, protected from rain and snow, the generator will last for many years. To assemble the protective casing, do the following:
- in a pipe with a diameter of 7.5 cm, cut a longitudinal groove 2 cm wide;
- cut the back end of the cut pipe at an angle of 45 degrees;
- place the motor-generator with the propeller in this pipe and fix it on it.
For the motor to rotate freely, you will need a ball bearing-based swivel joint, similar to that found in a household fan. It can rotate endlessly in any direction.
To ensure that the cable, which is used to remove the currents induced in the stator winding, does not get wound or twisted, the connection in the hinge must be sliding, but ensuring reliable, stable electrical contact of the motor-generator with further located functional units of the circuit.
The use of a brush-graphite contact is unjustified - graphite has an electrical resistance an order of magnitude higher than that of aluminum and steel, and the power of the installation will noticeably drop. The hinge is installed on a base made of a piece of profile pipe. After assembly, check that the resulting rotating mechanism does not jam, does not spin, or frays the cable.
Having ensured sliding contact and free rotation of the installation in the direction of the wind, a shank made, for example, of a plastic water pipe and a piece of sheet plastic or aluminum is attached to the additional outer housing of the motor.
A round or profile pipe is used as a support, one end of which is concreted into the ground - at least a meter deep. To prevent the support from sagging over time due to a hurricane, it is supplemented with three or six guy wires, converging in the center at the same angle and directed in different directions.
Having finished assembling the motor-generator part, if necessary, install a diode rectifier next to the motor. Current losses in wires can be significantly reduced by using a step-up transformer located near the generator set - as in lines transmitting industrial electricity over long distances.
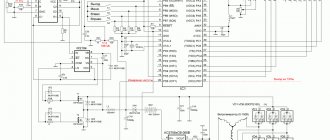
The charge controller, battery and inverter are switched on further according to the diagram. The wind power plant is fully assembled and ready for use.
Principle of operation
When the lifting force begins to act, the generator rotor begins to rotate. This force occurs when wind flow begins to flow around the blades. Under these circumstances, the generator begins to produce alternating and unstable current flows, which are rectified in the controller.
This current is intended for charging batteries. At the same time, a second device is connected to the batteries - this is an inverter, which converts the direct voltage of the battery equipment into single-phase or three-phase alternating voltage, which is used by the consumer.
The wind generator in normal cases does its work with the controller and inverter, but there are other ways to use it:
- Automatic battery operation.
- Automatic operation with battery and solar battery.
- Automatic operation with battery and diesel backup generator.
- A wind turbine that does its work in parallel with the network.
Components that a wind generator cannot do without:
- foundation base;
- electrical cabinet;
- towers;
- stairs;
- rotating mechanism;
- gondolas;
- electric generator;
- anemometer;
- brake system;
- transmissions;
- blades;
- systems for changing blade angles of attack;
Required tools:
- electric drill with drills (5.5 – 7.5 mm);
- gas and adjustable wrench;
- jigsaw with metal file;
- screwdriver;
- roulette;
- protractor;
- compass;
- marker;
- tap ¼ ×20;
Mast
To make a mast, an old water pipe with a diameter of at least 15 cm and a length of about 7 m is suitable. If there are buildings within 30 m of the intended installation site, then the height of the structure is adjusted upward. For efficient operation of the wind turbine, the blade is raised above the obstacle by at least 1 m.
The base of the mast and the pegs for securing the guy wires are concreted. Clamps with bolts are welded to the stakes. For guy wires, galvanized 6 mm cable is used.
Advice. The assembled mast has considerable weight; if installed manually, you will need a counterweight made of a pipe with a load.
What you will need
Various components from household appliances and cars can be used as the starting base for constructing devices. Some tools and materials required during the work process may vary depending on the base of the device.
To create from a washing machine
To complete the work of creating a wind generator from a washing machine you will need:
- electric motor from a washing machine with a power of 1.4-1.6 kW;
- 32 neodymium magnets with a diameter of 10-12 mm;
- sandpaper;
- epoxy resin or cold welding;
- screwdriver;
- current rectifier;
- tester.
To create from an asynchronous motor
To make a device from an asynchronous motor for a private home, you may need:
- steel water pipe with an outer diameter of 70-80 mm for building a mast;
- material for the impeller blades (aluminum tube, thin wooden boards, fiberglass) or ready-made factory-made blades;
- materials for making the foundation (boards, pipe or profile cuttings, cement mortar);
- steel rope;
- thin sheet metal or moisture-resistant plywood for the shank;
- asynchronous motor (the most popular models are AIR80 or AIR71);
- additional neodymium magnets.
To create from plastic bottles
To make a small wind generator based on plastic bottles, you do not need expensive materials.
Materials and tools for assembling a wind generator from plastic bottles:
- steel or chrome-plated tube with a diameter of 25 mm and a wall thickness of up to 1.0 mm with a total length of 3000 mm;
- cylindrical plastic bottles with a volume of 1.5 liters - 16 pieces (when using larger bottles, you may have to recalculate the shaft dimensions);
- bottle caps in the amount of 16 units;
- ball bearings No. 205 (other series with a shaft hole diameter of 25 mm are also suitable);
- a pair of 6/4″ clamps (used as bearing housings);
- two 3/4″ clamps that will serve as mounting points for the wind generator;
- additional clamp for installing the generator (in the example below, a product with a size of 3.5" is used);
- nine M4*35 size screws with M4 nuts;
- 32 M5 washers for installing covers;
- rubber tube with an internal diameter of 25 mm (segment 150-200 mm);
- bushing with an outer diameter of 25 mm and an internal hole of 9-10 mm;
- stepper motor with power up to 10 W;
- bicycle generator;
- lantern with dynamo;
- drill or screwdriver;
- hacksaw for metal;
- drills for making holes in a metal pipe with a diameter of 4 and 8 mm;
- screwdriver with Phillips and flat blade;
- wrench 7 mm.
To create from an electric motor
Necessary materials:
- generator from a car;
- working 12 V battery;
- an inverter with a power of at least 1 kW to convert direct current with a voltage of 12 Volts into alternating current 220 Volts;
- 200 liter barrel for making blades;
- 12 V light bulb for control;
- switch and voltmeter;
- copper wiring with wire cross-section from 2.5 mm²;
- a pipe with a diameter of about 45-50 mm for the axle;
- pipes with a diameter of 100 mm or more for building a mast;
- bearings;
- welding machine;
- cement mortar;
- guy cables with a diameter of 6 mm and anchors for fastening to the ground;
- fasteners (hardware, clamps, etc.).
Tools:
- roulette;
- pencil and metal scriber;
- set of wrenches;
- drill or screwdriver;
- container for mixing the solution;
- metal drills;
- grinder and several spare circles;
- metal scissors;
- files and sandpaper.
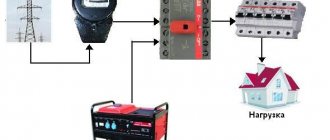
Wind generator maintenance
A wind generator, like any other device, requires technical monitoring and maintenance. To ensure uninterrupted operation of the windmill, the following work is periodically carried out.
Wind generator operation diagram
- The current collector requires the most attention. Generator brushes need to be cleaned, lubricated and preventatively adjusted every two months.
- At the first sign of a malfunction of the blade (shaking and imbalance of the wheel), the wind generator is lowered to the ground and repaired.
- Every three years, metal parts are coated with anti-corrosion paint.
- Regularly check the fastenings and tension of the cables.
Now that the installation is complete, you can connect devices and use electricity. At least while it's windy.
Legality of installation
It is not prohibited to install installations with an output power of up to 75 kW on your own territory, and no approvals will be required (a fact enshrined in the Resolution of the Russian Cabinet of Ministers).
And if you need to install a powerful generator of an industrial or commercial type, then you will need special preparation related to the creation of the foundation and fencing of the site - and this is already considered capital construction.
It is recommended that you read local regulations regarding energy and utility services before installing VEL. Different regions may have their own rules.
Generator selection
Making your own generator will require skills that not everyone has. For example, performing turning work. Therefore, it is necessary to consider the problem of purchasing a factory device that could be used on a wind turbine.
Types and features:
- Alternating current generators (asynchronous) are very easy to find and adapt to a wind generator. Cons: insufficient power; the unit will require modifications during installation.
- DC generators work great at low speeds and require almost no modifications. Disadvantages - it is difficult to find high-power generators.
- Asynchronous - it’s not a problem to buy a generator for little money, but such units are ineffective at high shaft rotation speeds, and internal resistance limits their power.
Generators are divided into two types according to the number of phases at the output. Single-phase generators are simple in design, but under high loads they vibrate strongly and can hum. Three-phase devices do not have these disadvantages, and in some modes they operate more efficiently.
Features of mast installation
Most often, the mast is made from metal blanks - either in the form of a complex frame (for large and powerful installations), or using one pipe (round/square cross-section), which is dug into the ground. In both cases, it is recommended to strengthen the mast with 3-4 guys made of metal rope.