Grounding is a valuable structure that protects home appliance owners from direct contact with a very useful, but extremely zealous flow of electricity. The grounding device will ensure safety when the zero “burns out,” which often happens on country power lines during heavy winds. It will eliminate the risk of injury due to leaks on non-current-carrying metal parts and the housing due to leaky insulation. The construction of a protective system is an event that does not require extra effort and super investments if the grounding calculation is done correctly. Thanks to preliminary calculations, the future performer will be able to determine the upcoming expenses and the feasibility of the upcoming task.
Why do grounding in a private house?
The operation of electrical appliances in a residential building is accompanied by the risk of short circuits or damage to the insulating coating of the wires. Such areas are dangerous to human life. If he touches faulty electrical equipment, he will receive an electric shock because... the body is a good conductor.
Therefore, for the safety of residents, all country cottages must be equipped with grounding devices, which also prevent premature failure of household electrical appliances.
Design and applications of the main grounding bus
Safety of working with electrical equipment is ensured by grounding. In the event of a leak, it diverts the current to the ground, so that a person will not be injured when touching metal parts. One way to create protection is the main ground bus. It is designed to connect several conductors for grounding and potential equalization. The tire can have different designs, sizes and installation methods. When working with it, you need to take into account a number of nuances so that installation and subsequent operation are carried out efficiently and reliably.
Ground loop device
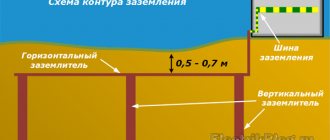
The ground loop is made up of several electrodes that are connected to each other by a metal rod and buried in the ground. Such designs most often have a square or triangular shape.
Pin installation depth
Vertical grounding pins are driven into the ground to a depth of 0.6 m, but not higher than the freezing level. A distance of 2.5 to 3 m is left between them. At the bottom of the trench, the ends of the electrodes are connected with a steel plate.
Why can't you put separate
According to the PUE, it is prohibited to ground private residential buildings using 1 pin.
There is such a thing as “flow resistance”. Around a rod buried in the ground, maximum voltage and electric current density are created. When it passes through the ground, the resistance to its movement increases, which stops after a set distance. This point is called the spreading zone.
One electrode provides a small area and slow spreading of electric current, so a minimum of 2-3 pins are used in grounding structures.
Galvanized
To extend the service life and protect from environmental influences, a zinc coating is applied to the steel in accordance with GOST 9.307-89 “Hot zinc coatings”. The steel strip is pre-treated and immersed in a container with molten zinc. The coating thickness is 40-200 microns. The thicker the layer, the more it contributes to increasing the strength of the product. The coating is strengthened by repeated immersion of the strip in molten zinc.
Galvanization is currently the most effective and cheapest method of protection. Coating increases the cost of rental, but its service life increases. The properties of zinc are preserved even with minor surface damage. The galvanized strip is resistant to corrosion, elastic, does not crack and has a neat appearance. It is produced from carbon and low-alloy steel grades by slitting steel sheets and is supplied in the form of coils weighing 50-60 kg or rods 5-6 m long.
According to the PUE, the minimum cross-section of the grounding conductor for installations with voltages less than 1 kV is 75 mm2. 4x20 mm strip is the most economical solution that meets these requirements. More often, a galvanized strip with a cross section of 4x40 mm, 5x40 mm, 5x50 mm is used to make a grounding loop. These products ensure compliance with standards and are convenient for grounding installation. According to the standard, one meter of 4x40 mm strip weighs about 1.3 kg. The weight of a linear meter is also regulated by GOST 103-2006 and is used to calculate the required amount of tape.
Grounding standards for a private home
Requirements for the arrangement of grounding of country cottages:
- The distance between a residential building and the external contour of the device is from 1 to 10 m. Recommended is from 2 to 4 m.
- The depth of the pins is 2-3 m. Part of the rod (0.2-0.25 m) is left on the surface for connection with a steel plate.
- The minimum cross-section of the bus that is laid to the triangle from the input electrical panel is 16 mm².
- To connect the elements of the grounding structure on the shield, bolts are used. The electrodes are connected with a strip of metal using welding.
- The maximum value of the design resistance is when using a 220 V network - 8 Ohms, 380 V - 4 Ohms.
Laying power and information cables for SCS
Joint parallel laying of power cables and information lines of SCS
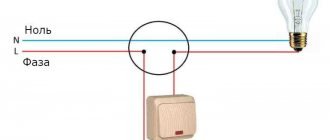
When laying power cables and SCS information lines together, the requirements of the PUE (electrical installation rules) should be taken into account, in particular clause 2.1.16:
“In one pipe, sleeve, box, bundle, closed channel of a building structure or on one tray, the joint installation of mutually redundant circuits, circuits of working and emergency evacuation lighting, as well as circuits up to 42 V with circuits above 42 V is prohibited. The installation of these circuits is allowed only in different compartments of boxes and trays having solid longitudinal partitions with a fire resistance limit of at least 0.25 hours made of fireproof material.”
Conclusion: SCS power and information cables must be laid in different compartments of boxes (cable trays), separated by a metal (or other low-flammability) partition or in separate trays, boxes, channels, etc.
In addition, one should take into account the influence of sources of electromagnetic radiation (EMR), which include: electric motors, electric cables, some types of lamps, heaters and other equipment.
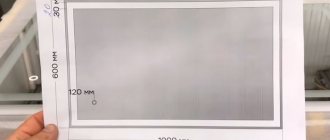
For electromagnetic compatibility, according to the recommendations of the TIA/EIA-569 standard, the minimum distance from the SCS lines to the fluorescent lamp should be 120 mm; The minimum distances between power wiring up to 480 V and SCS lines are given in the table:
| Minimum permissible distances between telecommunication routes and power wiring | Distances, mm | ||
| 5 kVA | |||
| Unshielded power lines or electrical equipment located in close proximity to exposed or non-metallic paths | 127 | 305 | 610 |
| Unshielded power lines or electrical equipment located in close proximity to a grounded metal conduit | 64 | 152 | 305 |
| Power lines installed in a grounded metal conduit (or equivalent shielding) located in close proximity to the grounded metal conduit | — | 76 | 152 |
Types of ground loops
To instantly drain the electric current into the ground, the subsystem distributes it into several electrodes, which are located at a distance from each other. This allows you to increase the dispersion area. There are 2 options for making grounding.
Linear
In this case, 2-3 electrodes are placed in a semicircle or in a line. Such a contour is used if the area of the land plot does not allow for a closed structure.
Triangle
In this case, use 3 pins and connect them together with metal strips. The finished product is in the shape of a triangle with equal sides.
Built-in buses
The design is created completely from scratch by a master. However, there is already a built-in ready-made device with grounding buses on sale. An example is a DIN rail that comes with a 220V switch to power the device. Also included are zero tires with an insulator. The maximum allowed simultaneous number of connections is 22.
Three types of such slats can be found on sale. DIN U3 is used for circuit breakers; this model is also available with a zero grounding bus. The third type is DIN U4 with additional functionality. All products have an anti-corrosion coating and are easy to install.
One of the most popular rails is TLK-ERH-CU 19-inch. Made of copper, inexpensive and of high quality.
Source
Grounding schemes: which one to choose
The grounding system of a country cottage depends on the type of network connection to it. The TN-C principle is often used. At a voltage of 220V, the mains voltage is provided by an overhead two-wire line or a two-wire cable. At 380V, a four-wire line or four-wire cable is used.
TN-CS
In this case, the PEN input is divided into parallel conductors.
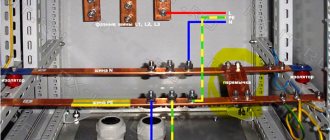
The PEN conductor, located in the input cabinet, is divided into 3 buses:
- neutral – N;
- earth - RE;
- distributor for 4 connections.
The N bus is placed on insulators, the PE is connected to the body of the input cabinet. The conductors do not contact each other. A circuit is connected to the distributor. The ground electrode is connected by a copper jumper with a cross-section of 10 mm² to the N bus.
TT
In this case, the tires are not split in the input panel, because neutral and ground are already separated in the network. Only the PE conductor is connected to the ground electrode.
Protective potential equalization system
First of all, regardless of what type of grounding is present in the incoming electrical wiring, it is necessary to install a potential equalization system in the garage, abbreviated as EUP.
To do this, all metal structures of the garage, even those that are not related to electrical appliances, as well as the reinforcement of the concrete floor, are electrically connected using conductors. This is done for two reasons:
- If dangerous voltage appears on one body of electrical equipment, this potential will be the same on all metal structures of the garage, including the concrete floor. As you know, electric current is possible only with a voltage difference, and since it will be the same everywhere, the risk of injury is significantly reduced. From life, we can give an analogy with birds sitting on exposed wires of overhead power lines.
- Internal lightning protection against secondary manifestations of lightning discharge, when an electromagnetic pulse induces high voltage electrical charges on metal surfaces, which can cause a spark breakdown between structures. The occurrence of sparks in a garage is potentially explosive when the air is saturated with gasoline vapors.
Practical implementation of the EPS as part of the grounding system
The potential equalization system must be connected to the garage ground. It can be done by bringing all the conductors into one box, or by drawing a closed circuit around the perimeter of the floor in the form of a metal strip with steel wires welded to it, which are welded to various structures.
Bolted connections are also welded to this strip for grounding various stationary equipment or electrical appliances that do not have a standardized three-pin plug with a grounding contact. In this case, this strip of the potential equalization system will also serve as the main grounding bus.
If the electrical wiring in the garage is in satisfactory condition, but is two-wire, then it can not be redone, but only change the sockets to three-pin ones, connecting them with a protective grounding wire PE from the main grounding bus, welding a bolted connection on the strip under the sockets to connect the copper conductor PE , coming from the grounding contact of the socket.
Grounding principles
In TN systems, in which the neutral wire is solidly grounded, the equipment is grounded using protective grounding, performed in different ways depending on the power supply system used.
When supplying power according to the TN-C scheme, the neutral and protective wires are combined in one PEN wire. This system is outdated and should not be used in everyday life. The TN-S circuit, which has the best electrical safety, is very rare due to its high cost.
In this system, the protective grounding wire PE extends from the transformer substation itself. Therefore, two grounding systems are feasible for garage use: TN-C-S and TT.
It is necessary to analyze in more detail how one and the other system works, so that grounding in the garage in the garage can perform its protective functions, while being absolutely safe.
What is required for grounding
To independently arrange a grounding system for a country residential building, you will need the following tools and materials:
- bayonet shovel;
- sledgehammer;
- set of wrenches;
- welding machine;
- perforator;
- Bulgarian;
- corner 50x50 mm made of stainless steel (2 m long);
- copper wire with a cross section of 6 mm²;
- a stainless steel strip 4x40 mm (its length is equal to the distance from the porch of a residential building to the location of the ground loop);
- 3 metal strips (each length is 120 cm, minimum thickness is 4 mm, width is 4 cm);
- bolt M10 or M8.
It is not recommended to skimp on the thickness of the electrodes - the reliability and service life of the grounding structure depends on this.
Copper busbar design
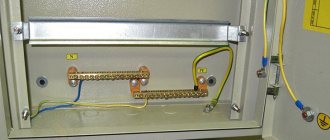
The grounding bus is a set of metal parts that ensure reliable contact between the electrical installation housing and the ground. Main components of the system:
- main bus GZSh;
- bends;
- ground wires;
- general outline.
Terminals, strips, grounding clamps according to PUE and GOST can only be made of copper and steel, regardless of the characteristics of the circuit and the type of electrical installation. In many ways, the effectiveness of the protective grounding device depends on the resistance.
The IEK grounding bus is usually a copper plate with a set of holes. The wires must be crimped with a connecting sleeve or cable lug. For fastening, grounding washers or a bolt and nut are used. The wires are masked.
Standard grounding bus connection diagram:
- ground loop;
- strip or wire from the circuit to the input panel
- grounding bus in the shield.
In private homes, the system is installed in a separate cabinet or water distribution device with protective components and automatic switches. If the input device is mounted on a pole, the bus will be mounted inside it. Remember to re-ground the PEN conductor outside the pole.
How to make grounding yourself
Before you independently arrange the grounding of your country house, it is recommended to study the step-by-step instructions on how to properly make and install the structure.
Selecting a location for installing circuits
First of all, a safe location for the ground loop is selected on the site for the residents of the cottage. If the electrical wiring breaks down, the protection is triggered, and all the current goes to the electrodes buried in the ground. It is very dangerous to be here at this moment.
Therefore, the site for laying the system is selected where no one walks. It is better to make a branch behind the building near the fence, but the distance from the ground electrode to the foundation of the house should not exceed 1 m. It is additionally recommended to fence off the danger zone with a small wooden fence.
Initial excavation work
In the selected area, mark a triangle with equal sides of 3 m each and remove the soil to a depth of 0.5 m. The width is equal to the size of a bayonet shovel. This is done to facilitate welding of the metal strip with the pins.
A trench of similar depth is dug from the triangle to the foundation of a residential building. It contains a terminal for the current that connects the electrical panel to the ground loop.
Installation of ground electrodes
A grounding structure is laid in the finished trench. To do this, the ends of the pins are first sharpened with a grinder, then driven into the ground to a depth of 3 m at the ends of the triangle. Their upper ends should be located on the plane of the pit.
Welding
Metal strips 4 mm thick and 40 mm wide are welded to the protruding ends of the electrodes driven into the ground. The result is a steel triangle, to which a long strip of steel is welded, extending to the foundation of a residential building. Here the grounding structure is connected to the conductors exiting the panel. To do this, an M8 (M10) bolt is welded to the end of the strip at a distance of 0.3-1 m from the ground surface.
backfilling
After completing the welding work, the trench is filled with soil and thoroughly compacted. But first, a saline solution is poured into the bottom of the pit. To prepare it, use a bucket of water and 2-3 packs of salt.
Installation procedure using the modular method
One of the most popular methods is the modular-pin method. One of the main advantages of this variety is practicality, due to the fact that it does not require a large area. It is also worth noting the ease of installation: the entire process can be completed by one person.
A modular grounding system is a system consisting of steel pipes 150 cm long fastened together, coated on the outside with a layer of copper.
Efficiency is ensured by the great depth to which the ground electrode is driven.
Installation is carried out in two stages:
- the pins are driven into the ground one after another using a jackhammer;
- The grounding conductor is connected to the electrical panel.
If the process is carried out inside a building, then all actions must be performed at floor level. And if outside the building, then you first need to dig a small ditch, half a meter deep, into which to lay the conductor and stretch it to the shield.
Which is better - homemade contours or a purchased kit?
To equip the grounding of a country house, you can buy a ready-made device kit. This will allow you to quickly install the structure, often without even the use of welding equipment. To connect individual elements, manufacturers make special fasteners.
Factory designs are considered more reliable because... All parts are made of stainless metal and are additionally treated with protective compounds. But they are expensive - from 7,000 to 10,000 rubles.
A grounding system assembled with your own hands from materials available at home allows the owners of a private cottage to save a lot of money. And if you correctly calculate the circuit and carry out the installation work efficiently, the homemade design will last no less than the factory one.
Economical use of material
Since the cross-section of the metal is not the most important parameter, it is recommended to purchase material with the smallest cross-sectional area. However, you need to stay within the minimum recommended values. The most economical (but able to withstand sledgehammer blows) options for metal products:
- pipes with a diameter of 32 millimeters and a wall thickness of 3 millimeters;
- equal angle corner (side - 50 or 60 millimeters, thickness - 4 or 5 millimeters);
- round steel (diameter from 12 to 16 millimeters).
As a metal connection, the optimal choice would be a strip of steel 4 millimeters thick. An alternative is 6mm steel rod.
Note! Horizontal rods are welded to the tops of the electrodes. Therefore, another 18–23 centimeters should be added to the calculated distance between the electrodes.
The external grounding section can be made from a 4 mm strip (width 12 mm).
Common installation errors
Owners of country houses, when independently installing grounding structures, often make the following mistakes:
- The electrodes are covered with a layer of paint and varnish material to protect the product from corrosion. As a result, such a coating prevents the flow of current into the ground.
- Bolt the grounding pins to the metal connections. As a result of corrosion, structural elements lose contact with each other.
- The triangular outline is placed far from the foundation of the building. This leads to a significant increase in the resistance of the grounding system.
- Aluminum and copper conductors are used simultaneously. In this case, due to contact corrosion, the connection of the elements deteriorates.
- A very thin profile is used for electrodes. As a result of the formation of corrosion, the resistance of the metal product increases significantly.
If any deficiencies are found in the system, it is recommended to eliminate them immediately. A malfunctioning grounding device is unable to provide reliable safety to owners of private houses that use household electrical equipment.
And now the formulas themselves
We have decided on the shape of the outline and the sizes of the elements. Now you can enter the required parameters into a special program for electricians or use the formulas below. In accordance with the type of grounding conductors, we select a formula for calculations:
Or let’s use the universal formula to calculate the resistance of one vertical rod:
For calculations, you will need auxiliary tables with approximate values depending on the composition of the soil, its average density, ability to retain moisture and the climatic zone:
Let's calculate the number of electrodes without taking into account the resistance value of the grounding horizontal conductor:
Let's calculate the parameters of the horizontal element of the grounding system - the horizontal conductor:
Let's calculate the resistance of the vertical electrode taking into account the resistance value of the horizontal ground electrode:
According to the results obtained as a result of diligent calculations, we stock up on material and plan the time for the grounding device.
Due to the fact that our protective grounding will have the greatest resistance during dry and frosty periods, it is advisable to begin its construction at this time. If properly organized, it will take a couple of days to build the circuit. Before filling the trench, you will need to check the functionality of the system. This is best done when the soil contains the least amount of moisture. True, winter is not very conducive to working in open areas, and excavation work is complicated by frozen soil. This means that we will start building the grounding system in July or early August.