Stretch ceiling is a solution to problems in organizing the interior. It is easy to install, quickly hides existing unevenness, decorates the interior and has an affordable price.
But the main difficulties are not related to the installation of the ceiling, but to the organization of lighting and electrical wiring.
What points should be taken into account when organizing work? What are the features of installation, and how does it depend on the type of surface?
Wiring subtleties: where to start?
The main rule of installation work is planning and no rush. You should not start until the material part has been studied, a diagram has been drawn, and the points of lighting and fastening of the boxes have been determined.
Electrical wiring of a suspended ceiling must be organized in compliance with the following rules:
- Before starting work, draw a diagram according to which the wires are laid along the surface. Please note that wiring under a suspended ceiling should only run perpendicularly or parallel. Installing wires diagonally is prohibited;
- When placing distribution boxes, make sure that they remain accessible after completion of repair work. This is easy to do - just follow the diagram drawn up earlier, study the features of the ceiling, analyze the pros and cons of each option. If you do not think through the installation location of the box, then its further maintenance will be complicated;
- Once the design of the diagram is completed, transfer the drawing to the ceiling. For these purposes, use a hammer drill. Don't be lazy and make enough fastenings for the clamps. Wire sagging is unacceptable;
- install junction boxes taking into account the drawing. All wires that are located under the tension structure must be placed in a corrugated pipe (options are possible). The conductor should extend out of the pipe at a distance of 12-15 centimeters;
- After completing the work, check the correctness of the assembled circuit and the reliability of the fastening of the elements.
Where to place junction boxes
In the picture there are two rooms, all the sockets will be on one circuit breaker, can you tell me where it is better to install the junction boxes? Black circles are sockets, a red rectangle is a counter and machines (this is a corridor)
What will the ceiling be like? How will connections be made in junction boxes?
A lot depends on the answer to these questions.
In general, if the wiring option is without wiring or with wiring in deep socket boxes.
It is also possible in the sub-unit, mainly interested in saving wires, connecting or soldering or crimping.
Letter wrote: It is also possible in sub-stationary units, mainly interested in saving wires, connecting or soldering or crimping.
Then you need to draw cable routes and look at different options, combine, etc. Wiring definitely does not guarantee a reduction in cable length, rather the opposite.
table near the floor-to-ceiling window
Thank you! I will draw
I read somewhere that in Israel they put a box in the ceiling under the chandelier, one per room, but I haven’t been able to do this myself yet.) They are easy to find later, and the routes are easier to design.
High quality electrical installation work (Moscow, Moscow Region). Assembly of shields. Supervised installation, consultations » >
Alexey_Spb wrote: In general, it is better to install junction boxes either behind a suspended ceiling
MrGalaxy wrote: to gain access to the box for inspection, you will need to dismantle the ceiling film.
There is no need for this; a good box needs revision no more often than the cable itself.
MrGalaxy wrote: Alexey_Spb,
Let me clarify, there was an important point in my message:
Alexey_Spb wrote: (but make the connections inseparable)
Such connections are even allowed to be walled up.
The savings with boxes are questionable, they also cost money, but labor and consumables. Just connect with a cable. A maximum of 25 meters will be added, 50 RUB/m.
Karibych wrote: The savings with boxes are questionable, they also cost money, but they work and are consumables. Just connect with a cable. A maximum of 25 meters will be added, 50 RUB/m.
It's not a matter of saving; connections can be made much more reliably in boxes than with a cable.
High quality electrical installation work (Moscow, Moscow Region). Assembly of shields. Supervised installation, consultations » >
Karibych wrote: The savings with boxes are questionable, they also cost money, but they work and are consumables. Just connect with a cable. A maximum of 25 meters will be added, 50 RUB/m.
It's not a matter of saving; connections can be made much more reliably in boxes than with a cable.
services wrote: alx220, that’s the point, “it can be done”!
That's why I wrote it like that, because even in a box you can do nonsense
High quality electrical installation work (Moscow, Moscow Region). Assembly of shields. Supervised installation, consultations » >
Karibych wrote: The savings with boxes are questionable, they also cost money, but they work and are consumables. Just connect with a cable. A maximum of 25 meters will be added, 50 RUB/m.
It's not a matter of saving; connections can be made much more reliably in boxes than with a cable.
Alexey_Spb wrote: Let me clarify, there was an important point in my message:
Alexey_Spb wrote: (but make the connections inseparable)
Such connections are even allowed to be walled up.
volchenok wrote: MrGalaxy, I saw this on YouTube performed by Zemskov. I also thought what kind of idiots they were, they didn’t check the diagram, but the ceiling had already been pulled up.
Do you want to repeat the stupidity of this showman?
alx220 wrote: connections can be made much more reliably in boxes than with a cable.
Any connections can and should be made reliable. If you don’t have this ability, then it’s better not to take it.
Karibych wrote: It was just about saving (cable
On lighting, you can save cable with boxes if for your loved one it’s a pity to spend money on an extra ten or two meters of cable, but on the socket group the result will be the opposite.
avmal wrote: Did you want to repeat the stupidity of this showman?
For what? I had enough of the stupidity of some of the installers who didn’t even install a distribution box and stuck the plugs behind the suspended ceiling. As a result, there was an emergency call, the resident was hysterical, and where the machines were located in the panel near the apartment of the director of their housing department, she found them and successfully turned them off, but she was unable to do her own (they live in the same building). In fact, two frightened women and a child, a half-de-energized apartment (by me) because the rest is paid, the director’s machines are turned on. Something like this.
volchenok wrote: Why? I had enough of the stupidity of some installers,
aleksandr29 wrote: no more than 10 thousand costs turnkey, and the amount is not large.
What if, as usual, you want to add something? When all the repairs are done. +6-10 thousand for dismantling the ceiling? or is aesthetics more expensive?
aleksandr29 wrote: To install a new ceiling does not cost more than 10 thousand. It costs turnkey, and the amount is not large.
There are different ceilings. Some friends made their own ceiling out of fabric with a pattern. Cost 86 thousand. So I found it for them even cheaper. That’s what all the companies offered for 130 thousand.
And in the walls, if the connection is permanent, you can cover it up, after remembering the place where the boxes are located.
High quality electrical installation work (Moscow, Moscow Region). Assembly of shields. Supervised installation, consultations » >
You can also put it in the wall, but it seems to me that it is more convenient and practical to put it on the ceiling than to cover it in the wall. In any case, if you need to add something, then go from this box in the wall to the new outlet along the ceiling
aleksandr29 wrote: avmal, the person seemed to ask a specific question. Why advise what you like, but the questioner does not need?
The person was specifically told that junction boxes have nothing to do behind the suspended ceiling. Do you also disagree with regulatory requirements?
I would like to see the wiring of 3-4 light groups in the socket boxes with control from 2-3 places, especially when the LED strip is among them. I don’t see any problems in installing boxes on the ceiling, you just need to choose the placement wisely and provide protection. Regulations and rules are all great, but paranoia usually costs a pretty penny.
What does paranoia have to do with it when opening the ceiling stupidly costs extra money.
Did you have to open it often?
Derspiwak wrote: I would like to see the wiring of 3-4 light groups in socket boxes with control from 2-3 places,
3-4 lighting groups are 2 two-key switches, i.e. two mounting boxes. And what problems might arise when switching such a scenario? I had to connect 5-6 cables in one box, and the photos were posted on the forum. No difficulties.
Derspiwak wrote: Regulations and rules are all great, but paranoia usually costs a pretty penny.
Amateurishness and short-sightedness usually cost a pretty penny, but not compliance with regulatory requirements. And paranoia is when, without experience and relevant knowledge, they begin to plant a garden, overwhelmed by surging “brilliant” thoughts, not realizing that all this innovation has long been comprehended by progressive humanity and buried as unnecessary, and more often because it is harmful.
Source
Watch the video: Electrical wiring under a suspended ceiling
Wiring under a suspended ceiling is carried out taking into account current fire safety rules and PTE standards. To avoid damage to the film of the suspended structure, the distances to the pendant lamps must be strictly observed.
If, according to the instructions, the distance between the wire and the film should be 15-20 centimeters, then you should not underestimate this parameter for the sake of “aesthetics”. If necessary, it is better to replace the lamp.
In the process of wiring, provide technological reserve. This is explained by the following points - it simplifies the connection of electrical receivers and the wiring maintenance process.
It was mentioned above that the corrugation with the wire should not sag - this is a must! If this happens, then install additional fasteners for the conductor in the problem area.
To simplify the work, use plastic clips that will simplify the work. Another option is to use a dowel with a clamp.
The main electrical receivers for which electrical wiring is laid under the suspended ceiling are lamps.
When choosing devices, consider the type of tension structure (the material from which it is made). So, for PVC products, choose lighting devices of lower power. Mistakes in this matter lead to melting of the film.
The best option is to use LED light sources. Advantages: low temperature, high light output, ease of installation.
Even a beginner without electrical engineering education can install such structures. As for laying wires, without any knowledge, trust the work to experienced craftsmen.
Make sure that the conductors do not intersect.
If this is unavoidable, then provide protection against short circuits in places where the intersection occurs. In any case, at the stage of drawing up the circuit, try to ensure that the wires cross as few times as possible.
Selection of material and wire cross-section
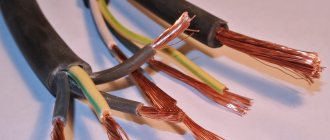
In order to install wiring, you need to know what wires to buy and what size they should be. On the modern market of building materials and electrical equipment you can find a great variety of products from various brands. But for us it will be enough to know the two main types that the market represents - these are VVG and PVS. VVG is bare vinyl, that is, each core was in vinyl insulation, and all these cores were in another insulation. Usually, in construction stores, such a cable is only single-core, that is, its core is cast, and not made of hundreds of thin wires.
PVA is a vinyl insulated connecting wire. The most common copper wire, which is used both for wiring and for making carriers and other devices. This cable is made of copper and has stranded wires, that is, one core consists of hundreds of thin wires, this has a positive effect on its electrical conductivity and, in general, on the quality of the product.
If you are going to partially make the wiring, then you should find out what wires you already have installed. If the copper is single-core, choose VVG, if it is aluminum noodles, then choose AVVG - the same VVG, only aluminum. If you have completely decided to change the wiring, then definitely opt for the PVS cable.
Select a section. Typically, modern wiring is made separately for the lighting group and for the group of sockets, and for particularly powerful consumers, a separate line is drawn from the panel. So, the line for lighting is carried out using a 1.5 mm² wire, and it will be enough to lay the socket line with a 2.5 mm² wire. By the way, these values correspond to the PUE.
If you want to individually calculate the cross-section of the conductors, then calculate the entire load on the line. For example, we run a separate line to the kitchen. There we have a washing machine (1.5 kW), an electric kettle (2 kW), a microwave oven (1.5 kW), and small kitchen appliances such as a mixer and blender (1 kW). We add everything together and we get that when used simultaneously, the power consumption will be 6 kW/h. 6000/220=27 amperes is the current consumed by your appliances.
A 2.5 mm² wire passes exactly 27A, a 1.5 mm² cable passes a current of 4.1A. If you have more powerful equipment, for example, an electric stove, then take a more powerful cable - 4 mm², which is capable of passing a current of 38A. If you are planning LED lighting, then select 1 mm² per lighting group. It is not worth taking less, since cases of installing conventional tungsten lamps are not excluded. Based on these figures, we calculate the cross-section of our conductors.
Tree
If the ceiling is made of wood, then the main “masking” material is steel pipes.
When choosing the diameter of the product, be guided by the thickness of the wire harness (cable products) used. If you plan to use several cables, then pull them through one pipe (provide for a larger diameter of the product in advance).
Requirements for junction boxes:
- IP 65 version;
- made of metal;
- The internal elements of the box are protected from the cable cores touching them.
For these purposes, use insulating materials.
Watch the video: wiring and light for suspended ceilings
Installation is performed according to the following algorithm:
- mark the path along which the wires (cable products) will go;
- mark locations and install passage and distribution boxes;
measure the pipes and cut them, then fix the products on the ceiling, combine
- construction by welding;
- make any changes in the cable path (raising, lowering, turning) at an angle of 90 degrees;
- tighten the cable at small intervals (so that there is no sagging), then leave 22-25 centimeters at the outlet (this length is enough to strip and connect the wires);
- combine the wires that converge into distribution boxes under the suspended ceiling;
- Ground the wiring, then check the quality of the work performed.
Metal
If the ceiling surface is made of metal, then the pipes for laying must be made of electrical plastic. The advantages of the material are ease of installation, fire resistance, and reliability.
Boxes for combining wires should also be made of the same material. If the installation of such structures is unacceptable indoors (as required by regulatory documents), then use steel pipes.
Install as follows:
- mark the path along which the wires will pass. Proceed according to the diagram drawn (this will make it easier to repair wiring under a suspended ceiling in the future);
- mark and install distribution boxes;
- measure the pipes and cut them to the required length, then fix them on the ceiling. Upon completion of work, glue the structure;
- Make sure that all directions of cable movement are made at an angle of 90 degrees. Use corrugation for these purposes;
- pull cable products in fixed tubes using a steel broach and
- route the cable to a distance of 22-25 centimeters on each side;
- solder or weld conductors in junction boxes;
- check the correct installation.
If there is no money for the device and no circuit
In some cases, searching for wiring is a fundamental task: for example, you urgently need to make a through hole in the wall, hammer in a dowel or nail. In such cases, you can use the means at hand to understand where the wiring is located in the panel house:
- Indicator screwdriver. This method was already briefly mentioned in the previous section of our article. A conventional indicator screwdriver detects voltage, and therefore it also detects wires with thin insulation at a shallow depth without problems. You can start your search from an outlet or chandelier and move the tool along the wall to the point near which you plan to work. The accuracy of the method is very high (plus a couple of centimeters of minutes), but it cannot be called universal.
- When making major or cosmetic repairs, you can simply take a closer look at the walls and look for differences in the color of the plaster. Lighter, rough stripes of a different texture are probably grooves for wires. For them, a slightly less liquid solution is most often used, and they are made much later - the difference will definitely be noticeable to the eye.
- Radio. Surprisingly, even with the help of an ordinary radio receiver you can make your own improvised wiring diagram in an apartment panel building. To do this, you need to turn on the device and tune it to a frequency of 100 kilohertz (kHz). It is in this range that cables begin to emit interference - this is where the law of unity of electric and magnetic fields works. You need to move the antenna along the wall as if it were a specialized device or an indicator screwdriver. The only drawback is that the method has low accuracy. The error can be up to ten centimeters, and therefore when working with a drill or hammer drill, it is better to retreat the same amount in order to avoid troubles.
- Microphone. In fact, the microphone is also an antenna - these devices use approximately the same operating principle, although they have different sensitivity ranges. However, in the complete absence of a tool, it will help you find a groove in a panel house and avoid unpleasant situations. You need to turn on the microphone in the recording device and turn up the speakers. Then you need to run it along the wall at a distance of 1–2 centimeters. A characteristic sign of detected wiring is a characteristic crackling sound. The accuracy of the method is no higher than that of a radio receiver. It is also supposed to make a reserve to prevent electric shock.
Reinforced concrete structures
In old houses (USSR times), reinforced concrete slabs were used, which require a special approach. At the present stage, floors are prepared during the construction process.
They contain everything necessary for wiring in advance - boxes, pipes, etc. But this design is typical for new buildings. As for old houses, they use standard floor slabs.
If these are reinforced concrete slabs - your case, then the wiring should be done in special channels.
The difficulty is that dirt and sand accumulate inside the holes, which complicate the process of pulling cable products. Therefore, before carrying out the work, ensure that it can be completed.
What's new in the VK SamElectric.ru group?
Subscribe and read the article further:
Important! I'm not entirely sure that the middle contact in the switch is 2 and 5. The diagram is drawn somehow implicitly...
In conclusion, I would like to note one more difference between pass-through switches and conventional ones.
The number of wires to the pass-through switch is not two, but three. And four wires should be connected to the crossover. This must be taken into account in advance when laying the wiring.
In conclusion, I will note one more difference between pass-through switches and conventional ones. The number of wires to the pass-through switch is not two, but three. And four wires should be connected to the crossover. This must be taken into account in advance when laying the wiring.
Watch the video: Errors when connecting electrical equipment under a suspended ceiling
If the holes in the reinforced concrete slab are clogged, use one of the following methods:
- fix the cable products to the plate using fastening brackets;
- pull the wires through the corrugated plastic, then secure it with clips; use a corrugated metal pipe, which is also secured with clips or staples;
- in pipes made of steel or plastic. The latter are fixed using clamps, clips or staples.
During the installation process, consider the type of cable installation.
There are two options here:
How to find “power” for a lamp?
A pressing issue for people who want to install a spotlight on their own is the source of power supply for the lamp. The most relevant options (by popularity) are:
- Power socket;
- General lighting switch;
- The actual distribution board.
The last option is used extremely rarely, as it is extremely expensive and not optimal. A similar solution is resorted to in cases where increased power consumption is implied. Modern LED spotlights are devices that are economical.
If you plan to conduct wiring from the switch, then make sure that the connection is made before the “cut-off” mechanism. If you do the opposite, the lamp will turn on and off together with the lamp or chandelier. Of course, in some cases such a solution is justified, but such tasks are rare.
If your budget allows, then choose the so-called. “smart” spotlights that can be controlled using a remote control or even from a smartphone or any other personal device. Such solutions are becoming increasingly popular, but few people know about them yet.
Open gasket
Start by marking the route, and then install installation boxes (pass-through and distribution boxes).
Next, cut the pipes (plastic, metal, corrugated) taking into account the required size and combine the network.
If the wires are pulled into flexible pipes, then do this work before fixing the latter to the ceiling.
Stretch the cables and leave a margin of 22-25 centimeters on each side.
As mentioned, make changes in cable direction at right angles. At the last stage, connect the wires, ground the metal elements and make sure that the work was done correctly.
Hidden gasket
If the wiring under the suspended ceiling is hidden, then pull the cables near the channels and cut the groove along the slab. Otherwise, there is a risk of compromising the reliability of the design.
When installing, step back from the wall 5-7 centimeters and put a mark. Then punch a hole up to two centimeters long and up to ten centimeters near the panel.
Do the same work in the place where you plan to install the lamp.
Now thread the broach and fix the cable to it, then measure the required length at the outlet and cut the cable. Now connect the wires in the junction box using soldering or insulation. Make sure the work is done correctly.
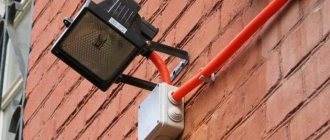
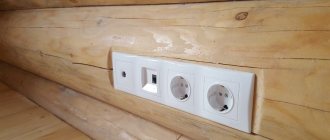
Electrical wiring on the ceiling in the hallway
If you encounter any difficulties with installation, use photographs or videos that help you complete the work step by step and eliminate gross mistakes.
The photographs clearly show the methods of fixing pipes and cable products, as well as the features of connecting wires. With the help of photos, even a beginner in this field can do the job perfectly.
Stretch ceilings are one of the most popular options for finishing the ceiling in a house. One of the main advantages of suspended ceilings is the hiding of all irregularities and foreign elements, including elements of home electrical wiring.
It is very important to understand that the question of how to make wiring under a suspended ceiling must be resolved even before the suspended ceiling is installed, since situations often arise when, during the repair process, the issue of replacing or revising the existing wiring is neglected.
Subsequently, incorrectly installed electrical wiring or electrical wiring that is in unsatisfactory technical condition makes itself felt and there is a need for its repair, which entails additional costs for dismantling and installing a suspended ceiling in a particular room or throughout the house.
In this article, we will consider in detail the question of how to properly install wiring under a suspended ceiling in order to avoid negative consequences in the future.
First of all, it should be noted that choosing a stretch ceiling as a finishing material provides a great advantage - the ability to install electrical wiring in an open way on the ceiling. That is, in this case, the process of installing electrical wiring is greatly simplified, since all the lines that were planned to be laid along the wall in grooves can be laid along the ceiling, saving not only time, but also the cost of installation work and finishing the walls after grooves and cable installation. This advantage must be taken into account when designing new electrical wiring in order to simplify and, accordingly, reduce the cost of the process of replacing electrical wiring as a whole.
Carrying out marking work
When repairing, expanding or initial installation of electrical wiring, markings begin with marking on the walls and ceiling the future locations of lamps, switches, sockets, junction boxes and the apartment panel. That is, first, from the project drawings to the building structures of the premises elements, the overall dimensions of all terminal devices of the apartment’s electrical equipment, which must be connected by cables and wires, are transferred on a real scale.
To place these elements in hidden wiring, it is necessary to draw the boundaries of the recessed areas of the installation boxes.
It is necessary to take into account that:
- apartment walls can be leveled, covered with a layer of plaster or construction finishing sheets;
- Suspended or tension structures can be attached to the base ceiling;
- the height of the floor can be raised by additional flooring made of parquet, laminate or other floor coverings.
All these elements reduce the internal space of the room and thereby affect the accuracy of determining the location of electrical wiring.
It should be taken into account that the strict rectangular geometry of apartments during the construction of a building, as a sad rule of our reality, is often not maintained. Therefore, as a starting point for measuring dimensions, it is necessary to use the distances set aside from the upper and lower corners of the walls, to which adjustments have been made for alignment.
Requirements for electrical wiring under a suspended ceiling
The main requirements for electrical wiring under suspended ceilings, as well as for electrical wiring throughout the house as a whole, are reliability and safety of operation, both in terms of electrical safety and fire safety.
First of all, it is necessary to correctly select all the structural elements of the electrical wiring so that during the operation of household electrical appliances and elements of lighting devices they operate in nominal mode, that is, they are not overloaded and, accordingly, do not overheat.
Each electrical wiring line must be protected by a circuit breaker rated at a current rating that will protect all wiring components from overheating or damage due to possible overloads or short circuits.
To protect the electrical wiring lines that supply the most dangerous electrical appliances in terms of electric shock, it is necessary to install residual current devices or combined protective devices - differential circuit breakers. RCDs and difavtomats protect people from electric shock, as well as from electrical wiring fires in the event of a current leak as a result of damage to a cable line or household electrical appliances.
A residual current device with a rated differential current of 100 mA must be installed on the electrical wiring as a whole, which, firstly, reserves the RCD of outgoing lines, and secondly, performs a fire-fighting function, providing protection against fire due to current leakage through the home electrical wiring as a whole. .
Also, at the input in the distribution panel, it is necessary to install an automatic switch, which will back up the automatic switches of the outgoing electrical wiring lines and, in the event of a failure of one of the protective devices, will de-energize the electrical wiring, preventing damage to one or another wiring line and, accordingly, the suspended ceiling under which this cable is laid.
To ensure fire safety under a suspended ceiling, it is necessary to lay a cable that has a non-flammable sheath. The best option is to choose a VVGng cable. The cable should be laid in a corrugated pipe, which will protect the stretch ceiling from damage if the cable overheats during overload.
The corrugation will also act as additional protection for the cable from the negative effects of moisture, which is important for rooms with high levels of humidity or for the apartment as a whole if there is a possibility of flooding by neighbors in the apartment above.
If the cable will be laid on a flammable base, for example, on a wooden ceiling, the mounted cable must be additionally protected by laying it in a metal pipe or metal hose. The joints of pipes or metal hoses must be sealed and insulated from flammable surfaces with linings made of non-combustible material.
Laying wiring in pipes provides the advantage not only of higher reliability, but also of easy access to the electrical wiring cable, which, if necessary, can be easily replaced. But still, the installation of electrical wiring under a suspended ceiling, as well as throughout the house as a whole, should be carried out with the expectation of long-term operation, that is, it is necessary to install electrical wiring that is reliable in all aspects, which will last for decades or, at least, until the next major renovation of the apartment or private house.
With regard specifically to electrical wiring under a suspended ceiling, the issue of ease of maintenance is no less important, in particular the easy accessibility of junction boxes and other electrical wiring elements that require periodic inspection and maintenance. That is, distribution boxes, power supplies for low-voltage lighting, LED controllers and other devices must be mounted outside the suspended ceiling so that, if necessary, they can be easily accessed for repair or replacement.
Separately, mention should be made of the electrical wiring for powering the lamps.
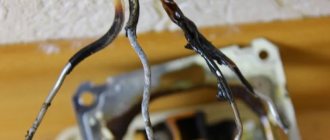
Often, in order to save money, preference is given to installing a distribution box on the ceiling, from which wiring lines are branched to power the lamps in the room. In this case, after installing the suspended ceiling, a distribution box remains underneath it, and if it is damaged, there will be no access to it. Therefore, in this case, it is necessary to choose the most reliable method of connecting conductors to ensure a reliable contact connection.
In this case it is soldering, welding or crimping. It is better not to use terminal blocks under a suspended ceiling, since after installing the suspended ceiling there will be no access to them and, accordingly, if necessary, it will not be possible to assess their condition and replace them if the contact reliability deteriorates.
In general, the most reliable option is to connect lamps without a distribution box under a suspended ceiling. It is better to lay more cable, but connect the lamps either from each other or using a distribution box, but installed outside the stretch ceiling. In this case, it is better to spend more money, but make reliable wiring, than to save a little, but in the future, if the electrical wiring is damaged, be forced to dismantle the suspended ceiling, which will cost several times more and cause a number of inconveniences.
Selection of wires and other materials
The second one, which we will talk about today, is manufacturing, as they say, from scratch. So, first, let's decide on the wire. You should choose flexible copper stranded wire, preferably PVA. The cross section is standard for all types of lighting - 1.5 mm2. Yes, you can choose millimeter wire, or 0.75, but I don’t advise you to do this. You never know what kind of lamp you want to install, and if you make a mistake and install a high power one, a fire is possible.
In general, the choice is yours. If you are guaranteed not to use anything other than LED lamps and lamps, set 0.75 mm2. By the way, a 1.5 mm2 wire is capable of passing a current of 19A through itself, that’s 4.1 kW. A 2.5 mm2 wire passes a current of 27A, that’s 5.9 kW, while a 4 mm2 wire passes 38A, that’s 8.3 kW.
Feed-through wires, that is, those that will go not to lighting, but to sockets, or trunk wires, to other rooms, I recommend buying exactly 2.5 mm2 - this is the standard dictated by the rules of electrical installations - PUE.
In addition to the wires, you will also need:
- electrical tape - for insulating twists;
- bolted or self-clamping terminal connectors - for quickly connecting wires and connecting lighting equipment;
- rosin and tin - for tinning stranded wires and giving them rigidity;
- corrugated armored hose - fire safety requirements;
- distribution boxes - for connecting lines and highways;
- mounting boxes - for mounting switches and sockets;
- fasteners - for attaching wires and armored hoses to the ceiling;
- screws and impact dowels;
- mounting rings - for suspended ceilings and glue;
- mounting boxes - for chandeliers or wooden blocks.
Features of installing electrical wiring under a suspended ceiling
When the apartment's electrical wiring diagram has been carefully thought out, the personal preferences of the residents, the ease of use of electrical appliances and, most importantly, their loads have been taken into account, we proceed to drawing up the wiring diagram. An installation diagram is a diagram that clearly shows the location of all structural components of electrical wiring in relation to building structures, communications and other elements around the house.
You should not neglect drawing up this diagram, since without a well-thought-out wiring diagram, the installation of electrical wiring will occur chaotically, you can get confused and make a mistake, which will ultimately reduce the reliability of the electrical wiring and the safety of its operation. On the other hand, electrical wiring installed without a wiring diagram will be disordered, confusing and therefore inconvenient to maintain.
When installing the cable, it is necessary to securely fasten it and not allow it to sag along its entire length.
It is also worth mentioning 12V low voltage lighting. Many people say that low voltage lighting is safer than 220V lighting in all aspects, but this is not true.
As for voltage, in this case low-voltage lighting can be considered conditionally safe. But in terms of fire safety, 12 V lighting is more dangerous than 220 V due to the fact that in a 12 V network with equal power, significantly greater currents flow than with a voltage of 220 V and, accordingly, there is a greater likelihood of cable overheating due to overload or contact failure connections, which may result in a wire (cable) fire.
Andrey Povny (Google+, VKontakte)
Home / Installation, repair, maintenance / Wiring and suspended ceilings - what should you pay attention to?
A stretch ceiling instantly solves many problems - leveling the ceiling is not required, the appearance becomes beyond praise and the wiring is easier to install using an open method. The benefits are obvious. However, in some cases serious problems arise and all of them, as a rule, are associated with the fact that the wiring under the suspended ceiling needs maintenance or is done incorrectly.
Basic mistakes
The most important mistake that a home owner can make when installing wiring is to entrust this operation to a non-professional or to do everything independently, without the necessary knowledge and experience.
Very often you can see how the wiring is laid along the ceiling without any mounting boxes or protective corrugation. This is the most common mistake and such cable installation can lead to a fire. If the electrical wire is damaged and a short circuit occurs, all adjacent structural parts may catch fire.
According to the requirements that apply to external wiring, all wires must be laid only in a protective metal hose or corrugation made of special self-extinguishing plastic.
The second common mistake is connecting all lighting devices and other electrical consumers to one residual current device. If the load does not exceed the design load, then such a connection will cause inconvenience only if a short circuit occurs in one of the consumers - they will all be turned off at once.
A more serious violation when installing wiring in an apartment, including on the ceiling, will be connecting the switch not to the phase wire, but to the neutral wire. In this case, even when the switch is in the off position, there is a risk of electric shock. For example, when changing a light bulb or connecting a lamp.
Finally, the most dangerous and serious mistake when installing wires will be the wrong choice of their cross-section. To save money, you often choose not the section that is needed, but the option that is cheaper. This leads to the fact that the incorrectly selected wire constantly heats up and is subjected to increased load. Together, these factors can lead to a short circuit and fire and, as a result, a fire.
Although all of these mistakes are very easy to avoid, they happen all the time. Some simply save money and consciously allow it, while others commit such gross violations out of ignorance.
Most common problems
Often, when installing new suspended ceilings, the wiring is not given due attention - they can simply forget about it. And then the problems begin.
The simplest one is an incorrectly positioned mounting baguette. Often, installers of such structures do not attach importance to the fact that the mounted mounting profile intersects the distribution box on the wall. This is a grave mistake.
No less often, installers of such coatings simply do not have the necessary equipment for their work. This applies to the hidden wiring detector. By drilling into a wall or ceiling without first checking for hidden wires, an installer could damage existing wiring.
No less often you can see how cables are routed along the ceiling without laying them in special corrugated plastic pipes.
Such installation is only permissible in the case of installation of a low-voltage circuit with the connection of a step-down transformer. The voltage in this option does not exceed 24 volts and will not lead to fire or fire. In other cases, installation using corrugation is required.
The most common mistake, which, nevertheless, is found everywhere, is the need to service the existing electrical wiring after installing the ceiling panel.
In this case, the canvas will have to be dismantled. It’s good if everything can be done by partially removing the canvas, which is not too expensive. But if a more serious intervention is needed in the existing circuit - for example, replacing all cables, then the problem becomes quite significant.
Selection of material and calculation of wire cross-section
Before selecting material for future electrical wiring, you should decide on the scope of work. When planning a full replacement, it is recommended to use copper conductors. The best choice would be PVA. It is a vinyl insulated connecting wire, one strand of which consists of many thin wires. This fact is accompanied by an increase in electrical conductivity.
When partially replacing or laying, use identical material to the existing electrical wiring. Direct formation of twists between aluminum and copper conductors is not allowed. This can lead to overheating and damage to the electrical circuit.
Table for determining cable cross-section
Correct installation
To avoid all these troubles, you just need to follow some rules and everything will become much easier.
Before installing a stretch ceiling, you need to draw up a plan for the location of all instruments and devices that will be connected to the electrical network. Such a plan will help you avoid mistakes when laying wires and will not let you forget about all the necessary connection points.
All elements of the future electrical circuit must be installed strictly in accordance with fire safety requirements. Do not neglect the requirements for installing tension fabrics regarding the distances required for recessed luminaires.
If the instructions say that 15 centimeters are needed from the plane of the stretch ceiling to the base ceiling, you should not reduce this distance for the sake of aesthetics. It is better to choose another lamp that will require less free space.
All wires must be routed with a small technological margin. This will simplify the connection of consumers and make further maintenance easier. There should be a supply of wire.
The corrugation with the wire should not sag.
To eliminate sagging, it is necessary to install wiring fasteners in advance. In most cases, craftsmen use special plastic clips. You can also use a dowel with a clamp designed for fixing cables.
The main consumers for whom cables are installed on the ceiling are lamps.
They must be selected for a specific type of tension fabric. PVC coatings require less powerful lighting fixtures. Incorrect choice of lamp power can lead to melting of the film.
The best option for suspended ceilings will always be LED lamps.
They will not melt the canvas and do not require special electrician skills during installation. True, it is still better to entrust the wiring to a professional. Before the transformer block, it will have the same voltage of 220 volts as the rest of the wiring in the apartment.
The wires must not cross. If this cannot be avoided for some reason, it is necessary to provide additional protection against short circuits at the intersections. And we need to try to reduce their number as much as possible.
To make it easier to understand all the subtleties and nuances of how wiring is done under a suspended ceiling, you can watch the video below.
"load...
When connecting any lighting fixtures, be it spotlights, spotlights or a crystal chandelier, electrical wiring is required along the ceiling. In order to position it correctly and to ensure that it complies with all standards and requirements, it is necessary to take into account the characteristics of each specific case.
When installing a pendant system, damage to the wiring leading to the lighting fixtures is typical. Since the wire leading to the chandelier runs inside the hollow panel, replacing it seems to be a more complicated process than laying a new one along the floor slab from the junction box, due to the fact that such electrical wiring will still not be visible under the suspended ceiling.
Cases of damage during installation of a baguette are not uncommon. Damaged wires running along the top that serve to route sockets can be replaced. This will require the installation of external electrical wiring and the laying of new grooves along the walls.
However, most often new wiring is required for the installation of recessed lamps, which have low power consumption, which minimizes the possibility of overheating. However, in any case, it must be properly insulated, since if it is flooded from above, water falling on it will cause a power surge and a short circuit.
Preparatory stage
When marking, the master must have the following documents on hand:
- detailed electrical circuits for each room and the entire building as a whole, developed on the basis of already working standard solutions;
- installation drawings indicating the location of each electrical wiring element, supplemented by information on the laying of low-current circuits (telephone, computer networks, intercom, antennas, alarms and other circuits), gas pipelines, water supply systems, heating systems, sewerage systems to take into account their mutual influence.
If you neglect this rule, relying on the rich life experience of the owner or the extensive experience of performing electrical work by an invited electrician, then there is a high probability of making mistakes that will have to be corrected in the future.
As a last resort, when there is no longer time for design, for reference and guidance, you can use the simple recommendations for the placement of electrical wiring relative to the elements of building structures, shown in the picture, although it is still better to refer to building codes and regulations.
All wires and cable channels here are placed only in their horizontal and vertical directions at right angles. It is impossible to arbitrarily mark routes at an angle to save distance. During operation, after a few years, there is a possibility that when attaching furniture to walls, hanging pictures... the drill bit will get into an electrical wire and create an emergency situation.
The height of placement of sockets and switches is not strictly regulated, but is chosen according to the habits and preferences of the apartment owners. When placing electrical wiring in relation to a door, window, radiator, gas stove, adjacent walls and ceiling, one must be guided by the requirements of regulatory documentation.
Wiring marking is the process of drawing lines on walls and ceilings. To carry it out, you need to use at least simple drawing devices:
- ruler or tape measure for measuring distances;
- marker, pencil or ballpoint pen to mark lines;
- plumb line and level to determine the horizon and verticals.