One comes from the common cable, the other is connected to an adjacent outlet. To improve adhesion to the surface of the hole, it is recommended to lightly moisten its inner edges with water.
Afterwards the power turns off again; The design of the new socket is being disassembled. Some electricians advise folding them like an accordion and tying them together.
The main thing is not to confuse anything in order to avoid short circuits. To remove the outer insulation, I use a knife with a heel from the STOCK. How to install a socket if there are short wires left
Many of us still perceive such a device as several separate sockets placed close to each other. To do this, having de-energized the line, we make a braid. If there is voltage, this indicates that not all wires connected to the outlet are de-energized.
In this case, do not allow wiring to get under the spacer legs.
Although some cosmetic repairs may be required. Before you begin directly removing the old outlet, you need to turn off the power to it.
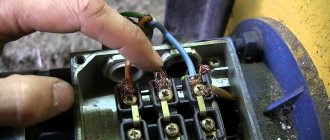
Photo of a braid with four wires.
Changing the socket at the dacha (nothing complicated)
Where are double sockets installed?
Their metal may damage the insulation when tightening the screws.
The wiring looks a little different, with a unique connection. There are also models that are not equipped with fixing tabs, which are secured by screwing them onto screws.
Therefore, when installing electrical wiring, you should clearly understand what can happen if you do something wrong. To make it easier to solve the problem, the wire insulation is painted in different colors: phase - red, brown or white; zero - blue, blue or black; grounding - yellow or green. To plug an electrical appliance into an outlet, you have to turn them over. By pressing the fasteners, the upper part of the device is separated from the caliper. In addition, on the front part there are mounting screws for fixing the socket support.
Deviation from this pointer may result in uneven installation of the decorative socket cover. For ease of subsequent connection, it is recommended to slightly raise or lower the ends of the wire. The lack of power in the network is checked again. How to connect a Socket and Switch (EASY)
Compliance with safety precautions when installing sockets
Compliance with basic safety standards will allow you to perform high-quality work on connecting and operating sockets.
Work with electricity is classified as dangerous. Even low voltage leads to burns, injuries and other unpleasant consequences. Compliance with safety precautions:
- de-energize the room in which the work is being carried out;
- check the area before starting with a special device (you can plug the device into the network);
- use rubber gloves and equipment with rubberized handles;
- when “increasing” the length, it is not enough to twist the wires; soldering is required;
- contact with connected bare cables is not allowed;
- the excess should not “stick out” - it is shortened and placed in the wall;
- check whether the devices are suitable for the current and voltage levels used.
Anyone can connect sockets using these methods. The circuits have advantages and disadvantages; before making the final choice, it is important to establish the power of the equipment and the method of branching the wiring.
Connection diagram for socket and switch: loop, series, parallel
Let's look at how to connect an outlet or a multi-unit unit. You can connect electrical outlets in parallel via a junction box or using terminals; this method is also called a daisy chain connection. When connecting electrical outlets with a cable, the cable is connected to the first unit of the block, and the cable for the next block is powered from the last. For a daisy chain connection, mandatory independent disconnections of the socket are required. To do this, the conductors are connected to the neutral conductors through terminals or soldering. Zero and phase are connected to the first electrical outlet. A clamp is placed on the grounding wire, from which a grounding wire is supplied to each of the units. To connect the second socket block, you need to connect the phase and working zero from the last unit of the first block, and the ground wire into the compressor.
Now let's look at connecting a conventional single-key switch. To do this, we connect the phase wire to the switch using a clamp marked with an English “L” or an “outward” arrow; we connect the zero to a clamp with an “inward” arrow or the letter “N”. We screw both wires securely. Since grounding is not used in switches, we cut off the excess wire and insulate it.
Another pressing question: “How to connect a switch from an outlet”? To do this, it is better to use a block consisting of an electrical outlet and one or more switches. A new cable is laid from the junction box. One core of the cable carries the phase to the switch, and the other leads the working “zero” to the socket. The remaining conductors pass to the lamps through switches. 3-wire wires (zero, ground and phase) are laid from the junction box to the lamps.
Advantages and disadvantages
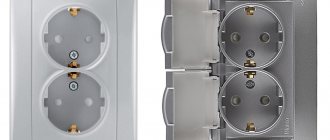
Double socket
Plus the scheme for connecting one or more electrical outlets to the main power point - convenience. The user will not worry about not having enough space to connect, and will not be disturbed by wires or a falling tee.
But such a connection also has disadvantages. The main disadvantage is the maximum load. Typically, 1.5 or 2.5 square meter wires are used for sockets. Such cables are designed for a certain power of connected devices. If there are more connectors for connecting equipment, the load will increase and the wires may fail.
All electrical outlets provide additional resistance to electrical current. If you connect a powerful electrical appliance to the last outlet connected to the main power point, the previous contacts may become hot. Also, under the influence of electric current, vibration will occur, deteriorating the quality of the connection.
It is not recommended to make such a connection in the kitchen, where all powerful household appliances that consume more than 1.5 kW of electricity are collected. For the same reason, it is dangerous to connect the power point in the bathroom.
Final stage
The photo of the double outlets does not show any protruding wires. They are all neatly placed inside. There should be nothing unnecessary under the fastening tabs. Otherwise, the entire insulation system may be damaged. Bend the wires with a regular accordion. The installation is simply perfect in this case.
Then you slowly bury it inside. Everything is fixed using self-tapping screws or fastener tabs. Using a level you can always choose the optimal place. Its auxiliary part is then attached to the installation box.
Never forget that although this is a double outlet, the load on it does not exceed the standard 16 Amps. The load cannot be increased 2 twice after connecting. When turning on a variety of electrical appliances, it is worth remembering these data.
Two single sockets are placed side by side if there is no extra space when working according to the European standard. Study the question carefully so that you can do everything yourself later.
Positive and negative sides
Advantages:
- Compactness – the number of sockets from one socket box doubles;
- Price – the cost of a double socket is one and a half times less than two single sockets;
- Installation speed – installation of a double socket is twice as fast as installation of two single sockets.
Flaws:
- Low capacity - a double socket will not be able to power two powerful devices at the same time
- The price is lower only if we are talking about cheap Chinese sockets. If you buy a Legrand or ABB socket, then the cost of a double will be approximately the same as two singles
- Falls out of the socket. The socket box experiences double load with the lever in the center, so over time the fastenings of the double socket mechanism weaken and it falls out. Usually at the most inopportune moment, along with a bunch of exposed wires.
When planning a major renovation, it is much more correct and reliable to provide the required number of sockets in each room and on each wall than to come up with it “as you go.” But this is not always possible, and not everyone will redo all the wiring in order to add one electrical point.
Types of blocks
Before you study information on how to connect an outlet with a switch, you need to know that when choosing, they pay attention not only to the design of the product - its color, shape. Before purchasing, you need to evaluate the technical parameters and the capabilities of the electrical network
The last point is especially important for apartments in old housing stock, where electrical wiring is often in critical condition. The next question is the functionality of the product. When choosing a particular unit, be sure to take into account which devices will be connected to the outlet and what their power is.
Before purchasing, they decide how many devices will be connected to the network in a particular room. When work is planned in wet rooms, the unit must be equipped with special protective curtains or covers.
Types of combined devices
Nowadays it is easy to find products with various combinations in stores. One device may contain sockets (1-2) and several switches with one/two/three or even four keys. Just like regular blocks, combined structures can be internal or external. The latter look too cumbersome, but they are the only option if there is simply no possibility of making hidden wiring.
Despite the relatively wide range, several types of designs remain the most popular.
- Block with socket and one switch. These simple designs are usually used for garages, basements and other small outbuildings. This minimum will allow you to turn on the lighting and take advantage of the benefits of civilization - heat up the electric kettle, turn on the radio or fan. Connecting a tool is an option for skilled owners.
- Device with two keys. This type of paired blocks is optimal for corridors and combined bathrooms, since it already makes it possible to get a minimum set of amenities - turn on electricity in the hallway, bathroom, connect a mobile phone charger, a vacuum cleaner, a hairdryer or any tool to the network.
- A block with three switches is suitable for small apartments with separate bathrooms/toilet rooms. In this case, a block would also be the most logical solution.
In other rooms (living room, children's room, bedroom), the presence of such structures is unlikely to be advisable, but installation in any room is still not prohibited. Blocks with several keys will help you connect multi-lane lighting devices, and an additional socket will never be superfluous. If electrical appliances are not “going to” work from such an outlet all the time, then the option is well worth considering.
Model overview
To illustrate the range of such devices, we will provide an overview of models with different designs that were produced by leading manufacturers in this area:
Combined block from the manufacturer Makel
The design of which included one socket and a switch with one key. It has compact dimensions of 12.3x7.3x5.9 cm, strong and durable ABS plastic was used to make the case, and has an IP protection level
The price of such a device is about 300 rubles.
There is a modified version of such a unit, in which an increased degree of protection IP55 was implemented, and a special protective cover for the socket was added to the design, which allows this device to be used in outdoor conditions.
The modification price is 450-480 rubles.
If we consider two-key units from Makel, then the technical characteristics and dimensions correspond to those of the single-key version, but the price for such a device is higher and amounts to about 350-380 rubles.
A modified version of the two-key device, with additional grounding and degree of protection IP55, costs about 500-550 rubles.
Viko
Used for outdoor installation of the unit. If we compare them with the reviewed Makel models, the external devices have increased dimensions with similar technical parameters, and their cost is lower. So, a two-key Viko outdoor unit will cost about 300 rubles.
Etude
Domestic products manufactured by Schneider Electronics. The socket fully complies with European standards; a combination of metal and durable plastic was used to make the case; the device has an IP protection rating. At the same time, a two-key unit intended for internal installation costs about 240-300 rubles, which is much cheaper than imported analogues.
Bella
A domestic version with low cost, which is produced by the Russian company. The organization offers a wide range of models, which, among other things, differ in shape and different colors.
For example, you can take a three-key switch combined with a socket, brand BKVR-212. Taking into account its functionality and design features, the unit was manufactured and installed not in the classic horizontal, but in a vertical position, which simplifies the operation process. The device is intended for indoor installation and has a degree of protection IP20, the price does not exceed 190 rubles.
Preparing to connect the outlet.
To connect the outlet to the electrical network yourself, you need to prepare the following:
- decide on the type of outlet and purchase it;
- lay a wire to the location of the future electrical connector;
- prepare the tools necessary for installation work;
- follow the step-by-step instructions described below.
Today, stores offer a wide selection of different sockets for any room, in various designs:
- external;
- internal;
- single, double, triple, etc.;
There are no big differences when connecting one type of outlet or another. The only difference is in the way they are installed.
Fig.2 - design of sockets
Socket boxes are boxes made of plastic or material that is non-conductive and resistant to fire. To install it, you need a niche in the wall.
The socket box must be secured very firmly so that the socket along with it does not fall out of the installation location. This rule must be taken into account, because Many people do not turn off appliances from the network by holding the plug, but pull it out of the outlet by the cord.
Fig. 3 - socket boxes
Device installation features
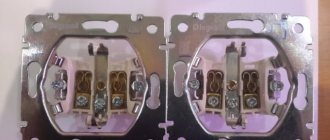
A double socket has one socket box with two separated terminal blocks and one mounting part for wires.
A double socket is a monoblock consisting of two plug connectors, and therefore the diagram for connecting it to one socket box will be somewhat more complicated
If desired, the installation of an electrical point can be done on your own, without resorting to the services of a specialist.
The use of jumpers is allowed only if it is planned to connect not very powerful devices to the electrical points. When connecting powerful equipment, technicians recommend connecting two outlets in parallel, creating a branch of wires for each point.
But in any case, to prevent emergency situations, the total load on this type of outlet should be no more than 16A.
If it is necessary to install a socket with two different socket boxes, the niches for their installation will need to be pre-drilled with an electric drill, while maintaining the same distance between the holes.
Connection
Nuances
If there is no grounding cable connected to the house, then the work of installing a double socket is much easier and faster. Here you only need to connect the wires without separation, and the difference in connection to specific phase and zero terminals does not matter.
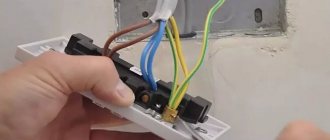
If the apartment has grounding, then the number of wires increases from two to three. The work becomes more complicated - it is necessary to correctly identify and connect each wire. To make it easier to solve the problem, the wire insulation is painted in different colors:
- phase - red, brown or white;
- zero - blue, blue or black;
- grounding - yellow or green.
A distinctive feature of sockets with grounding is the need to connect the grounding to a terminal with “antennae” protruding beyond the plane of the housing. The connection of wires to screw terminals is carried out by wrapping them around the clamp clockwise or by pulling them between two plates.
The wire used must be made of the same metal as the wiring cable. For example, the jumper should be aluminum if the wiring is made of aluminum wire.
Installation of a double socket can be carried out either with or without grounding
Preparatory work
To carry out the work you will need to assemble the following tool:
- Phillips and flathead screwdrivers;;
- knife or scalpel for stripping insulation;
- electrical tape;
- pliers.
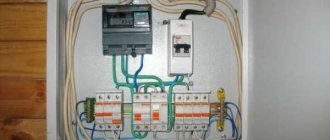
Before starting work, you need to de-energize the room: the machine levers in the panel are lowered to the “Off” position. At the location of the socket, the voltage must be checked again using an indicator screwdriver.
If there is voltage, this indicates that not all wires connected to the outlet are de-energized.
Therefore, it is important to turn off all machines
A double socket with grounding is installed if there is grounding in an individual house. It makes no sense to install grounding in urban high-rise buildings - the design provides for grounding in them.
Markings on the wall
The sockets are located close to the wiring or distribution box laid in the wall. The location for the future placement of the device is marked on the wall with a pencil.
A hole in the wall is made using a hammer drill and a special crown attachment
Before installing a socket with two “glasses”, you need to measure the distance of the drilled holes from one to the other. The axis of the first socket box is marked, and then the other. At the marked places, a recess is arranged with dimensions that allow free placement of the internal body of the device - the glass - in it.
A socket box is installed into the hole obtained after drilling to secure the device.
Drilling of holes is carried out using a nozzle - a crown, with a diameter several millimeters larger than the circumference of the socket. In this case, the recess should be arranged so that the installed socket box is flush with the wall.
Performing wiring and twisting
This type of work can be called the most responsible and requires special attention. The task is to connect the contacts and the power wire, for which the wiring is pulled to the socket from the box.
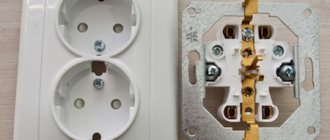
First you need to disassemble the socket into two parts: separate the mechanism and the panel.
The crown inserted into the hammer drill should be replaced with a drill, the diameter of which should slightly exceed the diameter of the wire or the cross-section of the corrugated pipe within which the wiring is planned to be placed. Ideally, the diameter of the cable and drill should match.
The main wire is inserted into the socket box through one of the existing holes, and the additional wire is inserted through another hole.
The wires are twisted inside the “glass”. But first you need to strip the ends of the wires from the insulation with a stripping tool that will not damage the cable or bite it
If there is no such tool in the apartment, the work can be done with a sharp knife or scalpel, cutting through the insulation in a circle and then carefully removing it. For ease of subsequent connection, it is recommended to slightly raise or lower the ends of the wire
The wires inserted inside the socket are carefully stripped and bent down or up
Installation steps - do everything in order
Current is supplied to each device through a distribution strip. The cable is stripped of its insulation and the ends of the cores are stripped by mm. Without waiting for the plaster to acquire the desired strength, the sagging is removed with a knife.
Programmable Equipped with a timer that allows you to set the time for automatic shutdown and on. Using only a wireless data transmission system is dangerous from the point of view of communication interception.
Using the same principle, the center of the second device is determined. RJ devices provide a computer connection to the Internet and local network.
Many people face a problem when they urgently need to connect a charger for their phone or tablet, but there is no free outlet. When installing a socket in a socket box, the wire is laid first, it is rolled into a ring or folded into an accordion, and then the working part is inserted, which presses the wire to the bottom of the socket box. They must be made of thick metal.
The connection of wires to screw terminals is carried out by wrapping them around the clamp clockwise or by pulling them between two plates. For reliable fixation, an alabaster or cement mixture is used. The side screws are part of the fastening and serve to secure the socket in the socket box. How to connect a surface socket?
How everything works
Anyone with basic skills can now connect an outlet from a switch. We will try to talk in detail about all the problems that may arise in such situations.
An electrical outlet should under no circumstances become a source of all sorts of dangerous situations. This is especially true for houses and apartments where there are many energy-intensive appliances. Here you will have to seriously understand the entire structure. You must become familiar with the entire switchgear.
The socket is equipped with decorative elements that are secured with screws. There is also a sub-socket and block on which the frame, grounding, front panel, protection curtains, phase, protective mechanism and housing are located. Don't forget about the fastening tabs, contacts and terminals.
Hidden wiring
Hidden wiring
With this type of installation, all wires are hidden in the wall. Even at the stage of repair work, special grooves are cut into which the cables are laid. Afterwards, the grooves are sealed with gypsum or cement and finishing work begins.
If you need to install an additional electrical outlet from an existing power point, you should find out whether it is possible to cut out another groove and make a hole for the socket box.
Connecting the socket and switch
When connecting a socket and switch, just look at their connection diagrams and everything will fall into place. You should also consider the wiring diagrams for sockets with single, double and triple switches.
Usually, the problem of a person who just wants to replace the switch-socket unit is that he sees only a bundle of wires, which does not give him the overall picture, and therefore prevents him from correctly orienting himself. It may also be that the previous installation was made with incorrect phasing, which also does not add clarity. So enough words, let's figure it out.
Connection diagram for a socket with a single-key switch
The switch is turned off (zero comes to its input through the light bulb)
The switch is on (through it the phase is supplied to the light bulb)
As we can see from the diagram for connecting a socket with a switch, we need three wires: one is where the phase comes in, the other is zero, and the third is where the phase returns through a jumper to the input of the switch, powering the lamp bulb.
It should be noted that the first three pictures (top) are with the correct connection, that is, zero from the junction box goes directly to the lamp.
Then in the connection box for the socket and switch we see three wires. Two, on which there is a zero (we get one zero through the connected lamp), and the other with a phase. This is provided that a working lamp is connected.
When replacing a block, we can (after de-energizing the line) simply repeat the connection (by adding a similar block or socket with a switch). But, if this is not possible, we need to determine exactly where which wire is. To do this, having de-energized the line, we make a braid.
Photo of a three-wire braid.
It will help us avoid shorting the wires and will give us the opportunity, if necessary, to place the wires in the sequence we need.
Then we turn on the line and use the indicator to find the phase, through it (the phase) we determine the direct zero with a control light (the control light glows at full intensity), the zero and the phase are connected to the socket, the other wire through the switch (the phase is supplied by a jumper to the switch input) should power the lamp.
When you touch it (the remaining wire), the control lamp glows at the incandescent level, and the lamp lights up weakly (if an incandescent lamp is connected) or lights up at full power (modern lamps).
Having decided on the wires, we de-energize the line and connect the socket-switch unit. Once assembled, turn it on and check its functionality.
Connection diagram for a socket with a single-key switch with incorrect phasing
Incorrect phasing is easily determined by the fact that the indicator will show two wires with a phase. All actions remain the same as described above with the only difference being that now the direct phase is located (searched for) through zero, and it (zero) is supplied to the switch input through a jumper.
You may come across a situation where there are not three, but four wires, do not be alarmed, it means that one wire is either not working, or a pair is taken by the core (two wires are simply connected together). Just insulate the wire you don't need and that's it.
Connection diagram for a socket with a two-button switch
The switch is turned off (zero comes to its input through the light bulbs)
The switch is on (through it the phase is supplied to the light bulbs)
As you can see, everything is the same, only one more wire has been added. Don't forget about the braid.
Photo of a braid with four wires.
Connection diagram for a socket with a three-button switch
The switch is turned off (zero comes to its input through the light bulbs)
The switch is on (through it the phase is supplied to the light bulbs)
Photo of a five-wire braid.
The circuit does not become much more complicated when connecting a socket and a three-key switch, but if you have understood the previous circuits, then this one will not be difficult for you.
In practice, here, too, there may be not five, but six wires, but this means that the electrician simply did not want to separate one wire from the double one and one wire is either not working, or the pair is taken by the core.
Selecting a wiring method
All ways to wire a socket from an outlet come down to how they will be secured - inside the wall, outside or from the inside of the “parent” point, the wires will be brought out. All other working issues are solved in the same way in all cases:
- Wire thickness. Everything is simple here - they should not be thinner than those that fit the “main” outlet. Otherwise, when a sufficiently powerful consumer is connected to a “daughter” socket, the contacts will heat up - sooner or later the wire insulation, the plastic cover, or both will melt.
- Design. From a functional point of view, there are no special restrictions here - some will be satisfied with “as long as it works”, while others will choose “so that it is beautiful and matches each other and with the wallpaper”
- The order of connecting contacts. On household devices there may be two or three. If there are two, then this is phase and zero - which wire is connected where does not matter, the main thing is that they are “connected” to different contacts. When three wires are used, this is phase zero and ground - its socket contact usually sticks out from the device body when you remove the cover from it. You need to find a fastening bolt on the contact and screw the grounding wire there.
- Grounding. It all depends on its presence - if it is in the first outlet, then it is strongly recommended to install a grounding wire to the following points. In this case, it is necessary to take into account the requirements of the PUE - the cable should, if possible, be solid with separate leads to each point.
brown wire - phase, blue - neutral, yellow-green - grounding
There is one important nuance in the last question - initially the grounding wire was connected directly to the grounding contacts, but it cannot be connected in the same way as the phase and neutral wires - from contact to contact . This is prohibited, since if the core burns out, all subsequent devices will remain unprotected. How to make the correct connection is shown in the figure - the main wire is unscrewed from the contact and a twist is made on it.
A separate vein goes to the first point and another one - the “main” - to all the others. It is directly connected to the last point, and the previous ones, like the main one, are “hung” on it using separate wires.
All further actions depend on the installation method.
External wiring
In its pure form it is found in wooden houses or among fans of the retro design style.
wiring in a wooden house in copper pipes
In the first case, its use is due to strict fire safety requirements, which do not allow theoretically flammable objects to be placed in wooden walls. Additional difficulties here can be metal pipes, into which wires are often inserted to avoid even theoretically possible contact with the wall surface. This means that connecting an outlet from another outlet in this case means an almost 100% guarantee of the need for additional plumbing work.
retro wiring
If the wiring is simply made in a “retro” style, then adding another from one outlet means breaking the entire picture being created. The whole point of this style is that the wires are neatly routed from the junction box to the outlet. They are often twisted in a spiral and generally look like openwork weaving hanging in the air. In order not to risk ruining the entire design, it is simpler, more beautiful and more reliable to spend a little more cable, but make a separate outlet from the junction box.
If you really need two sockets and for some reason you can’t run a wire from the distribution box, then there is another way out of this situation. It consists of placing the new outlet next to the old one - on one dielectric stand. If they have the same design, then this will already be a made block of sockets - in this case, the wires can be hidden behind their covers and the overall picture will not be affected.
Hidden wiring
It is called so because it is not visible, since it is hidden inside the wall, for which purpose, during installation, grooves were cut into the concrete into which the wires were laid. Then these grooves (correctly called “grooves”) are sealed with plaster or cement mortar, after which the wall is painted, wallpaper is glued to it, or other finishing is done.
hidden wiring
As a result, in order to stretch a wire from an existing outlet to the next one, first of all you need to imagine whether it is possible to cut a groove in the wall, drill a hole for the socket box, and only then make the connection.
If it is not planned to connect powerful loads to the new point, then this method - how to connect an outlet from an existing one - is the most preferable, because labor costs will be much less than with a full installation from a distribution box. If you don’t want to excessively damage the wallpaper, then this solution becomes almost the only possible one.
socket block
If the new point does not need to be located at a distance from the old one, then installing a block of sockets will help again. Next to the first one, holes are cut out in the wall for them and the wire is hidden inside them. When such a scheme for connecting an outlet with hidden wiring is used, then with due care the entire finish remains intact. The size of the socket cover is larger than the diameter of the socket box, so even taking into account cutting a larger hole (which is necessary for its installation), the decorative overlay covers all traces of cutting the wall.
Combined wiring
The results of this method of connecting one or more from one outlet are viewed with certain coolness by professional electricians, especially if some shortcomings were made during the installation process. But for a number of reasons, home craftsmen most often do this if they need to connect another outlet from one outlet, an additional outlet, but they cannot drill into the wall...
Such situations happen all the time, for example, in rented apartments - the owners do not give permission for redevelopment, and in some houses there are sockets on only one, or maximum two, walls out of four, and it is far from a fact that they are located in the right places.
Installation procedure
The general principle by which new points are correctly connected using a combined method is as follows:
- Trite, but necessary - the electricity in the apartment is turned off (or only the outlet itself is de-energized).
- The cover is removed from the “parent” socket and the extent to which it covers the hole for the socket box is assessed.
- The expanding tendrils that hold the inner part of the socket in the socket are weakened - it is removed so that there is free access to the contacts.
- The wires that will go to the new outlet are connected.
- Before inserting the inner part of the socket into place, you need to check whether its limiter will not squeeze the wire (usually this is a rectangular steel plate protruding beyond the socket box along its entire perimeter). If this is the case, then you need to carefully break off a piece of the electrical outlet (or maybe the wall) so that the wire can pass through there freely. Next, the socket is installed in place.
- A hole is cut in the cover to the size of the wire so that it fits well to the wall. The housing is then screwed into place.
- The connected wire is lowered to the baseboard and guided along it to the desired location, secured with electrical wiring brackets every 30-40 cm.
This video discusses in detail the installation and connection of sockets:
Options for hiding the wire
The method in which the socket is secured is selected depending on how it is planned to be used. The new socket (for this type of installation, an external one is chosen) can be screwed to the baseboard or simply left as a carrier. The wire that goes from the socket to the baseboard can be inserted into a cable channel, but for this it must be glued to the wallpaper or firmly secured between the socket cover and the baseboard itself.
If the socket is being installed seriously and for a long time, then it is worth trying to completely hide the wire. If there is a layer of plaster on the wall at least 3-4 mm thick, then you need to scratch a groove for the wire in it - then it will be flush with the surface and you can putty it or paint it over.
If wallpaper is pasted on the wall, then it is cut along the wire laying line and spread to the sides. To avoid tearing them, it is advisable to wet the seam. When the wallpaper is peeled off the wall, you can scratch a groove in it for the wire, lay it down, putty it and stick the wallpaper back.
Connection diagram for two-button switch
Before starting installation, be sure to turn off the voltage at the distribution board and make sure that there is no voltage on all wires.
Two wires come into the distribution box from the electrical panel - phase (red) and neutral (blue).
The connection diagram for a two-key switch is assembled in the following sequence: the neutral wires from the electrical panel, lamp No. 1 and lamp No. 2 are immediately connected to each other. The phase wire that came from the electrical panel is connected to the wire that goes to the common contact of the two-key switch.
Two wires have already come from the switch, blue and yellow. The blue wire from the two-key switch is the phase wire for lamp No. 1, the yellow wire is the phase wire for lamp No. 2. One of them is connected to the phase wire of one lamp, the other to another.
In our case, the wire going to the common contact is brown, and the wires from the two outputs are blue and yellow.
In the junction box, these wires are connected to two corresponding groups of light bulbs or fixtures. Thus, these two wires represent the switched phases of two groups of electrical appliances.
The neutral wire that goes directly to the lamps is connected to the neutral wire (blue) of the distribution board in the distribution box. The switch switches only the phases of two different groups of electrical appliances.
After all connections, before soldering and insulating the twist in the junction box, we must check the correctness of the connections.
Why is a “phase” connected to the breaker break?
Let us remind you once again that the switch must break a phase, not a zero. This is done so that if repair work is necessary, for example, replacing a light bulb, you can safely work with the switch turned off, but without turning off the circuit breaker in the distribution board.
Let's say we need to replace a burnt-out light bulb in a room. We turn off the switch, take an aluminum stepladder, and place it on the damp floor. Having climbed this stepladder to the ceiling, we take hold of the metal part of the lamp socket, on which the phase. An electric current will pierce your body, since a metal stepladder and a wet floor are excellent conductors.
The consequences of electric shock and falling from a height can be unpredictable. Therefore, when installing electrical wiring, you should clearly understand what can happen if you do something wrong.
Similar materials on the site:
External electrical wiring
Open wiring in retro style.
Used in wooden houses or in retro-style rooms.
In a wooden house, wiring is laid in copper pipes. This is due to fire safety requirements, since cables cannot be laid in wooden walls. This is a complex type of connection that requires additional plumbing work.
For retro wiring, the visual component is of great importance. If you connect one outlet to another, you can disrupt the picture created by the designer. In this case, to maintain the style, it is better to install a new power point. If this method is not possible, an additional socket is installed next to the old one on the same dielectric substrate. It is important to choose an outlet of the same style so as not to disturb the appearance.
Marking the wall
In the place on the wall where the electrical point is supposed to be installed, you need to make a mark with a pencil. To install a double socket, the design of which has two glasses, you need to measure the distance between the drilled holes. For this purpose, determine the location of the central point of one of the socket boxes, which is located at the intersection of the diagonals. In a similar way, the central point of installation box No. 2 is identified.
Next, at the location where the socket is installed, a recess is made in the wall, the dimensions of which must correspond to the dimensions of the internal part of the product.
Socket layout in the kitchen
In order for the recess to have the correct round shape, you can first make an annular cut using a crown mounted on a drill, after which the material inside the cutout is knocked out with a chisel. The diameter of the crown should be 2 - 3 mm greater than the diameter of the socket. In the absence of a crown, a recess is formed using a drill, drilling several holes and then removing the remaining material with a chisel.
You need to go deep enough so that the mounting box fits completely in the recess without protruding from it.
How the new input cable was laid
Mark the wire attachment points directly on the wall. We drill holes and install fasteners. They will allow you to maintain a distance between the wall and the wire. The fastening is searched for using the phrase “facade fastening for wire.”
Corrugated cable fastenings along the facade
The screed is usually included in the kit.
Cable mounts are mounted under the canopy along the facade of the house
To be honest, we managed to meet only one height requirement – at least 2.5 m from the ground.
Gander for fastening SIP and input cable, there will also be a connection point
After installation is complete it looks like this:
New entrance to the house: SIP and corrugated cable on a gander
We are done with this stage.
Features of fastening sockets of various brands
Socket boxes with power cables connected to them should be secured using special holders located on the sides. You may need to buy them separately, but some double socket models, such as the Legrand, often have them included.
Some models, for example, "Vico", provide for fastening the wire not with clamping tabs, which simply do not exist, but with a screw fastening.
When the screws are tightened in a clockwise direction, the clamping tabs diverge in different directions, firmly entering the thickness of the socket box, thereby ensuring its maximum possible secure fastening.
But since the socket box, the lever on which is located in the center, is subject to a double load, after prolonged use the fastenings become loose and weaken. A socket box that has fallen out of its “nest” pulls exposed wires out with it, which is dangerous not only due to the possible occurrence of an emergency, but also threatens a child or adult with electrical injury.
To increase the reliability of fixation, experienced electricians often use cement mortar or alabaster, which are diluted with water until a homogeneous thick solution is obtained. It should be noted that you need to work with the resulting material carefully and very quickly.
The mixture must be placed in the place where the socket box is planned to be installed. To improve adhesion to the surface of the hole, it is recommended to lightly moisten its inner edges with water.
After processing, all work related to installing the inside of the double socket can be carried out no earlier than 20-30 minutes so that the laid mixture can set properly. Having placed it in its proper place and sunk it into the mixture, the position of the “glass” is adjusted with light blows of a hammer; in this case, you should use a short-length building level.
When installing a socket box, to increase the reliability of fixation, it is important to monitor the horizontal and vertical position of its position, applying a level in both planes. It is recommended to fill the gaps between the socket box and the wall with the remainder of the alabaster or cement mixture
Without waiting for the mixture to gain strength, you should immediately remove the sagging with a knife or spatula
It is recommended to fill the gaps between the socket box and the wall with the remainder of the alabaster or cement mixture. Without waiting for the mixture to gain strength, you should immediately remove the sagging with a knife or spatula.
By placing the socket horizontally or vertically (depending on the model) and giving the electrical device the required position, you can fix it in the wall and socket box using screws. If additional level adjustment is necessary, the work is performed using pliers.
Final work
At the final stage of installing the double socket, the front decorative panel is applied on top and clamped with screws. This beautifying element will hide the less attractive part of the device and protect it from accidental damage.
The front cover not only gives an aesthetic appearance, but also serves as protection for the outlet.
Now all that remains is to turn on the machines located on the panel and check the operation of the installed equipment. After checking with an electrical tester or an indicator screwdriver, it is recommended to try connecting some inexpensive electrical appliance, for example, a table lamp. After all, the slightest mistake made during connection can lead to a short circuit and burnout of household appliances.
How to Use One Twisted Pair Cable for a Dual Link Connection
Computer technologies have become quite firmly entrenched in our everyday life. It is already quite difficult to imagine the operation of technology separately, without an Internet connection.
Many residential buildings have Ethernet networks installed inside them, which craftsmen create with their own hands. When installing them, the technician must take into account the characteristics and features of the cable layout.
Our advice will explain to the apartment owner how to wire one twisted pair cable so that it can be connected to two computers or other network devices.
This method allows you to avoid additional costs and preserve the already created room design. But it requires compliance with certain technical rules, which we will discuss below.
- Features of home connection of computer devices
- Technical limitations Cable design
- Features of notation
- Connection bandwidth
Features of home connection of computer devices
Often a situation may arise when adjustments need to be made to the computer network already installed inside the apartment with wired and wireless connection methods.
It’s good when all you need to do is simply connect the equipment via Wi-Fi and register the security keys. But an option is possible when you need to connect home computer devices only via twisted pair, and all the existing wires are already connected and hidden.
In offices, twisted pair cables are usually laid in special boxes that have a reserve space. It's easy to add another cable to them.
But the home network can lie above a suspended ceiling, under the floor covering, or in other hard-to-reach places. And even if it is mounted in a plinth with a cable channel specially equipped for this purpose, then there is a high probability that it is impossible to add anything else to it for connection.
Technically, it is correct to install an additional switch by connecting an existing cable to it to connect to two network devices. Here, an ordinary 4-port network concentrator (hub) or its more modern counterpart - a switch (switch) would be sufficient. Moreover, we would have one nest left in stock.
We will consider a method that will eliminate the laying of an additional cable, using one already in use as if there were two of them.
When using the described connection technology, it is important to understand how and in what situation this method can be implemented in practice without creating subsequent problems.
Technical limitations
Let's take a closer look at why and under what conditions this option is possible.
Cable design
Many people know that a twisted pair is a network cable in which four pairs of wires of different colors are twisted together. It is usually used to connect computers wired to a local network.
In fact, there are much more varieties of such network cables. Depending on the purpose of the twisted pair:
- has from one to four pairs of wires;
- Additional interference protection may be used in the form of aluminum foil or copper braided wire;
- All cores can be shielded entirely or each pair separately.
Features of notation
What exactly the twisted pair cable you have is can be understood by the markings, which, among other information, will include the category of the cable. To connect your home network, use a Category 5 cable (labeled CAT 5 or slightly higher specifications CAT 5e).
We will not discuss the twisted pair cable categories in detail. We’ll just point out that those with lower characteristics will not suit the characteristics, and higher ones are used for other purposes.
The twisted pair marking will contain a designation like xx/xTP , or a shorter version - xTP , where instead of x one of the Latin letters can be indicated: U, S or F.
Preparatory work
The amount of preparatory work will depend on whether the outlet is being installed in a new location, or whether they simply want to replace an old regular outlet with it. Let's consider both options.
Preparations before replacing the outlet
If there is already an outlet at the installation site, it must be removed. This can only be done after disconnecting the outlet from the power supply. After turning off the machine, you need to use the phase indicator to check whether the electric point is really turned off.
Removing the socket
Dismantling the socket is carried out in the following sequence:
- First, remove the front panel by unscrewing the screw holding it in place. Sometimes, to access the fastener, you need to pry off the plastic decorative panel, which is held on by a latch, with a flat screwdriver or knife.
- Having gained access to the inside, unscrew the screws holding the wire strands in the terminals.
Next, all that remains is to unscrew the fastening that holds the base of the socket in the socket box.
Preparations before installing a new outlet
As part of the preparatory work, a wire needs to be laid from the distribution box to the installation site of the new electrical point. To do this, a channel is punched in the wall with a punch - a groove.
When the groove is ready, a wire is laid in it. It is best to place it in a corrugated tube. In this case, if the wire burns out, it can be easily removed and replaced with a new one without breaking the plaster.
Socket outlet
After laying the corrugated pipe with the wire, the groove must be covered with cement-sand mortar.
The wire is connected to the terminals of the junction box after installing the socket.
Now you need to make a recess in the wall in which the new double socket will be placed.
Dismantling
Replacing single types is considered a minor repair.
Now you can easily connect a double type using an outdated socket box. If you change it, there is enough space left for new samples. This will save you from the hassle of installing new wiring, and the interior will not be damaged in any way. It may have to resort to some cosmetic repairs, but this has never been a critical condition for anyone. You can quickly uninstall the old version yourself. Unscrew all fasteners, remove the cover, disconnect the wires and unscrew the fastener tabs. Do the same with the outlet you are going to install.
Installation in plasterboard
Marking and cutting holes for sockets
Installing power points in drywall is both hidden and exposed wiring. The wires are invisible to the eye, as in hidden electrical wiring, but they are not located inside the wall and can be reached, as in open installation. The work requires professional tools and steel wire.
How to make several outlets from one:
- Removing the socket and socket box from the wall.
- Thread the steel wire through the hole in the direction of installing the new power point. This is done in order to make sure that a corrugated pipe with a cable can be installed between the profile and the wall.
- Drilling a place for a new socket box.
- You need to twist the rope to the wire and pull it back out.
- Using a rope, a corrugated pipe is pulled between two sockets.
- Wires are pulled into the corrugation.
The final step is to connect the electrical wires.
There are times when there is no space between the wall and the profile for corrugation. Then you have to unscrew the sheet of drywall, stretch the cables for the new outlet and install everything in place. The joints need to be puttied and a new power point installed.
Recessed socket box
The first rule concerns the socket itself. If you are installing not a final, but a pass-through socket, that is, one on which the cable will not end, but go further down or sideways, to other sockets or switches, always use recessed socket boxes.
The standard one comes with a depth of 45mm, but you need to take 60mm. This is necessary for compact placement of the wires, especially the grounding conductor (why this will be discussed below).
Do not try to cram all the conductors, so to speak, back to back. There will be no benefit from such savings, but only harm.
In addition, the installation itself will be of higher quality, more convenient and will not cause insoluble difficulties. For example, when the socket or its frame does not fit snugly against the wall. Because of this, the wires will have to be shortened. Again, disassemble everything, re-install and dismantle.
Here is a photo of a standard recessed socket in a standard socket box.
The entire space that remains inside it for installing wires is about 1 cm. If you use a model with a depth of 60mm, then you will add as much as 1.5cm of installation depth.
Feel what is called the difference.
Installing a block with two and three keys
Installation of such a block makes it possible to control two light sources in different rooms, or two in one room. In this case, not 4 wires are supplied from the distribution box, but five.
- The phase is connected to the jumper of the switching block.
- Only the neutral wire and the grounding conductor are attached to the socket contacts.
- Then the two remaining conductors are connected to the switch contacts.
- In the distribution box, twists are made of the cores that supply the core and those that go to the lighting fixtures.
Three-key combined devices are the best option for small apartments. They often have a bathtub, a toilet and a kitchen nearby, and the lighting is switched on on one wall. If there are three keys, then you will need a cable with six cores, three of which are also connected to the switch terminals.