According to electrical standards of the last century, the construction of protective grounding in private property was considered optional. The load was light, and the steel pipelines handled the tasks of draining electrical leaks tolerably well. Time is running. Steel and cast iron communications have replaced plastic and composites. The country property was filled with numerous household appliances. Water and heat are supplied using powerful pumps, and heating devices are in operation. It's time to protect yourself personally and the units from the vagaries of useful, but capricious electric current. Let's do the grounding ourselves! The work is not difficult; a skilled owner will not have any problems with the execution.
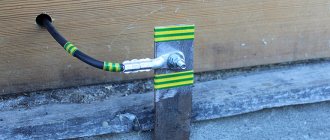
Connecting a power cable to a free-standing bathhouse
So, we have a separate bathhouse and a power cable that either comes from the street from the nearest transformer, or has already powered the house and other buildings. The number of phases (and, accordingly, the voltage) and the methods of grounding the conductors may differ In principle, you always have a choice - 380 volts on three phases or 220 volts on one phase, because 380 goes to the consumer, and on site it is already divided to 220.
Splitting a single zero into “zero working” (N) and “zero” protective" (PE) in the transformer gives a different grounding system, which is designated TN-S . If splitting is carried out directly at the entrance of wires into the building, then this is TN-CS .
Grounding can be done not only on the transformer, but in the bathhouse itself, where a separate solidly grounded circuit will be created for the steam room or only for power units (for example, for an electric furnace).
Natural grounding methods
There are a number of natural ground electrodes that are capable of discharging electricity in case of problems in the network. Devices and objects that may be located on the site next to the bathhouse, performing other tasks:
- cast iron pipes that pass directly into the ground or lie on it;
- metal pipes of wells;
- lanterns, fence posts made of iron;
- metal-braided cables running underground;
- the iron component of the bathhouse foundation, located underground;
- steel water pipe.
It is important that the ground electrodes are not covered with insulation, which prevents the current from entering the ground and dissipating. The ideal option would be to lay the iron structures below the freezing point of the soil - this way the grounding will work perfectly in any season of the year.
Shield
The location of the switchgear is chosen close to the input of the power wire. It must be openly accessible so that the switches are clearly visible. In a bathhouse, the shield must be installed in the vestibule or locker room, closer to the front door or window.
How to choose the right RCD and connect it in the panel
Difautomatic devices open the network when the network is overloaded, so they are installed at the output, after hooking up the load, on each of the electrical wiring lines. The RCD is selected taking into account the load, from 5 to 10 A. To the upper left terminals, they are marked N, they always supply zero, to the right - phase. Bottom right (L) output to automatic.
Grounding
It is convenient to connect the electrical wiring of the bathhouse to natural grounding electrodes located next to the bathhouse:
- vertically dug metal supports;
- lamp posts;
- drainage pipes;
- cast iron bathtubs standing on the ground.
If there is nothing metal nearby, dig in a metal circuit.
Panel diagrams
A common switch is installed in the panel, and the input cable is connected to it. Sometimes they make additional switches for each zone or connect one or two lines to the machine. Jumpers are installed between them. Zero and phase (blue and gray wires) are connected to the upper terminals, and ground to the lower terminals. The machine is selected according to the total load, zonal switches - according to the linear load.
Sockets
If you make an outlet in the bathhouse, like in a house, you will have to change it when the time comes for acceptance. You need to choose fittings with protection category IP 44. The contacts are fastened to a plastic lining. The sleeve of the plastic box is attached to the wall so that there is a gap of 1.5 cm between the socket and the tree. They should not be placed near sources of high humidity.
Grounding calculation
It must be said that accurately calculating the grounding device is quite difficult, almost impossible. Even qualified electricians often use the method of approximate selection of the number of electrodes and the gap between them.
The result of the calculation is influenced by a lot of natural factors. The humidity level changes periodically, it is very difficult to find out the real density and resistance of the soil, etc. In this regard, the resistance of the grounding structure may differ from the calculated value.
There is no need to organize artificial grounding if the resistance of natural protection complies with the PUE standards. If the readings of the control devices are less than 4 ohms, the protective circuit can be installed a little later (if the load on the electrical network increases). Although, on the other hand, it is better to take care of your safety and organize an artificial grounding system in advance.
Despite the imperfection of grounding calculations, they are necessary to:
Grounding details
The grounding system is several electrodes buried in the soil and connected by electrical connection to a grounding bus. When calculating, it is necessary to take into account the characteristics and properties of all components.
For calculations, algorithms and formulas specified in the PUE are used. Some indicators are variable and depend on the decisions of the electrician, while others are unchangeable, such as the approximate value of soil resistance.
Determination of the optimal protective circuit
The shape of the contour can be any: from a geometric figure to a straight line. The choice depends on the parameters of the site where the grounding will be organized.
The easiest way is to make a linear system. But the electrodes will be phonated, which, in turn, will affect the current. This can be avoided by including a correction factor in the grounding formula.
The optimal shape of the protective system is considered to be a triangle. The main thing is that the electrodes have the required length and are located at an equal distance from each other. In this case, the gap between adjacent elements must be different from their length.
Correct selection of electrodes
Vertical electrodes perform the main protective function. The result of grounding is affected by the length and metal content of the rods. The distance between the parts determines the length of the metal connection, and therefore the volume of material for its arrangement.
The resistance of the elements depends on their length. In addition, for work you need to use materials that resist corrosion well.
Choosing a geometric shape for a grounding system
The most common configuration, according to which it is easiest to install a protective ground loop with your own hands, is an equilateral triangle. A triangular outline is formed by three metal rods driven into the ground with a sledgehammer, the distance between a pair of which should be equal. In addition to triangles, grounding systems are constructed in the form of squares, straight or round lines, or other geometric shapes. Maintaining equal distances between grounding conductors is a mandatory condition; clear geometry is desirable, but not essential.
Often, autonomous buildings filled with all kinds of equipment are simply surrounded by a grounding loop. An excellent, effective option if there are funds for this and enough free space on the site. More precisely, you don’t need any special money to independently organize grounding, but the choice of the shape of the circuit is most often dictated by the site planned for the grounding device. However, do not forget that when connecting ground electrodes in parallel in one row, the efficiency of the system will be reduced due to the influence of the electrodes on each other. Closed contours are a priority.
There are three or more grounding electrodes in the protective grounding complex. An operational ground, created to optimize the signal delivered to devices, may have two ground rods. Because soil is a nonlinear conductor; there must be at least two grounding electrodes. So it is necessary that a potential surface is formed in the space between them, facilitating the spread of current. A single rod is not enough for this.
The operating potential of the grounding system is affected by the distance between the vertical electrodes. The more often they are installed, the more effective the grounding. Recommended minimum distance is 1.0m, maximum 2.0m. When the maximum limit is increased between the metal rods, a gap in the potential surface is formed; it will reduce all arrangement efforts to zero.
The distance between the extreme grounding point and the foundation must be more than 1.0 m. The system will work flawlessly at a distance of 4-6m from the house. It makes no sense to arrange grounding further than 10m from the building.
What does grounding consist of?
Grounding is a deliberate connection of a non-current-carrying point of an electrical installation with a ground electrode. The elements of the grounding system include:
- grounding conductors;
- metal strips connecting ground electrodes into one circuit;
- linear connection of the distribution panel with the ground loop.
It is most convenient to choose pieces of a metal circle or corner as a material for grounding conductors. Their length depends on the estimated freezing depth in a given region
, however, is at least 2 m. As an exception, you can take metal pipes with flattened ends. It is not recommended to use reinforcement - the hardened surface of the reinforcement changes the distribution of current in the ground, quickly corrodes and collapses.
Strips for metal bonding should be chosen with a thickness of at least 4 mm. Their length must be sufficient to connect the grounding conductors into a single grounding loop and laying a section of general metal connection to the foundation of the house.
Do-it-yourself protective grounding installation
In general, the quality of protective grounding directly depends on the soil. For example, it is difficult to make good grounding on stones. Here you need to create “reliable contact” with the ground, which in this case is very problematic. But here, too, there are methods and developments that we will not consider. Let's just touch on the usual everyday option.
The most suitable soils for a reliable ground loop are loam, clay and peat. It is much more difficult to establish good grounding on sandstone. An important indicator will be the depth of groundwater. The higher the groundwater, the better the grounding will be. As you know, water is an excellent conductor of electricity, therefore, it plays an important role in this matter.
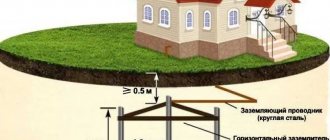
To make a reliable grounding loop for your bathhouse or house, you need to choose a damp, shady place near the building about a meter from the foundation. It is not advisable for people to walk here; you can organize a flower garden with shade-loving plants. After this, a trench is dug in the form of a triangle perimeter, the width of a shovel bayonet. We choose the depth depending on the soil. The drier and rockier the soil, the deeper we dig. But on average you should go at least half a meter deep.
Having prepared the trenches, we move on to the ground electrodes. Iron pipes, angles, channels, metal rods and fittings can be used in their role. Of course, fiberglass reinforcement cannot be used here, since it is an ideal dielectric. A more advanced option is special electrodes made of steel or copper, which are made specifically for these purposes. This video is just a promotional video for this topic.
Having cut the selected or existing material approximately 2 meters long, we hammer the grounding conductors into the ground at the corners of the prepared triangle. Then, using welding or special clamps (dies), we connect the clogged corners or electrodes to each other. It is best to use a metal strip as a connector.
If connections are made by welding, then these places are cleaned of slag and painted over with red lead. Just don’t paint all the metal parts, this will significantly worsen the result. The purpose of this work is to create a large area of contact between metal parts and the ground. The larger the area, the better. This will significantly reduce the electrical resistance. This is what we are trying to achieve.
The next stage is to connect the made grounding loop with a wire (preferably bare) to the grounding bus in the electrical distribution board of the house or bathhouse. It is better to take the wire cross-section 16 mm 2 or more. We connect using bolted connections: for better contact it is advisable to use lugs. If the input shield is metal, we also ground it through a special bolt. This is done without fail.
After the grounding circuit is mounted and connected to the assembly, you can cover it a little with earth, sprinkle it with ordinary table salt, pour water on it and compact it well. Salt and water will create the least electrical resistance between the ground and the circuit. Then the entire trench is filled with the remaining earth and leveled.
At this point, the installation of protective grounding can be considered complete. If everything is done correctly, then when taking measurements, the circuit resistance should not exceed 4 ohms. But, as a rule, no one ever does this. There are companies that deal with electrical measurements, but the prices for these are . So the best option is to do the entire protective grounding device yourself and correctly, observing the points described above.
Wisdom Quote: Real life happens where it is not visible.
Algorithm for constructing a triangular circuit
Work order:
- On the site selected for the installation of the grounding system, we mark the points for laying vertical conductors. These are the vertices of a triangle with sides approximately 1.2-1.4 m.
- We outlined the outline of the future trench. It will be triangular with a “branch” for connecting grounding to the entry point into the house or into the external panel. Choosing the minimum distance from the contour to the shield will ensure savings in materials. The width of the trench is arbitrary, but takes into account the need for welding work in it. The depth depends on local conditions. You need to add 20 cm to the installation level of the horizontal conductor recommended by electricians. For example, if the depth of the horizontal metal connection is 0.8 m, the trench needs to be deepened by 1.0 m.
- We drive pre-sharpened rods into their installation points, periodically moistening the soil around the driving point with water. The vertical ground electrode should be almost completely immersed in the ground except for the extreme 20 cm.
- We weld a horizontal connecting bar to the sections of electrodes protruding from the ground.
- From the point closest to the grounded structure, we lead the plank along the section of the trench dug to the power cabinet. We put it on the wall.
- We weld a steel bolt with the threads facing outward at a convenient point for connecting the strip connected to the cabinet. Those. The head of the bolt will be welded to the bar, from which you need to remove rust and galvanization, if any. To connect the grounding to the shield located inside the house, you will need to drill a hole in the wall through which the grounding cable will be routed.
- We attach a grounding wire to the welded bolt and secure it with a nut.
- Then we thickly treat the welds of the underground joints with bitumen, and fill the external joints with automotive silicone sealant.
- We call an electrician with an ohmmeter and check the operation of the created grounding system. The test is carried out in dry weather so that atmospheric moisture does not alter the readings. According to standards, the circuit resistance should not exceed 4 ohms. If the device confirms that the resistance is exceeded, the grounding will have to be modified: install an additional vertical ground electrode and turn the triangle into a rhombus.
- If the instrument readings satisfy the requirements of PUE-7 and confirm the formation of a circuit with a sufficiently low resistance, we bury a trench and connect the equipment to grounding not in parallel, but separately for each technical unit.
All. The grounding construction process can be considered complete.
A home handyman who knows how to properly make and correctly connect grounding will spend no more than 2–3 days on the work.
The main tasks of grounding in a bathhouse
The main task of grounding is to drain electric current, which could find a loophole in the protective insulation. It rushes upward to the metal cases and fastening elements of washing machines, electric heating devices, etc. Such equipment should not conduct current, in principle. However, it is attracted to iron surfaces, which is felt in the form of pinching, tingling, and in particularly serious cases, even more sensitive blows.
The organization of the grounding loop is intended for:
How to make grounding in a bathhouse
It is quite possible to make a grounding loop yourself if you follow all the tips. At every stage of work, accuracy and attentiveness are important.
Preparatory work
Work with the ground includes the following actions:
- Step back 1.5 meters from the foundation (more is possible), mark the place for the trench.
- Dig a trench to a selected, pre-calculated depth (if the ground on one side is wetter, the depth is reduced by 0.5 m). The width is usually 0.5 meters.
- From the corner of the bathhouse foundation, which is closest to the trench, dig a ditch of small width with the depth of the trench itself.
Ground rods
How to correctly arrange the ground rods? Usually they are driven in, depending on the selected geometry, at a distance of 1 meter from each other. Hammer by hand with a sledgehammer after sharpening the end. For convenience, a horizontal “platform” is welded to the second end.
Ground loop
The quality of the completed circuit will completely determine the operation of the grounding in the future. You can make the connection yourself if you have experience in welding. Otherwise, it is worth inviting a specialist with the necessary equipment.
Procedure:
- Horizontal conductors are welded to vertical ones, creating a single circuit.
- Check the quality of welds.
- Part of the horizontal conductor is laid to the corner of the building, bent, and released outside.
- A bolt is welded to the extended end, which is necessary for connection to the shield.
It is forbidden to replace welding with rubber connectors - such a circuit will not be reliable. The bathhouse will not be protected from short circuits and other troubles.
Checking the operation of the circuit
There is a simple way to check the operation of the system. You should take a light bulb with a carrier, connect it to the phase at one end, and to the bolt on the circuit at the other. After applying voltage, the lamp should burn brightly, which means the circuit is reliable. Dim burning is a sign that the joints need to be overcooked. If the test is successful, the contours are covered with soil after coating with anti-corrosion solutions.
Connection of the circuit and the distribution panel
The circuit should be connected to the distribution panel. Single-core copper wiring of 0.4 square meters is suitable. cm. One end is connected to a welded bolt, the other to a grounding bus in the shield. It is advisable to invite an electrician - this is the most important job. Only a specialist can adjust the operation of the grounding system.
It is important to protect the system from snow and rain. To do this, cover the area with the welded bolt with a “visor” or perform protection in another convenient way
Proper execution of work guarantees the safety of people and all available equipment.
Advice from professionals
We recommend paying attention to the following points:
- A common mistake is installing a non-built-in regulator for the electric heater in the steam room. This can be corrected by installing a limiter that will automatically disconnect the equipment from the network when it reaches 140 degrees.
- In the steam room and shower there should not be any connections consisting of several pieces of cables twisted together. Any violation in the insulation is a risk of a sudden short circuit in the wiring and fire.
- To save money, owners often lay the cable directly above the stove. This is prohibited by fire safety regulations. No matter how heat-resistant the cable turns out to be, there is always a risk of deformation and fire if there is constant exposure to high temperatures.
- When there are many machines, it is unsafe. Many masters assure owners that the more machines installed in the bathhouse for each equipment, the lower the risk of network overload. But practice shows the opposite. The slightest poor-quality connection will cause a short circuit - it is enough to secure one circuit breaker at the input, which will turn off the power if the permissible load is exceeded.
Laying an electrical cable is a critical stage in the construction of a bathhouse. An attempt to undertake installation without knowledge and experience threatens with dire consequences, including a fire. There is no need to skimp on material here. For advice and permission, it is better to immediately contact the responsible service. You should entrust the installation work to electricians or do it yourself, but under their guidance.
Why is grounding needed?
The main purpose of the grounding loop in a bathhouse or sauna is to drain the current that has penetrated through damaged protective insulation. In the event of a short circuit, 220 V electricity is attracted to devices made of iron - the equipment can be damaged and cause serious injury to a person.
If there is a ground electrode in the bathhouse, this will help achieve the following goals:
- the equipment will remain operational;
- the person will be protected from injury;
- The power grid will begin to operate without interference or power surges.
Typically, grounding in a bathhouse is done in the presence of electrical appliances, an electrically heated oven, and a boiler. After installation, the ground electrode will drain leakage current into the ground, since electricity always follows the path of least resistance.
Electric sauna stove: installation instructions
Installation of an electric oven is simple; instructions from the device manufacturer are always supplied with the purchased product. The specifics of the installation lie in the conditions in which the electrical appliance will operate. The temperature and humidity in the sauna create a risk of electric shock, so many factors must be taken into account when connecting the stove.
Choosing an electric stove for a bath
When purchasing an electric sauna stove, pay attention to the following points:
The power of the product is determined from the condition: 1 kW of furnace - per 1 m 3 of steam room. If there are poorly insulated areas (glass doors, windows, tiles), the power of the device must be increased. Each square meter of such areas increases the volume of the steam room for calculations by 1.5 m 3
Therefore, it is important to insulate the room well, first of all, the ceiling.
Wiring requirements for an electric furnace in a bathhouse
Electric sauna stoves 220 V with a power of up to 4.5 kW operate on single-phase current. High power devices use three-phase current. You can connect several heating elements in parallel to the network, but this increases the current threefold. Therefore, in this case, select the correct cross-section of electrical wires designed for the power of the furnace.
For a single-phase network, use a three-core cable, for a three-phase network, use a five-core cable.
Rules for placing an electric furnace for a bath
It is recommended to install an electric stove in the corner closest to the front door. Manufacturers produce corner electric stoves for Russian baths; some models can be hung on the wall. Modern products can be installed in the middle of a steam room if all requirements for the safe operation of the device are met.
- The gaps specified in the technical documentation of the device must remain between the hot surfaces of the stove and the walls of the bath. Typically the gaps are 50 cm.
Features of installing electric furnace elements in a bathhouse
Installation of the furnace body in the bathhouse
The housing contains heating elements and their connection points. There are models in which space is allocated for stones, a water tank or a steam generator.
Installation of a control panel for an electric furnace in a bathhouse
Using the remote control you can set the temperature and various effects. Sensors allow you to see changes in heating. In modern electric sauna stoves, the control panel of the device is often built into the stove body, and the device is configured directly from the steam room. A remote control is also supplied with the device and performs duplicate functions. When installing the remote control, adhere to the following recommendations:
Due to the high temperature and humidity in the steam room, install the remote control on the wall in a room that is maintained at room temperature.
Temperature and humidity sensors for an electric furnace in a bathhouse
The sensors are connected using special heat-resistant cables. Sensor wires must be solid; multiple cables connected to each other cannot be used for extension. They are installed in the places specified in the oven operating instructions. Typically, sensors are installed above the stove, shelves or above the exit from the steam room.
Grounding an electric furnace in a bathhouse
The room must have its own grounding circuit to which the stove is connected. The circuit is buried in the ground at the construction stage of the bathhouse. The grounding cable from the furnace to the circuit is pulled through cable channels. If there is no circuit, connect the oven grounding cable to the neutral terminal on the electrical panel.
This concludes the list of basic rules for installing an electrical device in a bathhouse. By completing them, you will be able to install an electric sauna stove with your own hands and get a safe, easy-to-use unit.
Do you need individual grounding for a bathhouse?
All news
23.03.16
Dear friends!
Each owner of his own land plot, when developing it, is faced with the issue of electrical safety in his outbuildings. Protection is necessary not only in a private home, but also in other buildings where electrical equipment is used: bathhouses, sheds, etc. Most of these extensions appear much later than the residential building itself. As a result, we are faced with a number of questions. How to ground an object if the house itself is already grounded? Is it necessary to create a separate circuit for additional structures?
Let's look at the answers using the example of the house of one of our readers.
Question: I have a country house with three phases connected to it. A bathhouse (log house) is being built 40 meters from it, in which it is planned to use two instantaneous water heaters of 7 kW each. Consumption in the house is up to 8 kW. The shield in the house is not grounded. Where should I do the grounding and which kit should I choose? Do I need to purchase a separate set for a bath?
Answer: For a country house, the ZANDZ ZZ-6 kit is used. The distance to the bathhouse is quite large, so you need to install a pin near the panel of the house and near the bathhouse, or lay copper-plated wire with a cross-section of 10 mm from the house to the bathhouse at a depth of 0.5. Grounding works effectively when located near the facility's electrical panel.
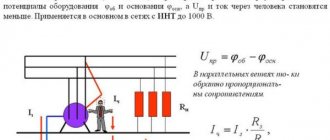
For electrical safety, you will need grounding for the bathhouse. If you install the pin only near the switchboard of the house, then if the wiring or device in the bathhouse malfunctions, and vice versa, being near the pin will be dangerous. Since a distance of 40 meters is enough for the touch voltage to become a dangerous value.
The lower the ground resistance, the lower the touch voltage
Contact our technical specialists with any questions, they are all ready to help! Send questions to our email. address, as well as in our groups on social media. networks:
See also:
- Lightning protection of a private house
- Grounding a gas boiler
- Grounding calculation
Do you want to receive selected news about lightning protection and grounding once every 3-4 weeks? Register and automatically receive an email newsletter with a selection.
All news is published in our groups in instant messengers and on social networks. [News channel on Telegram]
See also:
Copper plating of ground pins: is 100 microns thick enough?
Lightning protection of the college of culture in the Komi Republic
New inspection control well for ZANDZ grounding
Lightning protection of a field camp
Installation sequence
First of all, all work must be carried out taking into account the specifics of the given premises. Moreover, this will completely affect not only the principle of wiring placement, but also the material used. It must be remembered that in the bathhouse there is always high humidity, and in some rooms there is also high temperature.
Rough design for placement of all instruments and wiring
Project
- When installing electrical wiring in a bathhouse with your own hands, you definitely need to create a project.
- It is a plan for the placement of rooms in a building, on which the location of all devices is noted.
- It should also show the principle of laying wires (see also the article Features of brick bathhouse projects).
When using a large number of electrical appliances, it makes sense to power each of them through its own circuit breaker
- Next you need to make a diagram of the entire electrical circuit. In this case, lighting fixtures, junction boxes and switches are indicated.
- It should be noted that its manufacture may require certain skills and education. The slightest error in calculations can lead to a short circuit and even a fire.
- It is worth noting that installing electrical wiring in a bathhouse is a rather responsible process, which means that the finished project and diagram should be shown to a specialist to make amendments and correct errors.
- Some experts advise using systems for lighting the steam room that will operate on direct current with lower voltage. To implement such an idea on a project, you need to indicate the location of transformers and rectifier bridges (see also the article Steam room in a Russian bath: device features).
- Taking into account these features of creating diagrams and drawings, they need to display power consumption and network voltage. This will also make it easier to purchase all the necessary equipment.
Advice! Professional electricians do not recommend using ready-made designs if they were not intended for the selected room. In this case, an individual approach is important.
Selection of materials
- After the project is ready, it is necessary to calculate the required number of wires, lamp sockets, protective shades, sockets and other necessary elements.
- Only after the list has been compiled, the installation instructions advise you to go shopping.
- For the entire lighting system, aluminum wire with a cross section of 2 x 2.5 is usually chosen. However, professional electricians advise using three-core copper material with a smaller cross-section. This is due to the fact that the third wire will be used for grounding.
Sockets with moisture protection
- Many manuals that tell you how to conduct electricity from a house to a bathhouse recommend using a regular two-core cable for input. In this case, its cross-section is selected in accordance with the power consumption. However, if an electric heater is installed in the steam room or there is a boiler in the bathhouse, then two phases should be input, which means that the cable must be led from the distribution panel of the house and it must have at least three cores.
- All devices that will be installed indoors must be protected from moisture and overheating. They are usually made of a special material with full or partial sealing.
Protection of lamps in the steam room
- The same rule applies to the choice of input panel. However, it must have a sufficient number of strips so that the necessary machines and switches can be positioned.
- Special attention should be paid to insulation and protective corrugation. They must withstand high temperatures well and be able to withstand moisture.
- It is worth noting that the price of such materials is quite high, but their degree of protection justifies the high costs.
Advice! To protect incandescent lamps, it is worth using special lampshades that are adapted to work in such conditions. Otherwise, they will often burn out.
The simplest wiring option in a bathhouse using a junction box
The task and device of protective grounding
The purpose of grounding is to drain electric current that has found a loophole in the insulation to reach the surface. This surface includes metal cases and fasteners for washing machines, computers, microwave ovens, and electric heating equipment. According to their functional responsibilities, they should not conduct current, but they are always ready to provide their metal “barrel” for leaks and short-circuit current. This warm welcome is often felt by the owners of leaky or overly loaded equipment in the form of light blows, pinches and tingling sensations.
Breakdowns in the housing of household units rarely cause serious concern. Well, it shook me a little: it kind of cheered me up. However, the apparent absence of serious risks is not a reason to relax. Stray currents that escape contribute to headaches, discomfort and an unreasonable feeling of anxiety. In addition, ungrounded equipment is noisy and interferes, reducing the speed and quality of signal reception, processing and transmission. Such troubles will not immediately disable the equipment, but will significantly help reduce its working life.
This means that a grounding circuit is necessary:
- to protect owners from electromagnetic radiation, negative mood and ailments;
- to eliminate interference in the electrical network;
- to maintain equipment performance.
Protective grounding will eliminate these misfortunes by providing the current with the most attractive paths to exit. The principle of movement of electricity is very similar to water. It flows to where there are no obstacles, where there is less resistance and where it is easier for it to pass. Those. in order to prevent people and equipment from being harmed, it is simply necessary to lay an unobstructed path “to the left” for the electric current, in the case of grounding, by definition, into the ground.
The resistance of the path being constructed must be less than that of a person and the equipment connected to the protective grounding. Then most of the electricity that has broken through will flow along the intended path with the least barriers, go outside the building and dissipate in the ground. And the owner and equipment will receive only the regulatory minimum.
The grounding system is a closed or linear circuit, which includes:
- two or more metal grounding rods, strictly vertically immersed in the ground;
- a horizontal grounding conductor that connects the electrode rods into a common circuit;
- a bus that provides entry into the house and grounding connection to the protected units.
An autonomous building may have several grounding systems, but one of them must be connected to the main grounding bus or to the main element of the electrical wiring - to the distribution panel with the formation of a metal connection between the panel and the grounding conductor connected to it.
Is grounding necessary in a bathhouse?
Many cottage owners are planning to equip bathhouses so that on cold winter days they can relax in the bathhouse after a hard day of work.
But before you set up a bathhouse or sauna with your own hands or how to ground a bathhouse, the sauna needs to be prepared for this. We suggest that you familiarize yourself with the requirements for grounding the bathhouse. If many questions do not arise regarding the power supply of the bathhouse, then on the topic of whether it is necessary to ground the bathhouse, how to ground the bathhouse, the requirements for grounding the bathhouse, opinions differ.
Let's try to understand these issues together.
- The bathhouse supplier is liable for warranty obligations for the electrical equipment of the bathhouse only when installing and connecting the equipment by enterprises that have a license for electrical installation work.
This means you need to order turnkey grounding or look for a company with a license.
It is recommended to install the electrical equipment of the bathhouse (electrical control panel, pump, electric heater, isolation transformer, etc.) in a separate room in order to ensure electrical safety, as well as the reliability and durability of its operation.
It is allowed to place electrical equipment under a canopy or in a room with a bathhouse, but the distance from the electrical equipment to the bathhouse must be at least 3.5 m.
Electrical wiring must be connected to the location of the bathhouse electrical equipment (in an open or hidden way) in accordance with the PUE (electrical installation rules), and a grounding loop must be installed. When using natural or artificial grounding conductors for grounding purposes, it must be ensured that the resistance of the grounding device is measured by a specialized laboratory with the provision of an appropriate protocol. The resistance of the grounding device must correspond to the PUE and be less than 4 ohms.
It is necessary to measure the grounding loop of the bath not only for the protocol, but also for personal safety.
If there is a high-quality external electrical network in accordance with the PUE (re-grounding of the neutral wire along the length of the overhead line and at the entrance to the building), a simpler version of the grounding circuit can be implemented - this is the use of a specially laid neutral protective conductor from the input panel (together with the phase and neutral working conductor), which is the 3rd (in single-phase) or 5th core of the cable (in three-phase networks). The neutral protective conductor should not have soldered or contact connections, and also pass through switching devices, i.e. it must be intact from the beginning (in the input panel) to the end (to the electrical control panel).
How to connect a sauna to electricity from the house?
The bathhouse is built separately from the house and is connected to the switchboard with a separate cable, through its own machine and RCD. Most often, the power cable is laid underground, which has some advantages over creating an overhead line.
- Advantage number one is that this type of installation ensures the safety of the cable and prevents its breakage in gusty or heavy winds.
- Advantage number two is that the cable’s invisibility does not spoil the external aesthetic appearance of the surrounding landscape. The distribution board is most often installed at the entrance to the room, from the outside, but installation inside the room is also possible. Electrical sockets and lighting fixtures are connected to this panel.
If the plans include the installation of additional electrical equipment - an electric stove (although who would install an electric stove in a frame version or a log house?), a steam generator, electric heating, then the total power must correspond not only to the wiring in the bathhouse and steam room, but also to the main power cable itself.
Connecting electricity via overhead line
A free-standing bathhouse can be connected with a SIP cable or aluminum wires without insulation, which are stretched between two buildings. It is better to choose a SIP cable so as not to pull it over a section of wire without insulation. The SIP system has its own system of fastening to facades and a load-bearing steel core, which makes it possible to tension the cable.
If the footage from the line connection point is more than 25 meters, an intermediate pole must be installed. The SIP cable has aluminum wires and cannot be inserted into a wooden bathhouse. To enter the bathhouse, a power circuit breaker or switch is installed on the facade, after which a cable with copper wires is connected and introduced into the room using a metal sleeve.
Underground electrical cable installation
This method of connecting a bathhouse will require a significant amount of excavation work when digging a trench with a depth of 0.8 to 1.2 meters, from the connection point to the bathhouse. The cable for underground installation can be laid directly into the ground or a plastic sleeve from the pipe can be used to better protect the cable from damage.
For these purposes, it is better to use products with insulation made from XLPE grade cross-linked polyethylene, which has a guarantee of about 25 years. The cable can be connected to two panels from below, through the foundation along the internal wall and laid in a metal pipe. This type of connection is intended to protect the cable from possible mechanical damage and comply with the requirements of the Electrical Installation Regulations.
Installation of distribution panel
The dimensions of the internal shield are determined by the number of used circuit breakers and RCDs that will be installed. The shield is placed at a height of 1.5 to 2 m from the floor near the entrance to the bathhouse in order to turn it on upon entering.
At the input, an RCD must be installed for all electrical wiring and an input circuit breaker, which must have a lower operating current than the circuit breaker in the house that protects the outgoing line. If a 25 A automatic circuit breaker is installed in the house, a 20 A automatic circuit breaker can be installed in the bathhouse at the input. The RCD at the input protects all the electrical wiring of the bathhouse and is designed to protect the bathhouse from fire and protect people from possible electric shock if it leaks.
Requirements and GOSTs for wiring in a bathhouse
How to conduct wiring in a bathhouse according to GOST:
- The electrical panel is installed indoors, not outdoors. If the room is not dry enough, it must be completely waterproofed. According to GOST requirements, pipelines of any purpose should not be located near the switchboard.
- The wires that lead inside the steam room must be heat-resistant (PRKS, RKGM). The cable for the steam room must have an insulating layer of silicone rubber.
- Metal hoses and corrugations are permissible in dressing rooms and auxiliary rooms, but they are prohibited in the steam room and washing room.
- The only electrical appliances that can be installed inside the steam room are lighting ones.
- If the bathhouse has an electric stove, then the electrics are supplemented with wires for power plants.
- In St. 7.1.82 PUE states that the rated operating current of the RCD in the bathhouse should not be higher than 30 mA for lines supplying sockets.
Taking into account these rules and regulations, the wiring in the bathhouse is carried out correctly and lasts a long time.
Be sure to use ouzo in the shield. Prevent the penetration of elevated temperatures into the electrical panel.
Cables must have a third grounding conductor, both for sockets and lighting.
Only install special heat-resistant lamps and wires in the steam room.
To install wiring in a bathhouse in accordance with all the rules and GOSTs, it is better to invite a professional electrician with extensive experience and not risk your property and health.
Selection of wires, switches, lamps
For the completed wiring diagram in the bathhouse, all its components are selected: wires, sockets, switches and lamps. The cable brand is selected in accordance with the conditions in each of the bathhouse rooms (high temperature and humidity).
Depending on the material of the current-carrying conductor, the wiring in the bathhouse can be copper or aluminum, but due to the much better mechanical and electrical parameters, the choice should be made in favor of copper wires. The main parameter for any cable brand is the wire cross-section. The cross-sectional area is selected based on the load connected to the corresponding section of the wiring.
For the steam room
The requirements of GOST R 50571.12-96 establish the following division of the steam room into zones:
Rice. 2: division of steam rooms into zones
Look at the picture, all zones are built in accordance with the location of the stove, be it electric or solid fuel. In relation to laying wiring cables and installing other equipment, these areas have the following requirements:
- The first is intended exclusively for the stove, if it is an electric heater, then the wiring for connecting it;
- The second is considered the most loyal in terms of wiring requirements; no standards are provided for it;
- For the third zone, there are requirements for equipment that must normally withstand temperatures of 125°C or more, and wiring of 170°C or more;
- Only lamps, sensors and regulators can be installed in the fourth zone, but their wiring is selected as for the previous bath zone.
For internal electrical wiring in the steam room, heat-resistant cables should be used, for example, flexible copper RKGM, PVKV, PRKS or PMTK.
Lamps in the steam room must have a metal body to which grounding is connected, a sealed glass shade with a degree of protection of at least IP24. You should not choose models with a plastic body or parts to connect lamps, as they can melt and deform, causing moisture to penetrate inside.
Dressing room, locker room, rest room
In other functional areas of the bathhouse, the use of VVGng power non-flammable cables is allowed.
When choosing circuit breakers for protection against power surges in the network, first of all it is worth determining their operating power. The main machine must have maximum power; for auxiliary devices this figure is significantly reduced.
To set the limit value of the machine for disconnecting from the network, the current strength in the circuit and in its specific section is taken into account. For example, if the current strength in a section of the circuit is 18A, then the maximum permissible threshold of the main circuit breaker is 20A.
No less important for the protection of electrical appliances is a residual current device (RCD). According to the PUE, the RCD response threshold should be from 25 to 30 mA.
Components of the ground loop
Any grounding of a separate building must include horizontal and vertical components. There are ready-made devices on sale that make it very easy to install grounding with your own hands. You don’t have to look for materials to arrange the circuit, but such devices are not cheap.
Vertical grounding conductors
If you decide to use non-grounding elements, any products made of ferrous metals without galvanization or paint are suitable for vertical rods.
It is difficult to drive reinforcement with ribs into the ground; it is much easier to work with a channel or strip. The smooth surface of rolled metal is the key to easy, successful driving into the ground. When the house and bathhouse are located in a rocky area, you will have to call in well drilling specialists. Rods are installed in the wells, and the hole is filled with sand and soil.
The lower edge of the rod should be sharpened using a grinder. The soil must be moistened with water before work. The size of the rod is about 3 cm (diameter), the wall thickness is from 3 to 5 mm, the length depends on the freezing point in a particular area. You also need to take into account the location of the groundwater. Usually 2-3 meter rods are enough, and the ground loop will work fully.
How to save on materials
The cross-section of metal parts does not affect the quality of the grounding loop, so it is better to purchase materials with the smallest area permissible according to the PUE:
- Diameter of black steel rods: for vertical grounding conductors – 16 mm, for horizontal ones – 10 mm, for pipe ones – 32 mm;
- Cross-section of galvanized steel rods: for vertical elements - 12 mm, for horizontal - 10 mm, for pipe elements - 25 mm.
For underground metal connections, it is better to use a 6 mm rod or a 4 mm thick strip. Horizontal elements will be welded to vertical ones, which means that 20 cm should be added to the estimated length of the conductors.
Well, of course, when working with electricity in a bathhouse, you need to remember safety rules and comply with all requirements for calculating the grounding loop.