Wall-mounted sockets are more popular than overhead sockets. Their undeniable advantage is their compactness and the absence of surfaces for collecting dust. They are reliable in terms of resistance to mechanical stress. Their most important advantage is the hidden wiring, which eliminates the creation of obstacles when finishing the interior. To get all these benefits, you must first figure out how to install a socket in the wall . You can do this yourself, even if you have to install a socket box and lay wires. Connecting sockets is much easier than installing light switches.
Connecting the socket in the installation box
Briefly about the types of built-in sockets
The technical parameters of the outlet must fully comply with the requirements of the connected consumer. You need to look at the power of the devices that will be powered by it. The maximum permissible current in Amperes is indicated on the housing of the sockets and in their instructions. The power of the connected electrical equipment is measured in kW. These values can be compared using the table.
Table 1. Correlation of socket power to consumer parameters and required wiring cross-section.
| Outlet current A | Consumer power kW | Wire cross-section mm2 | |
| Aluminum | Copper | ||
| 6 | 1.3 | 2.5 | 1 |
| 10 | 2.2 | 2.5 | 1.5 |
| 16 | 3.5 | 2.5 | 1.5 |
| 32 | 7 | 10 | 6 |
All built-in sockets that may be needed for installation in an apartment or private house can be divided into 3 groups:
- ordinary;
- waterproof;
- power.
Conventional sockets are used to power the vast majority of electrical appliances. You can connect a mobile phone charger, computer, router, hair dryer, refrigerator, microwave oven, etc. to them.
Regular socket
Waterproof sockets are used for installation in wet areas, usually in bathrooms. They can be distinguished from ordinary ones by the presence of a lid covering the socket for connecting the plug. It provides splash protection. Such an outlet will be required if the installation is carried out in close proximity to a sink, shower or bathtub. For this purpose, devices with protection class IP44 and higher . This will reduce the likelihood of electric shock even in the event of flooding, which is accompanied by water leaks along the walls. If the installation is carried out in a large bathroom of a private house far from water sources, then you can get by with a regular outlet.
Waterproof socket in the bathroom
Prices for waterproof sockets
Waterproof socket
Power sockets used in houses and apartments usually have the same plug standard, but have a higher power rating. Their indicator for this parameter is 32A and above . They are used to connect devices with high electricity consumption. First of all, this is an electric stove, electric oven, air conditioner, fireplace or boiler. Sometimes power outlets may have a triple socket. Their choice depends solely on the plug with which the electrical appliance is equipped.
Power socket
Prices for power sockets
Power socket
Installing an outdoor (external) outlet
These types of sockets are very popular in wooden private houses and country houses. To install such an outlet, you do not need a socket box. The socket is attached to the wall using self-tapping screws.
As for the electrical cable, it is laid in cable ducts or simply along the wall with fixation using special plastic brackets.
An example of cable channel installation is presented below:
In the photo above the cable channel is open
An example of self-tapping screws for attaching a cable channel
For example, consider the process of installing and connecting a double outdoor socket:
Step 1.
Remove the front panel of the socket.
Step 2.
We fix the socket to the wall using self-tapping screws and connect the power cable:
Step 3.
In the front panel of the socket you need to make a small cutout for the cable, as shown in the photo below. To do this, it is convenient to use metal scissors:
Step 4.
We install the panel in place and close the cable channel.
Precautionary measures
Since there is a possibility of electric shock when performing work, it is necessary to turn off the power to the apartment or house during electrical installation. This can be done using switches in the electrical panel. If the room has old-type wiring, you can turn off the power supply by unscrewing the plugs on the meter. Work on installing a socket box, when contact with live wires is excluded, is carried out without turning off the power, to allow the use of auxiliary power tools.
Attention! Before proceeding directly with electrical installation, you should make sure that the wires are actually de-energized. The check is carried out with an indicator screwdriver or tester.
Checking for voltage
Prices for voltage measuring instruments
Voltmeter
Determine phase, neutral and grounding
For a person who does not understand electricity, it is difficult to understand which of the three wires needs to be connected to the outlet,
and attaching contacts at random is fraught with unpleasant consequences.
However, in reality this is a fairly simple task
that we will help you solve.
First of all, it wouldn’t hurt to tell the theory briefly and simply. Our entire electrical wiring system, which powers apartments and residential buildings, is three-phase.
Typically the voltage between two phases is 380 volts and this is line voltage. But our sockets still have 220 volts, why? For this you need a neutral wire. Taking one phase with a neutral wire, between the phases there will be a potential difference of 220 volts, which is the phase voltage.
To put it very simply, each apartment has one zero and one phase.
Determining the phase with an indicator screwdriver
This method is only appropriate if you have only two wires for the outlet.
1.
First, you need to de-energize your apartment (house) by turning off the circuit breakers in the switchboard.
2.
We separate the wires, stripped of insulation, from each other so that they do not touch, which will help prevent short circuits.
3.
Now we turn the circuit breakers back on, thereby supplying current to our wiring.
4.
Now we directly determine the phase wire. Taking the indicator screwdriver by the small metal part of the handle, we touch the wire with the working (also metal) part.
If the light in the screwdriver comes on, it means that this is a phase wire,
and if the light does not light, then this wire is neutral.
Determining phase with a multimeter
However, with three wires available for the socket, only an indicator screwdriver is not suitable. For this you need a multimeter,
with which we can determine where the ground, zero and phase are.
We have already found out where the phase wire is using an indicator screwdriver. But the phase can be determined without an indicator screwdriver using a multimeter. To do this, you need to select measurements in the range of 220 volts and higher
and connect two probes to the
“V” and “COM” sockets.
We take the probe connected to the “V” socket,
and apply it alternately to the three existing wires.
When you touch a phase, the device will show 8-15 volts,
and when you touch zero or ground, the multimeter
will not respond at all.
1.
We take a multimeter and switch it to the voltage measurement range of 220 volts or higher.
2.
With one multimeter probe we clamp the phase (and we already know where exactly this wire is), and with the other one of the remaining two wires.
3.
We observe and remember the value that our multimeter is currently showing.
4.
Now, leaving one probe on the phase, with the other we clamp the third wire and also record the value that the measuring device showed.
If we touch zero and phase at the same time, then the multimeter shows the mains voltage of 220 volts
(a small run-up is acceptable).
And if we touch ground and phase, then the value should be less than
the previous one.
Socket height standards
Initially, you need to decide where exactly and at what height the outlet will be installed. There are so-called European and Soviet standards. According to the first, installation is carried out at a height of 30 cm from the floor. The Soviet standard provides for a level of 90 cm .
Eurostandard
You don't always need to be tied to the requirements, as there are cases where this option is not suitable. First of all, the need to install a socket at a different height arises in the bedroom, in particular when installed above a bedside table. It is placed in such a way that you can reach it while lying down, for example, to charge a mobile phone. It is convenient for the socket to be at a height of 65-70 cm .
Installation option above the bedside table
The location of outlets in the kitchen deserves special attention. Downward installation is excluded since they will be covered by furniture. They are mounted in any order, usually trying to be placed immediately above the countertop or under the bottom of the upper cabinets. In the latter case, they are invisible at a glance, but are always accessible.
Placement above the kitchen countertop
Marking
Mark the center of the axis on the wall where the wires will be laid and holes for sockets will be placed. To do this work we use a pencil and a tape measure.
If in the future you need to install adjacent sockets or an entire block of devices, you must maintain a certain distance between the mechanisms. The recommended gap is 7.1 centimeters (average center-to-center distance of socket boxes).
In the center we draw 2 axes: vertical and horizontal. The lines should be long enough - this will allow the socket box to be installed as evenly as possible.
Selecting a Receptacle-Compatible Mounting Box
Built-in sockets are fixed in a special installation box, the so-called socket box. It is a thin-walled cylinder that is walled into the wall. In the future, the socket is attached to it, and not to loose masonry material or concrete, which would be unreliable.
Advice! It is better to buy the installation box at the same time as the socket, which will ensure their full compatibility.
Sockets from individual manufacturers provide different methods of attachment to the socket box. First of all, this concerns the location of the screws. They can be located along a vertical or horizontal axis. Some devices have 4 mounts at once. The diameter of the installation boxes is 65-67 mm . Depth 45 mm . They can be made of polyamide, polypropylene and other materials.
Regular socket box
Attention should be paid to the selection of the installation box for the socket block. The fact is that almost every manufacturer produces its products to different width standards. That is, the distance between the sockets, including the overhead panels, differs so much that it will not always be possible to install it in an installation box of another brand.
Attention! If fastening is required in ordinary walls, classic cylindrical socket boxes are used. For installation in plasterboard, special installation boxes are produced with special screws and ears for attaching to the sheet.
Socket box for drywall
How to replace a socket with a new one
So, how to replace the socket yourself?
First of all, you should pay special attention to the mounting of the socket in the wall. After all, it often happens that it simply falls out of its seat. And this is fraught with a short circuit in the electrical circuit, which can even lead to a fire.
Let's look at the steps of replacing an electrical outlet step by step.
Before starting work on replacing the socket, it is imperative to disconnect the electrical network that powers it. In multi-storey buildings (usually on landings) panels with packet switches (packet switches) are installed, interrupting the supply of electricity to apartments. Find the bag that matches your apartment in its upper compartment and move it to the upper “Off” position.
You can, of course, de-energize only the room in which the outlet is to be replaced, and not the entire apartment, by turning off the machine responsible for the corresponding line. But to do this you need to know where it is exactly. Otherwise, the most reliable option would be to cut off power to the entire apartment.
It is clear that if you turn off the power supply to the apartment, you will also lose lighting. Therefore, if you have to change the socket in conditions when it is twilight or already dark outside, you should stock up on an alternative light source, for example, a flashlight, in advance.
You should think in advance about how to replace the socket if necessary. Since for this you, of course, will need a new socket (and, possibly, a socket box), as well as a simple plumbing tool (straight and Phillips screwdrivers, wire cutters or pliers) and a phase indicator. By the way, this simple and inexpensive electrical measuring device in the form of a test screwdriver is needed in everyday life quite often and therefore it’s a good idea to have it in the house.
Dismantling an old outlet begins with removing its panel. To do this, unscrew the central bolt in it, using a Phillips or straight screwdriver, depending on the type of its head.
To make sure that the line is truly de-energized, use the indicator to check the contacts of the socket. A phase wire is connected to one of them, and a neutral wire to the other. If the socket is energized, then when the probe touches the phase wire, its light should light up.
If there is no such indicator light when you touch both contacts of the socket, it means that the line is de-energized, and you can operate the socket, essentially, with your bare hands.
And only after making sure that there is no power supply can you continue working.
Loosen the bolts of the socket contact clamps and free them from the wires. Unscrew the bolts of the socket's internal spacers that hold it in the box and pull the socket out of it. You may first have to turn it several times in both directions.
Having pulled out the socket from the place where it was installed, we discover in this case that the socket box (box) is missing.
That is, the socket was simply installed in a hole made in the wall. This installation of the socket is incorrect and its fastening is unreliable. However, this can be found quite often in old houses.
Often there are metal socket boxes that do not have mounting bolts. Therefore, sockets are attached to them only with the help of their own spacer mechanisms. This way of fastening the socket is also very unreliable.
Next, you need to take a new standard socket and try it on the hole. In this case we see that he has completely entered it.
If the socket box does not completely fit into the hole, it should be shortened to the depth of the hole by cutting off its back part. In some cases, it is necessary to widen the hole to the size of the socket box so that it does not deform during installation.
If there is a metal socket in the hole, it should be carefully removed, while avoiding significant damage to the wall, in order to avoid repairing it in the future. Minor damage will be hidden by the panel of the new outlet.
Installation of a socket box
After purchasing materials, you can outline the installation location. The technology used for installation differs depending on the type of wall. Working with concrete, aerated concrete and brick is almost identical, but working with drywall is different. Differences are also observed in the set of tools that are required.
Installing a socket box in concrete, aerated concrete or brick
Working with such wall materials requires specialized tools. You will need to prepare:
- perforator;
- core drill 68 mm;
- chisel or pick for a hammer drill.
Core drill
Prices for socket drills (core drill)
Core drill
First you need to make a mounting hole in the wall to install the socket box using a special core drill. It is installed on a drill or hammer drill. Crowns come in different price segments and differ in cutting edge material. They come in diamond and carbide. Drills also differ in operating mode. Some are used only with a drill, while others are impact, so they are suitable for drilling with chiselling included.
Recommendation! When purchasing a core drill, you need to consider not only its diameter, but also the type of shank. For doors it should be cylindrical, and for a hammer drill sds-plus or another. Otherwise, the incompatible crown will not fit the existing instrument.
If you need to drill reinforced concrete, you will need to use a more expensive diamond-coated bit on the segments, since cheap equipment breaks. You also need to set the optimal number of revolutions recommended in the instructions for the drill.
There is a concrete drill in the center of the cylindrical crown. It is used for alignment. The protruding drill is placed in the center of the future socket box and deepened into the wall until the ring begins to be drilled with a crown. After this, you need to stop drilling and remove the alignment. This will prevent the protruding part of the tool from making a through hole. The centering drill is removed by knocking it out with a wedge or unscrewing a special clamping bolt.
Drilling into the wall
If you need to install a block of sockets, then you need to look at their instructions, as well as the parameters of the socket boxes and determine the center distance. Usually it is 71 mm . To make everything smooth, ideally, immediately after removing the crown to remove the centering drill, you need to make markings from the small hole along a horizontal line in increments of 71 mm . The resulting points will be used in the future to center subsequent drillings.
Marking for a block
After drilling, a circular hole will remain. All that remains is to knock out its central part. This can be done conveniently using a hammer drill with a lance. You can get by with an ordinary hand chisel and hammer. You need to insert the tool into a narrow strip of a larger drilled circle and strike. As a result, the central part will fall out. When working with aerated concrete or brick, this is not difficult. It will be more difficult to knock out concrete if it is reinforced with steel reinforcement.
Installation sequence
Having a hole ready, you can cut a groove in the wall to the ceiling, where the junction box is located, in order to make a branch of the power cable. To compensate for the error, the laid cable is taken 30-40 cm . In the future, the excess can be cut off. When moving on to laying the cable and connecting to the junction box, you will need to turn off the power to the room.
Junction box
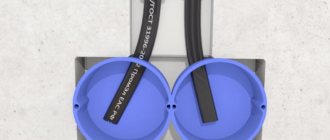
After preparing the groove and the hole itself for the socket box, you need to insert the installation box into it and check the depth so that nothing sticks out. Next, you should prepare a thick mortar. It is most convenient to use alabaster and gypsum plaster.
To insert the power wire into the box, you need to break out the window using pliers or cut it off with a knife. In such places, manufacturers make the plastic thinner to allow mechanical extrusion. Next, you need to place a little solution deep into the hole, and then insert the box with the wire inserted into it.
Gluing socket boxes
The socket box should be leveled using a level. If it has only two vertical or horizontal fasteners, then their orientation must be selected depending on the characteristics of the purchased outlet. If there are 4 fasteners, this does not matter.
Socket box with two fastenings
The side cavity between the box and the wall is also filled with solution. If alabaster was used, then after 3-4 hours the installation box will sit securely. You should wait until the solution is completely dry and stops evaporating. Under no circumstances should foam be used to secure the socket boxes, as it is a flammable material.
Advice! If you need to install one or more sockets, then it is not advisable to buy an expensive crown. Holes can be cut with a grinder. In this case, the amount of dust from the work increases. Although accuracy suffers, everything will then be covered with plaster. To cut with a grinder you will need a diamond wheel.
Work as an angle grinder
Prices for popular models of wall chasers
Wall chaser
Video - Installation of socket boxes in a concrete/brick/aerated concrete wall
Types of electrical outlets: 5 approaches to choosing a design
Global energy on our planet has created a paradox with electricity:
- on the one hand, the entire population uses electrical appliances from global manufacturers;
- at the same time, states introduced their own standards for electrical networks and methods for connecting different types of contact connections of plugs and sockets to them.
We, ordinary consumers, have to take this into account when purchasing foreign electrical appliances. Otherwise, you can get into trouble with the voltage value or design.
Well, if you go abroad for work or on vacation with a smartphone and laptop, then be sure to take care of adapters or specific extension cords. Otherwise, you will be left without working gadgets.
Types of electrical outlets in different countries: world practice
Residential premises usually operate on a single-phase circuit with a two- or three-wire voltage supply system.
Private houses can be connected with three-phase voltage via four or five supply cable cores.
The general principles for connecting household consumers to the power supply network include:
- plug-type design, when the supply voltage is supplied to permanently fixed contacts, recessed inside the socket for safety purposes;
- the exposed contacts of the plug are secured to the supply cord so that in the on position they become completely closed.
The technical implementation of these rules differs. The sizes and types of electrical outlets according to international standards are marked with letters of the English alphabet.
The briefest information on them is given below.
Table of types of single-phase electrical sockets
| Socket type | States | Features of use |
| A | Japan, America. | No ground contact. Power supply is 110 volts in America, 100 in Japan. For powerful kilowatt loads in Japan 200 volts. |
| B | America. | With grounding contact. Power supply 110 volts. |
| C | European Union, CIS, Russia. | 230 volts without grounding contact. |
| D | UK, India, Namibia, Nepal, Sri Lanka. | 230 volts with grounding contact. |
| E | France, Denmark, Poland, Slovakia, Morocco, Tunisia. | — |
| F | European Union, CIS, Russia, Denmark. | — |
| G | English version, Malaysia, Singapore, Cyprus, Hong Kong, Malta. | — |
| H | Israel, Palestine. | — |
| I | Australia. | — |
| J | Switzerland. | — |
| K | Denmark. | — |
| L | Italy, North Africa. | — |
These types of outlets can only operate safely up to a certain level of connected power. The rated current is usually written on their body: 6, 10 or 16 amperes. The last value is the maximum allowable.
A load of 16 A corresponds to a power of 220 (V) × 16 (A) = 3.5 kW. It cannot be exceeded: the insulation will overheat. Three-phase outlets can carry 32 amps.
Types of electrical outlets in Russia: 2 standards
Since Soviet times, many old houses where the wiring has not been replaced have used the Soviet standard of plugs and sockets. It provides a fork contact thickness of 4 mm and a rod length of 19.
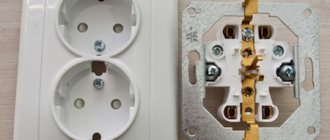
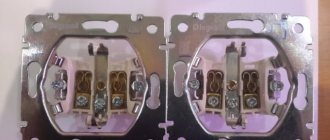
Inside the housing of the Soviet electrical outlet, two types of contact designs were used:
- spring loaded;
- reinforced with a bracket.
Such technological devices pressed the plug tightly and provided good electrical resistance of the transition contact. I think that the left design with steel springs worked better.
Modern equipment uses European standards. Its contact diameter has been increased to 4.8 millimeters.
The lengths of the contact rods for both types of sockets have not changed. The picture also shows that the Euro plug is made of one-piece plastic molding, and the Soviet 6-amp plug is fastened with screws from two halves.
The distances between the centers of the socket axes and their location on the body are the same. Therefore it turns out that:
- An old Soviet plug can be inserted into a European socket without any problems. But the tension of its contacts will be slightly weakened, which, in principle, is not critical for normal loads up to 6 amperes or 6 × 220 = 1.32 kW. There are not many old household appliances of this power.
- If you try to plug a Euro plug into a Soviet socket, it simply won’t go in: the reduced holes in the plastic won’t allow you to do this. But they can be drilled out or cut off with the blade of any sharp knife.
In this case there is a hidden danger. The usual voltage of 220 is supplied to the socket. A household appliance with a Euro plug with a current of 16 amperes can be connected to it, and the old contacts are designed to transmit only six. They will overheat and may cause a fire.
And almost all my friends did the same. I had to explain this feature to them.
Second danger
Power supplies for modern phones, smartphones and other gadgets are produced with contacts whose diameter is 4 mm.
This is normal for charging batteries with operating currents when installing the unit in a European socket. But using these housings to make extension cords is dangerous. I've already come across such homemade products.
Installation of socket boxes in drywall
To work with drywall, you will need a special type of mounting box with a special claw, which will allow you to press it to the sheet like a vice or clamp. To carry out installation, you need to drill a hole. This can be done with a special core drill for drywall. You can cut a circle with a mounting knife. Since the wires are hidden behind the drywall, no gating is required. The embedded cable should be pulled out into the resulting hole and inserted into the broken window of the socket box. You need to insert the mounting box into the wall and tighten the screws, retracting the clamping tab.
Fastening the socket box in plasterboard
Installation in concrete or brick
As always, we start by preparing the tools, in this case we will need:
As an alternative, you can use a concrete drill; in this case, holes are drilled around the perimeter of the seat for the “glass”, then the excess material is knocked out. This option is quite labor-intensive; it can only be justified if you need to make one or two holes.
In addition, we will need plaster to make a solution for “freezing” the planting nests.
Algorithm of actions for installing a socket box for concrete:
We install a bit of the appropriate diameter on the hammer drill, and then drill a hole.
You need to prepare for the fact that this procedure is quite dusty, so you should take care to protect your eyes and respiratory organs with glasses and a respirator. To limit the spread of concrete dust, the room can be “sealed” using plastic film and mounting tape. We knock out the concrete (B), clean the hole (C) from dust. We prepare the mounting socket (break out the plug for the cable supply), then insert the wires into the “glass” .Mix the gypsum solution and coat the seat (D) with it, then insert the socket box (E) into it. Remove the squeezed out excess solution (F).
After the gypsum solution has hardened, finishing work can begin.
After their completion, we proceed to the second phase - installation of electrical points. Since the same built-in sockets are used for plasterboard, concrete and brick walls, the algorithm for their installation is no different. That is, it is produced similarly to the process described above with drywall, so it makes no sense to repeat it.
Connecting the socket
Direct connection of the socket when installing in drywall is carried out immediately. If the mounting box is secured with mortar, you will have to wait 2-3 days . The sequence of further actions is as follows:
- shortening the protruding cable;
- stripping the ends of conductive wires;
- screwing the wires to the socket terminals;
- installation of an outlet;
- fixing the decorative frame.
The tail of the wire protruding from the socket is too long, so it will need to be trimmed. It is necessary to leave such a length that when folded it can be hidden in the remaining space of the box. The ends of the wires are cleared of insulation. In the absence of a special tool, this can be done with a mounting knife, being careful not to damage the conductor. The instructions for the socket recommend stripping the clay to 10-15 mm .
Wire stripping degree
To properly connect the wires to the socket terminals, you need to separate the grounding conductor, if any. Phase and neutral have single-color insulation, and grounding has two-color insulation. The supply wires are connected to the side terminals. Grounding goes in the center.
Electrical installation
The next step is to carefully fold the wires to place the socket in the installation box. Next, using a screwdriver, you need to screw it to the socket box using screws. Fixing with spacer pads is also possible. They are located on the sides of the socket. The more you twist them, the wider they move apart and provide rigidity of fixation.
Attaching to a socket box
After securing the socket, you need to snap its frame. If it is not there, then screw on the cover panel. It is held in place by one screw, centered between the plug holes.
Video - DIY socket installation
Subtleties of connecting the socket block
When connecting a double, triple or block of sockets, a parallel connection will be required. To do this, small pieces of wires measuring 15 cm . Their ends are stripped of insulation. Such segments are used to connect socket terminals. On sale you can find special blocks immediately connected to each other.
Block connection
Installation of sockets in a wooden house: ensuring fire safety
Dried wood burns well.
This property creates big problems in ensuring the safety of buildings made of wood: logs, timber or made using frame technology.
Installation of wiring in a wooden house requires strict adherence to the rules developed by many years of human experience, and the installation of sockets is a necessary part of this process.
The sad experience of fire victims and firefighters shows that when the fire is located inside a wooden wall, it is very difficult to extinguish it. You will have to initially dismantle part of the wall structure, and this will take a lot of time.
Legal requirements for hidden wiring
Russian regulations require that electrical wires and cables be isolated from wood with a sealed metal space.
If the insulation is damaged and it starts to ignite, it will not allow the fire to spread to the tree, and the limited volume of air will prevent the flow of oxygen, thereby preventing combustion.
Therefore, hidden wiring is placed in metal pipes or boxes of a certain thickness, and sockets and switches are built into special socket box designs made of non-combustible materials.
They have a hole on the side for a threaded connection with the electrical cable entry pipe, and the socket mechanism is inserted and secured on top with screws. Conventional plastic structures are prohibited here.
What to do with aluminum wiring
In older houses, all wiring is made of aluminum. Often such wires break off, so when you try to insert a new socket into an existing socket in the wall, you cannot connect. In this case, you will need to extend the wire. The use of ordinary twisting is unacceptable. To get out of the situation, you can use special glued pads. This will make it possible to build with copper wires, which eliminates oxidation between two different metals. By adding a couple of wires of 10-15 cm , you can connect an outlet.
Wire extension
Installation of power sockets for powerful consumers
If there is a need to power a powerful electric stove, oven or other equipment, then you need not only to choose a power outlet, but also a large cross-section cable. Its throughput must correspond to the consumption parameter of the electrical appliance. The wire for such equipment should not have twists in its path. It is not connected to the junction boxes, but is led directly to the electrical panel. This is a mandatory fire safety rule.
Connection features (electrical part)
Before starting this stage of work, you must make sure that the electrical wiring is de-energized.
That is, go to the input panel and turn off the machines, if this has not been done previously. In addition, according to safety standards, it is required to hang a sign “Do not turn on people working!”, but in everyday life this requirement is usually ignored. In any case, it would be a good idea to warn your family, and it would be better to lock the electrical panel.
After the safety standards have been met, you can begin connecting.
First of all, it is necessary to trim off the excess wire, leaving about 10 cm. The ends are stripped; it is advisable to use a special tool for this purpose - a stripper; it allows you to quickly remove the insulation without damaging the current-carrying conductor (TCC). If you don’t have one, you can use a knife to strip wires; in extreme cases, an ordinary stationery knife will do.
If stranded wires are used in the wiring, their ends must be crimped or tinned.
In everyday life, this requirement is often ignored, which is fundamentally wrong, since the likelihood of loose contact increases, which can cause a fire. Therefore, do not be lazy, at least tin the ends of the wire. If you use a cable with a monolithic TKZh, there is no need to tin or crimp the ends.
Next, the prepared wires are connected to the corresponding contacts; the connection diagram for a network with and without grounding is presented below.
Accordingly, grounded electrical points (B in Fig. 12) can be used in both options.
If a group of sockets is connected, they must be connected in parallel, and the grounding wire must be supplied from a common point, as shown in the figure below.
This is done so that if the ground “burns out” on the first outlet, other electrical points in the group are not left without grounding.
When connecting, it is important to make sure that the wires in the clamp are well tightened, otherwise the contact will be broken, as described above.
As for the standard regulating the location of zero and phase in sockets, it does not exist, but it is considered good form when all connections in an apartment or house are made in the same way.
Connection methods taking into account consumers
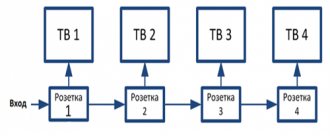
A block of sockets of one group is connected using a daisy chain method. It involves connecting all elements of the group to a common power supply line. The circuit created by the daisy chain method is designed for a load that does not exceed 16A.
The only “disadvantage” of such a circuit is that in the event of damage at the point of contact of one of the cores, all the elements located behind it cease to function
Today, connecting a block of sockets is often carried out in a combined way, which is based on a parallel circuit. This method is actively practiced in European countries. We use it to provide a separate line for powerful consumers.
Parallel connection involves laying two cables from the junction box:
- the first is sent in the form of a loop, powering four of the five sockets of the 5-seater unit;
- the second is supplied separately to the fifth point of the socket group, which will be intended for powering a powerful device.
The good thing about this method is that it ensures the functionality of a single point and makes it independent of the functioning of other nearby participants in the chain.
The main advantage of the combined method is to ensure the maximum degree of safety, which is especially important when operating powerful and expensive devices
The only drawback of the scheme is the increase in cable consumption and labor costs for the electrician.
Both daisy chain and combined connection methods can be closed or open. The first involves hollowing out channels in the wall to lay lines and “sockets” for connectors, the second is implemented by laying a PE conductor on the wall surface.
Skirting boards and cable channels used in the open installation method perform not only an aesthetic function, but also protect the PE conductor from mechanical damage
The use of plastic cable ducts increases the safety and aesthetics of open wiring. Most of them are equipped with partitions, between which a line is laid. It is convenient to monitor the condition of the PE conductor through the removable front part.
Wiring
The work is performed in the following order:
- We check the insulation and cable cores for defects.
- Remove the cover from the junction box.
- We insert different ends of the cable into the junction box on one side, and into the installation box on the other. To make it convenient to make new connections in the future, we install the cable with some reserve (10 - 15 centimeters).
- We prepare a groove at the top of the hole for the wire. To make the grooves, we use a hammer with a chisel or a hammer drill with an impact attachment. If the wall material is not hard, even a chisel is suitable for making grooves.
- We lay the wires (corrugated pipe with a cable inside) in a groove. The wire should lie freely in the niche, without interfering with the electrical outlet. On the back of the device there is a special slot in which we place the wire.
- The wire can be fixed with alabaster mortar. The recommended pitch is 250 millimeters.
- We cover the defects with putty.
As a fixing composition, you can use not only alabaster, but also gypsum (medical or construction). To prepare the solution, pour the base into a container. Add water in small volumes, trying to obtain a solution of medium thickness.
The composition must be used very quickly, because after just a couple of minutes it will be very difficult to work with, and after 5 minutes the solution will become completely unusable.
Design and installation locations of socket blocks
The design of the socket block differs from a conventional socket only in the number of “seats”. It consists of a plastic body and an internal part, represented by terminals with contacts and terminals, to which springs for the plugs are attached.
Most modern models are equipped with grounding contacts, which are designed to increase the safety of the system and reduce voltage from all electrical appliances connected through the unit.
The number of connection points of the installed socket block is determined based on the availability of household appliances placed in one group
There are two types of socket blocks:
- Designed for hidden wiring. Installed into the thickness of the wall using a module made of glass-shaped socket boxes;
- Designed for open wiring. They are installed on the wall surface using a plate-shaped socket box.
In addition to the two main types of socket blocks, there is also a very practical retractable type. They are easily mounted in a countertop or cabinet, from which they can be pulled out when needed. Their operating principle is similar to power supplies located on/in the wall.
Socket blocks are often installed in kitchens, placing them behind the work table at a height of 10 cm, inside kitchen cabinets and behind the walls of adjacent cabinets at a level of 30-60 cm from the finished floor. Built-in sockets are convenient to use when connecting a group of low-power household appliances: hoods, multicookers, refrigerators...
The recessed housing of the retractable socket group, consisting of three to five electrical outlets, remains hidden in the tabletop until you lightly press on its top panel
When arranging halls and living rooms, they are placed near computer desks or behind the TV screen. Socket groups of three electrical points can often be found in bathrooms. But in this case, devices with waterproof housings are used, placing them at a distance of at least 60 cm from the water source.
Switch installation cost
The price of installing a switch is approximately comparable to the cost of installing a socket and starts from 200 rubles for installing a regular switch.
The cost of installing high-tech switches (touch, dimmer, automatic) is higher, but this is not due to the increased complexity of the work, but to the fact that these devices are more expensive in themselves.
Switches and sockets are a common requirement for a comfortable life in the modern world. To ensure that their use does not cause trouble, you just need to choose them wisely and install them correctly.
3.6/5 — (10 votes)
Finishing
Finishing work can begin only after the fixing composition has completely dried. If you rush and start plastering the grooves and holes earlier, there is a high risk of the built-in device moving.
Finishing is done as follows:
- We use a primer to treat all noticeable defects, which may include irregularities, chips, and holes. Once again we trim the surface around the socket boxes.
- When the wall is dry, we begin to putty the surface. After the putty has dried, sand the coating. As a result, it is necessary to obtain the most even concrete surface possible.
- Apply another layer of primer and wait for it to dry.
Types of switches
Switches are classified according to the way they turn on the light.
- Key switch. The most common and easy-to-use type of switch. The external control element in such a switch is a key with two possible positions: on and off. Switches of this type are single-key, two-key and three-key, which makes it possible to control the voltage on one, two and three light sources, respectively.
Key switch - Dimmer – brightness control switch. The control element most often looks like a washer or wheel. When rotating, the brightness intensity first turns on to the minimum level, then increases to the desired level. Switches - dimmers are used in rooms where there is a need to turn on dim light, for example, in bedrooms and children's rooms.
Dimmer - Push button switch. The control element in such a switch is one or more buttons. The convenience of such a switch is that switches for a large number of light sources can be placed in a small area. Modern push-button switches are more often used in high-tech style interiors.
Push button switch - Cord switch . Controlled with a cord. Most often used on spotlights, sconces, floor lamps. Combined key-cord switches are convenient to use where the switch is located high enough, moving it is not possible, but the ability to turn on the light from a small height is required, for example, in children's rooms. Cord switch
- Rotary switch. Operated using a rotary lever. This switching method was used in the first mass-installed switches at the beginning of the twentieth century. Now it is used as a historical attribute in retro-style interiors.
Rotary switch - Circuit breaker. It turns on due to motion sensors. Typically used in walk-through areas. Motion sensor switches can be programmed to operate at specific hours, which is convenient for use in rooms with windows and outdoors. Also, the circuit breaker can be converted to manual control and used like a regular switch.
Circuit breaker - Sensor switch. Modern look of switches. The control element in such a device can be a touch sensor, a thermal sensor and a cotton (noise) sensor. Sensor switch
- Remote switch. Consists of a control panel and a receiving sensor. The sensor is installed directly to the lamp. Such a switch is convenient because it does not require additional wiring for the switch. In addition, the remote control can control several switches. It is used more often in large rooms.
Remote switch
Some switches are equipped with LEDs to make it easy to find the device in the dark.
Based on the type of installation, we can classify the open-mounted switch (surface-mounted) and the hidden-mounted switch (built-in).
- Built-in switch. An open installation switch is more often used in everyday life. Installed in a hidden socket box in the wall.
- Surface mounted switch. Open installation switch in open (laid on the surface of walls) electrical networks. The easiest type of switch to install.
To control lighting in the open air and in wet rooms, an outdoor switch is used. Most often, the external installation switch is overhead, but there are exceptions. The body of such a switch is insulated from the penetration of water and dust.
The degree of protection of the housing from external particles and moisture is indicated by the manufacturer on the packaging and the switch housing. The marking is determined by international requirements and has the form IPXX, where the first X is the level of protection from foreign objects, and the second X is the level of protection from water. The most common level of protection is IP54 (the product is protected from dust and splashes). The IP marking diagram is shown above, in the section with sockets.