All sockets in a house or apartment are connected to the main panel, where automatic switches are installed, which in case of a dangerous situation are turned off, sometimes even at the most inopportune moment. The initiator of their operation is sometimes the incorrect connection of the sockets to each other or their output to one power cable. Correct connection of sockets ensures uninterrupted and safe operation of household appliances. In this article we will look at how to connect sockets in different cases and which circuits are considered correct.
Existing connection methods
Sockets with more than two pieces are connected in three ways: in series, in parallel and mixed. Electricians use other terms - star (for the first option), loop (for the second). Before choosing one of the methods, you need to find out the pros and cons of each, and choose the one that is suitable for a particular apartment.
If the room has electrical wiring, it is important to consider the way the cables are routed and the total power available. New ones may exceed the limit; the wire will have to be pulled from the shield.
Parallel connection
The essence of the method is to connect sockets in one distribution block, which bears the entire load when the electrical equipment is turned on. A cable is pulled from the common house panel to the distribution box, and wiring is pulled from it to each power point (separate wires).
The advantage of this method is the independent operation of each power point and switch. If one device burns out, the others will continue to work. But if the main wire becomes unusable, the voltage will disappear completely. In such a situation, it is easier to find the gap and fix the problem.
Serial connection
A daisy chain connection means a sequential transition from the first outlet to the next. Instead of twisting wires, device contacts are used. The phase and neutral cables are connected to the first mechanism, then to the next and sequentially to the last.
The “pure form” method is rarely used. For example, if you need to install an additional socket or switch or move one of the devices some distance. In the second situation, they leave the old access point and lead from it to a new location - this way there will be less need to scratch the walls.
It is forbidden to connect devices with high power to sockets connected by a cable. Air conditioners, microwave and conventional ovens, washing machines and other similar devices must be powered from other access points. In a daisy-chain system, many outlets are connected to the same circuit, so the load falls on each one.
Mixed connection and grounding in series connection
If you decide to use a series connection of sockets, you can strengthen the overall design by using a mixed method. The essence of the method is as follows:
- A central cable is connected to the distribution box from the common panel board.
- In the preliminary wiring plan, the most distant point of access to power is selected.
- The selected outlet is connected from the distribution box cable.
- The rest are powered from this device.
This method increases the reliability of the network. If an outlet fails, the others continue to work. Disabling the entire system is possible only in the event of a malfunction of the main cable, twisted in the junction box.
This technique has disadvantages - the large length of the wires used, the need to install several junction boxes (for each branch). To know for sure whether high-power devices can be connected to the network, it is necessary to calculate the voltage before the cable wiring stage. An accurate calculation will help you choose how to connect the sockets in the end - in series, parallel or mixed.
Ring connection
This type of connection is rare in post-Soviet countries. The method has a number of undeniable advantages, which is why it has recently been gaining popularity.
How to properly connect sockets to each other with a ring connection:
- From the main (communal) panel to the apartment (house, dacha), a common cable is run in a circular manner.
- In each room (premises), a cut-in is made on the main wire, a distribution box is installed, and a separate circuit is drawn to a separate room.
- Lastly, branches are made to each access point.
If one part of the wire burns out or breaks, the devices continue to work with a ring connection because electricity comes from the other side of the ring. Repairs will still need to be made, but the power supply will remain intact. The reliability of the system is comparable to the parallel connection of sockets. The downside is that the wire consumption is higher compared to classical methods.
Open and closed wiring
The difference between the methods is noticeable to the naked eye. The closed wiring is located inside the wall, for which grooves (grooves) are punched or cut into it, in which the connecting wire is hidden under a layer of putty. Open wiring is laid along the surface of the wall, on which it is held in special fasteners or laid in plastic guides - cable channels.
Accordingly, if you can see the wires that fit into the outlet, then the wiring is of an open type. Otherwise, closed wiring is used, for the installation of which the walls were cut.
These two methods of connecting an outlet can be combined with each other - if the old points are connected in a closed way, then nothing prevents you from connecting a new one in an open way. There is only one choice - in wooden houses the socket can be connected exclusively in an open way, just like all other electrical wiring.
Open wiring - advantages and disadvantages
An analogy with the most common extension cord (surge protector), which is essentially an additional branch of the electrical network, but is connected not to a junction box, but to an outlet, will help you understand why open wiring is good.
Advantages:
- You don't have to cut the wall to install a new outlet. This is especially true for those premises that have already been renovated.
- Installation does not require tools such as a wall chaser or a hammer drill.
- In the event of a breakdown, you don’t have to open the wall - all the wiring is in front of your eyes.
- Installation speed. Even after all the work has been completed, adding another point to the existing wiring is a matter of several minutes.
- If desired, you can quickly completely change the wiring - ideal for temporary connection schemes.
Flaws:
- There is a high probability of external influence on the wiring - children, pets, you can simply accidentally hook it. This disadvantage is mitigated by laying wires in cable channels.
- Exposed wires spoil the entire interior of the room. True, it all depends on the design abilities of the owner of the room - cable channels will fit perfectly into modern design solutions, and if the room is made in a retro style, then special wires and other accessories are produced for this.
- The need to purchase special fasteners, even if cable ducts are not used - in wooden houses, open wiring should be laid at a distance of 0.5-1 cm from the wall surface. Wires are often laid inside iron pipes - all these requirements are aimed at increasing the safety of using open electrical wiring.
As a result, this connection method justifies itself if for some reason there is no point in laying the wires to the outlet inside the wall. Besides the fact that the wiring will be visible, there will be no differences in the operation of the outlet.
Hidden wiring - pros and cons
Despite some significant disadvantages, it is used almost everywhere - the advantages of its use still outweigh.
Advantages:
- The wires to the socket fit into the wall, so wallpaper or other finishing can be done freely on the outside.
- Meets all fire safety requirements (in concrete buildings) - even if a short circuit occurs, there is no fear of a fire from the wires in the wall.
- There is a very low probability of damage to the wiring - it can only be damaged when drilling walls.
Flaws:
- For installation you need to cut the walls.
- It is difficult to carry out repair work.
- If the walls are finished, then after installing an additional outlet you will have to redo it.
The disadvantages are leveled out by preliminary calculations - if you plan in advance where and which block of sockets should be installed, then problems usually do not arise in the future.
How to choose the right method
To choose parallel or serial connection of outlets, you need to calculate several parameters: the amount of money that can be spent on electrical wiring, equipment power and wall decoration (the ability and desire to redo repairs in case of breakdowns).
The optimal way is to connect two sockets to one wire of a panel or distribution box - a parallel connection. If the room does not have a large number of sockets and appliances (for example, only a TV), the loop method is suitable.
Advantages and disadvantages
The final version of the wiring diagram
To determine the optimal wiring diagram for sockets and switches, it is necessary to prepare a wiring plan, calculate the number of devices and the possible maximum power. At the same time, in newly built buildings it is necessary to plan future possibilities without unnecessary modesty: an additional TV, the purchase of a separate freezer, and the like.
Based on the data received, the connection type is selected. The advantages of the sequential method include:
- simple connection system and circuit assembly;
- the ability to adjust the voltage level, make it less;
- You can use one fuse per circuit.
The disadvantage becomes obvious after a malfunction occurs - if one socket breaks, the rest will not work.
Is it possible to connect sockets in series?
Connecting sockets in series mode has a number of disadvantages and limitations. In a large room and a significant number of powerful electrical appliances, this method cannot be used - the load is too high. It is better to parallel the sockets or use the ring type. The recommended quantity per chain is 5-6 pieces.
Another disadvantage is the uneven distribution of voltage at power points. Each outlet accounts for a portion of the total electrical flow. Therefore, serial connections are not used in residential and industrial premises. But you can use it in Christmas tree garlands and others.
Arrangement of electrical sockets
The market offers a huge number of sockets that differ in design, appearance and color. There are stationary models: internal, designed for embedding into the wall, and overhead, installed on the wall.
There are remote units with a switch - a pilot extension cord for connecting a computer, for example. Sockets also differ in the degree of protection from dust and moisture - in accordance with the IP standard. The level of protection against moisture, for example, may even include the possibility of immersing the device in water while it is turned on.
For normal conditions, in which the vast majority of users live, the quality of contact of the current-carrying wires with the socket terminals is of greatest importance. This is where the problem most often arises in the form of poor contact, heating and melting.
The most common type of connecting wires to sockets is screw terminals. The wire strands are pressed to the terminals with screws. The advantage of this type of connection is that it provides a greater force of pressing the core to the terminal, which ensures fairly good electrical contact.
For greater reliability, it is advisable to place two washers under the bolt head. One is a regular flat one, the other is a spring washer (Grover washer). In this case, the screw will not unscrew spontaneously and the clamp will not loosen.
Conventional sockets are connected with two wires - phase and neutral. But there are sockets with three terminals, one of which is connected to a ground wire. They are called “sockets with grounding”. The plug plugged into such a socket, in addition to two ordinary pins, also has a terminal that connects to the grounding terminal of the socket.
The number of household electrical appliances in our homes is increasing every year. Everyone wants to have an electric kettle, microwave, coffee maker, etc. at home. But there are not always enough installed sockets for all these devices. And even if there are enough of them, they are not located where necessary.
You have to use these devices one at a time, unplugging them from the sockets or using some kind of extension cords, which is not very convenient. In this case, the easiest way out is to parallel connect the sockets to each other. Install two or three sockets in one place and connect them in parallel.
Compliance with safety precautions when installing sockets
Work with electricity is classified as dangerous. Even low voltage leads to burns, injuries and other unpleasant consequences. Compliance with safety precautions:
- de-energize the room in which the work is being carried out;
- check the area before starting with a special device (you can plug the device into the network);
- use rubber gloves and equipment with rubberized handles;
- when “increasing” the length, it is not enough to twist the wires; soldering is required;
- contact with connected bare cables is not allowed;
- the excess should not “stick out” - it is shortened and placed in the wall;
- check whether the devices are suitable for the current and voltage levels used.
Anyone can connect sockets using these methods. The circuits have advantages and disadvantages; before making the final choice, it is important to establish the power of the equipment and the method of branching the wiring.
Basic connection options
In old houses, all connections were made in a junction box under the ceiling. After it, the wires diverged each to its consumer. With the advent of blocks - various devices assembled in a single housing - it became possible to save on cables and cut less wires. In addition, there is no need to carefully measure the height of the socket with the switch in order to place them exactly next to each other.
The disadvantage of such combined devices is that if one thing fails, everything will need to be replaced together. It cannot be replaced separately.
Single-key option
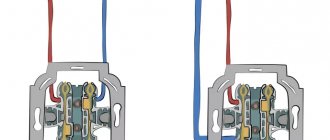
This is the simplest version of the block design. All you need is the unit itself and a connected 3-wire cable. In the distribution box itself, it is necessary to make the wiring: phase, zero - to the socket, zero - to the lamp, another wire from the lamp - to the switch. Now you need to make the necessary connections inside the block itself.
As can be seen from the figure, connecting elements in one block is no different from separate ones. A phase and a neutral go to the socket. The same phase goes to the contact of the switch, then to the lamp. Now everything is inserted into the box, screwed on, and the key is put on. If you did it right, everything will work.
If the outlet is grounded, then the cable will not have 3, but 4 wires. The fourth is yellow-green. It goes to the ground contact. You can't connect it anywhere else!
Two-key block
There are situations when you need to turn on the light in the bathroom or toilet, and then you need to connect the washing machine somewhere. An outlet can only be installed in the bathroom itself if it has the necessary waterproofing. If not, then it is best to mount everything in the hallway. To save space and wires, we will again use the “all in one case” block, but only now with two keys. Connecting it is also not difficult.
The first thing to do is to choose a suitable design. Remember that the washing machine uses a heating element - a tubular electric heater. When heating water like a household appliance, it can have a power of up to 2200 watts. The socket must have a rated current of 16 A (the power of the heating element itself, plus the machine motor, plus reserve). Grounding is required here.
Now let's move on to the connection itself. With this option, a cable with 5 cores will be lowered to the socket box from the distribution box. The phase end is red, or brown, or black. Zero – blue, light blue. Earth – yellow-blue
It is important not to confuse the markings so as not to get hurt later
Let's look at the diagram: the grounding (green in the figure) is connected to a special grounding contact of the socket. It is clearly visible: there are “antennae” on it, which get in the way when the outer cover is put on.
The phase end (red) goes to one of the terminals. From there, jumper to the switch. From its output contacts, two wires go (yellow and beige in the figure) to the junction box, and from there to the corresponding lamps. If you need to change the order in which the keys are turned on, swap the yellow and beige ends on the terminals.
Block with three keys
Don't think that the three keys are not used anywhere. This can be convenient when, in addition to the bathroom and bathroom, there is a kitchen nearby, and the lighting is turned on from one wall. This is especially common for small apartments. But you can turn on decorative lighting, depending on your imagination.
So, we have a socket and a three-key switch in one housing. A cable with 5 or 6 cores comes from the distribution box (with or without grounding). For simplicity, let's consider an example without grounding. The circuit differs from the two-key design only in the presence of one more contact, and as a result, a connection.
The same picture is visible as in the two-key circuit. The phase wire goes to the socket, and a jumper comes from it. Zero - only to the socket. And three wires go out - for three lamps, or for three groups of lamps. The more cores a cable and connections have, the easier it is to make a mistake. Therefore, you need to be careful during installation. If something doesn’t work out, it’s better to rest a little and then carefully check everything again.
How to connect sockets with a cable
Work related to electricity, including installation/dismantling of sockets, is certainly one of those that requires a professional approach. Today, connecting sockets is done in one of the following ways: using a separate electrical wiring line for each location or connecting several points to one source (with a cable).
The first option requires large financial costs, in addition, it poses a number of additional difficulties if the installation is carried out with the finishing already completed. However, all this is more than compensated for by reliability.
When it comes to servicing powerful electrical appliances, it is recommended to use only sockets with a separate line. It must be remembered that the circuit formed in this way is designed for a certain total load, and if the operating conditions are not observed, problems may arise at any time.
This article is intended to help those who have decided that connecting sockets with a cable is the best option for their home.
So, a daisy chain connection is a parallel connection of all elements (in our case, sockets) to one electrical wiring line. The cable from the power panel goes to the socket box, where it is connected to the first socket, a second is added to that, a third is added to the second, etc.
The disadvantage of this scheme is that if one of the wires is damaged at the point of contact, then at a certain point in the circuit, at least all subsequent elements will stop working. Hence the conclusion: the fewer sockets included in the system, the more reliable it will be.
Electrical wiring can be either hidden in the walls or run along their surface. The open version is simpler and more convenient, however, it does not always look good from an aesthetic point of view. If you don’t want to constantly touch the cable, then it makes sense to place it in small pre-made grooves (grooves), and then carefully seal them.
The disadvantage of hidden wiring is the need to once again “unravel” the walls when the need arises to carry out any work. Each of the gasket options has its pros and cons, so the choice here is individual.
Parallel connection of sockets in a modular block
There is a socket module in which a parallel connection of sockets is made. Of course, they are all sold already assembled, but I would like to disassemble and explain the connection principle itself. To connect the wires to the socket block, you must first remove the cover by unscrewing the screws securing it.
If you now look closely at the design of the socket, you can see that the terminals of the receiving holes are connected to each other in parallel. To supply voltage to all terminals, just connect the wires to any pair of them.
Let's look at how the wires are connected in such a block. We remove all installed wires and, for clarity, take multi-colored ones: brown wire - phase, blue wire - zero.
As you can see in the photo, the block consists of four sockets. Each outlet, like any other, has two contacts. Our task is to connect all the sockets so that they work independently of each other, and this can be done by using a parallel connection of sockets.
It's actually quite simple. Let's assume that the right contact of the socket is zero, the left is phase. We connect a blue wire to the right contact of each socket: from the first to the second, from the second to the third, etc. We similarly connect the brown wire to the left contact of each socket.
This outlet module is equipped with grounding contacts. The grounding wire is connected to them using a bolt and washer, so we will twist it into a ring. We will leave the phase and neutral wires straight, since the wires in the socket contacts themselves are fixed using a pressure plate
When connecting, you need to pay attention to the color of the wire insulation.
The yellow wire is usually connected to the ground terminal, blue and brown are connected to the “phase” and “zero”. If the grounding wire is stranded (consists of many thin wires), then after folding it into a ring it is advisable to tin it. Otherwise, individual wires may stick out from under the washer and screw, and contact will not be complete. The same applies to the “phase” and “zero” wires.
After removing the insulation (about 1 cm long), they must be twisted with pliers and tinned. When purchasing modular-type sockets, as in the example, it is advisable to check the correct connection and reliability of the contacts before installation. If necessary, the contacts need to be tightened.
Having connected the conductors to the terminals, it is advisable to attach the wire at the branching point to the body of the socket so that it cannot be pulled out. The mounting method may vary depending on the design of the outlet. You can use an adhesive plaster or a metal plate with holes along the edges. Some sockets are equipped with a special clamp for this.
In conclusion, you need to check the correctness of the connection by connecting an electrical appliance with a Euro socket to each pair of receiving sockets. At the same time, the ease of switching on/off is also checked.
If the plug is inserted and removed with excessive force, you need to bend the grounding pins that protrude on the sides. Before installing the cover, you need to cut a side hole for the wire. Usually there is already a mark for it in the lid. You just need to cut out the designated place and, after installing the cover in place, screw it in place.
Connecting sockets with a cable
Sometimes it becomes necessary to install an additional outlet, connecting it in parallel to the already installed one. This connection scheme is more economical than laying a separate wire.
In this case, the wires from the new socket must be connected to the terminals of the installed socket so that the “phase” is connected to the “phase” and the “zero” to the “zero”. Usually in sockets the phase wire is located on the right.
When connecting electrical devices and connecting wires to each other, you need to make sure that the metal of the wires being connected is the same. Those. a copper conductor must be connected to a copper conductor, and an aluminum conductor to an aluminum conductor.
When copper comes into contact with aluminum, oxidation of the metals occurs (in the form of a white coating), which ultimately leads to a breakdown in contact. If the condition of identical metal of the connected wires cannot be ensured, you need to tin the contacting ends of the wires (this will not save you from oxidation, but will slow down its process). We will talk about how to parallel connect sockets with a cable in the next article.
Similar materials on the site:
- Double switch connection diagram
- Pass-through switch connection diagram
Stages of connecting and installing the socket block
To carry out installation work when connecting sockets, you will naturally need tools. Their set is quite standard:
- - level;
- – wire cutters;
- – screwdriver;
- – knife with pencil;
- – perforator.
It is not necessary to buy the latter; you can simply borrow or rent it. Still, the tool is not cheap and there is no point in spending extra money if there is no particular need for it. There should definitely be no problems with all other equipment.
When attaching the socket box to the wall surface, screws are used. If it is located inside, then you will need to make a cavity in the surface. We will consider a standard situation in which only one cable is connected to the electrical outlet from the panel.
You don’t have to worry too much about whether all the cables will fit into the box, which is already occupied by a socket. A standard 42 mm socket box will easily accommodate everything you need.
Step-by-step process for installing a socket yourself
Removing the old structure
- We de-energize the outlet by turning off all switches in the electrical panel. To make sure that there is no current in the outlet, use a multimeter - an electrical measuring device.
- When starting to disassemble the old structure, the first thing you need to do is unscrew the screws and remove the upper part of the body. The device cover is made of plastic and is usually secured with two screws.
- Under the cover there is an internal socket mechanism, with which further work is carried out.
- The working part of the product is also removed by unscrewing the screws. In this case, you should carefully hold part of the old socket.
- Using a knife, you need to expose the wires by 10 mm.
- The new device also needs to be divided into 2 parts - the base and the cover.
Replacing the socket box
Sometimes it is necessary not only to install the structure, but also to replace the socket box at the point. The need to replace equipment may arise for a number of reasons: the electrical outlet has become cracked, broken, or it turns out that it did not perform its functions properly.
Installing a new device will not cause any particular difficulties. After removing old equipment, a certain procedure must be followed:
- You can remove the old device by unscrewing the screws that secure it to the wall.
- To pull it out of the wall, you need to pry it with a knife (when installing a socket box in a plasterboard wall). If the room has concrete and brick walls, you can remove the mechanism using pliers or a screwdriver.
- Wires are inserted into the new socket box. It is important before purchasing a new device to measure the diameter of the hole or the old design, since the dimensions of the socket boxes may vary.
- To fix the device in the wall, use a gypsum solution, which is prepared according to the instructions included with the product.
- After the solution has dried, you can begin installing the socket.
Scheme for connecting sockets with a cable
After the socket boxes are installed, it is necessary to prepare the cable for the jumpers. We measure the cable with a reserve for each block, but do not make too long jumpers. Their length should be such that after connecting the socket, it can be installed in the socket box. For jumpers, I used a cable of the same brand and cross-section as the supply cable.
Connecting sockets with a cable involves connecting several electrical sockets to one wiring line. To implement this method, it is necessary to connect the incoming and outgoing cables with a loop directly on the contact part of the socket. All wires: phase, neutral, grounding are connected in parallel.
Disadvantages of Electrical Daisy Chaining
Many electricians believe that this method of connecting sockets is unacceptable according to the PUE:
- According to electrical rules, it is impossible to carry out wiring with a break in the PE conductors, since they will remain ungrounded.
- Low level of reliability. Complex calculations must be made before work is carried out if there are any conflicts with overloading due to capacity. The worst thing that can happen when there is a short circuit is a fire in the system.
- You can connect sockets using a daisy chain method if you plan to use low-power electrical appliances; to work with another device you will need a separate outlet and power cable. In this case, the main advantage is lost - efficiency.
In addition, the volume of energy consumption for household needs is increasing. It is necessary to carry out other electrical installations, calculate its reliability, and select sockets with other parameters.
How to connect sockets: in series or in parallel
All sockets in a house or apartment are connected to the main panel, where automatic switches are installed, which in case of a dangerous situation are turned off, sometimes even at the most inopportune moment. The initiator of their operation is sometimes the incorrect connection of the sockets to each other or their output to one power cable. Correct connection of sockets ensures uninterrupted and safe operation of household appliances. In this article we will look at how to connect sockets in different cases and which circuits are considered correct.
Basic rules for wiring sockets
The rules for installing sockets and the tools that may be needed in the process are regulated by SNiP (building codes and regulations) and GOST.
When installing electrical wiring and working with sockets, you must familiarize yourself with the Electrical Installation Rules (RUE):
- wiring elements (distribution box, meter, sockets, switches) must be easily accessible;
- sockets are installed at a distance of 50-80 centimeters from the floor. The rule is taken for safety purposes when the premises are flooded;
- if there are gas or electric stoves in the room, as well as heating radiators and pipes, sockets are installed at a distance of 50 centimeters or more from grounded equipment;
- wires to devices are laid from bottom to top;
- sockets in the room are installed at a rate of no more than 1 per 6 square meters. You can connect more sockets only in the kitchen;
- equipment cannot be installed in the toilet;
- The wiring is laid at a distance of 10-15 centimeters from pipes, floor beams and ceilings. The height of the wiring from the floor should be 15-20 cm;
- wiring and connection of wires are carried out inside the distribution box;
- “Ground” and “Zero” are connected to the devices with a bolted connection.
This is all the information you may need when connecting a double socket yourself. Having mastered the necessary rules, anyone can connect a new device with their own hands.
Experts recommend that beginners pay special attention to following safety rules, since they will have to work with contacts that conduct current.
You can once again familiarize yourself with the features of the double socket installation process by watching the video:
Socket connection diagrams
When installing electrical wiring, it is important to choose the right scheme for connecting several outlets to each other. There are three ways in total:
- Parallel connection or star connections.
- Serial or loop.
- Mixed.
The concepts of “series” and “parallel” are arbitrary in this context, and they should not be perceived in the classical understanding of connections of electrical circuit elements.
The above methods can be supplemented with a ring connection, when all sockets in an apartment or house are powered from one wire. Such a scheme may include all three connection options. Each of them has its pros and cons. When choosing a connection method, it must be taken into account that the electrical connection is vulnerable at twist points. At the same time, increasing the number of distribution boxes reduces the service life of the wiring.
Let's look at each socket connection diagram in more detail.
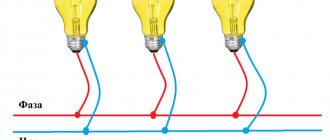
Series circuit
A daisy chain connection involves connecting several sockets in series in a row with each other. The connection is made without a distribution box, since the cores are fixed at the contacts of the sockets in the socket boxes. A phase and a neutral conductor are supplied to the main socket. Wires extend from it to other points.
This method is used when it is necessary to combine sockets into a single block. But such a circuit is not suitable for connecting power devices, such as electric and microwave ovens, washing machines, and air conditioners. If the load is exceeded, the contacts may burn out. And if the wire in the first socket burns out, those connected after it will not work.
It is also important to note that the ground wire cannot be run as a loop, it must be connected to each point, as shown in the diagram above.
Parallel connection
The parallel connection of sockets is also called a star connection. The essence of the method is that the circuit includes distribution boxes in which independent connections of sockets are made. One main power cable comes into the box. Wires are branched from it point by point. Outwardly, it resembles a star, which is why the method got its name.
An important advantage of this method is the autonomy of the outlet, that is, independence from the state of others. If one of the sockets fails, the others continue to function. But if the main cable burns out, then the voltage disappears in all. However, in such cases it is always known with certainty where to look for a break.
Another disadvantage of this connection scheme (in parallel) is the increased wiring consumption. To connect each outlet, you need to draw a separate line, which increases the cost of electrical installation work.
Mixed scheme
A mixed connection helps improve the reliability of the socket connection diagram. This method is often used when installing points using the daisy chain method. The essence of the method is to install a distribution box to which the power cable is connected. Then the electrical wiring is laid out for each outlet in the room. Branches are made from it to the remaining points, which are located between the box and the far connection point.
Mixed connection provides reliability because the circuit includes independent power points. If one of them fails, the remaining sockets are not deprived of voltage and continue to function. Finding a break will also not be difficult, since the electrical points are connected independently of each other.
Ring connection
Connecting sockets with a ring is an unusual scheme, as it is rarely used. But this method has its own number of advantages. The meaning of the wiring is to lay the main power cable around the perimeter of the room. The wiring comes out of the distribution panel and goes into it at the other end.
The joints for branches into separate rooms are made in distribution boxes. The connection is made using a cable or star type.
The cross-section of the main cable is selected based on the total load of the room, when several devices are turned on simultaneously in each room. A ring connection is not inferior in reliability to a parallel connection, since the circuit maintains the autonomy of the points.
Installation of branches in a socket box
In order to fully comply with the requirements of the PUE and at the same time not incur too much cost for laying a separate PE conductor to each socket, you can make branches directly in the socket box. For this purpose, special terminal blocks or crimp sleeves can be used.
The main advantage of terminal blocks is that there is no need to use special tools for their installation. Such products are installed very quickly and easily. In addition, each of them can be easily dismantled for repairs or maintenance of the connection points of the wiring elements.
In turn, the advantages of crimp sleeves include higher quality electrical connections, as well as their low price.
When using terminal blocks or crimp sleeves, you must act very carefully, since you will need to compactly arrange all the resulting connections in the socket box. Some experts recommend not limiting yourself to making a branch for the ground wire, but connecting the phase and neutral to the socket contacts in the same way.
Phase and neutral wires can be connected directly to the socket contacts. The quality of such a connection is largely determined by the type of contact. Standard bolt clamps are often unable to provide sufficient reliability for connecting two wires inserted into them at once. Therefore, for devices intended for connection with a cable, it is necessary to use terminal blocks. Another option is to use high-quality devices equipped with several clamps for each terminal.
Selecting a device for installation
The market offers a wide range of different models of sockets, both universal and special. And only a small part of them can be used in everyday life:
- C1A is a distribution device that does not have the possibility of grounding. Works with direct current no more than 9A, and alternating current up to 15A. Maximum voltage up to 250 volts.
- C2a - sockets with lateral grounding contacts, the design provides a contact for connecting a PE wire. Designed for connecting energy-intensive consumers such as electric stoves and washing machines to the network.
- C3A - The grounding contact is made in the form of a pin; it differs from the option described above only in the design of the grounding contact.
- C5 is a classic type of Soviet sockets. A square with a cylindrical cutout for an electrical appliance connector. Nowadays they are losing their relevance, since there is no possibility of connecting modern European plugs for electrical appliances. Can withstand current up to 7 amperes.
- C6 - modern Eurotype sockets. Installation is carried out on top of the wall when the junction box is located on top of the mounting hole.
The choice of a specific outlet model depends on the purpose and operating conditions. In rooms where there is high humidity and there is a risk of moisture getting into the outlet, a special model with protection parameters from moisture and dust is required. The level of such protection is determined by the markings on the case.
Components for assembling a triple socket
Let's look at what main components our triple socket will consist of. The modern electrical equipment market offers customers a wide range of sockets. However, in this abundance, finding a triple socket in a single housing is very problematic. Even after finding the product you are looking for, a person may encounter two problems:
- 1. Obviously overpriced product;
- 2. The model does not meet the buyer's requirements.
What to do in such a situation? Most craftsmen use this method in 99% of cases - they assemble a block of single sockets
. Therefore, a triple socket is often assembled from three ordinary sockets.
To do this, we need three regular sockets with a rated current of 16 A. Moreover, we only need their internal part. You can safely throw away the overhead frames for each outlet, since we won’t need them. And to combine three single sockets, we need a special overhead frame with three holes, which will create the appearance of a single whole.
The procedure for installing the loop
All work requires a professional approach and compliance with safety regulations. You need to know how to properly connect a group of outlets. Before starting, it is necessary to de-energize the entire apartment in order to disconnect both phase and zero. The absence of voltage is checked with an indicator at the place of work. Installation is carried out in the following sequence.
- Marking and preparing the site.
- Wall chipping.
- Laying the cable from the junction box to the first socket box.
- Preparing wires for jumpers.
- Installation of socket boxes.
The quality of installation depends on the types of contact elements. Models with a flat-spring connection method are considered reliable. In extreme cases, it could be a plate clamped with a bolt. The cable supplied to the socket must protrude beyond the wall surface by no more than 80 mm. If necessary, it should be shortened.
The cable braid is removed, the wires are separated to the sides. On the left is the phase, on the right is the neutral, in the middle is the ground wire. Their ends are exposed by 10mm using an insulation stripper or knife. The socket has self-clamping spring terminals for easy operation. Insert the sufficiently stripped end of the wire into the hole until it stops.
Then you need to check the reliability of fastening of all wires by pulling. First of all, the leads are packaged, and the entire structure is inserted into the socket box, pre-fixed on the sides with screws. The level is checked for horizontalness, then the screws are finally tightened. The last to be installed is the front panel, the overlay frame.
Problem on serial connection of conductors
Condition. Two lamps and a resistor are connected in a circuit one behind the other. The total voltage is 110 V and the current is 12 A. What is the value of the resistor if each lamp is rated at 40 V?
Solution. Since a series connection is considered, the formulas of its laws are known. You just need to apply them correctly. Start by finding out the voltage across the resistor. To do this, you need to subtract the voltage of one lamp twice from the total. It turns out 30 V.
Now that two quantities are known, U and I (the second of them is given in the condition, since the total current is equal to the current in each series consumer), we can calculate the resistance of the resistor using Ohm’s law. It turns out to be equal to 2.5 ohms.
Answer. The resistor's resistance is 2.5 ohms.
Methods for upgrading an outlet
There are two ways to install several sockets in place of one, which are often used in everyday life:
- installation of a double socket;
- installation of a block of several sockets.
The methods are not equivalent, so to make the right choice you need to know the features of the devices used.
Advantages of a double socket:
- the ability to select a model suitable for installation in an existing socket box - without causing damage to the finishing of the apartment by installing an additional mounting socket;
- lower cost than two single ones.
Disadvantages of a double socket:
- less rigidity of fastening on the base - the outer part is much larger than a standard socket box;
- the total permissible current for both pairs of plug connectors is 16 A (single sockets are designed for the same amount);
- plug connectors have a fixed orientation, limiting the ability to rotate the device by 90o during installation.
The installation of a double socket, both indoor and outdoor, is identical to the installation of a single socket:
- The built-in device can be selected according to the size of the existing socket box. If the double socket has a mounting box of individual dimensions, then a socket of the appropriate dimensions is made for it.
- The external socket is mounted according to the manufacturer's instructions, on a flat socket box.
For reference. In addition to ease of installation, overhead double sockets are convenient in that they can be connected both externally and hidden - by placing them over the point where the cable exits the wall.
Fixing in the wall
It is important to securely secure the socket box in the wall hole to prevent the socket from being pulled out during operation. For this, it is best to use alabaster, which you can buy in the store.
Dilute it with water to form a thick paste, then spread the mixture into the socket hole. After this, insert the socket box into the wall on the alabaster and be sure to level it. For the mixture to dry, you need to wait an hour and a half and only then install the socket. It is attached to the socket box with claws and screws - the socket is inserted and the fastening bolts are tightened. The final stage is the installation of the decorative panel.
Series connection of resistances
If the conductors were connected in series in a circuit, their resistance at each point will be the same. The resistance in the sum of all circuit elements will be equal to the sum of the voltage reduction in the circuit sections.
Experience can confirm this. The series connection of resistances is calculated using instruments and mathematical verification. For example, three constant resistances of known magnitude are taken. They are connected in series and connected to a 60 V power supply.
After this, the expected indicators of the devices are calculated if the circuit is closed. According to Ohm's law, there is a current in the circuit, which will allow us to determine the voltage drop in all its sections. After this, the results obtained are summed up and the total value of the reduction in resistance in the external circuit is obtained. The series connection of resistances can be confirmed approximately
If we do not take into account the internal resistance created by the energy source, the voltage drop will be less than the sum of the resistances. Using instruments, you can verify that equality is approximately observed
Preparation
The ground wire is always yellow-green. Never use it for other purposes. Phase wire - white, red, brown; zero - blue, black. Unfortunately, some electricians adhere to other traditions. In old Soviet houses, generally all the wires are white. It will be convenient for you if the neutral and phase wires are located equally on all sockets. For example, the neutral wire is always below or to the left.
It is customary to place the socket so that the contacts are at the bottom. This makes some sense: in the event of a roof leak, water flowing down the wires will collect in the form of drops on the bend below and will not immediately reach the live contacts.
We begin connecting the outlet by preparing:
- tools (screwdriver, indicator screwdriver, long-nose pliers, wire cutters, possibly a crimping tool (crimper, press pliers), building level);
- consumables: suitable wires, terminal blocks, possibly sleeves or cable terminals;
- flashlight.
Turn off the main switch!
Select the exact location for attaching the socket. It is impossible to solve this scientifically, only for reasons of convenience and possible movements of the sofa, table, cabinet... We mark the places for the mounting screws. Construction level - to help. However, you can get by with a modern smartphone with a suitable downloaded program.
In our case, we now need to cut the wire in the right place. We estimate the length for the bend and 1 cm for the terminal. Let's have a snack. (Measure seven times - cut once!) We strip the wire from the top braid, We strip the ends of the wires by 1 cm. (The photo is incorrect - the ends are too short.) This is quite convenient to do with a stationery knife. You can extend the blade just enough to cover the thickness of the insulation without damaging the wire. A special tool is, of course, convenient, but it is only necessary for professionals for daily work.
Stripping the wire with a special tool
We bend. It is more convenient to work with a soft multi-core wire, and more reliable with a thick single-core wire. The example uses copper wire with a cross section of 2.5 square millimeters.
How to connect a double socket and a triple socket, three-phase and with three wires (grounding)
When connecting a double or triple socket block, the power wires are connected to different conductive plates. If these are separate electrical outlets, we connect them using a parallel connection, for example a cable, as described above.
Now let's look at how to connect a grounded (three-phase) outlet. All three-phase electrical outlets are distinguished by the presence of four contacts for a three-phase plug (the fourth is ground or zero). The grounded outlet is connected using a separate four-wire electrical wiring (three phases, ground and neutral), stretched from the electrical panel. The wires are connected to similar contacts on the electrical outlet.