In addition, it:
- much more durable
- much easier to install
- and at the same time it is not so expensive (you can find kits for about 5,000 rubles)
Plus to all this, the entire installation is done without welding.
It is the need for welding that stops many people from doing this work themselves. Either there is no apparatus, or there are no necessary skills.
So you have to hire third-party electricians.
All grounding takes up space on the territory of your home, literally a few square centimeters.
And it can be done without any problems right in the basement of the building.
On average, it turns out that in a private house without a boiler, in order to achieve the required 30 Ohms, you will have to drive an electrode with a total length of 6-9 meters. For a house with gas heating (R=10 Ohm) - 9-15 meters.
These are averages. More accurate data is always individual and directly depends on the region where you live, the quality and composition of the soil.
If your house is built on sand, definitely buy a 15-meter kit. Even without a gas boiler.
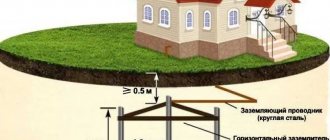
The distance of the grounding route from the wall is also regulated. Unlike the input cable, it must be at least 1 meter.
For underground cable entry this figure is 0.6 m. Why so, read in detail about these and other requirements in a separate article.
Equipment
What is usually included in the standard kit?
- starting tip
- rods
- couplings
- pin driving head
- attachment for a vibratory hammer or a powerful hammer drill with an SDS-max chuck
- anti-corrosion conductive lubricant
- clamp for connecting the ground wire
- waterproofing tape
Let's take a closer look at each of the points.
Starting pointed tip – which one is better?
It can be with an acute angle of 60 degrees, or a universal angle of 90 degrees. Depends on the density of the soil.
Which angle is better? As a result of scientific research, it was found that the best tip shape is a circular cone.
And the optimal opening (pointing) angle for clay and sandy soils, provided that the strength characteristics are maintained, is from 45 to 53 degrees.
Selection of rods for modular pin grounding
Usually they come copper-plated with a standard length of 1.5 m. For basements with low ceilings, you can take a shorter one - 1.2 m.
The most common rod diameter is 14mm.
They say that the higher the contact patch with the ground, the better. This is certainly true. But don’t expect any super improved resistance characteristics when increasing the cross-section.
According to the formula for calculating grounding for a single vertical ground electrode, the diameter does not greatly affect the overall indicator.
Even if you increase it by 100%, the resistance will decrease by only 9%.
Not what you expected, right? Therefore, there is no particular point in overpaying and buying the thickest possible pins.
Take the minimum allowable according to the standards.
In addition to copper-plated ones, there is another type of threaded rods - couplingless galvanized ones. In them, the rod is simply screwed into one another. On the edge of one pin there is an external thread, on the other - an internal one.
It is impossible to say for sure which is better, copper or zinc. Every manufacturer always praises their products.
However, keep in mind that copper plating, although resistant to corrosion, is only as long as it is not damaged.
And it can be scratched very easily. For example, when using gas wrenches, tightening couplings.
Or when entering rocky soil, knocking off the top layer with the sharp edges of pebbles.
In this case, the copper protective coating is destroyed and the scratch site begins to actively oxidize. Next, there is a gradual but inexorable destruction of the steel core, as a result of which the overall resistance of the entire circuit sharply deteriorates.
That is why the copper coating should be as thick as possible. The recommended value is at least 0.25mm (including thread!).
With zinc the opposite is true. Such pins are not particularly afraid of external damage. In them, zinc is a reducing agent relative to the steel core.
Therefore, here zinc will corrode first, and only then steel. And as long as the entire zinc layer does not deteriorate, the steel core will feel good.
Nevertheless, the warranty periods indicated by manufacturers are approximately as follows:
- copper-plated rods – 30 years
- galvanized – from 20 to 30 years
True, by using galvanization of a larger diameter (20mm > 14mm), the service life indicators can be equalized. However, this does not in any way affect the overall resistance of the grounding conductors. So choose according to your budget.
There are also stainless steel sets.
These are intended for those who do not save at all on electrical costs and want to make a circuit that is called “for centuries.”
Clutchless rods
By the way, despite all the advantages and good contact, many consider threaded connections to be the weakest point of such modular systems.
Think about water pipes lying in the ground. After several years of operation, it is the threaded couplings that rust first.
The same thing can happen with pins. In addition, at the moment of hammering with a vibrating hammer, the connection often weakens. Simply put, the thread is unscrewed.
Experienced installers, after each entry of another rod into the ground, tighten the electrode along the thread. At this point another mistake occurs.
When you tighten a smooth pin or socket with a serrated wrench, you scratch and strip the copper layer from the surface. What this leads to was discussed above.
After 3-4 years, instead of a full-fledged electrode, you will be left with a hollow copper tube with rusty dust inside.
How to do it right? In this case, it is better to pull through the entire system using an impact nozzle inserted into the upper coupling and screwed in until it stops.
This way you will not touch either the electrode or the coupling.
Also note that in all coupling kits, the coupling itself is slightly wider than the diameter of the rod. What does this mean?
A narrower electrode, when entering the ground following such a coupling, will not be in close enough contact with the soil surface. To obtain real resistance indicators, sometimes you have to wait several days until the earth crumbles and compacts all the free spaces.
Therefore, many people prefer a different type of deep grounding rods. For example, like OBO Bettermann with the BP (Bundes Post) system.
In such sets, the pins are joined together without threads, using the pressing method.
This is something like a tongue-and-groove connection with a self-release pin. When driven in, the tenon is tightly wedged into the groove and an absolutely monolithic connection is obtained.
Sometimes inside the hole at the end of one rod there may be a lead ball, which, when struck, fills the entire space even more tightly.
Therefore, if you do not trust couplings and want to eliminate the human factor, buy such kits.
Correct installation of the hammer for driving
Always screw this head all the way in! The design of the coupling and nozzle is such that the nozzle must pass through the coupling until it comes into direct contact with the pin.
This way the impact energy will be transferred to the rod and will not destroy the coupling thread.
If, after screwing in, the thread is visible from the bottom of the coupling, but it is not visible at all on the impact head from above, then you have assembled the kit incorrectly.
In a normal situation, no thread should be visible from below, but 1-2 turns may remain on the driving bolt from above. Otherwise the clutch will jam.
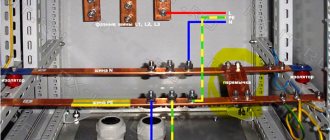
Features of the ground clamp
One part of it is adapted for connecting a pin. The second, under the seat of the wire or grounding bus.
Since the tire is most often made of steel, there is a dividing partition in the middle of the plate. It is necessary to prevent the occurrence of bimetallic corrosion when dissimilar metals come into contact.
How to make modular pin grounding
How is the entire installation done? First, you need to dig a small pit 0.5 m deep.
Next, screw the starting tip onto the first rod.
After that, we try to hammer it into the ground with our hands. To make it easier to enter the ground, add water.
If the ground is soft enough, with forward movements and blows of a small hammer, sometimes it is possible to drive the first pin in completely.
Why is it better to try to do this manually first? When the first or second electrode is clogged, stones often appear in these upper layers. In the case of manual work, the electrode can then be easily pulled out and moved to a new location.
But if you worked with a hammer drill from the very beginning, then the density of its penetration into the ground will be such that without excavating another 1 m it will not be possible to pull it out.
After immersing the first ground electrode, screw on the coupling and insert the second rod.
Don't forget about lubrication. It improves conductive properties and protects threads from corrosion.
Also make sure that the pit is constantly in water. This significantly improves the penetration of the electrodes into the soil.
At the same time, pay attention to an important point! Some unscrupulous electricians try to deceive customers in such a cheap way.
They hammer in two or three electrodes, generously moisten the pit with salted water, sprinkle the area with fresh earth and immediately take a measurement. Indicators with such soil may initially be ideal.
But a few days after the soil dries out, everything changes dramatically. Only you won’t even know about it.
Without special measuring instruments, it is impossible to understand how reliable and high-quality the ground loop is made. You can only cross yourself and believe.
Drive the second and subsequent electrodes into the ground with a high-power impact hammer or jackhammer.
Grounding manufacturers recommend tools with an impact of 20 Joules or higher for this purpose.
That is, it is better that it is not an expensive Hilti hammer drill, but a cheap no-name Chinese hammer.
By the way, there are grounding kits that can be hammered without a jackhammer, but with a regular sledgehammer weighing more than 10 kg.
To do this, you will need a special dowel, on which the blows will be applied.
The most important thing here is not the force of the blow and the size of the swing, otherwise you will quickly break the landing hole, but the uniformity and progression of movements.
When working with punches, pay attention to the curvature of the guide. Due to strong bending and vibration, the impact head often breaks!
After deepening the next pin, a measurement is made. Where black soil and loam with clay predominate, the readings from just one ground electrode can already reach the minimum required 30 ohms. When immersing the second one to a depth of 3m, it is quite possible to approach 10 Ohms.
But where there is sand, the electrodes will simply fly down one by one, without giving the desired result.
The rule here is that the heavier the pin, the better the resistance.
But this of course does not apply to rocky soil.
If almost all the pins from the set have been driven in, and the last one has gone in halfway and stood up as if dead, cut it off with a grinder near the ground, leaving room for compression.
If the resistance results are poor, you will have to retreat a distance equal to the depth of the already clogged ground electrodes and make a second one in a new place. Then connect the two circuits with a horizontal bus.
Ground loop resistance measurements
What should you know about measurements? Keep in mind that if you constantly added water to the pit during installation, all measurements should be repeated the next day, when the soil has dried.
Otherwise, there is a high probability of error.
If you are unable to achieve the standard and all the pins are used up, try pouring an electrically conductive compound for grounding devices into the hole. You dissolve a special powder with water and pour it over the walls of the electrodes into the well.
Fill everything with soil on top and compact the soil. After a day, the composition will tightly clog all the cracks and increase the density of the soil to the ground electrode.
In some cases, it is possible to reduce the resistance by almost half of the original!
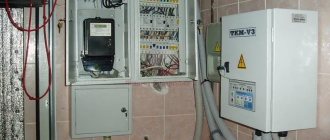
Measurements and issuance of a protocol are mandatory! When connecting a house to the power grid, the power engineers of the network company begin to have a lot of questions.
If there are some nuances, they may refuse altogether. And if you have a drawing of a grounding circuit and a measurement protocol, many questions will disappear by themselves.
Therefore, when they say that the grounding loop can be done completely independently with your own hands, they are being a little disingenuous. You will still have to call a third-party organization or an electronic laboratory with measuring instruments.
Previously, the main device for measuring the resistance of the ground loop was M416 and two pins to it.
Today, digital analogues are becoming increasingly popular. For example, such as the IS-10 or the 2120ER meter.
This cannot be done with a regular multimeter!
When checking modular-pin grounding, one peg is driven in at a distance of four times the depth of the ground electrode, the other at two times. On a regular contour (triangle, square, line), the technology is slightly different.
Keep in mind that all measurements are taken in the summer, during the period of maximum drying of the soil.
And now about a mistake that many people are not even aware of.
If the resistance is too good, this is the same “jamb” of installation as too much!
It should be one order of magnitude higher than the grounding resistance at the TP.
There is no need to do it with “reserve” and be happy at the same time. Otherwise, when connected via the TN-CS system, all the “crap”, including short-circuit currents to the ground, will flow primarily not through the transformer substation, but through the grounding of your house!
The current is not a fool, it will tend to where there is less resistance. That is why many, after making an ideal grounding loop, connect their private home using the TT system.
How do you know if everything is in order on the transformer at the energy transmission company? And when was the last time they checked their circuit?
Installation of an inspection well and grounding connection to the outside
When the normalized resistance is reached, a clamp is installed on the last segment to connect the grounding conductor or bus.
This place is protected by an inspection well. This can be either a factory design or a homemade one from a sewer pipe.
Choose those specimens that are designed for use in the ground (orange).
This assembly is a prerequisite for installation. All ground loop contacts must be open and accessible for inspection or replacement.
This place cannot simply be covered with earth. Otherwise, when your grounding wire falls off, you will find out about it only after a serious accident and forced replacement of burnt equipment.
But sometimes it is left directly on the surface without any protection. This is often done in basements. In this case, the grounding is carried out as a solid bus on the wall of the house.
But we will consider the option with a well. Two covers are put on the coupling. A hole is drilled in one of them in the center.
After which a pressure seal or PG seal is mounted there.
These are installed on metal distribution cabinets. Next to it or on the side, another hole is drilled to lead the conductor out into the corrugation.
The central seal is necessary to tightly fit the plug onto the cylindrical grounding pin.
If you do not find similar seals, simply seal all holes after installation with silicone sealant. Next, prepare the copper grounding conductor.
This is PuGV and PV-3 wire with a cross-section of at least 10mm2. It is not advisable to connect it so that the stripped wires stick out.
It is better to do this through pressing with a tip, followed by heat shrinking.
Wrap waterproofing tape over all contacts in compression.
Simple electrical tape will not do here!
After all procedures, the protective coupling is closed on top with a lid.
Do not use a plastic bottle as such protection for the inspection well.
It will never create a seal. Moreover, on the contrary, it will retain water in this place, gradually destroying the contacts.
How to connect the grounding wire and the main grounding bus itself in the panel room of the house, read in a separate article.
Source
Share the news on social networks
- Related Posts
- 5 rules for choosing a good dryer for fruits and vegetables - which one is better, reviews from housewives. Rating and errors during operation.
- What color are the wires phase zero ground - marking 220v and 380v
- Smart mounting gun hilti bx3 what's new - review of advantages and disadvantages. Direct mounting technology from Hilti.
« Previous entry
Types of grounding technologies
There are two main grounding technologies. These are traditional and modular pin grounding.
To install the first type of grounding, pins are used that are driven vertically into the ground. They are connected to each other by steel strips. Then connect the ground loop to the distribution panel.
For the manufacture of traditional or standard grounding, ferrous metal is used. Strips, pipes and corners are made from it. To install this structure, three metal electrodes are driven in in the form of a triangle at a depth of 3 m. The interval between the electrodes should be 5 m. Then they are connected to each other using a metal strip and electric welding.
This grounding technology has a number of disadvantages. Among them are a large volume of earthworks, the need to use welding and the susceptibility of the metal to corrosion. Due to these imperfections, this technology has now faded into the background.
What's the point?
We have decided what grounding is. One of its types is modular grounding. This system is used in both residential and industrial enterprises. One of its advantages is the speed of installation. You can assemble and install such a system in a few hours. In addition, this does not require specialized equipment or any technical skills.
Any digital or electrical equipment can fail, therefore, in order to avoid unpleasant consequences, deep modular grounding systems are installed.
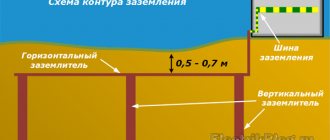
Depth of laying conductors and sequence of work
For laying conductors, the optimal depth is 0.5-0.7 m. Above this depth, the surface layer of soil is constantly exposed to various weather and human influences, which can disrupt the grounding system.
When carrying out work on installing grounding, it is initially necessary to dig a channel 0.5-0.7 m deep. Install grounding electrodes in it according to the instructions described above.
Lay the connecting conductor in the channel and connect the electrodes to it using the supplied clamps. Then we connect the structure to the electrical panel and fill the channel with soil.
Existing disadvantages
Despite the large number of advantages, modular grounding also has several disadvantages.
First of all, it is impossible to use this system in rocky soil. When installing a structure in such soil, the system can either move a stone that gets in its way, or bend around it. But this only applies to small stones. If the pin hits a large and strong stone, then further installation of the system will be impossible.
Another drawback is the price category. Copper-plated rods cost about 380-400 rubles per meter. Judging by the reviews, additional components for them are also expensive. If we compare this system with standard grounding, the price of the modular kit will be lower than the price of drilling operations, but higher than the price of ferrous metal. However, it is customary to compare not only the cost of materials, but also take into account the durability of the structure and the time it takes to pay for itself.
Top best modular pin grounding
EZETEK CN – 6 with SDS-max nozzle
The kit is designed for installation at a depth of up to 6 meters. There are 4 rods, which are made of stainless steel, which allows you to extend the service life of the product several times. The length of each element is 1.5 m, while the diameter is 16 mm. Connecting parts are also included in the package, so a person pays only once, providing himself with reliability and safety for a long period.
The average cost is 9,100 rubles.
EZETEK CN – 6 with SDS-max nozzle
Advantages:
- Reliability;
- Quality elements;
- Durability;
- Safety.
Flaws:
- Not found.
EZ 6, copper-plated rod 14.2x1500mm
A high-quality product from a top manufacturer that can satisfy a person with price and durability. The electrode is made of copper-plated metal, which will prevent the formation of corrosion for the entire service life. At the same time, the set will retain its conductive properties for many years. The set contains 3 pins, each 1.5 meters long. There are also all the necessary fasteners and installation instructions.
The average price is 5,200 rubles.
EZ 6, copper-plated rod 14.2x1500mm
Advantages:
- Reliability;
- High-quality execution;
- Price;
- Durability.
Flaws:
- Not found.
TDM electric grounding kit No. 1
An excellent product for those who want reliability and safety at the best price. The product is intended for private use. A positive aspect is the pin coating, which is made of 99% copper. To increase service life, the kit includes a special anti-corrosion paste.
The average cost is 9,300 rubles.
TDM electric grounding kit No. 1
Advantages:
- Good security;
- Durability;
- Strength;
- Value for money.
Flaws:
- Not found.
Grounding methods, main parts and recommended materials
Regardless of the brand of the device or its technical characteristics, each system consists of the following elements:
- Ground loop. There are two options available: artificial and natural; most electricians recommend using the latter.
- Grounding conductors.
A natural option involves using a metal fence or metal pipe as the main circuit. However, in order to achieve this, his resistance must fully comply with accepted standards. If this cannot be done, then according to the PUE it is necessary to use an artificial option. To build it, a person will need a minimum of effort and money, since it consists of:
- Reinforcement or metal strip, rod, etc. The main thing is that the selected element is smooth and metallic;
- The cable is made of copper or steel, it must fully satisfy the cross-sectional area;
- Special materials are used for fastening, often these include: metal corners, couplings, etc.;
- The insulation must be made of plastic elements.
Contour difference
This method is different in that it can be used for almost all country houses. At the same time, the structure is highly resistant and is not subject to the destructive effects of corrosion. Also, it is not necessary to use welding for installation.
Pin grounding is made of steel elements, whose length can reach 1.5 meters, and there is a threaded connection.
Copper-plated pins are mounted into the ground using a vibrating hammer; for this you need to use a special attachment. The installation is carried out at a great depth so that weather changes cannot affect the technical parameters.
The kit can be purchased from a company that installs them; it is often sold ready-made. Of course, the cost of such elements reaches tens of thousands, but this decision is due to high quality, reliability, strength and durability.
On average, the service life reaches 30 years, and if the main element is made of stainless steel, this value increases to 50.
Black metal outline
This is a cheap method, which has a short service life: only 5-10 years, after which the product is subject to corrosion. It is important to understand that over time the resistance of the kit will become many times worse than at the beginning. To slightly increase the service life, some people use parts made of black rolled metal, which is treated with an anti-corrosion substance. In this case, it is worth remembering that the coating should not serve as a dielectric.
Main requirements for resistance
It is necessary to use a grounding kit for a summer cottage if the circuit has low resistance. This has a positive effect on safety, because the charge will pass through a person and will not cause him harm, and will direct all the main energy to the ground.
To determine the resistance, you should look at the type of soil, as well as its properties. A suitable option is clay, the humidity of which reaches 20-40%; this is the best solution for every private home.
To ensure the functionality of the design, it is necessary to carry out some tests, including resistance measurements. Then a person will receive the most accurate result and will be able to evaluate the capabilities of the equipment.
Rating of the best electrolytic grounding
Electrolytic grounding kit CMZ – 2.5 vertical
An excellent set from a well-known manufacturer, which is designed for placement on difficult types of soil. Suitable for both home use and for grounding electrical installations in the ground with high resistance. The kit includes high-quality equipment that is reliable and durable.
The average price is 40,000 rubles.
Electrolytic grounding kit CMZ – 2.5 vertical
Advantages:
- Reliability;
- Safety;
- Suitable for difficult soil.
Flaws:
- Not detected.
EZETEK 2.5 V
Reliable grounding, which is placed in soils with high resistance, therefore suitable for installation in sand and rock formations. This is the main advantage of such models. The system guarantees high-quality flow of currents into the ground, which will allow the product to be used safely for 50 years. In addition, the product is equipped with lightning protection, which significantly increases efficiency.
The kit is designed for placement in a well, the depth of which reaches 2.5 meters. The kit contains a vertical electrode, a special composition for filling the space, a measuring well, as well as fasteners. All this ensures reliability and safety of operation.
Sold at a price of 40,000 rubles.
EZETEK 2.5 V
Advantages:
- Popular manufacturer;
- Safety;
- Suitable for most structures;
- Durability.
Flaws:
- Not detected.
ZandZ ZZ-100-102
One of the popular Russian kits, which is used in many regions of the country. Designed to organize reliable grounding in any soil where there is high resistivity. The main advantage of such a device is that it does not require the use of special equipment; all actions can be performed by one person.
Sold at a price of 60,000 rubles.
ZandZ ZZ-100-102
Advantages:
- High service life;
- Safety;
- Reliability;
- Good equipment.
Flaws:
- High price.
Installation features
When laying modular grounding, the pins are immersed in the ground with the blunt end, and the sharper end is used for fastening to the coupling.
Conductive lubricant is applied only to the inside of the couplings.
The structure is assembled by hand before driving it into the ground. If during the deepening process the system becomes loose, it is necessary to tighten it, but again manually. No additional intervention with special tools is required.
The jackhammer must be positioned in such a way that a zero angle is maintained between the hammer and the pin, otherwise the structure may be damaged.