Description of the scheme
LEDs are not very powerful, but using them in low-current electrical circuits is acceptable and advisable. As an example, we can consider a circuit for obtaining a digital ammeter to determine the current strength in a car battery, with a nominal value range of 40...60 mA.
Variant of the appearance of an ammeter on LEDs in a column
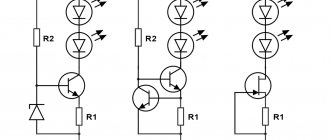
The number of LEDs used will determine the threshold current value at which one of the LEDs will turn on. You can use LM3915 or a microcontroller with suitable parameters as an operational amplifier. The input will be supplied with voltage through any low-resistance resistor.
It is convenient to display the measurement results in the form of a bar chart, where the entire practically used current range will be divided into several segments of 5...10 mA. The advantage of LED is that the circuit can use elements of different colors - red, green, blue, etc.
To operate a digital ammeter you will need the following components:
- Microcontroller type PIC16F686 with 16-bit ADC.
- Configurable jumpers for final signal output. Alternatively, DIP switches can be used as electronic shunts or signal shorts in conventional electronic circuits.
- A DC power source, which is designed for an operating voltage of 5 to 15 V (if there is a stable voltage, which is monitored by a voltmeter, 6 V is also suitable).
- Contact board where you can place up to 20 SMD LEDs.
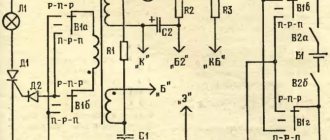
Electrical circuit of an ammeter on LED sources
Professional Responsibilities
The job description of an automotive electrician usually includes the following responsibilities:
- Carrying out diagnostics using special devices of electronic control systems, ignition and other electrical equipment of various types of vehicles;
- identifying faults in electrical equipment, repairing them and adjusting systems using additional equipment or manually;
- parameterization of electronic systems;
- installation of units and electrical appliances with their connection to the network according to the diagram;
- installation of additional electrical equipment of the car (car radios, air conditioning systems, car alarms, etc.);
- charging car batteries;
- replacement and repair of electrical wiring in a vehicle.
In order to perform these works efficiently, the master must have perfect knowledge of the structure of machines of various manufacturers, brands and models, and their electrical circuits. Ability to operate modern diagnostic devices and common plumbing tools is also required.
It is very important to comply with fire safety precautions and labor protection standards when working.
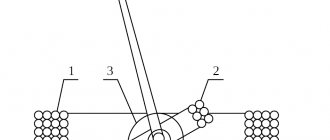
Sequence of placement and installation of the ammeter
The input current signal (no more than 1 A) is supplied from a stabilized power supply through a shunt resistor, the permissible voltage across which should not exceed 40...50 V. Then, passing through an operational amplifier, the signal is sent to the LEDs. Since the value of the current changes during the passage of the signal, the height of the column will change accordingly. By controlling the load current, you can adjust the height of the diagram, obtaining results with varying degrees of accuracy .
Mounting the board with SMD components, at the user’s request, can be placed either horizontally or vertically. Before starting calibration, the viewing window must be covered with dark glass (a filter with a magnification of 6...10x of a regular welding helmet is suitable).
Calibration of a digital ammeter consists of selecting the minimum current load value at which the LED will light. The setting is varied experimentally, for which a resistor with a small (up to 100 mOhm) resistance is provided in the circuit. The error in readings of such an ammeter usually does not exceed several percent.
Did you know that you can convert an old voltmeter into an ammeter? How to do this - watch the video:
Don't throw away the old shock absorber unless you have a return hammer. Useful homemade product
An old shock absorber strut can turn into a very useful thing, so you shouldn't throw it away when replacing it. Today I will talk about how to make another homemade product that can make life easier for a car owner in terms of repairing his vehicle. Namely, how to make a reverse hammer. With its help it is very convenient to disassemble parts, remove bearings, CV joints or press-fit. Even a simple dent can be pulled out, but if such a hammer also comes with a powerful magnet.
Dismantling the shock absorber strut.
In order to be able to make a useful thing from the rack, you need to disassemble it correctly. The VAZ stand is best suited for this purpose. The upper part and the rod itself will be useful. Clamping the stand in a bench vise, use a grinder to carefully saw off part of the tube down to the plate where the spring is located.
Saw carefully, remembering that there is oil inside! Therefore, it is better to substitute the vessel. You need to remove all the elements from the rack, disassemble it and leave one rod and the top cover (removing the oil seal and bushing from it)
Making a reverse hammer.
To make a full-fledged reverse hammer, you need to attach a handle, a movable weight and attachments that will be used to the shock absorber rod.
How to make a handle.
It is most convenient to attach a handle clamp from a drill or hammer drill, but if you don’t have one, then attach any clamp that resembles a handle. The main thing is to be comfortable. This clamp must be secured to the part of the rod where there is a threaded connection. To do this, put on two nuts - they will act as bushings. Then you need to weld them well. Then weld the top cap of the rod to those nuts. To make the look neater, you can use a grinder to grind off any excess drops left over from welding. After which you can screw on the handle (clamp).
How to make a moving weight.
To make a movable weight, you will need the cut off upper part of the rack, and you also need to select a pipe of the required diameter. In such a way that it fits into the tube of the rack part and leaves room for filling with lead. After all, such a design will be light, and the weight should weigh at least a kilogram. Clean the surfaces, center them with nuts and connect the bases of the two cylinders, you can weld them at the bottom. After welding, you also need to clean everything (for an aesthetic appearance). To increase the weight, fill the free space with lead (I think there is an old battery lying around). I won’t teach anyone how to melt, probably everyone has this experience, because at least once in childhood they melted lead plates from a battery in a tin can. Since all the guys have already matured, instead of a can you can use the housing from an old oil filter, and in order not to start a fire, take a burner. Carefully pour the lead into the available space, let it cool, and then you can clean the resulting weight with a grinder. It should turn out to be quite a beautiful thing. Now you can install the weight on the rod. So that such a hammer can be used to the maximum for various purposes, make attachments that can be screwed on. These can be either hooks from bolts for removing bearings, or an attachment for the head. As a result, it will be possible to remove the bearings, press them in, tighten the CV joint and halve the generator. Therefore, instead of throwing away the old stand, it is better to make such a necessary device out of it.
Many car owners use their garage as a workshop, gradually filling it with practical devices that make car repair and maintenance easier. Many of them can be made independently using the recommendations presented in this article.
Many accessories for a garage workshop can be made independently; the video below demonstrates some of them.
Garage homemade products are devices that make garage life much easier; in addition, they work no worse than factory machines. By equipping your workshop with such devices, you can independently produce the necessary parts for your car, as well as various crafts for your home or garden.
How to set the adjustment resistor
To do this, the current strength that passes through a specific LED is sequentially set. A regular tester can be used as a control device. A voltmeter is included in the circuit before the microcontroller, and an ammeter after it. To eliminate the influence of random ripples, a smoothing capacitor is also connected.
A practical advantage of making the device yourself (there should be no less than four LEDs) is the stability of the circuit with significant changes in the initially specified current range. Unlike conventional diodes, which will fail if short-circuited, LEDs simply do not light up.
LED diodes, like current meters in a car battery, not only save charge and preserve batteries, but also allow you to read the readings in a more convenient way.
A digital voltmeter can be built in a similar way. 12 V elements are suitable as light sources for this application, and the presence of an additional shunt in the voltmeter circuit will allow more efficient use of the entire height of the bar graph.
Please rate the article. We tried our best:)
Did you like the article? Tell us about her! You will help us a lot :)
Homemade metal tools for the home workshop
These do-it-yourself devices for the home workshop are designed to facilitate the metalworking process. They are usually made from scrap materials and tools.
Among the most popular devices are:
- pipe benders;
- press;
- vice;
- milling, metalworking, turning, drilling and thicknessing machines;
- devices for sharpening drills, knives and other tools.
With their help, a home craftsman can make practical devices for a summer house, garage, and also equip a comfortable home. Examples of useful machines and devices in the household can be seen in the photo below.
Homemade metal cutting machine
The video demonstrates how to make some useful household devices.
Taking into account the presented recommendations and drawings, any home craftsman will be able to make useful devices for the garage and machines for his workshop, arrange an ergonomic space in it, and realize his creative abilities.
Car repair is a serious and responsible job that requires certain knowledge and skills. There are operations that even a beginner can handle. But many types of repairs require serious experience and certain training.
However, any car repair specialist was once a beginner - each of us once did even the most familiar work for the first time.
To do many jobs with your own hands, you will need various tools and materials - they will be used to fix assemblies, assemble and disassemble, repair defects, etc.
Let's figure out what special tools and devices you may need when repairing cars yourself.
Phase-sensitive modification device
Phase-sensitive models are sold at 10 and 12 V. The permissible error parameter for the models fluctuates around 0.2%. Counters in devices are used only of the two-digit type. Microcontrollers are used with rectifiers. Ammeters of this type are not afraid of high humidity. Some modifications have amplifiers. If you are assembling a device, you will need switched resistors. A regular lithium-ion battery can be a source of stable current. A diode is not needed in this case.
Before installing the microcontroller, it is important to solder the filter. A converter for lithium-ion will need a variable type. Its sensitivity indicator is at the level of 4.5 microns. If there is a sudden drop in voltage in the circuit, it is necessary to check the resistors. The division coefficient in this case depends on the throughput of the comparator. The minimum pressure of devices of this type does not exceed 45 kPa. The current conversion process itself takes about 230 ms. The speed of the clock signal depends on the quality of the counter.
Chip CA3162E
BY42A can also be found in two board versions, but the color marking of the wires remains the same. To reduce the influence of ambient temperature on measurements, the additional resistor is made of a material with a low temperature coefficient of resistance. The connection can be made through a special socket connector, or using soldering. They contain a converter of the input signal into the angle of rotation of the arrow, showing on the scale the value of the measured voltage.
To also reduce the temperature factor during measurements, an additional resistor made of the same kind of material is connected in series with the ammeter coil. Connection Using a voltmeter, you can measure the current voltage in the power supply network.
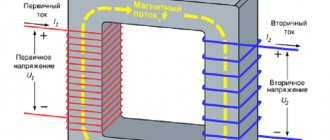
It is clear that a couple of amperes can be easily measured with a regular cheap multimeter, but what about 10, 15, 20 or more amperes? The scale readings are also multiplied by n. Homemade automobile voltmeter on microcircuits. If the connection is incorrect, the device display will show zero values. Receiving and transmitting alternating current is much easier than direct current: there is less energy loss. With the help of transformers, we can easily change the alternating current voltage.
CAE microcircuit for digital voltmeter and ammeter There are other microcircuits of similar action. Instrument transformers are depicted in the diagrams as ordinary transformers. A nuance when connecting a Chinese voltmeter and ammeter
Grinding Tools
Some craftsmen quite rightly use a drill with attachments instead of a grinder. A threaded rod is clamped into the chuck, and a disk of hard rubber is put on top. Its thickness can be one and a half centimeters. A circle made of sandpaper is already put on the disc. You can easily make such a device yourself.
But no one has canceled traditional grinding machines. This is a very useful tool and is more convenient than a drill. If you don't have either, you'll have to sand by hand: Auto tools aren't just limited to mechanical items!
Don't sand by itself, use a sanding block and you will be able to sand the part after a while. Now you know what the main tools for straightening a car are called, as well as how the straightening process itself occurs.
Spotter – straightening tool
A spotter is a welding machine for spot welding. This tool for straightening a car without painting makes it possible to repair parts that cannot be reached from the outside. Spotter straightening has the following advantages:
- No need to completely disassemble the car.
- High-quality result upon completion of work.
- Efficiency of execution.
- Possibility of repairing any mechanical damage to the body.
A spotter is a car straightening tool that copes with eliminating defects in doors, fenders, hood, sills and other body parts. It saves time and money on car repairs.
Torekh device
The specified ammeter (digital) is manufactured with increased current conductivity. The device can withstand a maximum pressure of 80 kPa. The minimum permissible temperature of the ammeter is -10 degrees. This measuring device is not afraid of high humidity. It is recommended to install it near a power source. The division factor is only 0.8. The maximum pressure the ammeter (digital) can withstand is 12 kPa. The current consumption of the device is about 0.6 A. The triode is of the phase type. This modification is suitable for household use.