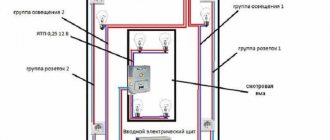
For many men, the garage is not only a room for covered parking, but also a full-fledged workplace.
Car enthusiasts spend many hours of their lives in it every day, and not only for repair work. There are no windows in such places, so full lighting comes to the fore here.
However, this is where the main problem lies. Connecting your garage to power grids seems like an insoluble problem for most.
Either there are a lot of obstacles with documents, or there are simply no electrical networks nearby. But don’t be upset, because there are several simple ways to illuminate your garage building, even without power lines nearby.
How to make lighting in a garage without electricity: effective ways
Here we will tell you several basic methods, all people have already tested them in practice. Each of them works, but has its own specific pros and cons, let's try to look at each one separately. Find out how to make garden path lighting.
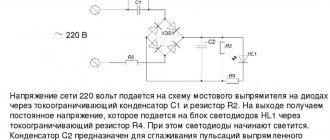
Finnish lantern
This method is suitable only for those who do not have the opportunity to open the doors on a sunny day. The installation is simple, this is what it looks like.
The result is good, but only in sunny weather. Think about this option in advance, you will have to break down the wall, and this is already a disaster.
Car battery
You can safely use an old 65 A/h battery. We connect regular 12-volt LED strips or spotlights to it. Such lighting sources are considered economical if you need light, just turn it on, and everything immediately starts working.
This is how we connect the tape to the battery, do not forget to observe the polarity.
Pros:
- Not a bad light, you can add light bulbs if you wish.
- An old battery is inexpensive.
- It's easy to connect everything together.
Minuses:
- The battery will have to be constantly charged while carrying it home.
- It will fail in a year or two.
Generator
You can also create light in a garage without electricity using a 2 Kilowatt gas generator. It's enough to make lighting or work with tools. This method can be called optimal. Of course, now the cost of generators is serious, but if you often find them in the garage, then you simply cannot do without one.
Combined garage lighting system
We can call this method the best, and we recommend using it. What do we need:
- LED strip or 12 Volt spotlights.
- Generator.
- Old car battery.
The essence of this method is quite simple: we connect the generator and charge the battery from it. The battery is connected to the LED strip and provides lighting; it needs to be charged infrequently.
If you need to turn on the tools, then simply start the generator and enjoy all the benefits. You can come up with several more applications, if you have your own ideas, leave them as a comment on this article.
How to apply for connection via the Internet?
This service is provided on the website “https://portal-tp.rf”. Here you need to register, submit an application, send scans of documents (the list is indicated above).
Many owners have a question: “To install light into the garage from a pole, who should I contact?” We answer: you need to contact the company that supplies energy resources in your area. The procedure in this case will consist of the same steps as described just above.
The electrical company will run their cable from the line on the pole to the entrance panel on the wall of the garage. True, this method is not entirely acceptable, since meters on the outer wall of the garage are often simply broken by vandals. Therefore, there is a second option, which involves underground laying of the power cable in a metal pipe from a pole with a power line.
Homemade wind generator
An alternative option for autonomous power supply to a garage and a dacha in general is to install a windmill, which can also generate free electricity. You can buy a ready-made device, but it will be quite expensive. For a 2-kilowatt model you will have to pay about 100 thousand rubles. That is why we suggest you make a wind generator with your own hands, thanks to which you can use light in the garage without electricity.
The only thing to consider is wind speed. If there are no strong gusts of wind in your region or site location, it is unlikely that you will be able to get free electricity.
Options for autonomous garage lighting
As already mentioned, the best choice for any garage structures will be LEDs. They have a lot of advantages, among which the following points should be highlighted:
- creating uniform and bright lighting;
- in terms of glow intensity, such a lamp creates a luminous flux that is equal to daylight;
- economical consumption of electricity;
- such lighting devices can be powered from various devices (for example, from a battery) in a situation where there is no source of electricity.
LED Garage Lighting
Most often, 12-volt LED strips are used to illuminate garage spaces. With its help, you can create general lighting by running a ribbon around the perimeter of the structure. In such a situation, the light emanating from the tape will fall evenly. Using an LED strip, you can also create local illumination of shelves and racks, as well as an inspection pit.
The same conditions and requirements are typical for the basement. In this regard, the lighting installation that will be used here should not have a power higher than 12 volts. You need to remember that in certain places in the garage you need to install a waterproof lamp, both when creating autonomous lighting and when electricity is available.
The best electrical appliances
Manufacturers offer consumers a large selection of lamps; popular products have advantages and disadvantages.
Suitable lamps for lighting:
Fluorescent lamps. They distribute the luminous flux evenly, the lamps are economical and durable. Their advantages are obvious, but before buying them you should also know about the disadvantages.
If the temperature in the garage drops below 5 degrees above zero, often the fluorescent lamps do not light up; when voltage surges occur in the electrical network, the light of the lamps dims. These lamps must be used in a heated room where a voltage stabilizer is installed.
Halogen lamps. These lamps are characterized by high energy efficiency up to 22 lm/W, they are used to illuminate individual areas. Halogen lamps work properly if the mains voltage is 12 W, so you will have to purchase a special power supply for them.
Among the disadvantages, it should be noted that it is unstable to mechanical stress, power surges and pollution. If you plan to install halogen lamps, then take care to protect them from aggressive factors during operation.
LED lamps and strips. Motorists rarely use LEDs for garages; they help organize local lighting. Among the advantages, economical energy consumption, good color rendering index, no pulsations of light flux, long-term operation, and safety should be highlighted.
The main disadvantage is the high cost of LED strips with lamps, although the products pay for themselves quickly.
Energy-saving lamps. Lamps that save energy are the most profitable option from an economic point of view.
Energy-saving lamps last a long time, work equally well in different temperature conditions, have excellent light output and are characterized by low energy consumption. Pit lighting in a garage can be done with a luminous flux in various variations.
Incandescent lamps. Today, incandescent lamps continue to be popular; they are affordable, easy to install and unpretentious to use. But now about the disadvantages, these include an insufficiently long service life, uneven distribution of light flux, and high energy consumption.
An incandescent lamp produces light of two spectrums: yellow and red, both of them are far from white, so color perception deteriorates. The low efficiency of such lamps can be easily explained - most of the energy consumed is transformed into heat.
Preparation stages
In both large and small garages, open wiring will require the use of boxes (made of plastic or metal). A corrugated pipe can serve as a replacement for boxes. When choosing an option, it is advisable to rely on the recommendations of professional electricians. In any case, a mandatory component is a general switch located at the entrance or entrance to the garage. It allows you to immediately turn on the overhead light when entering a room, or turn it off when leaving.
For illumination in inspection pits, you need 12 or 36 volt lamps (the choice between them is largely a matter of personal taste). Power supply to light sources must be done using a multi-core cable with a cross-section of 1.5 - 2 square meters. mm. It is recommended to choose lamps with a color temperature from 4000 to 5500 K. Base type - E27 and E40.
LED devices must have the following dimensions:
- SMD 5730;
- SMD 5630;
- SMD 3014;
- COB matrices.
To reduce the cost of purchasing lamps and energy consumption, you can place a mirror in the darkest places. By reflecting the rays, it will increase the illumination in the garage without extra costs.
Selecting a connection diagram
Electrical safety requirements require that inputs to distribution boards be grounded, and the grounding resistance is made to a maximum of 4 ohms. Regardless of the specific organization of power supply, an electric meter is installed in a separate garage, and if the garage is connected to the home electrical network, then it is not needed. The current of the input circuit breaker is determined by the value technically permissible in a given electrical network or permitted by the board of the garage cooperative.
Also, any scheme should have:
- residual current device;
- step-down transformers;
- separate automatic machines for chargers and welding machines.
It is correct to create lighting lines based on VVG 3x1.5 cable. Single-phase power circuits are made from VVG 3x2.5 wire, and three-phase ones are made from VVG 5x2.5 wire. VVGng 3x1.5 cables are used inside PVC pipes and ducts. Open installation on top of a combustible base requires the use of the VVGng LS 3x1.5 solution, which, thanks to complex insulation, makes it possible to do without enhanced protection. You can draw the route both vertically and horizontally. Whenever possible, you should choose the shortest diagonal spacer.
Important: turns are only allowed to be made at an angle of 90 degrees, with a gap of at least 0.1 - 0.15 m from the floors and ceilings. Wires should not be placed closer than 150 mm from heating pipes and other structures that heat up, at least periodically.
Since water and dust are invariably present in garages, all electrical equipment must be protected from both factors. It is prohibited to bring switches close to gates, jambs and windows. The minimum installation height for sockets is 0.6 m.
What is better not to do
Solar panels
They can be called a modern method that can really bring results. But if you use solar panels in a garage, it can be called a disaster. Let's just remember how much average batteries cost now; to light a garage and get electricity for certain work, you will have to pay about 5 thousand dollars for their purchase and installation.
This amount is considered unacceptable, even if you are constantly in the garage. They also need to be constantly wiped from dust and their condition monitored. And of course, there is a very high probability that they will simply be stolen.
Wind turbine for garage
The method is good, but only in those regions where there is a strong constant wind. To generate electricity to operate devices, you need a wind of 6 m/s. A light wind can provide illumination, but there are easier ways.
Solar lanterns
Here we will simply write down two main disadvantages:
- The light is dim.
- You constantly need to take it outside to charge, they also quickly break down.
You should forget about this option.
Power supply from generator
One of the common cases of garage lighting is the purchase of a gasoline or diesel generator. Here you can get by with models of the most minimal power up to 1 kW.
In addition, if absolutely necessary, all power tools in the garage can be easily connected from such a power station - an angle grinder, a drill, a small emery machine, etc.
However, the disadvantages cannot be avoided here:
- traffic fumes
- constant noise and rattling
- problems starting in winter
- complaints from neighbors who will be inconvenienced by all this
Light in garage without electricity
There are three types of garage power problems:
- permanent - there is no way to officially install light into the garage, from a common power line for a garage cooperative, residential or industrial complex, etc.;
- periodic – associated with power outages at certain times of the day, insufficient voltage in the network during “increased analysis” (power on in a large number of garages at the same time), frequent breakdowns;
- sudden - during natural disasters, cable breaks, accidents at a power plant.
Constant autonomous power supply
If it is not possible to install light in the garage on a permanent basis, you need to take care of a stable source of energy. For this use:
- solar panels with a converter to obtain the required voltage. It is convenient that, depending on the controller and inverter used, you can get a voltage of 12 and 220 V, that is, use halogen (12 V) and any other (220 V) lamps;
- wind generator. Their use is rational in mountainous or coastal areas, in open steppe spaces with constant wind;
- gas generator with direct supply of electricity to consumer devices or for recharging batteries;
- complex options.
Another interesting way to create daylight in the garage with your own hands is to install light guides. Unfortunately, there are few companies producing such systems in Russia. The main supplier is SolarWay, which produces light guides. They successfully replace a roof window and, in the presence of several light guides, guarantee sufficient illumination of the room.
The system can be installed on any roof, but you will need to make holes in the reinforced concrete floor slab in advance, and this is not always convenient. The optimal roofing option for installing a light guide is a lightweight structure on a frame with a thin coating (ondulin, metal tiles, roofing felt, etc. The use of specific roofing coverings depending on the angle of inclination of the roof is discussed in a feature article).
Technical parameters of SolarWay light guides are presented in the table.
It is interesting that even when constructing an underground garage or its location under the main part of the house (another building), it is quite possible to organize daylighting: you only need to increase the length of the light guide.
The valuable quality of lighting systems using concentrated and reflected solar radiation is the scattering of light flux, obtaining soft and natural light in the room.
Periodic power outages
Gasoline generators, gas (or other fuel) generators, batteries, and battery lamps will allow you to provide temporary lighting in the garage (12 volts or 220 V) during a planned or emergency power outage.
In the first case, the connection diagram provides for the use of a generator as a substitute for the main power supply. Switching electricity consumption from a centralized network to a generator is used manually or automatically.
Batteries are used in the same way: when the centralized power supply is connected, they are constantly recharged, and when disconnected, they are gradually discharged to ensure the required level of illumination.
Rechargeable lamps are a good solution for any cases of power problems. Being fully charged from a regular power supply, they can be used during emergency or planned power outages, as well as for local lighting in those areas of the room where lamps are usually not needed.
Sudden problems
A power line break, natural disaster, or other force majeure circumstances require emergency lighting in the garage. It will be successful if you can integrate an automatic switch to a generator or batteries into the main power supply circuit. At the same time, the light “blinks” and turns on again, powered by an alternative source. If this is not possible, it is better to keep a battery lamp, a regular flashlight, or at least candles with matches on hand. They must be placed indoors so that in the event of a sudden power outage it is possible to reach the storage location without the risk of falling into the inspection hole or getting hurt.
A useful set for “fast” backlighting to get a voltage of 220 V:
- 12 V battery;
- relay;
- wires;
- inverter (converter).
Motion sensor or photo relay
For convenient check-in at night, the owners install lighting in front of the garage. It is mainly used to illuminate doors and gates, and also has a decorative function. To save energy, install a motion sensor or photo relay before entering. They will automatically turn the light bulbs on and off.
To save electricity, use motion sensors or photo relays in front of the garage Source hunsingers.com
Types of lamps and fixtures used
When making garage lighting with your own hands, you need to carefully select not only lighting devices, but also lamps.
The modern market offers a wide variety of these functional elements, differing in different functionality and operational parameters; they should be taken into account when choosing:
- incandescent lamps with high efficiency and degree of heating, but requiring frequent replacement;
- halogen dumps that generate heat and are sensitive to voltage surges;
- compact luminescent; after use, special disposal is required;
- an ordinary luminescent that can create a flickering effect that is harmful to the eyes;
- LED lamps with a certificate of environmental friendliness and efficient operation.
LED lamps are the most suitable for arranging a garage lighting system due to their convenience and lighting efficiency.
The lamps create enough directional or diffused light and allow you to illuminate even the farthest corners of the room; they are easy to install and, if necessary, replace.
Methods of lighting in a garage without electricity.
- Immediately, my brother and I decided to build a modern system based on solar panels, which, through a control controller, charged the battery and could simultaneously power 12-volt lamps. If 220 Volts were needed, it was planned to use a converter from 12 V DC to 220 Volt AC - an inverter. But after we found out the final cost, the desire to pursue this option immediately disappeared.
- At work I came across an old uninterruptible power supply (UPS) and we decided to replace the old low-capacity battery with a 65 A/h car battery. Here you should take into account the technical characteristics of the UPS, which is designed for a certain maximum output power. And the operating time depends on the size of the connected load and the battery capacity in ampere hours. This method did not suit us, because it required periodically carrying it home and charging the battery. There was no way to use power tools at all. Which was very stressful and took a lot of time. The same will happen when using a battery with a 220 Volt inverter.
- After reading about the Philippine Lantern, we decided to use it to illuminate the garage during the daytime. We took a plastic bottle with clean water and diluted bleach, which prevents water from blooming, and temporarily installed it in the roof instead of a hood, and this is what we got. According to the developers, sunlight passing through a bottle of water is refracted and scattered in all directions, illuminating the garage like a 45-60 Watt incandescent lamp. But for our climate this is not an option, the lighting turned out to be poor, and in cloudy weather this technology is generally of little use, and as a result, we dismantled it after a couple of days.
- After all the experiments, we decided to buy a 2 Kilowatt gas generator since we periodically needed to work in the garage with power tools. Everything would be fine, but just starting the generator every time you need light in the garage is not rational and expensive.
- As a result, we have a combined system consisting of a gas generator, which we start while working with the tool; at the same time, a 12-volt car battery is charged using a charger. As a result, we always had battery powered lights in the garage. Just so that it doesn’t discharge quickly. We used economical LED strips to illuminate the garage. They are directly connected to the battery in parallel, observing polarity.
← Previous page Next page →
Price for solar panels
So, I decided on solar to electrify my garage. Now you need to select the power and type of battery.
Since my power requirements are very modest: I need to light the garage and play music, a 100 W battery is enough for me.
Although initially I wanted to be able to turn on any tool, at least a drill or an angle grinder, but then you need batteries and an inverter with a capacity of at least 1 kW, they require a large area for installation - these are additional problems and costs. After thinking about it, I decided to go with a modest option. For comparison, I will provide calculations for two options.
Solar battery
I purchased a JF Solar 100 W 12 V solar battery worth RUB 4,500. It has protection against atmospheric influences, as well as against hail up to 5 mm. I ordered the cheapest controller from China for 500 rubles and a cable to connect the battery from the mast to the controller. As a mast I used a pipe with a diameter of 2 inches, which I purchased at a scrap metal collection point for 500 rubles. I already had everything else.
It must be borne in mind that at low voltage (12 V) it is necessary to use exclusively copper wires of large cross-section. To calculate, we use Ohm’s law, which we once taught in school.
P = U*I
where P is power, watt,
U - voltage, volts.
I - current, ampere.
So, with a power consumption of 100 W, the current in the conductor will be
I = P/U = 100 / 12 = 8.3 A
Further, according to the tables, we find that for a copper wire with a current of 8.3 A, the required cross-section will be 1.5 mm2
For comparison, with a consumer power of 1 kW
For such power, 24 V solar panels are usually used. Therefore
I = 1000 W / 24 V = 41 A
Accordingly, you will need a wire with a cross-section of 4 mm2, and this is a completely different matter and money.
In addition, it is necessary to make the connections of the conductors very carefully, it is desirable that there be as few of them as possible, because if the connection is poor-quality and with a large current, heat will be generated at the connection, from which it is possible, at a minimum, to destroy the connection, and, at a maximum, to ignite and fire.
Planning the lighting correctly
In order for everything to work smoothly later, you will need to carefully calculate the lighting scheme, including the power of incandescent lamps and the cross-section of wires
Every little detail must be taken into account, this is important. Otherwise, you will then have to redo something, correct it.
The situation will become more complicated if the incorrectly selected component suddenly fails or breaks.
We must not forget about the established lighting standards so that there is enough light in the workplace, as this is provided for by building regulations. If the additional energy source is intended as a backup in case of power outages from the household network, then a special unit is installed for smooth switching from one to another.
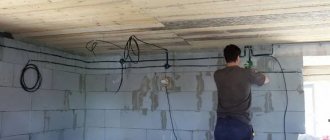
DIY garage lighting
Installing lighting fixtures on your own is only possible with certain knowledge of electrical wiring.
many lamps - requires a lot of energy
When working with lighting, you need someone who knows the basics of electricity. Without these skills, real chaos can happen, which will simply lead to a fire. There are 2 ways to install lighting fixtures:
- Open: laying cables along the outside of the walls. Carried out after finishing work. This option is used in garages and workshops.
- Closed: laying cables in grooves - tunnels inside the walls. A closed process is carried out before facing work. The grooves are made using a groove cutter. The holes are laid along the baseboard and along the edges of the walls.
Planning
Before laying cables, it is necessary to prepare a plan with markings of light sources around the entire perimeter of the room. On the drawing you need to mark the location of sockets and switches. According to European standards, switches must be placed at a height of 90 cm from the floor.
It is important to consider the sequence of wire connections and bend locations. If there are a lot of wires, it is advisable to label each one so as not to get confused when connecting
Electrical wiring installation
After drawing up the plan, you need to make similar markings on the walls. You can use a contrasting cord for convenience. In such cases, it is better not to use dye, since cable laying is carried out after finishing work.
Using a construction tape, you need to measure the areas where sockets and lamps will be installed.
garage with green light
All sockets must be installed at a height of 50 cm from the floor. Since the method is open, the cables must be laid not close to the ceiling (at least 10 cm).
Wiring Design Tips
Regardless of the type of lighting system, the development of a circuit, installation of additional components, and exhaust hood in the garage should begin at the design stage of the room itself. There are a few more tips that will help you correctly install lighting fixtures in the garage:
- Cables should be well hidden in fireproof plastic boxes, and the wires should not be intertwined with each other.
- All lamps must be connected to a wire with a cross section of 2 mm2.
- The cascade switch system is best suited for garages.
- It is necessary to install general lamps on the ceiling, and local lamps on the walls for high-quality illumination of the corners and lower parts of the car.
- If the garage has an inspection hole, then it is best to install light sources inside with a power supply of no more than 12 V. High levels of moisture form condensation on the surface of the lamps, so it is necessary to install lamps with an additional transformer that reduces the voltage.
- Garage lighting is a good option for illuminating the parking lot and surrounding area.
Approximate calculation of the lighting system
You need to install lamps depending on personal preferences, but it is advisable to place them on the ceiling and walls. Garage lighting should not be distributed without a drawing. There you also need to calculate the exact number of lamps.
The calculation of the lighting system is as follows: For 1 square meter of garage space, 20 W are required. If LED lamps are used, then their number is calculated by the formula: P = pxS/n, where P is the specific lighting power per square meter, S is the garage area, n is the required number of lamps.
To better understand the calculation system, you can consider a similar example: with a room area of 30 sq.m. A total of 600 watts of lighting will be required. The indicator was formed at the rate of 20 W per square meter x 30 square meters.
Next, it remains to choose lamps that together will provide good lighting, for example, 2 halogen lamps of 240 W each. If the garage has high ceilings, you need to increase the final result (600 W) by one and a half times. During the design of a lighting system, various difficulties may arise, so in such cases special calculation programs are very helpful.
Which location is better?
When the types of light sources and their power are determined, it is time to choose their arrangement. The main requirement is that the light distribution be uniform throughout the garage. In most cases, lamps are placed as they consider convenient and comfortable for themselves. The traditional scheme involves fixing lamps to the wall and ceiling; a more modern approach involves the use of autonomous systems. Battery-powered flashlights can not only be moved to any convenient location, but are also completely independent of electrical networks.
It is recommended to make lighting in the garage multi-level: a large lamp is placed at the top, and smaller side lamps are installed for each work area.
A typical distribution is:
- first level - ceiling;
- second level - at a height of 1.8 m;
- third level (working) - at a height of 0.75 m;
- fourth level - 40 cm from the floor.
Full garage lighting is made in such a way that the shadow of the car does not fall on the lamps. The side lamps are mounted on brackets, which allows them to be rotated in the required direction. Stationary light sources are positioned so that they do not dazzle the eyes during entry, exit and normal work. Another prerequisite for success is the use of lampshades. This helps prevent the negative effects of glare and blinking. The main lamp is placed not just on the ceiling, but where it will illuminate the hood without creating a shadow.
It is especially important to prepare lighting in the inspection hole, where something can roll away at any moment. In this case, it is permissible to use only low-power light sources - LEDs and halogen lamps
After all, high humidity, which is difficult to get rid of, increases the risk of electric shock. The lamps are placed in bottles covered with steel mesh, along the edges of the pit, in specially prepared niches. As a result, the lamps will not interfere with work, and will remain intact even if a heavy object or sharp tool falls from above.
It is best to carry out the wiring in a hidden way - but keep in mind that after plastering the walls, this will no longer be possible. Calculate everything as carefully as possible so that the finishing material is not soon destroyed. The wires are made parallel to the ceiling, and before starting work, they consult with experienced specialists. If you are not confident in your knowledge and skills, it would be better to hire a qualified electrician, especially if the garage is located in the basement or other place where water accumulates.
When working independently, you need to create a clear diagram that will indicate:
- external power supplies or inputs;
- lamps;
- other stationary devices;
- wiring routes;
- sockets and switches.
You should always go to the store with this diagram - this way it will be easier for sellers to figure it out, suggest something, and there will be less risk of forgetting the necessary points or confusing certain points. Distribution boxes must be installed on top of all sockets and switches. When installation and connection are completed, it is advisable to immediately check the functionality of the components and switches. And if the slightest problems are detected, they must be corrected immediately.
Illumination with a Philippine lantern
In addition to the above methods of autonomous lighting of garage buildings, some car enthusiasts use the so-called “Filipino lantern”.
Philippine lantern
This method makes it possible to organize free lighting in the garage. Moreover, it is quite possible to do it yourself. The Philippine lantern operates on the principle of light refraction. You can make such a lantern from an ordinary plastic bottle. At the same time, it can be used either entirely or cut out of a part. The algorithm for making a Filipino lantern with your own hands is as follows:
- take a transparent plastic bottle;
- The container is easy to wash and remove the colored label;
- We put a rectangular or round screen made of stainless steel or galvanized on it;
- Clean water is poured into the bottle. It needs to be diluted with bleach. This will prevent the liquid from blooming and, as a result, a drop in lighting intensity;
- the liquid is poured so that its level is three centimeters higher than the installed screen;
- Then such a bottle is mounted in the roof of the garage structure. The bottle itself must be mounted on a rigid base.
Installation of a Philippine lantern
If the roof was made of corrugated sheets, then simply cut a hole of the required diameter in a sheet of material. To minimize the risk of the roof leaking through the holes, all joints between the bottle and the roof must be well treated with silicone or sealant. You can use a Philippine lantern as additional autonomous lighting for the garage in those regions where the sun shines most of the year. To increase the level of illumination, you can install several of these homemade flashlights. In cloudy weather, such a design will produce such dim light that working with it will be life-threatening. In addition, it is worth noting that if the sequence of manufacturing the Philippine lantern is violated, the lighting inside the garage will also be poor.
How to make your own light without electricity in the garage
Electrification of buildings and structures is an integral part of a comfortable existence. The need for light in garages is important; it is also possible to realize it without electricity, as it turns out. There are several options to choose from:
- from a gasoline generator;
- autonomous lighting (battery powered);
- using a windmill;
- on solar panels.
Each design is endowed with characteristic features, advantages and disadvantages. They will be discussed in detail further in the text.
Planning the lighting correctly
In order for everything to work smoothly later, you will need to carefully calculate the lighting scheme, including the power of incandescent lamps and the cross-section of wires
Every little detail must be taken into account, this is important. Otherwise, you will then have to redo something, correct it.
The situation will become more complicated if the incorrectly selected component suddenly fails or breaks.
We must not forget about the established lighting standards so that there is enough light in the workplace, as this is provided for by building regulations. If the additional energy source is intended as a backup in case of power outages from the household network, then a special unit is installed for smooth switching from one to another.
How to make lighting if there is no electricity
Implementing a plan is not as difficult as it seems. You will need knowledge of physics at the everyday level, a set of components and a thoughtfully chosen option. Modern lighting sources are distinguished by their reliability, brightness, and durability. Another feature is that the autonomous lighting is low-voltage, which means it is safer. Accordingly, power consumption is less and efficiency is higher.
Cheap and bright LEDs are unrivaled: they are used in cars, household lighting, and spotlights. They have also found application in autonomous systems. If you plan to use a gas generator for electrical energy as a power supply, then 12-volt light bulbs are just right.
The same solution is useful for connecting to panels that transform the light of the sun into energy.
A battery of several batteries connected in parallel will provide a charge to operate a flashlight or light bulb. There are ready-made solutions, or you can experiment to achieve the desired result.
All that remains is to calculate the number of lamps (light bulbs) for lighting, their power and begin to implement the chosen option.
Creative options using a variety of lamps
In critical situations, all methods are good. It is clear that we are not talking about candles or bowls of oil, but headlamps are quite suitable for lighting. The advantage of these solutions is the ease of implementation of lighting. They are suitable if light is needed urgently, but there is no time for “capital” options.
Efficient and effective ways for a garage space
The most effective method is the one that will not fail in a critical situation. Therefore, they often use a combination of several solutions, duplication, to protect themselves from accidents.
If implemented correctly, any chosen method of autonomous lighting will live up to the expectations placed on it.
The main thing is to periodically check the functionality of the components and troubleshoot problems in a timely manner, including replacing worn-out batteries.
Car battery
The car's battery powers the on-board electronics, including the lighting. The power is enough to power low-voltage (12 Volt) lamps or LEDs. But the supply of electricity in this source is not eternal; after a while the battery will have to be charged. Therefore, it is wiser to leave this method “in reserve” and use it as a backup.
Generator
Modern manufacturers offer special devices for tourists and extreme sports enthusiasts - biofuel energy generators. The device is powered by wood chips, cones, and pellets loaded into the fuel compartment. Produces light, heat, heats water, charges the phone. The main disadvantage is the price.