- Article
- Video
So, for example, you drew
a diagram of the electrical wiring in the apartment
and laid wires to the junction boxes. Now you need to route the cable from one box to the lamps, socket group and switches.
The main thing here is not to mix up the conductors so that a short circuit does not occur. The connection is quite simple:
- the input phase is connected together with the phase of the socket and switch (in due course, from the keys, the phase goes further to the light bulb);
- the input zero, just like “ground,” is connected to a socket and a lamp (this can be a chandelier or other lamp).
It is best to check the correct installation on the provided connection diagram for the socket, lamp and switch:
Please note that the best quality way to connect wires in the junction box is with WAGO terminals (shown in the picture). They are inexpensive and easy to use.
The video below clearly demonstrates how to connect all 3 elements together:
That's the entire electrical diagram for connecting a socket, switch and light bulb in one junction box. We hope the information was accessible and useful for you!
Always before starting renovation work in a room to move the switching points of lamps, it is necessary to think in advance about their installation locations. Work on the installation of switches and sockets must be accompanied by compliance with safe work rules. If the room has been in use, it must be de-energized and the wiring must be installed according to the approved diagram.
The solution to many issues in a room being renovated is to connect the switching device (switch) of a chandelier or other electrical device from an outlet. During the repair process, this method will help save on wires and the time required to complete the work; there is no need to make additional grooves.
What is needed to switch the circuit?
Electrical wiring can be open or hidden. In this article we will consider the connection of sockets and switches made according to the second option, when all electrical switching is hidden under a layer of plaster. Hidden design is the most common type of electrical wiring; open wiring is usually used as a temporary option.
Preparing the walls
Before connecting a socket and switch in the room, you need to prepare holes in the wall for their installation and grooves in which the wires will be laid. There should be three holes in total - for the junction box and for the connected switching devices.
It’s better to draw an approximate drawing on a piece of paper in advance, where exactly you plan to connect the switch and socket, and what route the wires will take to these places.
The hole for the distribution box is made, as a rule, under the ceiling, 10-15 cm lower. Holes for switching devices are made at the site of their planned installation. It is better to install the socket at a distance of 30 cm from the clean floor, where household appliances will be connected to it. It is advisable to install the switch at the entrance to the room at the level of an adult’s lowered hand - about 90 cm from the clean floor. These works are performed with an electric drill with a special bit for brick or concrete, a hammer drill with a Pobedit drill, an impact drill or an angle grinder.
When installing gates, consider several important rules:
- They can only be horizontal or vertical; no tilting is allowed.
- The entire path of the groove from the distribution box to the installation sites of the socket and switch must pass with a minimum number of turns.
- Vertical grooves cannot be brought closer to window and door openings less than 10 cm, and to gas pipes - less than 40 cm.
To install the grooves, you can use a hammer and chisel, a hammer drill, a grinder or a special tool - a wall cutter.
When all the holes and grooves are ready, thoroughly clean them of dust using a vacuum cleaner.
Installation elements and tools
To perform the electrical part of the work you will need the following materials and tools:
- distribution (socket) box, in which all wires are connected;
- two plastic or polypropylene mounting boxes (socket boxes), they are needed in order to securely fasten the switching devices in the wall openings;
- indoor socket;
- indoor switch with one key;
- lighting fixture;
- set of screwdrivers (flat and Phillips);
- knife or stripper for removing insulation from conductors;
- pliers with insulated handles;
- clamps or insulating tape;
- indicator screwdriver.
To switch the entire electrical circuit, you will also need a two-core wire. Nowadays, electrical goods stores offer a huge assortment of wires and cables, so immediately buy one so that each core has its own colored insulation, for example, red and blue. This will make it easier to switch the circuit; you won’t have to look for phase and zero with instruments, you’ll just need to connect wires of the same color.
In order to fix the wires laid in the grooves, you will also need alabaster and a spatula.
Alternative
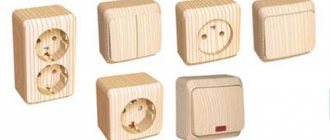
In some situations, you need not one outlet, but several. Few people know how to connect them correctly so as not to cause trouble. Therefore, it is better to choose an alternative option - a block of sockets. Such blocks come in regular and power types. They are very convenient to install and easy to connect.
There is a switch on the side, which allows you to disconnect the load without pulling out the plug. You can purchase units of 10 and even 20 A. Please note that some models come without a power cord; it must be purchased separately.
When making repairs or modernization in a house or apartment, remember: apparent simplicity does not mean that you can cheat somewhere. And this is especially important in electrical engineering.
Expert opinion
Viktor Pavlovich Strebizh, lighting and electrical expert
Any questions ask me, I will help!
There should be 1 socket in a room for every six square meters, with the exception of the kitchen, since it has as many sockets installed as needed. If there is something you don’t understand, write to me!
If you need to install a switch from an existing outlet
If the outlet is already installed and connected, you can also connect a light switch to it. There are also two options here, the choice between which depends on the location of the chandelier. The difference between them lies in the distance of the lamp from the socket - if close, then the neutral core is in contact with it, if far away, then from the shield. Let's consider both methods.
Phase and neutral supply from the socket
The easiest option is when both phase and zero are connected to the switch from the outlet. It is applicable if the light bulb/lamp is located very close. To connect them, you need to do the following:
- First of all, you need to install the chandelier itself, and then, according to all the rules, connect the switch to it through wiring.
- The connection procedure must begin with a circuit break - de-energization. This can be done by turning off either the group switch (for the room, if there is one) or the common switch (for the entire apartment/house).
- Next, open the socket cover and check the current at its contacts using a special measuring device (screwdriver with a light bulb).
- A conductor leading to the switch input is connected to the contact with the phase. The output is connected to the core of the lamp itself.
- A conductor suitable for the terminal from the lighting device is attached to the zero contact.
- If there is a grounding contact, then it must also be connected to the corresponding conductor of the chandelier.
- After all the wires have been correctly twisted, the contacts are closed, the wires are laid in their intended place, and the entire assembled system is tested after applying voltage.
Connecting only phase
Now let's consider the option of how to connect a switch to an outlet if the chandelier is located in close proximity to the switchboard. To do this you need to do the following:
- As in the case described above, first of all you should break the circuit by de-energizing the work area.
- Next, remove the cover from the socket and check for voltage (for safety).
- If the phase contact cannot be established visually, it is checked using a measuring device and temporarily applying voltage.
- A conductor is attached to the phase contact of the socket and brought to the switch input.
- The core from it must be connected to the input of the lamp.
- The neutral conductor is laid either directly from the shield (which is extremely rare) or from the distribution box closest to it.
- In the same way, it is necessary to connect the grounding conductor for the light bulb.
- After twisting the wiring, reliable insulation of the contact points and applying voltage, the serviceability of the assembled system is checked.
To power the lamp, a large current is not required, and therefore the wire is taken with a thin cross-section. The socket output requires a thicker conductor - a regular phase conductor from the switching mechanism will quickly overheat and burn out. The latter circumstance can even lead to a dangerous fire situation!
The main reasons for replacing the cartridge.
It is necessary to replace the socket in a chandelier not only due to manufacturing defects, but also due to design features. If the lamp is closed, the temperature inside the bulb increases greatly. Sometimes this leads to melted wiring.
In old sockets, contact with the lamp deteriorates over time. This can cause frequent breakdowns of the latter. After incandescent lamps burn out, sometimes fumes form on the terminals, which leads to poor contact. Simple cleaning rarely brings positive results, so the holders are replaced.
Another reason for replacement is the desire of people to switch to energy-efficient LED lamps. Since they are produced with a smaller base, there is a need to change the seat in the lamp. All holders have an identical design. They differ only in the diameter of the thread.
Connecting the switch through the distribution box.
The switch circuit consists of two wires coming from a network with voltage V; to install a new connection, you can purchase wires of different colors, for example: red and blue.
People may also be harmed.
But when connecting the switch, many may have problems.
If you intend to install the product outdoors or in a room with a high level of humidity, for example, a bathhouse, shower room or bathtub, you need to make sure that the structure is equipped with protective covers - curtains. Taking into account the colors, parallel connection of wires and installation of a second socket are carried out. In this article, together with you, I will first analyze all types of switches. The passage of time has changed this rule.
See also: Loop phase zero norm
The position of the key of this switch does not matter. Ideally, current should flow to the light bulb in the following sequence - phase goes to the central contact of the light bulb, zero goes to the base. How to make a socket from a switch if it is possible to aesthetically place them next to each other? A small section of wire connects the phase terminal in the socket and the input terminal of the two-key switch.
How to connect a light bulb and switch? We check the absence using a voltage indicator.
The device is proposed to be used instead of a regular outlet. In this case, each pair is divided into phase and zero veins. This scheme is less common, but in some rooms it is used.
Let's consider a diagram for connecting a combined device, consisting of 7 steps: The first stage is laying five 5 conductors from the distribution box to the dual electrical system. You should mark a cable line from the switch and light bulb to the distribution socket - this is if the connection circuit will be powered by voltage from the socket. Connection diagram for a socket-switch unit with two keys. Basically, units that combine a socket and a switch with two keys are installed on the partition between the doors to the bathroom and toilet. To increase safety and increase the service life of electrical wiring, it is advisable to use terminals instead of twists. Turn off the opening machine for the apartment.
One lamp - one switch
The simplest circuit consists of one lighting element and a single-key switch.
Theoretically, the connection does not differ from that described above - the neutral conductor goes directly from the distribution board to the consumer, but a breaker is inserted into the phase conductor. But almost everything looks a little more complicated.
To make this type of connection, you first need to decide on the location of the junction box.
It should be installed as close as possible to the installation location of the switch, while making it easy to access.
The number of wires required to create a branch directly depends on this. Its optimal location is under the ceiling above the switch.
And then everything is simple:
- We determine the location of the lighting element - the lamp (for example, in the center of the ceiling);
- We select the installation location of the breaker (conditionally - below the distribution box);
- We insert the wiring coming from the distribution board into the distribution box;
- We lay the wiring along the ceiling (along the shortest possible path) from the lamp socket and also put it into the box;
- All that remains is to lay the wire from the switch to the junction box.
For simplicity, we will designate the wire going from the switchboard to the box as “input”, and from the box to the consumer as “output”.
For a circuit with a single-key switch and one lamp, two-core wires are used.
After laying all the wiring (in an open or closed way), all that remains is to connect everything correctly and for this it is important to determine which core is phase and which is neutral. You can find out this using an indicator screwdriver, making a corresponding check on the terminals from the distribution board before turning off the power supply
You can find out this using an indicator screwdriver, making an appropriate check at the terminals from the distribution board before turning off the power supply.
To make it clearer, let's look at how to connect everything correctly using different colors of the braiding of the wiring cores.
For example, to create a power branch for a lighting element, a wire with cores painted brown and blue was used.
When connecting the input wire to the distribution board, the brown wire was connected to the phase terminal, and the blue wire to the neutral terminal.
Knowing this, all that remains is to connect everything correctly in the junction box.
Since the “zero” goes directly to the consumer, we connect the blue (zero) input core to the corresponding output wire.
It remains to include a switch in the circuit. A two-core wire will also be thrown from it to the distribution box, but in this case it is two parts of one line (phase).
We take the brown (phase) input wire and connect it to any of the wires, for example, also with the brown one leading to the switch.
All that remains is to connect the blue wire coming from the switch to the brown wire of the output.
Next, all connection points must be properly insulated, and only after this, the functionality of the created branch must be checked by applying voltage to it.
We examined in detail the method of connecting one lamp to a single-key breaker.
All subsequent schemes are built according to the described principle, so we will indicate only their key points.
Marking.
Each product must indicate all the necessary parameters. Markings include:
- normalized current (unit ampere) (sometimes lamp power in watts);
- normalized voltage (unit of measurement volts);
- normalized pulse voltage (unit kilovolt);
- type of current (for cartridges with a switch);
- manufacturer (the corresponding trademark, brand is indicated);
- product type;
- moisture, dust protection;
- highest operating temperature;
Products E14 and E27 can operate at a rated voltage of 250V. E14 can withstand rated current up to 2A (power 440W). E27 - can consume significantly more - up to 4A (power 880 W).
- The normalized temperature is designated by the letter T.
- The letter A (Amperes) is used to indicate the amount of current
- Voltage – V (volts).
- Moisture protection has the symbol - IPXI. This symbol is usually marked on the outside of the cartridge.
Expert opinion
Viktor Pavlovich Strebizh, lighting and electrical expert
Any questions ask me, I will help!
You can only bring light to the balcony through the wall, so you will need to drill a hole in a suitable place large enough for the corrugated pipe to pass through. If there is something you don’t understand, write to me!
Connection diagram for a switch in a distribution box
Connecting a wire directly to a light fixture or switch is quite simple - it doesn't require any explanation.
This article will discuss how to connect wires from a lamp, electrical panel and switch in one junction box.
Once again we would like to remind you that all work on connecting wires in the distribution box, connecting switches and lamps should begin only after the mains voltage has been removed.
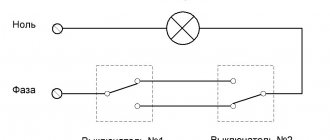
The switch connection diagram is quite simple, but one rule must not be forgotten: the phase wire is connected to the lamp through a switch, that is, the phase must always be connected open-circuit.
By following this simple rule, when the switch breaks exactly the phase and not the zero, you will ensure your safety and also make it safe to operate electrical equipment in your apartment.
If the switch disconnects from the load not the phase, but the neutral wire, then the wiring will always remain energized, which is not only inconvenient, but also dangerous.
For example, you need to replace a light bulb that has burned out in a chandelier. If the switch turns off the neutral wire and not the phase, if you accidentally touch the current-carrying parts of the chandelier or the base of the light bulb, you may get an electric shock, since these parts are under phase voltage.
You can determine the phase wire in the distribution wiring using an indicator screwdriver.
Again, for safety reasons, the phase wire (usually red) must be connected to the lamp socket in such a way that the light bulb is connected to the phase by the central contact of the base.
This reduces the likelihood that a person will touch the phase wire.
The switch connection diagram consists of one or more light bulbs connected in parallel, a single-key switch, a distribution box and a 220-volt power source.
Specialized stores offer a wide range of wires for electrical wiring, so for phase and zero it is better to take wires of different colors, for example, red and blue.
So, a two-wire cable runs from the distribution board to the distribution box. It is very convenient if it is two-colored, for example, the phase wire is red and the neutral wire is blue.
In addition, a cable from the lamp and a cable from the switch are suitable for the junction box. The phase wire from the distribution board (red) is connected to the red wire going to the switch.
The second (blue) wire from the switch is connected to the red wire, which is connected to the load (lamp, chandelier). As a result, we made the phase that goes to the lamp commutated.
The neutral wire (blue) from the electrical panel is connected to the neutral wire, which goes to the load (light bulb).
The result is that the neutral wire from the junction box goes directly to the light bulb, and the phase is connected to the light bulb through a switch.
The scheme works as follows. When you press the switch key, the circuit is closed, and the phase from the electrical panel is supplied to the lamp, its light bulb begins to shine. By pressing the key again, the electrical circuit is broken and the light bulb turns off.
After all connections, the twisting points are thoroughly insulated and neatly laid. It is best to connect the wires in the junction box by twisting and soldering.
Connection diagram for socket and switch in one junction box
Very often, a distribution box is installed in each room of the apartment, where all the switches, lamps and sockets of this room are connected.
In this case, due to the large number of wires going to the junction box, it is quite difficult to figure out what needs to be connected where.
How to connect a socket and switch to a distribution box?
Let's consider the option when a socket and a lamp are simultaneously connected to one distribution box.
So, two wires come from the distribution board to the box - red (phase) and zero (blue).
The procedure for connecting the switch and lamp is exactly the same as discussed above.
The socket is connected parallel to the supply wires: the socket phase is connected to the supply phase (both wires are red), and the zero from the socket is connected to the neutral supply wire (both wires are blue).
The connected wires must be well crimped and soldered, after which they are securely insulated and neatly placed in the box.
Similar materials on the site:
Home » Electrical » How to connect wires in a junction box
How to connect a socket to a lamp with your own hands?
Depending on the type and configuration of the luminaire, the device must first be disassembled. If you are going to connect the outlet to the lamp via a power cord, then in this case you do not need to disassemble anything. It is enough to carefully cut the power cord lengthwise and separate it into two wires, to which you can later connect the lamp to the outlet.
However, there is one nuance here, namely, in which part of the wire you will connect the outlet. If this is done before the switch, the socket will be operational all the time. But if you connect the socket to the lamp after the switch, then accordingly, voltage will be supplied to the socket only when the lamp is running.
If you need to connect a socket to a lamp through its body, then you cannot do without disassembling the lamp. To do this, you must first remove the cover on the lamp, which is most likely its base. Next, depending on how the wires are connected in the lamp, and they can be connected through terminals or simply with screws, two wires are connected to the existing power wires of the lamp.
Next comes the stage of connecting the socket to the lamp with your own hands. To do this, the socket is first disassembled, after which, again, depending on how the wires are connected to it, it is connected.
What is important to consider when connecting a socket to a lamp? There may be two or three connections on an outlet. If there are three, then one of them is allocated to the ground loop and does not need to be connected. The two main connection sockets on the socket are usually located at its edges. Once you disassemble the outlet, you will definitely be able to find them.
If you don’t at all understand the question of how to connect an outlet to a lamp, plus you’re still afraid of electricity or something else, then it’s better to call a neighbor or call an electrician. A smart electrician, even a drunk can connect an outlet to a lamp!
Most options for connecting one device to another will not require complex skills from the master, such as independently laying additional wires or installing grounding in an apartment where there is none. However, in this case, some restrictions are imposed on the operation of the connected sockets: certain types of electrical appliances cannot be connected to the network. To connect the outlet yourself, you need to understand the structure of the apartment's electrical wiring and be able to identify the functions of the wires located in the niche.
Radio communication
We carefully insulate all twists using electrical tape. If you want to expand your circuit by connecting an additional light bulb or, for example, adding a socket, you can use a double or triple switch, here is how to do this.
Do not twist aluminum or copper wires!
This is an extremely unstable compound that quickly oxidizes and can not only fail, but also ignite. To connect such wires, use special terminal blocks. In an electrical store they are presented in a wide range. According to the rules of good manners and for safety reasons, try to use blocks instead of twisting wires everywhere.
If you did everything right, you can be proud of your work. If not... well, finally call an electrician.
I really hope that the article will be useful to you and that everything will work out for you.
Perhaps I forgot to say something important that seems self-evident to me and not at all clear to you. Therefore, I will wait for your comments below and will be happy to answer questions, supplement and correct the article if necessary.
Thank you for your attention!
Is it possible to wire a socket from a switch and a switch from a socket, how is this easier to implement and what should you pay attention to?
It is these questions that we will try to answer in our article. After all, many of you have probably encountered the problem of having to install a new electrical point, and to do this completely renovating a room is not always advisable, and it is not necessary. The main thing is to approach the matter wisely and set priorities correctly.
Before considering the issues of making changes to the existing network, let's understand how it works. After all, your ability to make changes to it directly depends on your understanding of this issue.
Main diagram of the apartment electrical network
First of all, let's determine how the wiring diagram for an apartment or house is made. This circuit begins in the input panel.
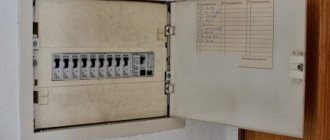
- So, let's start with the introductory panel. It can be located in the entrance or directly in the apartment. In it you will find an input circuit breaker, which receives a power cable from the general house electrical network. Sometimes instead of a machine there are batch switches or even circuit breakers, but this is mainly in old houses.
- From the input circuit breaker the wires go to the meter, and from it to the group circuit breakers. Usually there are two or more of these groups. This amount directly depends on the possible loads in your apartment.
- Group circuit breakers divide the electrical network of your apartment or house into several groups that are not connected to each other. Groups can be formed according to the nature of the loads or the ease of installation. This is not a fundamental question. The only thing that the instructions prescribe is the division into different groups of electrical appliances in the bathroom and kitchen with electrical appliances in the living rooms.
- From group circuit breakers, wires go to one, two or more distribution boxes. They are directly connected to a group network of sockets and switches. This concentration of connections in one place makes it possible to simplify maintenance as much as possible and hide utility networks.
Connecting switches and sockets
In order to determine whether it is possible to connect an outlet from a switch, let's look at the features of their connection to the group supply wire. After all, starting from this, we can clearly imagine our future scheme.
- To connect the socket in accordance with clause 7.1.13 of the PUE, three wires are required. One of them is phase, the second is neutral and the third is protective grounding. These wires, in accordance with clause 1.1.30 of the PUE, must be marked with blue as the neutral wire, yellow-green as the protective grounding wire and any other color as the phase wire.
- The phase and neutral wires from the supply group wire in the distribution box are connected to the power contacts of the socket. Protective grounding to grounding contacts.
- Connecting the switch is even easier to do yourself. After all, this requires only two wires. Moreover, both of them will be phase. The first wire is connected to the phase conductor of the group line and to the switch input.
- The second wire from the switch output goes to the distribution box, where it is connected to the phase wire of the lamp. The zero of the lamp is connected bypassing the switch, directly in the distribution box to the supply wire.
Electrical wiring project
To begin with, they draw up an electrical wiring project; it is best if the project is drawn up for you by professionals. But if you have experience and the necessary knowledge, then you can draw it up yourself.
You need to know that Russian standards are very different from foreign standards, which means that foreign wiring diagrams cannot be used in our country. All electrical installations in the house are planned at the initial stage; for this purpose, draw a house plan and indicate on it the places where there will be switches, sockets, chandeliers, etc.
At this stage, it is very important to create a diagram where the locations of the devices will be indicated.
The next step will be to indicate where the wires will be laid in the house.
After all the above manipulations, carry out the wiring.
There are three types of wiring and connections:
To make their work easier, they distribute the load. For example:
This option is a simple ungrouping of electricity consumers and the fewer groups, the more economically the material will be used. In order to simplify the installation of wiring, its installation is carried out in floor slabs. In the diagram, such wiring is marked with dotted lines.
When conducting wiring, it is necessary to take into account the current strength that will have to flow through the network, that is, this is the ratio of the total power of all consumers to the voltage. In houses and apartments, the maximum current consumption does not reach twenty-five Amperes.
All materials must be selected according to this parameter. The cross-section of the wires depends on the current strength.
If you calculate that your current consumption is 16 Amps, then you cannot install fuses with the same operating current value.
It is necessary to take a larger standard value than the calculated one.
Do-it-yourself electrical wiring in the house
To install the wiring yourself, you need to know which cable you need and use it. After all, it is produced with different cross-sections; it is selected based on current parameters.
At this stage, you will need to calculate the amount of materials that may be needed for installing the electrical wiring. Work such as drafting, wiring, and installation can be done quickly, but there is some difficulty in calculating the amount of wire required for wiring. But measurements can be made by taking a tape measure.
Expert opinion
Viktor Pavlovich Strebizh, lighting and electrical expert
Any questions ask me, I will help!
You will need tools: a Phillips and flat-head screwdriver with an indicator, an electrician's knife to remove the insulation, as well as side cutters and a level. If there is something you don’t understand, write to me!
Radio communication
We carefully insulate all twists using electrical tape. If you want to expand your circuit by connecting an additional light bulb or, for example, adding a socket, you can use a double or triple switch, here is how to do this.
Do not twist aluminum or copper wires!
This is an extremely unstable compound that quickly oxidizes and can not only fail, but also ignite. To connect such wires, use special terminal blocks. In an electrical store they are presented in a wide range. According to the rules of good manners and for safety reasons, try to use blocks instead of twisting wires everywhere.
If you did everything right, you can be proud of your work. If not... well, finally call an electrician.
I really hope that the article will be useful to you and that everything will work out for you.
Perhaps I forgot to say something important that seems self-evident to me and not at all clear to you. Therefore, I will wait for your comments below and will be happy to answer questions, supplement and correct the article if necessary.
Thank you for your attention!
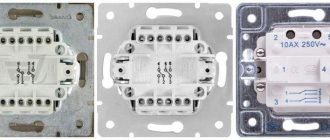
Dismantling the old block
Almost every day we come across the concept of “Kick-Ass”. Another kicker - at the end of the article.
2.Old socket block with switches in disassembled condition
What do we see? Everything is loose and rickety, the two upper switches are in a completely dead state, the third is not connected, and according to the owner, it never worked. The socket is more or less compared to them, considering that in such a place it is almost never used.
The panel house is 40 years old. The lights in the kitchen and bathroom are turned on at least 10 times a day. 40x365x10=146 thousand times. We did a good job.
At this stage, we understand the wires, check where the phase is, and turn off the power. In this case, you must have a headlamp; you can’t do without it.
We take out the insides. The main thing is not to break the wires and notice where everything goes.
3. We take out all the insides - the old socket, switches, metal box
The bad ends that went to the switches had to be cut off - they were still short.
The two bottom wires go to the socket. On the left is zero, on the right is the phase, which in the old days electricians designated with black rag tape (there was no other tape, no markers).
It is worth saying that for some reason the antique metal installation box is attached as tightly as tin. It is fastened with some screws and nuts that must be turned. I have replaced such blocks in prefabricated houses more than once, and each time tearing out this box is torture. I use powerful pliers and a large flathead screwdriver.
4.No one will ever need this again. Thanks for your service!