Any electrical equipment needs protection from disruptions in the operation of the electrical network: voltage surges, reboots and other negative influences. For these purposes, a huge number of automatic protective devices and equipment have been created. Some of them are technically complex and expensive, while others are affordable and simple. One such simple device is a surge protector.
What is a surge protector for and what does it protect against?
A surge protector is an electrical device designed to connect various household equipment and can protect it from the negative effects of power surges.
Electrical networks for any purpose are not ideal in terms of the quality of transmitted energy. Uneven load on the electrical network, accidents and the influence of various factors can cause voltage drops in the network, which in turn can lead to malfunction or failure of household appliances.
To protect home devices from sudden surges in voltage above the rated voltage, surge protectors are used. Also, such devices are used to reduce the influence of radio and electromagnetic signals on the operation of household appliances (for example, this is noticeable in acoustic and television and video equipment).
Which household appliances generate the most load?
Such devices include the following:
- irons;
- vacuum cleaners;
- TVs;
- microwave;
- dishwasher and washing machine;
- hair dryer;
- air conditioner;
- Electric kettle;
- fridge.
These devices cannot be connected to filter equipment together with a computer. It is also prohibited to connect two or more similar devices. In this case, the first filter connected to the outlet will experience the maximum voltage generated by all devices in the circuit.
Operating principle
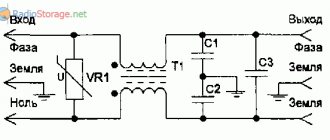
The principle of operation of network filters is quite simple and consists of filtering interference and limiting voltage.
Protection against radio and electromagnetic noise is provided by inductive elements (toroidal inductors) and capacitors, which help reduce high-frequency components to the normal frequency of 50 Hz. This occurs due to the fact that the resistance of an inductance increases with increasing frequency, while that of a capacitor decreases.
Method for detecting a broken cable section
A way to detect a possible break area is to use a device that will indicate that it is on or off. A radio receiver, any table lamp, and much more can serve as testing equipment. We connect the selected device into the carrier and then, starting from the plug, every 5 cm we begin to bend the wire in different directions. When the wire is bent in a certain place, the device will turn on. Therefore, this is where the cliff area was discovered.
8
Results
Illuminated switches are an extremely convenient and practical device that can be used in an apartment or house. Its installation is quite simple and anyone can do it, but the process requires a lot of concentration. The choice of one- and two-key models adds variability - with one or two buttons you can turn on all the lights in the room. It is very convenient and practical.
What does it consist of and how is it structured?
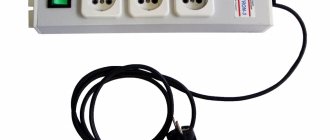
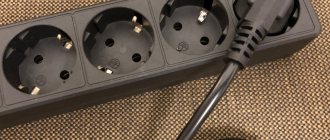
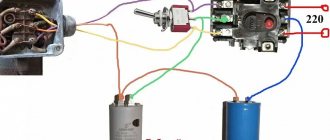
Externally, the surge protector looks like a standard extension cord with a cable of various lengths and several sockets for connecting household appliances. But the internal circuit is fundamentally different from ordinary household extension cords. Inside the surge protector, in addition to the pads, there is a protective microcircuit and a fuse. The surge protector also has a power button.
Expensive and well-made surge protectors have a capacitor bank and several chokes and additional protection systems, but inexpensive devices (often made in China) lack such components, but still contain a varistor.
Extension joint when broken or extended
When using an extension cord for a long time, sometimes the cable shorts due to kinks, blows once applied to the cord, etc. Maybe you wanted to increase the length of the extension cord. Let's look at how to connect an extension cord with your own hands.
To begin, unplug the power cord. If the cable is shorted, it will be immediately visible, cut off 10 cm on both sides from the epicenter of the short circuit, and wipe off the soot. We remove the top insulating sheath of the cable 5 cm, clean the wires 1.5 cm on both sides.
We twist the two bare wires together as tightly as possible, preferably without gaps for good contact, this will prevent the connection from heating up under load. We insulate the twist with insulating tape, and do the same with other wires; be sure to wrap both twists with insulating tape, for the elasticity of the twist and strength.
Some people prefer soldering wires; this method is better than twisting. Soldering of wires and insulation is carried out in the same way. When extending the cable, the same work is done
Types of network filters
Surge filters, like any household appliances, are produced in huge quantities and have different characteristics and appearance. There are basic, advanced and professional options.
Basic surge protectors are affordable devices and are often used to connect unpretentious home appliances. They have a very simple design, protect against voltage surges, but may not protect against interference.
Advanced devices are used for any household appliances. They are made more complex than the basic options, and are higher quality and more reliable devices.
Professional filters are used for highly sensitive and expensive equipment. Such devices are made of very high quality, their circuitry is complex and reliable.
There are also various additions to the standard surge protector device, for example, the ability to control how devices are turned on and off remotely (using Wi-Fi or Bluetooth interfaces). Also, surge protectors can have any cable length and the number of connection points in a socket group from 1 to 10 pieces.
Making an extension cord: step-by-step instructions
As a rule, the manufacturing process does not take much time, so if you have all the necessary elements and tools, you can make an electrical extension cord in 15 - 20 minutes. To do this, follow these steps:
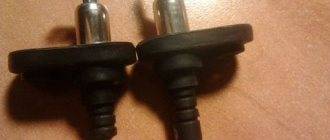
- Disassemble the fork; as a rule, it is unscrewed with one or more bolts, but the design may differ in different models. Rice. 1: Disassemble the plug
- Cut the electrical cable; to do this, remove the required length from the point where it is connected to the plug contacts to the point where the extension cord exits the plug. It should be noted that at the exit point the cable must have both layers of insulation, so you should not strip the top layer of dielectric with a margin. Fig 2. cut the cable
- Prepare a wire to connect to the plug terminals. To do this, step back about 1 - 2 cm from the edge of each core and carefully trim the rubber insulation. Rice. 3. Strip the ends
Be careful not to cut the core wire, otherwise this will reduce the cross-section and may lead to further overheating at the attachment point.
- Depending on the method of fastening in the plug contacts, prepare the ends of the wire (make loops, twist into one core, etc.).
- Do all these procedures for the second end of the wire.
- Connect the ends of the wire to the ends of the plug and assemble it. Figure 4: Connect the wire to the plug terminal
Please note that the assembled fork should not have any gaps - both parts fit snugly against each other. If you find a gap, disassemble it again and eliminate the cause of the unevenness. Where it exits the plug, the extension cord should fit snugly against the edges; if its diameter is not enough, add a little electrical tape.
Rice. 5: Assemble the fork
- Disassemble the electrical outlet or outlet block, depending on what you are connecting. Rice. 6: Disassemble the socket block
As a standard, they are equipped with one bolt in the center of the socket, but if the cover does not budge, you should inspect the structure for the presence of additional fastening points.
Rice. 7: standard socket mounting point
- Connect the ends of the wires to the corresponding outlet terminals of the electrical extension cord. Rice. 8: Connect the wire to the socket terminals
If you are making a device for a three-wire network, be sure to follow the wire markings. Especially for the ground wire, otherwise you may apply voltage to the body of the device.
- Reassemble the socket in reverse order, the electrical extension cord is ready.
Rice. 9: assemble the socket - the extension cord is ready
Please note that when connecting certain parts, contact must be ensured using special clamps, sleeves or by soldering. It is under no circumstances allowed to ensure contact only by screwing the wire to the lamellas or other parts. After making an electrical extension cord, do not rush to plug it into the outlet; first check its serviceability using a multimeter.
Checking the serviceability of the electrical extension cord.
To check the functionality of the carrier, you will need a regular multimeter or megohmmeter. The whole process can be divided into checking the integrity of the line and checking the insulation. Initially set the multimeter to dialing mode:
- Connect one lead of the multimeter to the socket of the outlet, and touch the second lead to the plug of the electrical extension cord. If the device does not report a circuit, touch the second prong of the plug.
- Hold the multimeter probe on the same contact of the plug where the device showed the circuit, and check other sockets in the block. Their contacts of the same name should also provide a circuit for the continuity of the electrical extension cord.
- Check the second pair of contacts of the electrical sockets and the output of the extension plug; they should also show the presence of a continuity circuit.
- If you are using a three-wire extension cord, make the same connection between the grounding pins on the plug and each outlet.
Rice. 10: principle of continuity of the extension cord
The presence of a circuit between all of the listed terminals indicates that the extension cord can normally transmit electricity in a closed circuit. But, in addition to the circuit, it is necessary to ensure the condition of the insulation. What is a megohmmeter used for? But if you don’t have one, you can use the same multimeter in insulation measurement mode. For industrial purposes, measuring insulation with a multimeter is not permissible, but for domestic needs this will be quite sufficient.
During the measurement process, you need to set a limit on the maximum resistance value in kOhms or MOhms. Apply the probes to the phase and zero terminals on the plug; if the resistance is more than 500 MOhm or infinity, its level is sufficient for normal operation of the electrical extension cord.
Rice. 11: measurement of resistance between phase and zero
If the resistance approaches zero or is tens of ohms, you have broken the insulation somewhere and you need to double-check all electrical contacts in the extension cord. If there is a grounding contact, the resistance value must also be checked between phase - ground and between zero - ground.
Rice. 12: ground resistance measurement
If during testing you have determined the integrity of the phase, zero and ground circuits in the manufactured electrical extension cord, as well as a sufficient level of resistance between all terminals, then such a carrier can be safely used to connect equipment.
How to choose a surge protector for household appliances
The choice of a surge protector largely depends on your budget and the equipment that the filter must protect. You need to understand that the more sensitive a household appliance is to voltage surges, the more complex the design and the more expensive it is to purchase a surge protector. It is also important to think about how many electrical appliances this filter will be designed for: this affects the size of the outlet group and the permissible load.
Some surge protectors may have a specific purpose: for computers, acoustic devices, washing machines or other equipment.
Additional functions of network filters are: lightning protection, overheating sensors, USB ports, indication, as well as the possibility of “smart” control.
It is also best to purchase devices from trusted, well-known manufacturers, as they have extensive experience in the production of such devices, as well as many service centers, certification and warranty.
Also, do not forget about what country you live in in order to buy or order a surge protector from the online store with exactly the type of sockets that are used in your territory.
How much power does a PC or laptop consume?
You can determine this indicator by looking at the characteristics of the computer. There is a sticker with technical specifications on the laptop power supply. To calculate power consumption, the output voltage value is required.
Here are two parameters, between which there is a double “=” sign. By multiplying these indicators, you can get the power that the laptop consumes (expressed in kilowatts).
On a desktop computer, this parameter is determined by the performance or characteristics of the built-in components (processor, video card, and others). The indicator also depends on the settings made by the user. By default, the BIOS reduces the operating frequency of the processor and video card, thereby saving energy. But, if necessary, these indicators can be increased, thereby increasing power consumption.
In addition, this parameter depends on the nature of the operations being performed. So, if a computer is used to surf the Internet and run games with poor graphics, then, on average, the device consumes 180 watts. To this should be added 40 watts, which go to power the monitor. Please note that the computer consumes electricity while in sleep mode (under these conditions, this parameter is 4 watts per hour).
Electrics for girls
Our knights don't always care about the little things. And, even in your free time from saving the world, you can’t approach them at any moment with another minor “sadness.” Therefore, it’s good to be able to do something with your own hands. For example... an extension cord.
You don’t need much to create it: a cord, a plug and a socket.
The cross-section of the wire determines how powerful an electrical appliance can be plugged into this extension cord. If you take 2.5 mm, then almost any home appliance. If 0.5 mm, as in the photo, then a maximum of 1500 W.
How does an electrical outlet work?
So, let's take a look at what's inside.
And inside it’s not at all difficult or scary. There are only two terminals for connecting the wire (three if you have a ground connection).
How does an electrical plug work?
Now let's open the plug body.
Also two contact screws, a sealing sleeve-clamp so that the wire does not pull out of the plug. This is an old style plug, they are still produced and sold. In it, you need to seal the wire with a ring on the terminals. New forks are much simpler; there is no need to make a ring.
Step-by-step manufacturing of an extension cord
Remove the top insulation from the cord. We strip each wire of insulation by approximately 7 mm for the socket and 1 cm for the plug.
Now is the most difficult moment. I know. that 99% of men won’t bother with this. But I will tell you how to properly prepare the cord. The ends of the wire must be tinned with solder. For this we need a soldering iron.
Now connect the cord to the socket and plug.
We carefully lay the wire inside and close the case. Our extension cord is ready for use.
Switch on cord
Sometimes it is necessary to install a switch so as not to constantly pull the plug out of the socket. There is nothing complicated about this either.
Step-by-step installation of the switch on the cord
Unplug the electrical appliance from the outlet. Open the switch housing.
We strip the top layer of cord insulation to a length less than the length of the switch.
We leave one of the veins intact, and cut the second one exactly in the center.
The cut sides need to be cleaned to 5-7 mm and tinned.
Secure it to the switch terminals, carefully lay the wires inside and close the housing. Our table lamp (sconce, floor lamp) now has a switch.
Simple, isn't it? Have you repaired plugs or switches yourself?
Did you like the article? Subscribe to the channel to stay up to date with the most interesting materials
We carry out calculations
To correctly select components for an extension cord, you need to know two parameters - voltage and current. Voltage , as a rule, is 220 V in household networks, 380 V in industrial networks. The current is calculated using a formula based on the connected load, that is, the total power of consumers. In our calculations we neglect inrush currents.
For example, we plan to connect a water pump (800 W), a drill (400 W) and a trimmer (1000 W) to the extension cord. The total power is 2200 W.
To determine the current, divide the resulting amount by the voltage.
2200 (W) : 220 (V) = 10 (A)
Now we can select the socket and plug. Current values are always indicated in the technical specifications, as well as on the housings of the elements.
To determine the required cross-sectional area of the wire, refer to the table below. It is better to choose a wire with the closest value upward, so that there is a reserve when connecting more powerful consumers.
Table for determining cable cross-section
| Current, A | power, kWt | Cable cross-section, mm2 | |
| 220 V | 380 V | ||
| 11 | 2,4 | — | 0,5 |
| 15 | 3,3 | — | 0,75 |
| 17 | 3,7 | 6,4 | 1,0 |
| 23 | 5,0 | 8,7 | 1,5 |
| 26 | 5,7 | 9,8 | 2,0 |
| 30 | 6,6 | 11 | 2,5 |
| 41 | 9,0 | 15 | 4,0 |
| 50 | 11 | 19 | 6,0 |
| 80 | 17 | 30 | 10 |
Safe socket, simple circuit with a secret
Hello everybody! I bring to your attention a “test stand” for craftsmen and electricians. This simple device will be useful not only for the novice DIYer, but also for an experienced electrician who often has to repair faulty electrical appliances. The essence of this homemade product is to prevent short circuits in the home electrical network when testing new electrical homemade products or when repairing faulty electrical appliances. Let me give you a simple example. Let’s say they brought you a faulty vacuum cleaner, but what the fault is is not yet clear. It will not be possible to measure the load resistance with a simple tester, since the motor has a winding that is checked with a special device and not all craftsmen have these. You plug a faulty vacuum cleaner into the outlet and the good thing is that nothing will happen, but if there is a short circuit in your vacuum cleaner, the consequences can be very different from a simple circuit breaker tripping to your electrical wiring failing and, worst of all, a fire. According to statistics, a very large number of fires occur precisely from poor electrical wiring and faulty electrical appliances. Making this homemade product will not take much time and money, and in return it is almost completely safe.
First, we prepare a base on which we can attach all the parts of the stand, namely two sockets, a machine and a wire with a plug. You can choose any suitable material, in this case I took a piece of plywood 18mm thick with dimensions of 25 by 6.5 centimeters.
We attach a DIN rail to the prepared base as in the photo. You need to step back from the top as much as is needed to install the machines and secure the wire.
The circuit breaker can be installed double or two single, as in the photo, with a rated current of 6 or 10 amperes, although this is not essential. In this scheme, the machine plays a secondary role - as additional protection and as a regular switch.
We connect the electrical wire with a plug to the machine and fix it to the base using self-tapping screws and a tin clamp.