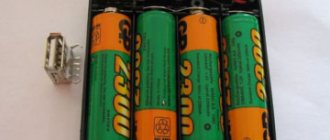
Sometimes car owners encounter difficulties when starting the engine. This happens especially often in winter. One of the likely causes is insufficient power to the starter, which may be a consequence of poor battery charging. The potential culprit should be seen not only in the battery; perhaps the cause is in the charger. To determine what the problem is, you should check with a multimeter how many amps the charger produces.
Checking the charger of a car battery is necessary to eliminate the risk of its malfunction.
Examination
It is worth paying attention to the technical characteristics of chargers, so you can understand the principle of checking it. Some car enthusiasts rely on the readings of devices installed on chargers. But this does not give any guarantees; they may well be “knocked down” and give erroneous readings. Therefore, it is advisable to periodically test the charger for performance.
The first check will be to measure the voltage. To do this, connect the charger to the battery. At the same time, the voltage on the crocodiles is checked. It should be equal to 14.4 V, and in no case fluctuate. Any deviations are considered a sign of malfunction. If the voltage is lower, but not much. For example - 14 V, then it is quite possible to use this device further. Just take this feature into account and do not try to charge completely discharged batteries.
If the voltage is below 13 V, it is not advisable to use the charger. Also, when the voltage increases above the normal value, it is not recommended to use a charger. This may cause damage
Is it worth repairing it yourself and where can I get it repaired?
The charger is a rather complex device, and it is not always possible to visually detect a defect. In addition, even if a charred element is found, the cause may be in another component. Replacing a burnt part will only lead to a repeat of the accident. Therefore, for self-repair, you will need at least knowledge of electronics and a general understanding of the principles of constructing chargers. You also need a minimum equipment set - a multimeter, and in some cases an oscilloscope. If any of these factors are missing, it is better not to undertake repairs. There is also little point in repairing chargers where a fault is found in the winding elements (transformers, chokes) if there is no donor device. It will not be possible to rewind them “on the knee” with factory quality, especially in pulse-type devices.
For clarity, we recommend thematic videos.
For repairs, you can contact specialists. And it is best if it is possible to take or send the faulty charger to an official service center . If this is not possible, you can look for a specialist on the Internet - on message boards or specialized forums. You can also contact your friends or garage neighbors. But if the memory device falls into the hands of self-taught people, the risk of poor-quality repairs increases many times over.
Chargers with advanced features
A combined-type starting-charger for passenger cars can start the car when the battery is dead and recharge the battery in a garage without removing it from the car. The device is a modified inverter welding machine with adjustable output voltage. There are pulse and transformer devices. Diagnostics and repair of starting-charging transformer devices differ little from the Electronics charger. Confident reading of electronic circuits and use of a soldering iron is a must for a craftsman.
More and more cars are equipped with lithium batteries. The chargers for them are different; the iMAX B6 smart device and similar electronic devices are used. They can charge all types of batteries and even single copies of lithium-ion and nickel-cadmium 18650 batteries. The device has a processor and automatically charges and discharges any battery using various modes. Repairing devices is complicated and is carried out in service centers.
Battery charge standards
Voltage is the main parameter of the battery. Therefore, the owner of his car needs to know what voltage should be in the battery.
The normal voltage of a 6 ST battery (6 cans) in a charged state should be from 12.6 to 12.9 volts. It follows that the charge of one can should be from 2.1 to 2.15 volts. If the voltage is less, then your battery is discharged. But this does not mean that your battery cannot be used. You are unlikely to be able to have a 100% charged battery at all times. In the table below you can see the dependence of the voltage and the degree of charge of the battery.
How to find the reason
When driving 20 km per hour, you need to connect two wires, as a result the battery will begin to charge. When driving at a lower speed in 4th gear, disconnect the wires. Otherwise, the battery may be discharged through the generator circuit. This method can only be used to connect the generator in emergency situations.
The car stalled and will not start - what to do?
Due to high voltage, the service life of devices is reduced. After arriving home, you need to quickly replace the relay and return the entire circuit back to its previous state.
Battery is low
As practice shows, the critical voltage level of a twelve-volt battery is a voltage of 10.8 volts. This type of discharge is called deep. Such a discharge is detrimental to the battery, it significantly reduces the service life of the car.
The table shown above shows how the degree of charge is continuously related to the density of the electrolyte. The battery charge can be checked not only by the voltage at the terminals. You can also check the density of the electrolyte. The density of a fully charged battery should be between 1.27 and 1.29 g/kb.cm. The density of the electrolyte can be measured with a simple device - a hydrometer.
How to check battery charge with a multimeter?
Most modern batteries have a special sensor that changes its color depending on the battery charge. However, it will not be possible to obtain accurate data using it.
How to check battery voltage with a multimeter?
To check the charge of a lithium-ion battery, you must perform the following steps:
- Switch the multimeter to voltmeter mode (voltage measurement) and set the range from 0 to 20V;
- Disconnect the battery from the car's electrical wiring;
- Connect the red probe to the positive socket;
- Connect the black probe to the negative socket;
- Record your readings.
If the multimeter shows that the voltage is 12.6 volts, then this indicates that the battery does not need to be charged and is fully functional. If the readings are below 12.6, this indicates the need to recharge the battery.
If the multimeter shows less than twelve volts, then the battery is completely discharged and needs to be charged urgently. If the reading is less than eleven volts, using such a battery can burn out the generator or charger, which means it is better to get rid of it and buy a new one.
It is important to remember that to obtain current data you need to check the charge, you need to wait 5-6 hours after the battery is disconnected from the car.
How to check battery charging from a generator with a multimeter? In exactly the same way, but now to measure the indicators, you will need to disconnect the generator from the battery, obtain the necessary data, and, if necessary, put it back on charge.
How many volts does it take to charge a phone?
Modern chargers have two main parameters that you should focus on. This is the voltage, which for most chargers is approximately 5.3V (volts), and the current, which can vary significantly, ranging from 0.1A to 3A (amps).
Interesting materials:
What awaits pensioners from January 1, 2022? What do you mean, you're a complete idiot? What does it mean to write to me in a personal message? Why was the fairy tale The Little Prince written? What is phenol used for? What is the pronoun used for? What is silver used for? What is epoxy glue used for? What is lavsan used for? What is PVC panel used for?
Repair
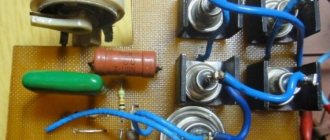
If you identify deviations from the norm, you should begin troubleshooting. To do this, you need to disassemble the device and check its components individually. Do not forget to disconnect the device from the mains before starting work.
First of all, check the diode bridge. To do this, voltage is applied to the memory. Current must be present both at the switch terminals and after the bridge. If this does not happen or the readings differ from the norm, you need to check all the bridge diodes individually. Serviceable ones should show a small resistance on one side, and on the other hand the resistance should tend to infinity. Replace any faulty diodes.
Automatic chargers have an additional board that regulates the operation of the device. It is checked quite simply. They simply measure the output voltage. If it is absent or significantly below the norm, then check the components individually or replace the entire board. The cause of unstable voltage is a breakdown of the capacitor.
Most often the transformer fails
. It is checked by ringing the primary winding. A working transformer should have a resistance of 20-30 ohms. In the event of a breakdown, this indicator usually tends to infinity. If it malfunctions, it is impractical to restore the charger. The cost of a new transformer is usually equal to the purchase of another charger. If you have extensive experience in electrical engineering, you can try to restore the winding. To do this, you will have to remove the old winding and wind a new one. But keep in mind that rewinding does not always help.
Conclusion
. As a rule, the average car owner is faced with the need to charge a car battery several times during the winter. To do this you just need to have a good charger. But, the question often arises of how to check a charger for a car battery. After all, this electrical device does not always work perfectly. Therefore, it is advisable to periodically check that it is working correctly.
Causes of battery charging failure
The main parameter in the battery charging process is the charge current. Many parameters depend on its value.
Capacity replenishment speed
There is an opinion that for normal battery charging, the charge current should be 10% of its capacity, i.e. with a battery capacity of 50 Amp*hours, the charging current will be 5 Amps. Under such conditions, it will reach its nominal capacity of 10 hours.
Imagine, you were turned on by the wires of another car in the winter, and in order to fully charge the car battery, you need to drive the car for 10 hours straight, that is, drive about five hundred kilometers.
It is believed that to replenish the battery charge to the nominal value, it is enough to drive 30 kilometers in a normal cycle, and in city traffic jams half that. That is, if your work is located more than 10 kilometers from home, this is enough not to worry about recharging the battery outside the car.
The case is different when work is close to home. You spent the capacity when starting the car, quickly drove to work, and then also home. After a week or two, your battery runs out. And not at all because there is something wrong with the car, it’s just the rhythm of the drive.
In this case, you should think about warming up the engine even in the warm season just to ensure that the battery is always charged.
Let's return to the charge current. If it is enough to drive a car 30 kilometers to fully charge the battery, and not 500, as in the example, therefore, the charging current of the car generator is not 5 Amperes, but much higher.
Battery life
The normal battery life is more than five years. Used cars imported from abroad have fully working seven- to nine-year-old batteries on board. There, however, the storage conditions for cars are different, and the temperature in winter is higher.
There are three reasons for the low durability of the battery: violation of the battery charging mode, the quality of the battery, the human factor, in other words, laziness.
Let's start with the first one. If the battery is not charged to full capacity all the time, the plates undergo a sulfation process. Sulfation, or the formation of lead sulfate on the plates, can be compared to a stomach ulcer in humans, only in humans it can be treated, but a battery ulcer is practically untreatable.
There are various methods of complete discharge-charge, charging with pulsed currents. Maybe there is some percentage recovery, but if the battery is completely dead, then alas...
The quality of the battery depends on the manufacturer. Modern technologies only affect the increase in battery capacity while reducing the size and weight, respectively, the amount of lead.
Better quality? If there are two different copies with the same capacity, starting current, cost, it is better to buy the one that is heavier, it has more lead, it will last longer.
About the human factor. The biggest mistake car owners make is parking the car in the fall with the battery until spring.
If the battery spends several months in a discharged, not even fully charged state, and even in the cold with a reduced electrolyte density, it is unlikely to survive until spring.
If you periodically use your car in winter, then regularly (a couple of times a week) you need to start the car and warm it up for at least fifteen minutes, checking the charging voltage.
If the car is not used in winter, it is better to remove the battery from the car, fully charge it and store it in a warm room, recharging it once a month.
During daily operation of the vehicle, it is necessary to regularly check the charging of the battery from the generator.
DC current measurement
, you first need to determine what type of current flows in the circuit being tested. This depends on the power source of the circuit. For example, batteries and rechargeable batteries are constant sources of power. To measure DC current, you need to set the rotary knob of the multimeter to the A -, DCA or I - icon, or press the button on the front panel corresponding to the desired mode. Both alternating and direct current are measured in amperes. Therefore, the value on the meter screen will be displayed in this value.
Using a USB Tester
It has been time-tested that many manufacturers, when manufacturing batteries, indicate a higher capacity on their case than it actually is. To correctly change this indicator and state, it is enough to stock up on a tester or mini-multimeter. These devices are available on the market at low cost, so finding them is not difficult. The tester, compared to a multimeter, looks like a small box with a USB connector.
There is a screen on the front side of the tester. During the check, the required indicators will be displayed:
- voltage (volts) and current (amps);
- current battery capacity in the phone;
- current memory slot (on the front side it can be switched with one button).
During operation, the USB cable from the tester is connected to a power source (charging unit, socket of a personal computer or laptop). The tester has USB and microUSB connectors. The check procedure is as follows:
- When determining the total charge of a smartphone or tablet with a microUSB socket, you will need to connect the tester and mobile device with a USB cable. Before checking your phone battery with a multimeter, be sure to discharge the device to zero.
- Next, you will need to connect the device to change to a power source and install an empty memory cell on its display or erase the one already in use. All you have to do is wait until the phone is fully charged.
- Once charging is complete, the screen should show 100% charging and 0 amp current. The display panel of the device will show the actual volume of the battery.
Amps and multimeter: what is it
Ampere is the SI unit that measures the force present in an electric current. Meters for determining it are called multimeters, which can be digital and analog or pointer.
There are differences between them. In the first case, the information is displayed on a liquid crystal screen, in the second there is a dial scale. An analog device has too high a measurement error. When working with it, you need to eliminate the slightest vibrations. Otherwise, the result may not be accurate. Digital more:
- comfortable;
- reliable;
- functional;
- practical;
- universal.
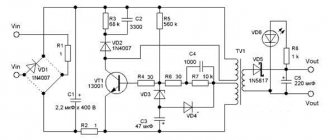
Principle of operation
The operation of the charger is based on reducing the voltage and converting alternating current to direct current. For this purpose, the circuit contains a step-down transformer and a diode bridge. The charging voltage should be 5-10% higher than the nominal value of this parameter for the battery, and the charging current should be about 10% of its capacity. Sometimes the phone is recharged from the car's DC battery. In this case, rectification (conversion from variable to constant) is not necessary.
Other ways to test a battery with a multimeter
The classic way to check battery capacity is to use a test charge:
- First, fully charge the battery.
- Then the load is applied so that the discharge current is calculated according to the data from the passport.
- After this, a measuring device is connected to the circuit.
- Measure the time it takes to reduce the current to less than 50% of the desired value. This time is indicated in the battery passport.
Checking battery charging
A voltmeter or multimeter helps in measuring voltage. If you want to measure voltage with a multimeter, set it to voltage mode. Then attach its contacts to the battery terminals and on the display you will see the charge of your battery. Polarity is not necessary. If you incorrectly attach the probes to the battery terminals, then the display will only show negative voltage. The photo below shows the result of the voltage measurement.
Using a load fork, you can also measure and control the battery charge. The mechanism of such a device has a built-in voltmeter that measures voltage. The load plug determines not only the battery charge, but also monitors the condition of the battery itself. To do this, the actual voltage is measured with resistance in closed circuit mode. The load fork emits the start of the car and determines the load on the battery. But when carrying out such a test, the battery must be fully charged.
Before checking the battery charge with a load plug, connect the terminals of the plug to the battery terminals and apply the load for 5 - 6 seconds. At the fifth second, note the voltage on the voltmeter. If the voltage drops below 9 volts, then such a battery will not last long. If the voltage drops to 10 - 10.5 volts, then your battery is still in good condition.
How to check battery capacity with a multimeter?
Another important indicator is the battery capacity. This characteristic shows how much charge it will give over a specific period of time, at a certain voltage, and it is measured in ampere-hours.
The capacity of a car battery can be checked in several ways using a multimeter.
Checking the car battery capacity under load
One way to check the battery capacity using a multimeter is to use a load, which can be a regular light bulb. It is worth remembering that if it begins to gradually fade, then you can end the test, since the battery is inoperative.
The load for testing the battery must be selected in such a way that it can take half the battery current, that is, if the capacity is 7 Amperes per hour, then the load should be 3.5 Volts. An excellent option could be a car headlight with a power of 35-40 watts.
This procedure looks like this step by step:
- The battery is disconnected from the generator;
- The load is connected;
- The battery should run under load for about two minutes;
- The load is turned off;
- A multimeter is connected to the battery in voltage measurement mode;
- Indicators are taken.
If the battery is working properly, then its voltage should be above 12.4 Volts. Accordingly, any problems during startup are most likely caused by a malfunction of the electrical wiring or other vehicle systems. If the multimeter readings are in the range from 12 to 12.4 Volts, this means that it will not work for a long time and you will soon need to purchase a new battery.
Checking the battery capacity using the test discharge method
In order to check the battery in this way, it is necessary to fully charge it and load it in such a way that the discharge current strength corresponds to the calculated value indicated in the battery passport. In this case, an ammeter or a multimeter turned on in the mode of displaying the current strength in the circuit is connected to the circuit.
After this, it is necessary to register after what time the current strength decreases by more than 50%. We compare the resulting value with the battery’s passport data and if the difference is not large, then it is quite suitable for use. If the difference is large, then this is a clear indication that the battery needs to be replaced.
Instructions
In order to measure the current in a circuit, it is necessary to connect a device in series to it. In this case, on the multimeter itself, you need to insert the red probe into the socket on the device labeled mA, and the black probe into com. Series connection means that the circuit must be broken and each probe is connected to a different wire, i.e. the device must be connected between two power sources. But since you are measuring current, and this is simply impossible to do in power supplies, you need to include some kind of device in the circuit, for example an ordinary light bulb, placing it in the circuit immediately after the power source.
If you are measuring AC current, the meter will display the maximum AC current value (A~ symbol - note that this is very similar to the DC symbol (A-), so be careful). And only after that you can start taking measurements.
Before checking the amperes with a multimeter, make sure that the current being measured is not too high, since such measurements may be unsafe due to the small cross-section of the probe wires. The latter may not withstand high loads. Experts recommend taking measurements at a current value of more than 10 A using electrical clamps.
We use a multimeter
This is an indispensable device that every motorist should have. Allows you not only to check the battery voltage level, but also the resistance of the sensors, the load of the on-board network in real time and many other important parameters. You can purchase this device for 300-700 rubles, which is 2-3 times cheaper than a load fork. This device is very easy to use.
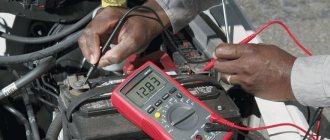
How to check the charge of a car battery with a multimeter? First you need to assemble it. We perform the following actions:
- We connect two wires with positive and negative polarity to the corresponding connectors.
- There will be probes at the ends of the wires. We apply them to
- First, set the device to voltage measurement mode and set the rotary switch to 20 Volts.
- We connect the multimeter leads to the battery and look at the result. In this case, the car ignition must be turned off.
Using special software
On smartphones or tablets, such applications may be installed by default. For example, the Android OS provides such a tool and can be enabled by typing the combination *#*#4636#*#*. In the menu that opens, you need to open the “Battery Information” section - there you can find out the current state of the battery and its performance.
For Apple models, we recommend the BatteryCare utility, available in the App Store for iPhone. It will help in the case of iPhone or iPad tablet computers. As for the Android platform, the Nova Battery Tester application has been developed for it. It allows you to check, in addition to the condition of the battery, its actual capacity. Moreover, testing of the program was carried out with laboratory equipment using several dozen batteries.
Introduction to multifunctional devices
Although different models of multimeters may differ in functionality and technical characteristics, their basic functions are the same. This means that all devices can measure voltage, current and resistance. Additionally, for example, it may be possible to test transistors.
In addition, testers can be electronic , where the readings are displayed on a digital display, or analog, equipped with an arrow that displays the value of a particular measurement.
Electronic multimeter
The appearance of electronic testers is quite similar, regardless of the diversity of the model range. At the top there is a digital liquid crystal display. Just below is a multi-position function switch containing the following positions:
- OFF—disables the device.
- ACV - work with alternating voltage.
- DCV - functions for constant voltage.
- DCA - sector for working with direct current.
- Ω - positions for measuring resistance.
Just below there are three connectors where you need to insert probes. And it needs to be done correctly. So, the black wire must be connected to the connector marked COM. Red is connected depending on what needs to be measured. It is connected to the connector marked “V Ω mA” when it is necessary to measure resistance, network voltage or current up to 200 mA. When measuring current strength greater than 200 mA, the red wire must be connected to the connector marked “10 ADC”. Otherwise, the fuse may burn out and even the device itself may fail.
Analog testers
There are also multimeters called dial or analog. Unlike electronic ones, the measured values here are determined using a scale with an arrow, which indicates the required parameter. They are less convenient to use. And the reading error is significantly lower than that of their electronic counterparts. They are also much more sensitive to mechanical influences and shocks - the frame on which the arrow is mounted can easily fail even from a strong shake.
But despite the fact that in most cases they are inferior to electronic ones, in some cases they may be preferable in operation.
Measuring current with an electronic multimeter
One of the directions of the tester is measuring current strength. To understand how to measure amperes with a multimeter, you need to know what kind of current, alternating or direct, the work will be done with. It's also a good idea to know the range over which measurements are taken. If you cannot obtain such information, then it is better to insert the red wire into the connector with a higher value, i.e., marked “10 ADC”. The switch also needs to be set to the highest possible value. This will prevent damage to the device in case of high current.
If the value displayed on the display is too low, then you can move the red wire to the “V Ω mA” connector, but also with the switch position at the highest values. When the value is still low, it is worth turning the switch to a lower setting until the measured current becomes adequate.
When measuring current, the device is connected to the circuit in series, which must be taken into account.
Measurement with a voltage tester
When measuring voltage, as well as measuring current, you need to know how to properly use a multimeter when carrying out such work. Here, too, it is necessary to pay attention to what kind of current we are dealing with - alternating or direct. Already guided by this, it is worth looking at what value needs to be set by the switch. For example, if we consider measuring the voltage in a simple outlet, we know that we mean an alternating current of approximately 220 volts. This means that the switch position must be set to an alternating voltage above this value. For example, 600 or 750 V, depending on the tester model.
DC voltage measurements are performed in a similar manner. If you do not know how many volts are in the circuit, then you should set the switch to a higher position, gradually reducing it to the most suitable values.
Unlike measuring current, when the device is connected in series, when measuring voltage, it must be connected in parallel. This is an important point to know how to use a voltmeter.
Determination of circuit resistance
Resistance measurement work can be considered the safest. It is extremely difficult to damage the device in any way here. The main thing is to know how to work with a multimeter in order to correctly determine the resistance. The main point to consider is the need to relieve tension before starting measurements. And here it’s not so much a matter of safety as the accuracy of the data obtained. Even a simple battery can significantly distort the accuracy of the readings.
You can set the switch to any position for measuring resistance in the “Ω” sector. Now that the probes are fixed at the ends of the conductor, the resistance of which needs to be known, you can look at the display indicators. There may be two options here:
- Indications “1”, “OL”, “OVER” - it is necessary to set a higher range, as overload occurs.
- Reading “0”—the range needs to be reduced.
In other cases, the resistance value of the conductor or semiconductor being tested will be displayed.
Dialing mode
Multimeters have the ability to use them as a dialer. And if this is not directly implemented in analog models, then digital ones have a sector when the switch is installed, to which the tester goes into dialing mode.
This function itself is rarely used, but in order to know how to fully operate a multimeter, this will not be superfluous. Let's say this feature is useful when it is necessary to determine the integrity of a circuit or an individual conductor. In some cases, it is thanks to the dialing mode that polarity can be determined.
In order to check the conductor for a break, connect probes to its ends. If the wire is intact, a characteristic sound signal is heard. Otherwise, no reaction will follow.
When carrying out work with dialing, special attention should be paid to the lack of power. If you do not de-energize the circuit on which measurements will be taken, then there is a high probability of failure of the device.
Sometimes other features are also implemented in multimeters, for example, a socket for testing transistors. However, they are used infrequently and only by people familiar with radio electronics. An ordinary amateur or a novice electrician is unlikely to have to use this opportunity - it requires certain knowledge. Otherwise, despite their multifunctionality, multimeters are extremely simple and unpretentious to use.
Safety precautions
It's easy to check the current strength. It is enough to connect the multimeter in accordance with the operating rules. It is necessary to follow the instructions in order not to violate safety precautions:
- The device is connected in a de-energized state.
- Pre-inspect the insulation on the wires. With a long service life, its integrity is compromised. There is a possibility of receiving an electric shock.
- You only need to measure amperes while wearing rubber gloves.
- Measurements are prohibited in rooms with high humidity. Moisture has high electrical conductivity. The risk of injury increases several times.
- Anyone who has suffered an electric shock, regardless of its power, must be urgently taken to the nearest medical center. It is forbidden to work with electricity alone. In an emergency, your partner can call an ambulance.
- It is strictly forbidden to work with devices that spark or are broken when connected to analog power sources, for example, to a battery, batteries or power supply. All this can lead to electric shock. Not too strong, but capable of harming the human nervous system and heart.
- It is forbidden to use a multimeter after an impact, just as it is forbidden to glue it with tape or insulating tape. It is better to use a new device or entrust it to a specialist for repair and testing for suitability.
After using the multimeter device, the cables that were cut are connected with the circuit de-energized.
A multimeter is a device that is simply impossible to do without in everyday life and other areas. Having even the most minimal knowledge of its operation, you can repair the devices. Knowing the indications, it is easy to determine their unsuitability.
How to prevent such a malfunction
It is enough to follow simple rules:
- Use original and high-quality chargers and cables;
- Do not use your phone or tablet while charging. Excessive movements may cause the connector to become loose. You can also try magnetic chargers and wires. They are easy to detach;
- Do not charge the phone from the car network immediately after starting;
- Do not discharge your smartphone to 0 and do not charge it to 100%. The ideal middle is from 10% to 90%. This is a proven fact. This way the battery will last much longer;
- Protect your phone and its connectors from dirt, dust and moisture;
- Try to prevent your phone from overheating or hypothermia outdoors and do not use it in such conditions. This negatively affects the condition of the battery and can reduce the service life of its serviceable operation and warranty.
Post Views: 497
What can you do when your car battery is not charging?
The first step is to find out the cause, and only then take action to eliminate it. To do this, you need to measure the voltage at the battery terminals, check the level, density of the electrolyte and its color. It is also, of course, necessary to visually inspect the surface of the battery, the car wiring, and also to determine the current leakage.
Let us consider in detail the possible consequences of each of the reasons for poor battery performance, and also determine what needs to be done in a given situation:
Oxidation of contact terminals
both prevents good contact and contributes to current leakage. As a result, we get a quick discharge or unstable/absent charging from the generator. There is only one way out - check not only the condition of the battery terminals, but also the condition of the generator and the ground of the car. Heavily oxidized terminals can be removed by cleaning and lubricating the oxides.
Generator malfunction
(belt, regulator, diodes).
Belt break
you would probably notice, but the fact is that even a slight loosening of the tension can contribute to slippage on the pulley (as well as oil ingress). Therefore, when powerful consumers are turned on, the light on the panel may light up and the battery will discharge, and on a cold engine a squeaking sound can often be heard from under the hood. This problem can be eliminated either by tensioning or replacement.
Diodes
in normal condition they should pass current only in one direction; checking with a multimeter will make it possible to identify the faulty one, although often they simply change the entire diode bridge. Improperly functioning diodes can cause both undercharging and overcharging of the battery.
The main reasons why the battery may not charge
To understand in detail all the possible malfunctions due to which the car battery does not charge, first of all, clearly define the situation:
| The battery quickly discharges and dies | or he | does not charge at all (does not accept charge) |
In general, when the battery refuses to charge, the following options are allowed:
- plate sulfation;
- destruction of plates;
- terminal oxidation;
- decrease in electrolyte density;
- short circuit
But you shouldn’t worry so much right away, everything is not always so bad, especially if such a problem arose while driving (indicated by a red battery light). It is necessary to consider special cases in which the car battery does not take charge only from the generator or from the charger as well.
Causes of malfunction of starter car batteries
The service life of a battery discharged by 25% is significantly reduced if:
- malfunction of the generator and voltage regulator;
- starter malfunctions leading to an increase in current or an increase in the number of attempts to start the engine;
- oxidation of power wire terminals;
- constant use of powerful consumers during long periods of idle time in traffic jams;
- repeated cranking of the crankshaft with the starter on short trips.
A reduced electrolyte level during battery operation is also a key reason for rapid battery failure. Therefore, the cause of the malfunction may be:
- Rare electrolyte level monitoring. In summer, checking should be done more often because high temperatures promote rapid evaporation of water;
- Intensive use of the car (when the mileage is more than 60 thousand km per year). Requires checking the electrolyte level at least every 3-4 thousand kilometers.