An electrical box is responsible for the distribution of power lines in the apartment - a kind of “control point”, in which automatic protective devices and an energy meter are installed.
If you correctly select and install the box for the electricity meter in the apartment, and then connect the devices in accordance with the established requirements, the use of household appliances, lighting equipment and electrical installations will not only be uninterrupted, but also safe.
In this article we will talk about the intricacies of choosing a box for an electric meter, and about the main stages of its installation. We also provide useful recommendations for connecting electrical appliances.
Why do we need boxes for machine guns?
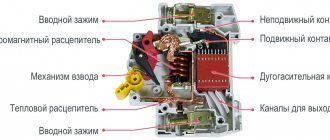
Circuit breakers contain many copper electrical contacts and moving mechanical parts. These design elements work properly as long as they are in frequency. If moisture or dirt gets into the protective device, problems begin. Copper conductors become coated with oxide, heat up and burn. The mechanics of the machine jam and become unusable. This is the main reason why electrical breakers need to be installed in protective boxes. As a result, the following purposes of the boxes are highlighted:
- protection of machines from dust and moisture;
- reducing the risk of fire spreading when switches catch fire;
- the ability to lock protective devices with a key (for example, from children at school);
- aesthetic appearance of switchboard equipment and ease of use.
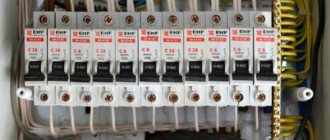
Protective box for electrical circuit breakers
Types of electrical panels according to GOST
According to GOST 32395-2013, electrical panels are divided according to their purpose. Boxes have a similar division. In terms of location, there are 2 types of protective boxes:
- Located in the apartment. Designed for installation of group and accounting-group electrical panels.
- Located on the staircase. Serve to protect distribution and metering and distribution boards from dust.
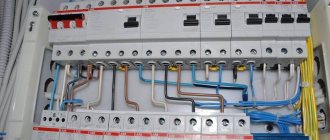
A panel with machines and a counter in an apartment.
There are also differences in the method of installing the box:
- boxes built into the wall;
- with dowel fastening.
Additional Information. Shields are also divided according to the type of network. The letters “SCHO” on the door mean that this is a lighting panel, and ShchS is a power panel.
Electrical cabinet design
The design of all electrical cabinets used in the Russian Federation must comply with GOST requirements. As a rule, foreign companies have no problems with this. But if the box is purchased from a little-known import manufacturer, then you should make sure that it meets Russian standards.
The fundamental difference between metal products is the presence of a copper grounding screw on the door. It is designed for reliable electrical connection of the movable door of the box with its fixed body. Plastic modifications do not require such measures, since their body does not conduct current, and touching it cannot harm a person.
Plastic box for 18 modules
Each box for vending machines is equipped with a door. For metal products, the door is often equipped with a lock. The key to the lock is supplied with the box. Usually it is inside it. Plastic boxes for circuit breakers are also equipped with doors made of translucent plexiglass.
Note! Externally, the keys to the boxes look the same. But in fact there are several types of them. The key from one door does not fit the other. Therefore, it is important to sign the keys or mark them in some other way. For example, using a tag.
Multi-tariff electricity meter
The main parameter from the point of view of savings is the number of tariffs included in the electricity meter for an apartment; there are single-tariff, double-tariff or multi-tariff electricity meters. Let's take a closer look at the two-tariff system, where the day rate is from 7:00 to 23:00 and the night rate is from 23:00 to 7:00.
As an example, consider electricity tariffs in Moscow in 2014.
The table shows that the night tariff T-2 is 75% lower than the day T-1 tariff, so if, for example, of your monthly 200 kWh, the night tariff T-2 accounts for half of the electricity consumed, then the price for electricity will be equal to:
C=Wday*T-1 + Wnight*T-2 = 100*4.53 + 100*1.16 = 569 rubles
With a single-rate tariff, when the price for electricity is the same at all hours of the day:
C=W*T = 200 * 4.50 = 900 rubles
The difference was 331 rubles, and in a year it will already be 4,000 rubles. Your multi-tariff electricity meter for an apartment or house will pay for itself in almost 1 month, and in the future you will actually save on electricity bills. And if you have your own home with a consumption of not 200 kWh per month, but 2,000 kWh (electric heating, electric heated floors, you turn on the washing machine only at night), then the savings with a multi-tariff electric meter will be much more significant.
But......not everything is the same for everyone when it comes to paying for electricity with two-tariff electricity meters, let’s take another region - the Kursk region:
In the Kursk region, the price for electricity, if the electric meter also “winds up” 200 kWh, will be at the “day-night” tariff equal to:
C = 100*3.22 + 100*2.41 = 563 rubles
And with a single-rate tariff:
C = 200 * 3.05 = 610 rubles
The difference with a two-tariff electric meter for an apartment or house is no longer so significant, and this is taking into account the electricity consumption day and night 50/50. And if in a private house this can be achieved quite realistically - by increasing the power of the house’s electric heating or heated floors at night, and reducing it during the day, then in an apartment, consumption during the day in most cases will be 80 percent, and this will lead to the fact that at the “day-night” tariff you will pay more than at the single-rate rate. But if the difference in the price of an electric meter of 600-800 rubles is not significant for you, then purchase a multi-tariff electric meter for an apartment or house. In case of constant overpayment at the day-night tariff, you can always switch to a single tariff by writing the appropriate paper to the energy supply, if you pay for electricity directly to them, or to your management company.
In my opinion, the transition to a multi-tariff regime, first of all, depends on a person’s lifestyle; if a person constantly wakes up at 7 am and goes to bed until 11 pm, then the transition to multi-tariff accounting is absolutely not necessary for him. You can turn on the washing machine after 11 pm, when you are already asleep, but you do not control the process, and one water leak in the washing machine, if you have to re-do the repairs for your neighbors and yourself, will “eat up” all the savings from the “nightly” tariff for many years .
Additional parameters of the electric meter
I will briefly describe the various additional parameters and functions of electricity meters. Electricity meters differ according to the principle of operation: electronic and induction. Many people mistakenly believe that if the electric meter for an apartment is electronic, then it is obviously more accurate than an induction one, but this is not so. If an electric meter has the same accuracy class (error), for example 1%, then these electric meters will count the same with an error of up to 1%.
Currently, there are many additional characteristics and options for an electric meter for an apartment or house - this includes displaying various information on the display (date-time, electrical network parameters, power value, electricity growth per month, year, etc.), storing values electricity for several months, electronic passwords, remote connection and reading of electricity meter readings via digital interfaces, GSM modem, using an optical port, and much more.
It is clear that the more sophisticated the electric meter for an apartment or house is, the more expensive it is. Leading manufacturers of electricity meters have a fairly large selection, from the simplest induction electricity meters for several hundred rubles, to electronic ones with all sorts of bells and whistles for several tens of thousands of rubles.
Also, when choosing an electric meter, pay attention that the electric meter for the apartment is included in the State Register of Measuring Instruments of Russia (State Register), i.e. an electric meter for an apartment must be “approved” by Russian standards in the field of metrology. Each measuring instrument that meets Russian standards is entered into the register under its own unique number.
Technical characteristics of boxes
When choosing a box for slot machines, you must be guided by its technical characteristics. They determine the number of protective devices that can be placed in each specific cabinet, under what conditions it is permissible to operate it, and how safe it is from the point of view of electric shock.
Insulation reliability class
Chapter 2 GOST 12.2.007.0-75 defines 5 classes of electrical products according to the method of protecting people from electric shock. Electric boxes for automatic machines belong to classes I and II. Their properties are:
- class I - electrical devices equipped with working insulation and an element for grounding;
- class II - devices equipped with double or reinforced insulation, but without elements for grounding.
Additional Information. Working insulation is the electrical insulation necessary for the normal operation of the device and to protect people from electric shock. In other words, this is the thinnest and weakest insulation, without which normal operation of the electrical box is impossible. Double and reinforced insulation have greater thickness and electrical strength. Accordingly, they guarantee lower risks of electric shock to humans.
Material of boxes for vending machines
The material of the case of the vending machine box mainly determines its operating conditions and safety of use. From this point of view, there are 2 types of products on sale:
- Plastic boxes. Usually these are small apartment panels. They are made from heat-resistant ABS plastic that can withstand temperatures up to 650 °C. This material does not support combustion well, does not rot from moisture and is easy to machine. These factors contribute to the fact that experts prefer plastic boxes.
- Metal boxes. These products are characterized by class I protection against electric shock. Metal models are coated with a polymer coating that protects them from the harmful effects of moisture and chemically aggressive environments. Metal boxes for machine guns must be grounded. They can withstand blows more easily. Therefore, they are installed in places where mechanical damage from the outside is possible.
Boxing for automatic machines with a grounding bus
Number of rows for machines
Another important characteristic of the box is the number of rows for slot machines. Circuit breakers are installed on DIN rails. Each rack is a horizontal row on which a line of machines will subsequently be located. The wider this row, the more protective devices can be placed in the shield.
One electrical panel may have several rows. On each of them, depending on the shield model, you can place from 2 to 180 standard machines with a width of 17.5 mm.
Permissible stresses
The characteristics of electrical panels are indicated in the technical documentation. When selecting this product, please consider its maximum operating voltage.
In a typical apartment box there is a voltage of 220 V AC. In a general floor box it reaches 380 V. In electrical cabinets of industrial equipment, the voltage can reach 600 V DC.
Instructions for installing a box for an apartment
The sequence of work for installing electrical wiring may be different. If a hidden wiring method is chosen, then the first step is construction work to cut grooves for the wires. At the same stage, you can prepare a niche in the wall for installing an electrical panel.
If a hanging box is selected, then this item should be skipped.
Stage #1 - preparing a niche and installing a box
The built-in box is suitable for walls made of materials that can be easily processed. For example, in a plasterboard partition it is enough to simply cut a niche exactly to the size of the box.
But a reinforced concrete wall requires a lot of effort to hollow out even a small recess, so it is more rational to take a wall-mounted model and hang it on dowels.
It is advisable to install external (mounted) models if the apartment is located in a wooden house. To install a built-in box, you will have to equip a sealed niche that prevents contact of electrical appliances with wood
Niche cutting is done in the following order:
- Marking. The distance from the floor is 1.4-1.7 m; for cutting accuracy we outline the outline of the box.
- Using a hammer drill, circular saw or jigsaw (depending on the material), we cut out the outline of the niche.
- We take out the cut pieces of drywall. If the wall is brick or concrete, we hollow out the middle with a perforator or drill.
- We clean the edges and remove debris.
- We install the box according to the instructions so that only the front panel with the door protrudes from the outside. If the kit contains special fasteners, we use them.
There are several mounting options; most often, the box is fixed in a recess behind the back wall. If there are small gaps at the edges, we cover them with plaster or alabaster. When there are no gaps, we perform additional reinforcement with glue.
It is important to remember that violation of the structure of the walls of the apartment can be fraught with problems. So, if the concrete wall is load-bearing, then cutting the reinforcement without an agreed upon design is prohibited!
In such situations, it is easier to install a mounted model - fix the body on the mounts intended for this. Self-tapping screws or dowels usually come with the box.
Along with the installation of the electrical panel, the wire entry is arranged: for internal boxes, grooves are hollowed out, which are then hidden under a layer of plaster; for external boxes, the wires are sewn into plastic boxes
Assembly is usually carried out after completion of construction work, when all the holes and grooves are sealed and the body is installed in place.
Stage #2 - assembling and filling the box
We offer step-by-step instructions for assembling an electrical panel for a standard 2-room apartment.
As an example, the initial assembly kit includes:
- 2 circuit breakers 40 A - at the entrance and after the meter;
- electricity meter “Mercury 50 A”;
- voltage relay Zubr D340t;
- 3 RCDs for 40 A;
- 7 automatic machines 16 A - for socket groups, separate - for the oven and for the bathroom, where the water heater and washing machine are located;
- 2 10 A circuit breakers for lighting circuits.
If any of the listed devices are missing or, on the contrary, their number is greater, then the number of machines can be reduced or increased.
For the listed devices, a box for installing an electric meter and machines with 3 DIN rails is suitable.
Each rail is designed for 12 places, a total of 36 modules can be placed. The electricity meter usually takes up space for 6-8 standard modules
First we fill the top DIN rail:
- Installing the input machine in the upper left corner, that is, in the first position. It is advisable to use a two-pole 40 A device. According to the marking, we connect the phase to one pole, and zero to the other.
- Installation of an electric meter . We fix it to the right of the input machine. It is better to entrust the choice of metering device to a specialist from the management company, who is informed about the maximum energy consumption.
- Installation of a second 40 A circuit breaker. It duplicates the functions of the input device and serves for additional insurance.
We fix the following devices on the second DIN rail - first the voltage relay , and then the RCD .
The voltage relay performs three functions: monitors voltage surges, records critical values and turns off the line in case of overload. Its presence is not necessary, but to protect expensive electronics it is better to install
Installing an RCD involves installing three devices with a rating of 40 A and a shutdown threshold of 30 mA, which serve three separate zones. However, for the bathroom it is recommended to use an RCD with a shutdown threshold of 10 mA.
Let's move on to the third DIN rail:
- Installation of single-pole circuit breakers . Kitchen outlet lines are usually overloaded, so we recommend dividing them into 2 groups and installing a separate protection device for each group.
- Connecting devices in the electrical panel to each other.
In the free space we install two buses: one for connecting the neutral conductors, the other for grounding. The space around the busbars must be free for the distribution of connected wires.
We recommend connecting devices using single-core wires. The installation process is faster, since they do not require crimping and installation of tips and are firmly fixed in the sockets
It is important to take care of your own safety - before starting work, be sure to remove the voltage from the network, that is, turn off the power supply to the apartment!
Lighting circuits may not have grounding conductors if the lighting process does not involve fluorescent lamps equipped with grounding contacts.
Next, we carry out the final connection work:
- Connecting the input cable and all working lines going to the power zones in the apartment. Testing of protective equipment, indication of conductors.
- Marking of machines . Indicating which group each device belongs to will make it easier to maintain the network in the future and allow you to quickly disconnect circuits in an emergency.
At this point, the installation of the apartment box can be considered complete.
Recommendations for selecting and assembling panels
Selecting, installing and assembling an apartment panel will not cause difficulties for an experienced electrician. For an inexperienced person, it is better to seek help from a professional electrician.
If you decide to install and connect the vending machine yourself, you must adhere to the following tips:
- Metal boxes require a ground connection. For this purpose, there are copper bolts inside the box with the corresponding “ground” pictogram.
- Cables must not be routed under a DIN rail. Ideally, they should not touch metal parts at all.
- Wires are connected according to color coding. Brown is phase, blue is zero, yellow-green is ground.
- Next to the circuit breakers their purpose is indicated. For example, “living machine,” “kitchen machine,” and so on.
- If an electricity meter is installed in the box, its display must be visually accessible. It is advisable to place the shield at a level comfortable for the eyes from the floor, 1.5-1.8 m.
Date of issue (verification) of the electric meter
In my opinion, and even more so from the inspectors of the network company, this is the most important point, since if there is a dishonest seller in the store or simply out of ignorance “sells” you a single-phase electric meter for an apartment, released more than 2 years ago, then according to the accounting rules electricity - such an electric meter, the inspector will not accept it from you and will force you to check the electric meter for your apartment, house, or, which will be much faster, buy a new one. For three-phase electricity meters, the period is even shorter, and is no more than 1 year . The issue date can be seen on the electric meter panel and in the passport (form) for the electric meter in the apartment.
Single-phase electric meter Energomera CE101
Three-phase electricity meter Mercury 230 ART
Let me note one more point: when you install a previously used electric meter for an apartment somewhere (it was in an old house, garage, gifted by a friend, etc.), then for the electric meter for the apartment you must have a certificate of verification not older than 1 year for three-phase electricity meters and 2 years for single-phase ones, i.e. you can use an old electric meter for an apartment if it passes state verification before installation.
Please remember this first of all, so as not to disrupt your plans for connecting electricity; without an electric meter, no one will supply electricity to your house.
Choosing a place for the shield
The main thing to consider when choosing a box for vending machines is its availability. Safety devices located inside must be easily accessible to apartment residents and maintenance personnel. Therefore, boxes built into the wall cannot be sealed with plaster or drywall.
Another selection condition is convenience. The box with machine guns must be located at eye level. This is especially true for switchboards that contain an electricity meter.
The installation location also depends on the characteristics of the environment. If it is intended that the box will be located on the street, then it is advisable to use plastic models. They, unlike iron ones, do not rust from dampness or rain. On the other hand, if the box with machine guns is to be used in an entrance hall or on a busy street, then it is better to use metal. An iron box is more likely to survive occasional and not so shocks and blows from other residents of the entrance or vandals.
Access distribution board
Tips for connecting devices
The assembly of the electrical box should be carried out by a qualified installer, but sometimes there is simply no opportunity or time to call a specialist.
In this regard, everyone who independently installs protective devices must know the following rules:
- The electrical box should be “with reserve” - a little larger in size than is currently required. Perhaps in the future the number of devices will increase, and the extra modules will prove useful.
- It is recommended to separate the RCD connection according to service areas : bathroom + toilet, kitchen, bedrooms. There is no need to combine groups from the bathroom and living room, nursery and kitchen into one RCD.
- The RCD does not protect against short circuits ; it is placed after the machine, and the rating of the RCD must be one step higher or at least equal. For example, if the machine is 16 A, then it is better to install a 25 A RCD.
- The correct connection order is: input circuit breaker - electric meter - RCD . Installing an RCD at the entrance instead of a machine is considered a mistake; only a difavtomat can replace an automatic protection device.
Typically, groups of machines are connected to one RCD for two reasons: either because of the saving of modules, or because of the high cost of the equipment. Ideally, an RCD should be installed after each machine.
Experts recommend not installing RCDs or breakers on outlet lines to which you plan to connect a PC in the future. If the response threshold is incorrectly calculated, the devices will erroneously respond to the computer and turn off the line.
When choosing an RCD, it is better to choose electromechanical devices than electronic ones. They are considered more reliable and do not require power to operate.
An example of an assembled electrical panel
As an example of an electrical panel assembly, you can consider a typical wiring for an apartment. At the entrance to the box, a QF 30 A input differential circuit breaker is installed. From it, the white (phase) and blue (neutral) wires go to the Mercury 201 single-phase electricity meter. Both devices are fixed using a DIN rail. The blue (N) conductor from the meter goes to the zero bus. And the white wire (L) to the line of group circuit breakers QF1-QF4. Subsequently, individual consumers in the apartment will be powered from these machines.
The shield is supplemented with its own socket, which remains energized even if the entire apartment is de-energized. It will come in handy, for example, during renovation work.
Assembled electrical panel for a summer residence
Maximum and rated (base) current of the electric meter
We have already decided on a single-phase or three-phase electric meter for an apartment or a house we need, then we need to select an electric meter based on the maximum current , i.e. according to our maximum load (the sum of the powers of all electrical appliances, with this, of course, the first thing that will help us is the power supply project , where its maximum current will be indicated on the single-line diagram on the input circuit breaker. If you are simply replacing the old electric meter for an apartment or house with a new one, then just look at the maximum current on the circuit breaker itself in the electrical panel, or on the panel of the old electric meter, and select an electric meter for an apartment or house with a current higher than that of the circuit breaker, i.e. if you have an incoming circuit breaker designed for 32 A, then you must not select an electric meter below 40 A. As an example, the photo shows an electric meter for an apartment, through which more than 60 A should not “flow”.
The first current value of 5A and 10A is the rated current of the electric meter for the apartment. The second value 60A and 100A is the maximum current . Within these limits, the electricity meter for an apartment or house will count correctly, with the stated error (accuracy class). If the operating current is greater than the maximum, then most likely your electric meter for the apartment will burn out, but if it is less than 5A and 10A, then the electric meter will have an error greater than stated, perhaps in your favor, or perhaps vice versa, it will overestimate the readings.
Electric meter accuracy class
It is necessary to decide what accuracy class (maximum error, expressed as a percentage) our electricity meter for an apartment or house will have; the lower the accuracy class of the electricity meter, the more accurate the electricity meter will be. The error can be either in your favor (under-metering), or vice versa - the electric meter for an apartment can overestimate the readings (over-metering).
Everything is simple here, if you buy an electric meter for an apartment, house, cottage or garage, then according to the requirements for electricity metering, the accuracy class of the electric meter should be no more than 2 (for the population, and equivalent categories, for example, such as GSK), if you if you are purchasing an electric meter for commercial purposes (enterprise, store, car service, etc.), then the legal requirements are stricter; you need an electric meter with an accuracy class of no more than 1. Electric meters are produced with an accuracy class of 0.2, 0.5, 1 and 2, although There may be (old housing stock) with an accuracy class of 2.5, but according to the law, it is high time to replace them with a higher accuracy class. The higher the accuracy class of an electric meter for an apartment or house, the higher its price. The accuracy class of the electric meter, according to GOST, is indicated on the panel of the electric meter in a circle.
Apartment panel equipment
Apartment electrical panels are equipped with a variety of equipment. Some devices are present in almost every box. Others, on the contrary, are extremely rare.
Automatic switches must be installed in every apartment panel. First of all, they perform the function of protection against short circuit and overcurrent. But they are often used as an ordinary switch to de-energize an apartment.
Metering device - electricity meter. Installed in almost every apartment. Serves to count the wound kWh for further conversion into money. Single-phase meters are installed for household consumers. For industrial - three-phase.
RCDs are used to protect people from electric shock. And also to prevent fire in the wiring if the insulation is damaged. RCDs are usually found in residential electrical panels.
Voltage relays are used less frequently. Used to protect household electrical appliances from excessively high or low voltage. If this parameter is exceeded, the voltage relay disconnects the apartment wiring from the general network.