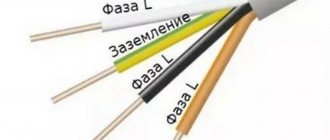
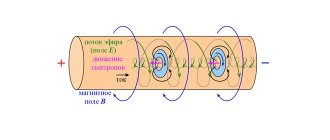
Electricity is the energy of electron movement. All matter consists of atoms, which consist of even smaller particles: protons, neutrons, electrons. The electrons in an atom move in orbits, or circles, around the central part of the atom, called the nucleus. Electrons are capable of moving from one atom to another. These movements form electricity.
Since the 19th century, it has become an integral part of the life of modern civilization and is used in all spheres of human activity. Power plants have been created to generate electricity, and batteries and electric batteries have been created to store it. These days, electricity consumption is increasing every day. Therefore, it is important to monitor the volume and structure of energy consumption both at the level of each individual country and globally throughout the world.
The following experiments with electricity will help us understand this phenomenon, as well as study its properties in practice. They are designed for children, but it is better to work on them under adult supervision.
Project “Serial and parallel connection of batteries”
Volt is a standard unit of measurement for electrical voltage. Ampere is a standard unit of current measurement. Sequential - one after another, like links in a chain. Parallel - next to each other, like rails.
Electricity is the movement of electrons in a conductor, and voltage can be compared to the pressure of, for example, flowing water on a pipe. The current shows the number of electrons, something like the volume of water flowing out of a pipe. Batteries produce electricity through a chemical reaction. They can be connected in line to increase the voltage, or in parallel to increase the current. To increase both indicators, you can combine these types of compounds.
The series connection circuit involves connecting the plus of each battery to the minus of the next one. Two 6 volt 2 amp batteries connected in this way will produce 12 volts and 2 amps in the circuit.
The parallel connection scheme involves connecting pluses with pluses, and minuses with minuses. Two 6 volt 2 amp batteries connected in this way will produce 6 volts and 4 amps in the circuit.
A mixed connection allows you to combine both types of connection to obtain any desired voltage and current value. Thus, a voltage of 120 volts can be obtained by connecting 20 6-volt batteries in series. If a current of 50 amperes is required, and each battery provides 1 ampere, then the general connection diagram will look like 25 similar circuits connected in parallel.
One battery provides a small voltage and current. By connecting them in series, you can increase these indicators. Even a simple 9 volt battery is a collection of batteries. This project shows how combining batteries in different patterns can be used to achieve a wide variety of voltages and currents.
For children, this project can be very educational as it shows hands-on how electricity works. For example, four batteries can be used to produce 6 volts. Students can show their own electrical wiring diagrams.
The purpose is to demonstrate how multiple batteries can be used to increase the voltage and/or current in a circuit.
What we need:
- several batteries that will be connected in series and/or parallel;
- holders for them or wire and solder;
- a voltmeter that can also measure current;
- optional - disassembled battery.
Progress of the experiment:
- Please note that every research paper on the topic of electricity requires compliance with safety precautions. There is a small risk of exceeding the permissible voltage/current level, which may lead to overheating of the entire structure. Soldering contacts makes the experiment more visual, but carries the risk of burns. When disassembling a dry battery, there is a risk of contact with the electrolyte.
- Decide what you will use: a battery holder or solder.
- Assemble a series circuit, measure voltage and current.
- Assemble a parallel circuit, measure the voltage and current.
- Create a circuit that combines both types of connections. Measure the same indicators.
- Optionally, disassemble the battery and show its contents. Adult supervision is required as the electrolyte contained in it is caustic.
Conclusion:
What is electricity? What is a battery? What is a series circuit? What is a parallel connection diagram? Does a 9 volt battery contain one battery or several? Why? What is the difference between AC and DC?
Ionic conductivity
In metals, as you remember, there is only one type of free charges - free electrons. In electrolytes the situation is different: free charges of two types arise here.
1. Positive ions formed from metal or hydrogen atoms.
2. Negative ions - atomic or molecular acidic residues (for example, or), as well as a hydroxyl group.
The second difference from metals is that carriers of free charges in an electrolyte can have a charge equal in magnitude to both the elementary charge and an integer number of elementary charges. Here is the valency of an atom or group of atoms; for example, when dissolving copper sulfate we have .
If there is no external electric field, then the free charges of the electrolyte undergo only chaotic thermal motion along with the surrounding molecules. But when an external field is applied, positive and negative ions begin to move in an orderly manner.
Place two electrodes in a vessel with electrolyte; We connect one of the electrodes to the positive terminal of the current source, and the other to the negative terminal (Fig. 5). When it comes to the passage of current through electrolytes, the positive electrode is called the anode
, and the negative one is
the cathode
(There is folk wisdom for remembering the signs of the anode and cathode:
Andrey is a positive guy, Katka is a negative girl
;-)).
Rice. 5. Ionic conductivity of the electrolyte
In the electric field that arises between the electrodes, positive ions of the electrolyte rush to the “minus” of the cathode, and negative ions to the “plus” of the anode. Thus, the electric current in the electrolyte is formed as a result of the counter-movement of ions: positive - to the cathode, negative - to the anode
.
Therefore, the conductivity of electrolytes is called ionic
(in contrast to the electronic conductivity of metals).
There is a lack of electrons at the positive anode. Negative ions, having reached the anode, give it their extra electrons; these electrons are sent along the circuit to the “plus” of the source.
On the contrary, there is an excess of electrons at the negative cathode. Positive ions, arriving at the cathode, take electrons from it, and this number of lost electrons is immediately replenished by their delivery to the cathode from the “minus” source.
Thus, in that part of the circuit that consists of a current source and metal conductors, electron circulation occurs along the “anode source cathode” route.
The circuit is closed by the electrolyte, where the electric current is provided by the two-way movement of ions.
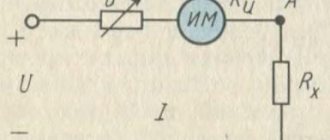
Project "Resistance: Is copper the best conductor?"
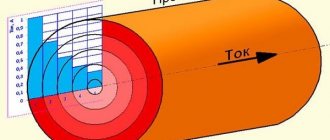
Resistance is a set of obstacles to the flow of electrons. It is designated by the letter R. It depends on the length and thickness of the conductor, as well as on the material from which it is made, so the value may vary for different sections of it. It is measured in ohms (Ohm). The permanent property of a particular material to resist is called resistance, denoted by the Greek letter ρ (rho) and measured in ohm-meters (Ohm-m).
The formula for calculating the resistance of a given piece of wire looks like this:
R = ρL/S,
where R is the resistance in ohms, L is the length of the wire in meters, S is the cross-sectional area in square meters, and ρ is the resistivity of the conductor in ohm-meters.
Electrical conductivity is the reciprocal of resistivity. It shows how freely the material allows electricity to flow. It is designated G and measured in siemens (Cm). cm=ohm-1.
G= σ S/L,
where σ is specific conductivity.
Specific conductivity is inversely proportional to resistivity ρ.
σ = 1/ρ.
In this experiment, you will be able to calculate the resistance and conductivity of the materials being tested using Ohm's law, which defines voltage as the product of current and resistance. An ammeter will help you measure the current, and a voltmeter will help you measure the voltage.
V=IR,
where V is the voltage in volts, I is the current in amperes, and R is the resistance in ohms.
The goal is to find out the resistance of various materials, as well as calculate their conductivity.
What we need:
- 9 volt battery;
- 30 cm of thin and thick copper wire without insulation;
- 30 cm of thin and thick iron wire without insulation (with the same diameters);
- wires made of other materials;
- wire cutters;
- ammeter;
- voltmeter;
- ruler.
Progress of the experiment:
Observe safety precautions when working with electricity.
- Connect the plus of the ammeter to the minus of the 9 volt battery.
- Connect the negative of the ammeter to the end of one of the wires.
- Connect its other end to the positive of the 9 volt battery.
- Use a voltmeter to find out the voltage across sections of wire of different lengths (start with 2 cm, then measure for 3 cm, 4 cm and so on). Make sure that the plus of the voltmeter touches the beginning of the wire.
- Record the current (from the ammeter) and voltage (from the voltmeter) for each length.
- Use Ohm's Law to determine resistance and understand how length, thickness, and material affect it.
- Display the results using a graph. Plot the length of the wire in meters on the x-axis, and the resistance in ohms on the y-axis.
- Calculate resistance using the formula: R = ρL/S,
- Here R is the resistance in ohms,
- ρ – resistivity in ohm-meters,
- L – wire length in meters,
- S is its cross-sectional area in square meters.
- Use the conductor resistivity ρ to calculate the conductivity σ and conductivity G.
Conclusion:
Which material is more resistant? Conductivity? Formulate a hypothesis about the dependence of resistance on temperature.
The thinner the wire, the lower its resistance. Copper has a lower resistance, so it is considered a more suitable conductor of electricity compared to iron. Why? The longer the wire, the higher the resistance. Since it is a characteristic of the material through which electrons flow, it makes sense that the more material involved (in length), the greater the resistance. Resistance is a constant value for a specific material, so the resistance directly depends on the cross-section. In the graph of this dependence, the slope of the curve demonstrates resistance.
So, is copper a better conductor of electricity than iron? Yes, because electricity can flow through it with less resistance. This is a permanent property of copper.
Calculate the resistance of a certain section of wire using Ohm's law, since the elements of the circuit are connected in series, and the current strength is the same in any section.
Project “The influence of wire thickness on the flow of electricity”
A conductor is a material that conducts electric current well. A semiconductor is a material that has lower conductivity than a conductor.
Does a wider conductor help electricity flow? Let's see which wire conducts current best.
The goal is to find out which wire allows electricity to flow more easily: a thick one or a thin one.
What we need:
- plastic tube;
- scissors;
- 2 D batteries;
- insulating tape;
- steel wool;
- 2 flashlight bulbs.
Progress of the experiment:
- Make your guesses. Will a circuit with a thicker wire conduct electricity better than a circuit with a thinner wire?
- Place the batteries on a flat surface. Connect a thin wire to one and a thick wire to the other.
- To attach the wires, cut two identical pieces from the tube. Stick one piece along each battery.
- Steel wool makes excellent thin wires. Take it apart into fibers and collect them on the edge of the table.
- Now we need to make a conductor. Take three steel wires and twist them into a thin wire. Then take ten more and twist them as well.
- Now you have two wires - thin and thick. Pass the thin one into one of the tubes, and the thick one into the other.
- Attach one end of a thin wire to the negative of the battery.
- Wrap the other end of the thin wire around the base of one of the light bulbs, and then glue it to the light bulb using electrical tape, but leaving the bottom part free.
- Now touch the bottom of the light bulb to the battery positive. If the circuit is closed, your light bulb will light up.
- Repeat steps 7-9 for thick wire. Which light bulb burns brighter?
Conclusion:
A light bulb in a circuit with a thicker wire burns brighter. Does this mean it conducts more electricity? Why? Imagine a parking lot full of cars rushing to get out - this is a battery. One lane of the road is opened for exit. How quickly will cars leave the parking lot? Now imagine that a four-lane highway is open. Will cars leave the parking lot faster now?
A thin wire conducts electricity, but has higher resistance. The thick wire looks like a four-lane track. It has much lower resistance, so the light bulb burns brighter - it’s easier for electricity to reach it.
Give your suggestion about what would happen if a different conductor were used. Will electricity flow the same way through any conductor?
The ability of various substances to conduct electric current
If we do not take into account the physical state, then all materials can be divided into three groups according to the degree of electrical conductivity:
- conductors;
- semiconductors;
- dielectrics.
Let's look at each case in more detail.
Conductors
This group includes substances that conduct electric current perfectly. These are metals, electrolytes and ionized gases.
Metals as conductors of electric current
The first subgroup of substances has a crystal lattice and is characterized by a large presence of free electrons, which are charge carriers when appropriate conditions are created, in particular an electric field. Their melts conduct electric current no worse than in the solid phase. Do not forget that metals can also be in a liquid state, an example of which is mercury. But the most widespread as conductors are the solid phases of these substances. When interacting with oxygen, metals form oxides, which conduct electric current only under certain conditions and are essentially semiconductors. They will be discussed below. Among metals, copper, aluminum, iron, silver, etc. have excellent electrical conductivity.
Liquid conductors of electric current
Liquid conductors mean acids, solutions, and electrolytes that conduct electric current. The charge carrier in these cases is ions. It should be noted that the common belief that water is a conductor is completely wrong. When H2O is in a pure state, there are no free ions in it. If, when electrodes are placed in water, an electric current flows, this only means that in this case we are dealing with a solution of some substance.
Project “What substances conduct electricity when dissolved in water”
Electric flow is the result of the movement of electrically charged particles (electricity) under the influence of the forces of an electric field applied to them. Pure water is a poor conductor of electricity, but certain elements dissolved in it allow it to conduct electricity. When dissolved, such substances form ions (charged particles) that transfer charge within the solution. Solutions with this property are called electrolytes. The more ions in a solution, the higher its conductivity. Nonelectrolytes are solutions that do not contain ions and do not conduct current. Electrolytes can be weak or strong. It depends on how they are ionized: completely or partially.
The conductivity of a solution can be measured using a conductivity device consisting of two metal electrodes, usually spaced 1 cm apart (which is why it is measured in microsiemens or millisiemens per centimeter). A constant voltage is applied to both electrodes. This causes an electric current in the solution. Because it is proportional to the number of ions in the water, conductivity can be measured. The higher the ion concentration, the higher the conductivity of the sample.
A conductivity device is commonly used in hydroponics, swimming pools, and water purification systems to monitor the amount of nutrients, salts, or contaminants.
A solution of some substances in water conducts electricity. These substances form ions when dissolved, and these ions carry charge through the solution. This project aims to build a device to identify which substances in solution can conduct electricity and which cannot.
The focus of this project is to create a device that would allow us to determine which substances, when dissolved, can conduct electricity - and what type of electrolyte they are in this case.
What we need:
- conductivity device;
- plastic cups;
- large paper clips;
- insulating tape;
- different types of water: distilled, mineral, carbonated;
- vinegar;
- sugar;
- salt.
Progress of the experiment:
- Experimenting with electricity at home requires care. Do not ingest the substances used in this experiment!
- Prepare different types of water.
- Prepare salt and sugar solutions by dissolving them in distilled water.
- Pour the liquid into a glass.
- Unfold the paper clips, securing them with electrical tape on opposite sides of the cup.
- Do not place the contacts directly into the solution, otherwise they will rust over time. Instead, place them on paper clips and dip the paper clips into the solution.
- Display the observation results in a table and graph. Depending on which conduction device you are using, note whether the LED lights are on and how bright they are. Rinse the cup and paper clips with distilled water between tests.
- If there is a spring nearby, test the water for conductivity. If it conducts electricity, think about what substances might be dissolved in it and where they might come from.
- Check the box corresponding to the light produced by the LED lamp. Depending on the brightness of the lamp, categorize liquids into strong, medium, weak electrolytes or non-electrolytes.
| Light intensity/liquid | Bright | Medium brightness | Weak | No light | Electrolyte type |
| Distilled | |||||
| From the tap | |||||
| Mineral | |||||
| Rainy | |||||
| Salt solution | |||||
| Sugar solution | |||||
| Carbonated | |||||
| Vinegar |
Conclusion:
What is electricity? What is an electrolyte? What is conductivity? What substances turned out to be good electrolytes based on the results of the experiment? Look at the label of your mineral water bottle. What substances in its composition do you think help conduct current? Look at the label on your bottle of sparkling water. What substances in its composition do you think help conduct electricity? The liquid paste inside flashlight batteries is electrolyte. Which of the tested substances could be used as such an electrolyte? Think about what other experiments with electricity at home you can do based on the project you completed.
Dielectrics
There are no free charge carriers in dielectrics. The flow of electric current in such substances is impossible under standard external conditions. The most popular materials that do not conduct electricity are mica, ceramics, rubber and rubbers.
They can also include air and certain types of gases, but for them, the degree of pollution will be decisive. If there are a sufficient number of free ions, they lose their dielectric properties. Thus, one cannot blindly assume that any substance is an absolute dielectric and does not conduct electricity. Under certain circumstances, most substances known to be dielectrics can acquire the properties of semiconductors.
For example, iron oxide, which under normal conditions prevents the flow of electric current, becomes conductive when the pressure and temperature increase, while its internal structure is not disturbed.
To summarize, we note that the qualitative difference between substances that transmit or prevent the flow of electric current is their conducting state. For metals it is constant, and for dielectrics and semiconductors it is an excited phase. Conductivity is quantified in terms of electrical resistivity.
Project “Conductor or Insulator”
Electric current occurs only when a continuous path is created for it to flow through. A variety of materials can be used to complete the circuit and create flow. Such materials are called conductors of electricity. Most metals, including aluminum, are considered good conductors. Materials that do not conduct electricity are called insulators. Most items made of plastic and rubber are insulators. It is important to understand the difference between conductors and insulators, not only for making circuits, but also for building houses and cooking, not to mention safety.
Determine which household items conduct electricity well.
The goal is to demonstrate an understanding of simple closed circuits and evaluate the conductivity of common household objects.
What we need:
- four fragments of insulated wire (preferably with clamps at the ends);
- battery D;
- small light bulb;
- household items for testing: paper clip, toothpick, foil, banana, tin can, coin, etc.;
- light bulb holder (optional);
- battery holder (optional).
Progress of the experiment:
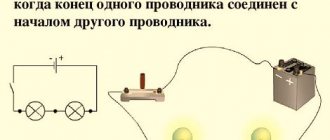
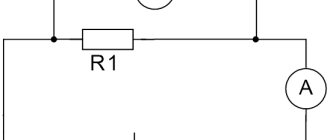
- Create a simple closed circuit by connecting the battery and the light bulb with two wires. An example can be seen in the graph.
- If you do not use holders, then the wires must be positioned so that one of them connects the plus of the batteries and the contact on the bottom of the light bulb, and the other connects the minus of the batteries and the contact on the side of the base. Electrical tape is used to secure the contacts. If the circuit is closed, the light should light up.
- Collect at least 10-14 household items for the experience. Choose items from different materials: metal, plastic, wood.
- Connect one object to the circuit to check whether it is a conductor or an insulator. First, remove one clip from the light bulb and attach it to the item. Connect this object and the light bulb with another wire. If it lights up, the object is a conductor of electricity; if not, it is an insulator.
- The following table can serve as an example of how the results of experiments can be recorded.
| Household item | Conductor | Insulator |
| Clip | X | |
| Wooden spoon | X | |
| Coin | ||
| Rubber spatula |
Conclusion:
How to create a simple closed circuit? How does electricity flow through a circuit? What types of conductors are there? What types of insulators are there? How do conductors and insulators work in a home to protect against electric shock?
Conductors Vs. Insulators
Valence electrons are like the outer planets orbiting a star. They are attracted enough to their atoms to stay in place, but it doesn't always take much energy to knock them out of place—these electrons easily carry electrical currents. Inorganic substances such as metals and plasma, which easily lose and gain electrons, top the list of conductors.
Organic molecules are primarily insulators because they are held together by covalent (shared electronic) bonds and because hydrogen bonding helps stabilize many molecules. Most materials are neither good conductors nor good insulators, but fall somewhere in between. They have difficulty wiring, but if enough energy is applied, the electrons will move.
Some materials are insulators in their pure form, but will conduct if they are doped. with small quantities of another element or if they contain impurities. For example, most ceramics are excellent insulators, but if you dope them, you can create a superconductor. Clean water is an insulator, dirty water is weakly conductive, and salt water with its free-floating ions is highly conductive.
Project “Creation of a rheostat”
A rheostat is a small device that regulates voltage by turning a knob.
What we need:
- flashlight light bulb and socket for it;
- two D batteries;
- wire pieces of about 40 cm and about 5 cm;
- long spring;
- wire cutters
Progress of the experiment:
- Connect the batteries so that the plus of one is in contact with the minus of the other.
- Cut the long wire in half and attach the pieces to the ends of the connected batteries.
- Connect the free end of one wire to the socket contact. Connect the free end of the second wire to the end of the spring.
- Connect the small wire to the other terminal of the socket.
- Close the circuit and notice how brightly the light bulb glows. If the light bulb lights up, it means electricity is flowing through the wires!
- Now slowly move the end of the short wire along the spring. What's happening?
Conclusion:
The further you move along the spring, the less bright the light bulb will shine. The longer the section of the spring that electricity has to overcome, the higher the resistance. The device you have created is called a rheostat. It allows you to change the flow of electricity passing through it.
Project “Plasma Ball! What is it and how does it work"
Experiments with electricity are always very exciting for children. Through this project, students will gain basic information about the plasma phenomenon and the application of the coil. Plasma is formed when gas atoms are heated to very high temperatures. As a result, the atoms have so much energy that when they collide, electrons are knocked out. Plasma itself consists of many electrons and ions.
The plasma ball is a device invented by Nikola Tesla in 1894, and it gained popularity in the 1980s. Essentially, it is a glass ball with an electrode in the center, filled with a mixture of inert gases. The principle of its operation is similar to the principle of operation of the Tesla coil. It contains a coil through which a very high frequency current is passed - the electrons in the coil oscillate very quickly and the surrounding atoms begin to lose their electrons, resulting in the formation of a plasma. Since some of the air has been pumped out of the balloon, it is very easy to create electrical sparks. Plasma is essentially a partially ionized gas whose ability to carry a negative charge makes it very sensitive to electromagnetic fields. Because of these unique properties, plasma is considered the fourth state of matter.
This experiment also allows children to become familiar with the basics of science—control, distinguishing between dependent and independent variables, collecting and presenting data, and making judgments about the validity and reliability of their findings. They act as scientists and learn to act like scientists.
The goal is to determine what a plasma ball is and how it works.
What we need:
- plasma ball (sold in toy stores);
- fluorescent lamp (sold at hardware stores);
- wooden (or non-metallic) stool or chair;
- a few coins and a multimeter.
Progress of the experiment:
- Copy the table on the next page so you can quickly record your observations.
- First, place your hand on the plasma ball. Write down what happened.
- Now bring a fluorescent lamp to it. Write down what happened.
- Ask your partner to help. Stand on a chair and place your hand on the ball. Do not touch the ends of the fluorescent lamp, but ask your partner to hand you the lamp. What happened? Record your observations.
- Get off the chair. Stand on the floor and repeat step 5. What happened? Write it down!
- Place the coin on top of the plasma ball. Now gently touch the coin with another coin. Don't touch it with your finger! You will be electrocuted!
- Now measure the potential around the ball by placing one contact on its glass surface and the other nearby. Prepare an electric field diagram by measuring the entire space around it. Complete the diagram.
- Write a report. Include all your observations and a diagram. Don't forget to include a list of references and basic information you obtained during your research. Did you like the project? What did you like? Are there any further steps you would like to take to learn more about the plasma ball and plasma itself?
Observation table
| № | What happened when I: | Observations and reactions |
| 1 | He put his hand on top | |
| 2 | He brought the lamp | |
| 3 | Picked up a lamp while standing on a chair | |
| 4 | Picked up a lamp while standing on the floor | |
| 5 | Placed a coin on top | |
| 6 | Touched a coin with another coin |
Figure: name the connections
Conclusion:
What is electricity? What is plasma? What are ions? What are noble gases? What is a Tesla Coil? How does it work? What are the safety precautions when working with a plasma ball? How is electricity generated and transmitted in it? Does the electric field look like the field next to a point charge? Can you find the equipotential lines? Can you calculate how much potential energy is needed to light a fluorescent lamp?
Electrolytic dissociation
The mechanism that ensures the appearance of free charges in the electrolyte is called electrolytic dissociation
. We will limit ourselves to considering electrolytic dissociation in solutions.
In general, dissociation is the disintegration of a molecule into its component parts under the influence of certain factors. In the process of electrolytic dissociation, the molecules of the solute disintegrate into positive and negative ions as a result of the action of electrical forces from water molecules
.
Many of the properties of water are explained by the fact that its molecules are polar.
, that is, electrically they behave like dipoles (recall that
a dipole
is a system of two charges of equal magnitude and opposite in sign, located at a short distance from each other). The polarity of molecules is determined by their geometric arrangement (Fig. 1 (image from howyourbrainworks.net)).
Rice. 1. Water molecules
The angle formed by the lines of the centers of an oxygen atom and two hydrogen atoms is approximately . In addition, the electron shells are shifted towards oxygen. As a result, the centers of positive and negative charges turn out to be spatially separated: “minuses” predominate in the oxygen part of the water molecule, and “pluses” predominate in the hydrogen part.
Being dipoles, water molecules create an electric field around themselves and act with electric forces both on each other and on impurity molecules (being attracted to each other by oppositely charged parts, water molecules create very strong bonds. That is why the specific heat capacity and specific heat of vaporization are so high water—breaking these bonds requires significant energy).
Why do salts, acids and bases break down into ions in water? The thing is that the molecules of these substances are also polar. Let's return to our example with dissolving table salt.
The sodium atom has one electron in its outer electron level. It is weakly bound to the atom and is always ready to leave its habitat. The chlorine atom has seven electrons on the outer electronic level - one is just missing to complete the set. The chlorine atom is always ready to grab the missing electron.
Therefore, when a molecule is formed, the outer electron of the sodium atom goes to the chlorine atom, and as a result, the molecule becomes polar - it consists of a positive ion and a negative ion. This molecule is shown schematically in Fig. 2 (chlorine atom is larger than sodium atom).
Rice. 2. Molecule
In other words, from an electrical point of view, the molecule also turns out to be a dipole.
The interaction of two types of dipoles—molecules and—is what causes the dissolution process.
In Fig. In Figure 3 we see how this process occurs (image from intro.chem.okstate.edu). The larger green balls represent chlorine ions, the smaller gray balls represent sodium ions.
Rice. 3. Electrolytic dissociation: dissolution in water
The left side of the figure shows the situation before dissolution begins. A grain of salt in the form of a small cubic crystal (The crystal lattice of table salt has a cubic structure. At the vertices of the cube, sodium and chlorine atoms are arranged in a checkerboard pattern, crosswise) has just found itself in the water.
An “electrical attack” from the water molecules immediately begins. The negatively charged (oxygen) parts of the water molecule face positive sodium ions, and the positive (hydrogen) parts of the water molecule face negative chlorine ions. The molecules begin to “stretch” by multidirectional electrical forces of attraction towards the water dipole molecules, and the bond between the sodium and chlorine ions that holds the salt molecule together weakens.
Eventually this bond becomes so weak that impacts from neighboring particles undergoing thermal motion destroy the molecule. It breaks down into a positive ion and a negative ion.
On the right side of Fig. 3 we see the result of such a decomposition: the chlorine ion and sodium ion, torn out of the crystal lattice, go “free floating”, surrounded by water molecules clinging to them. Please note that the water molecules stuck to the negative chlorine ion with their positive hydrogen parts, and on the contrary, their negative oxygen parts turned to the positive sodium ion. Thus, when salt is dissolved in water, free charges appear: positive ions and negative ions (Fig. 4). This is a necessary condition for the passage of current through the solution.
Rice. 4. Solution in water
The dissolution process described above proceeds in a completely similar way in the case of other impurities. Thus, alkali breaks down in an aqueous solution into positive potassium ions and negative ions of the hydroxyl group. When a sulfuric acid molecule decomposes, it gives two positive ions and a negatively charged ion of the acid residue. Positive copper ions and negatively charged ions appear in a solution of copper sulfate
Will all the molecules of the solute disintegrate into ions? This depends on a number of conditions.
Degree of dissociation
is called the ratio of the number of decayed molecules to the total initial number of molecules. When a substance is completely dissolved, the degree of dissociation is equal to .
Along with dissociation, the reverse process also takes place: recombination
. Namely, two particles of opposite sign can meet and again form a neutral molecule (recombine). Over time, a state of dynamic equilibrium is established in the solution: the average number of dissociations per unit time is equal to the average number of recombinations, as a result of which the concentration of the solution remains unchanged (remember a similar situation with saturated steam: with dynamic equilibrium of vapor and liquid, the average number of molecules emitted from the liquid is equal to the average the number of molecules that return from the vapor to the liquid, so that the concentration of the saturated vapor remains unchanged).
Dissociation-recombination processes are written in the form of the following equations, reflecting the state of dynamic equilibrium:
A change in external conditions can disrupt the current dynamic equilibrium and shift it in one direction or another. For example, as the temperature increases, the rate of dissociation increases and the concentration of positive and negative ions in the solution increases.
Project “Do Energy Drinks Contain Electrical Energy?”
To combat fatigue, many people drink energy drinks every day. This makes you feel energized. However, when you decide to drink another can of this drink, remember that it contains enough electrical energy to charge the battery. When electrons are transferred between two electrodes, they create an electric current.
The goal is to learn about different energy drinks and how much energy they contain.
What we need:
- energy drinks from different brands;
- water;
- jar;
- copper wire without insulation;
- zinc nail;
- voltmeter;
- sandpaper;
- notebook.
Progress of the experiment:
- Make a table and list the ingredients contained in each drink. Point out significant differences.
- Fill the jar with water and then attach one end of the wire to the voltmeter and the other to the nail.
- Place the wire and nail into the jar. Make sure they are not touching.
- Record the voltmeter readings. This will measure the amount of electricity in the drink.
- Pour out the water, clean the can and lightly clean the nail and wire using sandpaper.
- Repeat steps 2-4, conduct similar experiments with each energy drink. Record your observations.
- Analyze the data. Which energy drink showed the highest electrical charge? Have you been able to identify the ingredient that provides the highest charge? Can this ingredient have a negative effect on humans?
Conclusion:
Can energy drinks power batteries and provide different levels of electrical charge? What ingredients in energy drinks cause differences in electricity levels?