Home / Welding technique
Back
Reading time: 3 min
3
2664
The amount of power of an inverter device varies. The performance is affected by the power of the mechanism itself, as well as the volume of incoming current. Regardless of the existing issues, consumption can be measured and calculated using a simple formula.
Please note that the result may be inaccurate, with a small error. The formula is more likely to be useful during everyday activities. You won't have to worry so much about your electricity bills.
In our article we want to tell you what the power of an inverter depends on. You will know how to calculate the power indicator of welding equipment when working at home.
We will teach you how to save money when using a welding machine.
- Introduction
- Features and nuances
- Consumer billing
- Let's sum it up
What is metal welding called?
One of the options for joining two or more metal workpieces is welding. This method is characterized by reliability, efficiency and high speed of work. The joining principle is based on the fact that two parts are fused together at the connection point. This is achieved due to the fact that the metal is exposed to elevated temperatures.
After the arc is formed, the metal begins to melt. It is due to the fact that an arc is created during welding, this joining method is called electric arc welding. How to use electric arc welding correctly, let's look into the details. Initially, it should be noted that when working with welding tools, the use of a special darkening mask is required. This mask serves to eliminate the negative impact on the eyes from bright radiation that occurs during work. In addition, the mask eliminates the possibility of sparks and melting metal coming into contact with your face.
1) Manual arc welding
The most difficult option to use for an inexperienced welder, because most of the work has to be done with your own hands. The technology and other aspects are regulated by GOST 5264-80. The type of connection, the shape of the edges, the nature of the seam, the cross-section and thickness of the elements to be welded are taken into account.
Important: when manual arc welding, the master must independently maintain the length of the arc, control the angle of inclination and calculate how long the electrode will remain at one point.
The disadvantages of manual welding are the negative impact of decay products/light on the human body and the relatively low efficiency of work on a large scale. A low-skilled specialist will not be able to use an arc efficiently when working with manual arc welding, therefore, the suture method is definitely not for beginners.
2) Semi-automatic in a gas environment
The distinctive features of connection method 2 are the use of a movable consumable electrode + the presence of shielding gas. The second acts as a barrier between the external environment and the electric arc.
Please note: when air comes into contact with the arc, oxygen and nitrogen oxidize, resulting in the formation of unwanted oxides/nitrites, which can degrade the quality of the weld by 70%+.
The protective gas is argon, carbon dioxide, helium, or their combinations in certain proportions. Semi-automatic welding technology occurs by passing the wire through a gas nozzle, which causes it to melt. The arc length is controlled automatically, and the direction of movement + speed remains under the control of the welder. The work method can be carried out without a gas sheath - a special self-protecting wire interspersed with silicon, manganese and other metal elements with deoxidizing properties is used.
3) Automatic submerged arc welding
A method with increased productivity and minimal electrode losses. The welder does not have to worry about splashes, and the welding area is as safe as possible with regard to the formation of oxides and other harmful impurities for the weld.
Welding process algorithm:
- Wire feeding using special rollers.
- By means of a sliding contact, electric current is supplied to the wire.
- The electrode begins to move along the marking for the seam.
- Flux is poured out of the unit's hopper, due to the evaporation of which a gas cloud is formed, protecting the electric arc from the influence of the external environment.
- Seam formation.
- Cleaning from slag crust.
- Collect excess flux for reuse.
The work equipment does not require the operator to use special eye protection. Thanks to the automation of the process, the subjective influence of the welder is minimized, and therefore the risk of making a mistake tends to drop sharply.
Welding type designations
Often, beginners in welding are faced with various designations for the types of welding MMA, MIG, MAG, TIG. What do these letters mean? Let's take a closer look at each of the listed types.
MMA is manual arc welding with a consumable stick electrode. This is a common type of welding used both in industry and in everyday life.
MIG is mechanized inert gas arc welding. Wire is used as a melting additive.
MAG is an arc welding in an active gas environment with a consumable wire electrode.
MIG/MAG is the most productive compared to MMA.
TIG is an arc welding with a non-consumable electrode in an inert gas environment. As the name implies, tungsten electrodes are used for it, which have a very high melting point (more than 3000°C).
Let's list the main advantages:
- Low price of materials and welding equipment;
- can be carried out in various positions;
- Wide range of metals;
- Can be carried out in confined spaces;
We list the main disadvantages:
- The professionalism of the performer has a strong influence on the quality of the weld;
- The presence of a significant release of harmful substances to which the welder is exposed;
- Low productivity;
- Arc deflection due to metal magnetization
What electrodes are used?
- with base coating
- acid coated
- cellulose coated electrodes
- rutile coated electrodes
Many people are faced with the question of how to choose the necessary electrode? The diameter of the electrodes is selected according to the table provided by the manufacturer (usually indicated on the packaging), selected according to the thickness of the workpiece. Read more in our article.
The most popular models:
- AURORA PRO OVERMAN 180 Mosfet
- WESTER MMA-VRD 200
- RESANTA SAI 220
Welding machine Eurolux IWM-160
| Welding type | MMA |
| Welding current strength | 10-160 Amps |
| Input voltage | 140-260 V |
| Duration of activation | 70% |
| Electrode diameter | 1.6 – 4 mm |
| Protection class | IP21 |
PROS
- Compactness
- Has a strap for easy carrying
- Shockproof housing
- Does not require special skills to operate
- Hot start - automatically increases the welding current at the beginning of work, making it easier to ignite the arc
- Arc force – prevents sticking of the electrode, reduces metal spatter, and, if necessary, allows for deep penetration of the weld seam
- Anti-sticking - the device automatically reduces the welding current when the electrode gets stuck, making it easier to release it
- Quick connection
- Efficient cooling during operation
- Low price
MINUSES
- Short wires included
- No display
Welding inverter FUBAG IQ 160
| Welding type | MMA |
| Welding current strength | 20-160 Amps |
| Input voltage | 150-240 V |
| Duration of activation | 40% |
| Electrode diameter | 1.6 – 4 mm |
| Protection class | IP21S |
PROS
- Compactness
- Light weight (2.7 kg)
- Smooth adjustment of welding current
- Does not require special skills to operate
- Hot start
- Arc Fast and Furious
- Anti-stick
- Quick connection
- Improved cooling system
- Low price
MINUSES
- Short wires included
- No display
Inverter welding inverter RESANTA SAI 140
| Welding type | MMA |
| Welding current strength | 10-140 Amps |
| Input voltage | 220 V |
| Duration of activation | 70% |
| Electrode diameter | up to 3.2 mm |
| Protection class | IP21 |
PROS
- Compactness
- Light weight (4.3 kg)
- Has a strap for easy carrying
- Stable operation even at high current
- Hot start
- Arc Fast and Furious
- Quick connection
MINUSES
- The protective cover is rattling
- The wires included in the kit are short
Welding inverter FUBAG IN 176
| Welding type | MMA/TIG |
| Welding current strength | 10-160 Amps |
| Input voltage | 230 V |
| Duration of activation | 60% |
| Electrode diameter | 1.6 – 3.2 mm |
| The diameter of the wire | 1.6-4 mm |
| Protection class | IP21 |
PROS
- Compactness
- Multifunctionality
- The digital display and touch controls allow you to instantly set up the machine and control welding parameters without being distracted from your work.
- The electrode selection table is shown on the top panel.
- Stable operation at any voltage
- Hot start
- Anti-stick
- Arc force (only for MMA mode)
MINUSES
- Experience with TIG machines required
Welding inverter BlueWeld Prestige 186 PRO
| Welding type | MMA/TIG |
| Welding current strength | 20 - 160 Amps |
| Input voltage | 190-220 V |
| Duration of activation | 60% |
| Diameter of welding electrodes | 1.6 - 4 mm |
| Protection class | IP23 |
PROS
- Small dimensions
- Stable operation at any voltage
- Hot start
- Anti-stick
- Relatively inexpensive.
- Low power
- Convenient carrying handle
MINUSES
- Experience with TIG machines required
- Not suitable for welding aluminum.
- No argon burner.
Welding inverter Energolux WMI-200
| Welding type | MMA |
| Welding current strength | 10-200 Amps |
| Input voltage | 198-242 V |
| Duration of activation | 70% |
| Electrode diameter | up to 3.2 mm |
| Protection class | IP21 |
PROS
- Compactness
- Has a strap for easy carrying
- Smooth adjustment of welding current
- Hot start
- Arc Fast and Furious
- Anti-stick
MINUSES
- Short wires included
- No display
Arc welding techniques - welding methods
To get a high-quality seam, you need to learn how to maintain and then move the arc. The length of the electric arc especially affects the quality. If it is more than 5 mm, then it is considered long.
In this case, nitriding and oxidation of the molten metal occurs. It splashes out in drops, making the seam porous and not strong enough. If the arc is too short, lack of penetration may occur.
The electrode rod can move along different trajectories. With experience, each welder chooses “his own” option, or more often a combination of several movements
Various techniques are used to perform welding. Let's look at the main ones in detail.
Option #1: Bottom Butt Joints
The most common and simplest way to connect parts. For metal thicknesses up to 0.8 cm, double-sided welding is used. For connections made of metal thinner than 0.4 cm, only one-sided welding is performed.
For work, electrodes are selected whose diameter is equal to the thickness of the metal. If it exceeds 8 mm, welding is carried out with cutting edges. In this case, the cutting angle is about 30°.
Welding is performed in several passes. It is advisable to use removable pads made of steel or copper to avoid burns. The first pass is performed with a small diameter electrode, no more than 4 mm.
When making the first seam, its accuracy and penetration depth are very important. After applying it, there should be no fused metal behind the edges.
For the second and all subsequent passes, larger diameter electrode rods are used. They are chosen for high-quality filling of the recess formed between the edges.
The electrode is slowly moved along the seam, performing oscillatory movements, as if rocking the electrode from side to side, in order to completely fill the voids with molten metal.
Option #2: Bottom Corner Joints
Experienced welders claim that good results can be achieved by welding corners “in a boat”. This means that the parts to be connected are installed at an angle of 45° or other.
This ensures the highest quality penetration of the product walls, and the danger of undercutting and lack of penetration is reduced. This welding method allows welding of large cross-section seams to be deposited in one pass.
Craftsmen remind that when welding a T-type corner joint, the electric arc should be ignited only on a horizontal plane (+)
There are two types of boat welding - symmetrical and asymmetrical:
- The inclination of the parts is 45°. The likelihood of sagging or undercutting one of the walls is minimal. Welding of reverse and direct polarity is carried out at maximum current values. When carrying out reverse polarity welding, the length of the electric arc should be minimal.
- The parts are tilted at an angle of 60° or 30° - an asymmetrical “boat”. This option is very convenient if work is carried out in hard-to-reach places, since the amplitude of movement of the electrode is small. The welder directs the arc to the very root of the seam, and care must be taken that it does not go beyond the boundaries of the future seam. It is also not allowed to deposit too much metal in one pass.
Corner joints can be T-type, so you need to learn how to weld metal correctly and without errors using electric welding in several passes.
The use of one pass is only possible when welding simple structures with sides that form an angle of 45° in a fillet weld. The diameter of the electrode in this case cannot exceed the thickness of the metal by more than 0.15-0.3 cm.
Standard multi-pass T welding is performed as follows. For the first pass, an electrode with a larger diameter is taken than those selected for subsequent passes. For example, an electrode is used whose dimensions vary from 0.4 to 0.6 cm.
Some welds are made in multiple passes. In this case, the size of the electrode for the first pass and for all subsequent passes is different.
Welding is carried out smoothly, without transverse oscillatory movements. When performing other passes, they are necessarily carried out. It is important that the vibration amplitude is within the permissible seam width.
Another significant point. When performing T-welding on a fillet joint, the electric arc should always be ignited on a shelf positioned horizontally.
When doing electric welding of corners with your own hands, you can use an overlap type of connection. In this case, the parts to be welded are placed one on top of the other with an overlap. The arc during direct polarity welding should be short, and during reverse polarity welding it should be as short as possible. Direct the arc exactly to the root of the connection.
During the welding process, it is necessary to perform small amplitude reciprocating movements with the electrode. This will allow the entire joint area to be heated evenly. In this case, the weld pool will be evenly filled, and the seam will be convex and full-sized.
Option #3: vertical seams
Seams directed vertically are made only with a short arc. In this case, the working current should be 10% -20% less than when welding parts in the lower position. These requirements are easy to explain.
A lower current strength means that the molten liquid metal will not drain from the weld pool. A smaller arc is more convenient to use.
Welding vertical seams has its own characteristics. They are explained by the fact that in this position, liquid metal can flow down the seam. Therefore, the welding current and electrode angle must be selected correctly
Experienced welders prefer to weld vertical seams from the bottom up. The arc is set on fire at the lowest point of the future seam. After that, a small horizontal platform is prepared, the dimensions of which correspond to the cross-section of the future seam.
Then slowly move the electrode rod up. In this case, movements across the connection must be performed.
They can be in the form of a herringbone, corner or crescent. The last option is the easiest to implement. In addition, it is important to maintain the correct position of the electrode. Theoretically, penetration is best achieved if the rod is positioned perpendicular to the seam, that is, horizontally.
Butt welds are characterized by the following criteria:
Practice shows that in this position of the electrode rod, liquid metal flows down the seam. To avoid this, the angle of inclination of the rod is chosen within the range of 45°-50°. This is the optimal option for vertical welding. To weld parts in the bottom-up direction, select electrodes whose diameter does not exceed 0.4 cm.
Option #4: Pipeline Details
At home, you often have to remember how to electric weld a metal pipe. A vertical seam is usually made on the side of the part, and a horizontal seam along the circumference. Steel pipes are butt welded. All edges must be well boiled.
To ensure that the sagging inside the pipe is minimal, the electrode is brought to the product at an angle of no more than 45°. The seam width should be 0.6-0.8 cm, height – 0.2-0.3 cm.
Pipe welding is carried out using various seams and in different areas. Depending on the wall thickness of the part and its location, the diameter of the electrode and the type of seam are selected
Before starting welding work, the parts to be joined are thoroughly cleaned. The ends of the pipe are inspected. If they are deformed, they are straightened or cut using a pipe cutter. Then the edges of the parts are cleaned from the inside and outside to a metallic shine at a distance of at least 1 cm from the edge. Then start welding.
The joint is welded without interruption until it is completely welded. For non-rotating joints of pipes with walls up to 0.6 mm wide, two welding passes are performed, for products with walls from 0.6 to 1.2 cm wide - three passes, for parts with walls wider than 1.9 cm - four passes.
In this case, each subsequent seam is applied only after the scale has been removed from the previous one.
The quality of the first seam is most important. During the process, all blunts and edges should completely melt. There should be no cracks, even the smallest ones. If they exist, they are smelted or cut down. After which the fragment is welded again. Welding of rotary pipes is performed in the same way.
How to guide the electrode and the correct angle of the electrode
After igniting the arc, monitor the weld pool. Hold the electrode at a distance of 2-3 mm from the surface of the workpieces to be welded. You should be able to see and separate the weld pool from the slag.
A weld pool is a bright white spot of hot metal.
Hold the electrode at an angle from 30° to 60°, while maintaining the optimal distance, because the rod melts. Monitor its position and the condition of the weld pool. Speed up or slow down your hand movement depending on different conditions and occasions.
The welder selects the angle of inclination of the electrode depending on the spatial position, the weld and the set current. The faster you move the electrode, the less heating of the metal and the amount of penetration. If you move the electrode slowly, you can overheat the metal and burn a hole in the product.
A beginner should first train on his own on a thick sheet of metal. Task: learn how to ignite a welding arc and move the electrode along a horizontal surface to create a high-quality seam.
After this, you can begin welding in other spatial positions. A good help for beginners will be the video - Welding for dummies from FORUMHOUSE , in which technical specialist Denis Zamyslov will talk about the basics of welding skills and choosing an inverter machine.
What types of welding tools are there?
Before you learn how to use welding at home, let's look at the types of electric welding tools. The arc that occurs when melting metal can be formed in two ways - using direct and alternating current. If welding is performed with alternating current, then this indicates the use of transformers. Inverter devices cook with direct current.
Transformers for welding are used less and less, as they are being replaced by more efficient, reliable, inexpensive and lightweight inverters. Transformer types of devices are welded using alternating current, which results in the occurrence of arc jumps. Transformer devices are heavy because they are based on metal cores with copper windings.
If we talk about other disadvantages of transformer welding machines, they have a lot of them:
- Makes noise when working
- The network “sits down” when performing work, so voltage drops are observed that negatively affect the operation of household appliances
- It is very difficult for beginners to master the technique of transformer welding.
If we talk about advantages, then transformer devices also have them. They are easy to use, last almost forever and are not expensive.
Inverter devices operate from a 220V AC network. Their main difference from transformer devices is their size and weight. Instead of a bulky transformer, the design of inverter devices uses a board with semiconductor elements. They are not only small in size and weight, but also easy to use. If you are going to learn how to work with a welding machine, then it is recommended to do this using an inverter device. Using the example of inverter welding devices, we will consider the principle of applying welding seams in order to combine two metal parts.
Calculation of device power
Before you begin calculating the power of the device, you need to know the following parameters:
- range of input voltage and welding current;
- welding arc voltage;
- Efficiency of a specific device;
- duration of switching on;
- Power factor.
The welding current interval shows at what network parameters you can work. This is due to the fact that in reality the declared 220 volts are not observed in household electrical networks. Sometimes the voltage can be less than 200 V, and sometimes it can significantly exceed 220 V.
When connecting the welding machine to the mains, a voltage drop of 5-10 percent from the nominal value may be observed.
Schematic diagram of the current regulator.
In this regard, it is advisable to pay attention to models for which the operating range is stated to be from 150-170 to 220-250 volts. It is these devices that are able to provide the best power performance.
The welding current range determines its highest and lowest values. The power of the inverter directly depends on this characteristic. For household models, the minimum values can vary from 10 to 50 A, and the maximum - from 100 to 160 A.
The output voltage or welding arc voltage varies in the range of 20-30 V for cheap models. The efficiency of devices with a maximum current of 160 A usually does not exceed 0.85%.
One of the important characteristics of the inverter is the on-time. This parameter actually indicates how high quality a particular device is. The meaning of the criterion comes down to the ratio of work time to “rest”.
For example, if this indicator is 50%, then for every five minutes of operation the device should cool for the same period of time. Thus, the lower this parameter, the longer the breaks will be.
A high percentage, on the contrary, indicates that the device can be used for an extended period of time without interruption.
The power factor of a welding inverter directly depends on the duration of switching on. The calculation to determine this characteristic is determined from the ratio of continuous operation time to total time.
Let's look at everything using a simple example. Let's calculate the power of an inverter welding machine that worked for 4 minutes before the protection tripped. It then needed to cool for two minutes before it was ready to go.
So, to find out what coefficient this device has, you need to divide three by five - the total operating time, and multiply by one hundred. We get the desired value. For household mini versions and semi-professional equipment, the coefficient does not exceed 0.6-0.7.
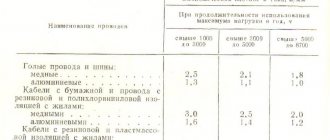
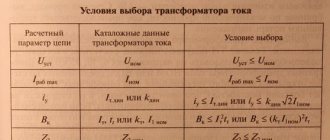
Welding machine characteristics table.
Let's say there is a device that requires a power supply of 160-220 V, and its maximum current is 160 amperes with an arc voltage of 23 volts. Let the efficiency of such a device be 0.89, and the duty cycle 60%.
The parameters listed above are quite sufficient to calculate power consumption. It is necessary to multiply the current by the arc voltage and divide it all by the efficiency. The result is 4135 watts.
This value shows the power consumed directly during operation. However, as mentioned earlier, it is also necessary to take into account the duration of activation. To do this, you need to multiply 4135 by 0.6. The result is 2481.
This value is the average power. It is considered the most relevant and correct when determining energy consumption.
This approach is closest to reality. After all, it is very rare to encounter a situation where the inverter would work for days on end without interruptions. Pauses and delays always happen; you simply cannot do without them.
It is worth at least taking into account the time required to change electrodes or to prepare parts for welding.
What is a welding inverter and how does it work
This device was called an inverter because it converts alternating current of a 220 V network with a frequency of 50 Hz into high-frequency oscillations, and then into direct current. At the same time, the device has a high efficiency: about 85-90%, and even under fairly heavy loads the counter “winds” a little. In any case, you won’t have to pay crazy bills. The consumption will be slightly higher than without welding, but not by much.
This small box is an inverter welding machine
Most inverter welding machines operate from a 220 V household network (there are also devices from 380 V). And this is one of their advantages. Moreover, they have practically no effect on it, i.e. do not reduce tension. Rest assured about your neighbors: they won’t even know that you are welding. The second important advantage is that they can work more or less normally at reduced voltage. Of course, you need to look at the specifications, but at 170 V, most of them still allow you to work with a 3 mm electrode. This is very important especially for rural areas, where low voltage is the norm rather than the exception.
What’s also good for beginners is that it’s easier to get and hold an arc when using inverter welding. And in general, according to many, it cooks “softer” and has a “lighter” arc. So if you want to learn how to cook, try inverter welding first.
How to choose a welding inverter manufacturer
Now you know how to choose a welding inverter based on technical characteristics. The most difficult task remains: choosing the brand of the device, or rather, the manufacturer.
Chinese welding machines or?
In the category of household welding inverters, almost all units come from China. There are brands that are completely unknown to anyone, and there are brands that have been working for years and have earned a certain authority. Well-known Chinese brands are, as a rule, equipment produced by reputable factories equipped with modern equipment.
The “owners” of the brand are Europeans, Americans and even Russians, and production facilities are located in China. This scheme has long been worked out and is well known. That’s why recently even two lines have appeared in the descriptions of devices: “homeland of the brand” and “country of manufacture.” To call these inverters “Chinese” is not entirely correct, but they were manufactured there. In general, it's up to you.
Chinese inverter welding machines known on the market do not have the lowest prices. But they have been tested, and most of them have a network of service workshops or a repair contract with one of the similar services. Here are a few brands that have mostly good reviews:
- Welding inverters Resanta. The homeland of the brand is Latvia, the manufacturer is China. There are three lines: SAI - models with a maximum welding current from 140 A to 250 A, supply voltage from 170 V to 250 V. Price from 6.5 thousand rubles for SAI 140, up to 14 thousand rubles. for the 250 amp model.
- SAI PN - models operating at reduced voltage - from 150 V. Price from 11 thousand rubles. for a 160-amp unit, up to 18-19 thousand rubles for a power of 250 amperes.
- SAI K are compact models that have less weight and dimensions, and have the same characteristics as SAI. Priced from 7.3 thousand rubles for a 160 A device, up to 12 thousand rubles for a 250 A device.
Resanta welding inverters of the SAI, PN (reduced voltage) and K (compact) lines (To increase the size of the picture, right-click on it)
- Household models ARS 165, ARS 205;
- Welding inverters Fubag (Fubag), the homeland of the brand is Germany, the manufacturer is China or France. The IN series is assembled in France, and the IR series in China. Permissible deviation in supply voltage 220 V +/- 15% (190 - 250 V). The Fubag IN series of welders can operate in MMA and TIG modes (welding in an argon environment; the TIG mode requires a special set of equipment - purchased additionally). Price from 11.8 thousand rubles for a device with a capacity of 16 Amperes, up to 18 thousand rubles. for a power of 220 amperes.
- The IR series of inverter welding machines is MMA welding only and has anti-stick and hot start functions. Price from 7 thousand rubles. for 160 ampere and up to 9.5 thousand rubles for 220 ampere.
- Another representative of Russian inverters produced in China is the Kedr inverter welding machines. “Cedar MMA” series - work only with consumable electrodes. There is a “hot start” and “anti-stick” function. Prices from 7.5 thousand rubles. for the lowest power (170 Amperes) and up to 9.5 thousand rubles. for a 220 Ampere unit.
- The “Cedar ARC” series is a professional series of units, they also have an arc stabilization function, the price starts from 10.5 thousand rubles for a unit with a capacity of 160 amperes, and up to 28 thousand rubles for a 400 ampere unit.
- Interskol inverter welding machines. This is another brand originally from Russia that produces equipment in China. Feature of the package: the power plug is not included in the package. It is stated that the device operates with a power supply from 140 to 240 V. There are two lines: “Interskol ISA, for MMA (manual electric arc welding with a consumable electrode). Prices from 6.5 thousand rubles. for a device delivering 160 amperes, up to 10 thousand rubles. for a power of 250 amperes.
- Intersokl ISP series - in addition to MMA welding, it can work in MIG/MAG mode (in an environment of inert or shielding gases). The price for ISP 160 amperes is 19 thousand rubles, for ISP 200 amperes - 21 thousand rubles.
- FoxWeld welding inverters are made in China. Good characteristics, wide choice. There are several lines of budget welders for dachas that operate at reduced voltage. FoxWeld Summer resident - price from 7.2 thousand rubles for a 160 A unit. A digital display with large numbers makes it easier to perceive information. Supply voltage is 180-240 V, although not the best performance at maximum current: PV 40%. Open circuit voltage 56 V.
- FoxWeld Corundum - With generally similar characteristics, it has the best current-voltage characteristic: open circuit voltage 78 V.
- FoxWeld Master can work with a argon arc welding kit. PV at maximum current is even lower: 35%. There are functions of “hot start” and “anti-sticking”, arc forced.
Russian welding inverters
There are only a few welding machines produced in Russia. Several years ago, Torus inverters appeared that meet the declared characteristics and produce a stable arc. What's nice is the long warranty - 3 years. Such a period occurs very rarely, so this already gives us hope that everything should work well. There are two lines:
- Household appliances "Torus" - 165, 175, 200, 210 (this is the power in amperes). Price from 13 thousand rubles. for a 165 amp model up to 15 thousand rubles. for more powerful ones - 200-210 amperes, duty cycle at maximum current 60%.
- Professional line Torus 235 Prima, 250 Extra, Torus 255 Pro (from 17.3 thousand rubles to 20.5 thousand rubles), PV at maximum current 80%.
The declared supply voltage is 165-242 V. Please note that welding cables are not included in the basic package. They need to be purchased separately.
Watch the tests of the Torus 250 inverter welding machine in this video.
Inforce inverter welders are also produced in Russia. They belong to the professional category, there are only two models for 200 and 250 amperes. They can operate in both MMA and TIG modes (torch and gas cylinders are purchased separately). The current adjustment is smooth - from 50 to 200/250 amperes, the work/rest ratio at maximum current is 60%. The price of Inforce inverters is 16-21 thousand rubles.
In Nizhny Novgorod, the ElectroIntel enterprise produces Neon inverter welding machines. This technique is designed to work in harsh conditions: it cooks normally at temperatures from -40°C to +40°C. The devices are universal - I also work in both manual arc welding and TIG modes. For devices of this type the price is very low. For example, a welding inverter NEON (Neon) VD 160 costs 9.7 thousand rubles. The second modification, which may be suitable for domestic use (for construction, for example) This NEON VD 180 is sold at a price of 12.5 thousand rubles. The devices have all service functions and a multi-board structure (more repairable than single-board analogues). The work/rest ratio of PV at maximum current is 80% (measured at a temperature of +40°C).
The principle of operation of the inverter and its connection
Inverter welding is based on the principle of creating an electric arc by closing two contacts. For this purpose, compact devices are used, where a step-down transformer is placed in the middle. In it, the voltage drops to safe values (36-70 V), and the current increases to levels capable of melting metal. The temperature of the welding arc can reach 5000 degrees.
After the transformer, the current enters the diode bridge and is rectified. Passing through the device's switches and transistors promotes the reverse conversion of voltage into alternating voltage, but with an increased frequency. Instead of 50 Hz, the equipment produces 20-50 kHz. Then it straightens again.
This tension allows the formation of smoother seams with fine scales and ensures complete mixing of the molecular structure of the metals. Strong connections withstand increased loads of refraction and rupture, and when tested under pressure, show proper tightness.
Due to their low weight, inverters are very popular among private craftsmen and various construction teams. Having learned to cook with such a device, you can not only solve current problems in a private home, but also start making money from it.
Welding generators
This is quite complex equipment that combines a generator (gasoline or diesel) and a welding power source. Moreover, welding can be done from both direct and alternating current. The equipment is already quite expensive, but it is the best option for those villages or construction sites where there is no electricity yet, or it is very unstable. If your holiday village is not yet electrified, you need a similar unit.
A welding generator is a combination of a diesel or gasoline electric generator and a welding machine
Can conventional electric welding machines be powered by a generator? They can, but if it also powers household appliances or other electrical equipment in the network, then they will have to be turned off during operation: the voltage will “jump”, which can cause them to break. There is one more point: welding machines require a generator of a simpler design (they are not so demanding on the characteristics of the power source). Because his scheme is much simpler. As a result, a welding generator costs less than an electric welding + generator pair.
If you do not have electricity, or there are significant interruptions in it, it is more profitable to buy not a welding machine for your home and/or cottage, but a welding generator.
The choice here begins with the type of generator: gasoline or diesel. Then select the type of welding power source: transformer, rectifier or inverter. Then there are the usual electric welding parameters described above.
What is needed to operate an inverter
An inverter-type welding machine or power source necessary to create a welding arc. There are a huge number of different manufacturers and brands of inverters, of course, prices for inverters vary significantly.
However, the operating principle of all inverters is the same; differences exist in the current-voltage characteristics and quality of the equipment.
To get started you need:
- Welding machine;
- Electrodes;
- Mask;
- Welding gaiters;
- Workwear (robes) and safety shoes
- Welder's hammer
- Metal brush
If you decide to try yourself for the first time, choose inexpensive materials and tools. For training, a mid-price welding inverter (which can be rented), 3 mm electrodes and a Chameleon mask are suitable.
Required Tools
For welding work you need a set of tools and special protection.
This is the welding machine itself, electrodes, hammer and brush. The diameter of the electrodes depends on the material to be worked on. Don't forget about protection. To protect your eyes, a welding mask is a must, and you should also wear thick clothing, suede gloves, and durable shoes. Devices that convert alternating current into direct current are also useful - this is a rectifier, inverter or transformer.
What else to look for when choosing
In conclusion, I will share my opinion on what additional functions would be useful for the device. After all, even minor parameters largely determine the quality and ease of use. For example, the protection class plays an important role for safety. This information must be included in the documents.
In addition to separating devices according to power supply from a three-phase or single-phase network, you should pay attention to whether there is such a good function as anti-sticking. If the electrode sticks to the surface, it will be extremely useful to automatically disconnect the device from the network.
“Hot start” also helps in operation. It allows you to quickly ignite the arc. And the presence of a display will help not to confuse operating modes and provide useful information. There are universal inverters in which the transition to argon arc welding is carried out in one touch.
The video will show what criteria to use to choose a welding machine whose power consumption will allow you to save:
How to weld metal correctly?
To carry out the process correctly, it is necessary to study and perform step by step all the operations described below.
It is also necessary to remember that a beginner needs to primarily monitor the quality of work, the thoroughness of operations and the development of skills, and not the speed of work.
So, the first stage is preparation:
- We collect all the necessary tools and equipment, put on special clothing;
- We clean the edges of the part and degrease them;
- connect the electrode;
- We carry out preliminary assembly using tacks; The size of the tacks can be different, usually the tacks are made 10-50 mm, or in the form of points (for small parts).
When it comes to working with pipes, the length of the tack should be at least 2-5 times the thickness of the pipe wall.
The second stage is welding of elements. The process begins with ignition of the arc. There are two main ways:
1st – by touch: the welding arc is ignited by briefly touching the metal surface; it is important to immediately remove the arc to prevent sticking.
2nd – by striking: the welding arc is ignited when held (like a match) across the surface of the metal. This method is preferable because it makes it difficult for the metal to stick, but it is not always applicable due to cramped conditions.
An important point when welding is the inclination of the electrode. If you learn how to hold the electrode correctly, you can avoid many unpleasant consequences. There are three main provisions:
1. Angle forward - the welding arc is deflected from the normal by 30-60 degrees, forming an acute angle between the arc and the seam. In this position, horizontal as well as vertical seams, ceiling seams are made, and pipes are joined in the absence of the possibility of turning the pipe during welding.
2. Backward angle - the welding arc is deflected from the normal by 30-60 degrees, forming an obtuse angle between the arc and the seam. This position is suitable for corner and butt joints.
3. At a right angle - an angle of 90 degrees is formed between the arc and the seam. This position is most often applicable in hard-to-reach places.
How to choose an electric welding machine
If you have decided on the type of welding machine (transformer, rectifier, inverter, automatic machine or generator), you need to choose a model. There are several key parameters that will make this process easier:
- Supply voltage: 220 V or 380 V. For everyday use, welders operating on 220 V are usually used. All types of welding machines except inverters are quite demanding on its characteristics. It is only inverters that can operate without problems in the range of 180-250 V. For the rest, when the voltage increases, the protection is triggered (they turn off), and when it decreases, the parameters drop significantly. Three-phase 380 V devices are usually more powerful and reliable, but they also cost more (minimum - about 20-30 thousand rubles). They are often purchased for production, for large service stations. For welding “for yourself” with your own hands, the power of these units is excessive.
- Output current. If you choose a welding machine for your home or garden, you will use it periodically; for most work, a current of 160-180 Amps is sufficient (inverters at this current can work with 3-4 mm electrodes without problems). If you plan to weld thick metal, you don’t need more than 190-250 Amps. Industrial models can output up to 500 A.
What current should be used to cook with different electrodes (general recommendations, carefully select experimentally) - Open circuit voltage. Measured on the device without load. It can be from 45 V to 80-95 V. The ease of igniting the arc depends on this parameter. The higher the open circuit voltage, the easier it is to start welding. The increased performance also ensures a more stable arc, making welding easier. This parameter is taken into account when choosing the type of electrodes: some need a low voltage for ignition (riutil coating), others need higher values (main coating).
| Metal thickness, mm | Diameter of electrodes, mm |
| 1.2 - 2.0 mm | 1.5 mm |
| 1.5 - 3.0 mm | 2.0 mm |
| 1.5 - 5.0 mm | 2.5 mm |
| 2.0 - 12.0 mm | 3.0 mm |
| 4.0 - 20, mm | 4.0 mm |
| 10 - 40 mm | 5.0 mm |
- The maximum diameter of the electrodes with which the unit can work. This indicator, in addition to the selection of electrodes, also affects the thickness of the metal with which the device can work.
Some general tips for choosing a welding machine. To decide which welding machine is best for your home, start from the tasks that you will need to solve. A transformer is sufficient for welding ferrous metal. If you need to weld structural or low-alloy steel, you need an inverter. For welding thin or non-ferrous metals - semi-automatic.
When working with a welding machine, you definitely need a welding mask or, better yet, a chameleon, as well as work gloves or welder’s gloves
Dimensions are often the deciding factor. If you need a portable, portable and compact welding machine, this is an inverter powered by a 220 V network. It is very small in size and weight. It is easy to carry even just on your shoulder, hanging on a belt. At the same time, it works with a wide range of materials, making it possible to obtain a good seam.
If your power supply is far from ideal, then an inverter welder is also suitable for you: they are not afraid of voltage surges and work even when dropped to 180 V. Some models designed specifically for low voltage operate at 160 V.
These same devices are also recommended for novice welders: some of them have several useful functions that make the work of a beginner in welding much easier:
- Hot Start mode - “hot start” - makes it easier to ignite the arc. At the start of welding, an additional current pulse is issued, facilitating ignition;
- Anti-Stick - “anti-sticking”. At the beginning of work, it is difficult for a beginner to select the correct welding parameters. As a result, the electrode “sticks” to the part. When working with transformers and rectifiers, it is not easy to tear it off later. In inverters, the current is automatically reduced, and the electrode can be torn off without any problems.
- Arc Force - increased power. When the electrode approaches quickly, the current increases, preventing the electrode from sticking.
If you are new to welding and are deciding which is better - an inverter or a transformer - the choice for you is simple: definitely an inverter (read how to choose an inverter welding machine here). It has only one drawback: after you learn how to work on an inverter, you will not be able to work on a transformer without retraining. Among other shortcomings: he does not like dust, especially metal. Therefore, it is better not to clean metals near it and not to work with an angle grinder or grinders. Well, like any electrical equipment, they do not like humidity and are afraid of condensation.
Sequencing
Step-by-step instructions provide for performing several types of work. First you will need to equip a welding inverter. 2 cables are taken from it. One is for connecting the ground wire.
On another, of sufficient length, an industrial or homemade holder is connected. The process of learning electric welding is quite complex and time consuming.
Start of welding: light the arc
When everything is assembled and connected, wearing a mask, you can begin to ignite the electric arc. Use a rough piece of metal for training. The arc is excited by tapping on the surface or striking it, like a match.
The new electrode has a bare tip and ignites fairly quickly. An electrode that has already been used for cooking, if it has had time to cool down, is more difficult to ignite, since a “visor” of coating has formed at its end. You need to hit 3-4 times to fight it off. But do not overdo it, otherwise, without coating, the rod will begin to stick to the product.
Electrode tilt
When the arc strikes, don't panic. Get used to the specific light. Your task is to first learn to keep the gap between the electrode and the product within 3-5 mm. Don't try to weld the joint right away. Just learn to hold the arc so that it does not go out (if you move too far) and the electrode does not stick (if you move too close).
The task is complicated by the fact that the length of the consumable electrode is constantly shortening, so you have to move your hand closer to the product. A “steady hand” comes with time, so you will have to burn more than one electrode before you get used to it.
When you have already mastered holding the electric arc, you can move on to welding. First of all, hold the electrode correctly. Usually they cook it by tilting it towards itself within 30-60º. Some welders choose the optimal tilt position of 45º. Backward angle welding provides good visibility of the weld pool, the metal is heated deeper. Welding at an angle forward (when the seam is pulled away from you) helps reduce heating. This is suitable for joining thin metals 1-2 mm.
You can weld from right to left or from left to right, tilting the electrode on different sides of the weld pool. It all depends on access to the connection point.
Electrode movements
On thin metals 1-2 mm, where the two sides are pressed tightly against each other, no additional movements are required. The arc is excited, the electrode is placed at the beginning of the joint, and is slowly drawn along the connection line. The seam will be narrow and scaly.
On thick metals, provide a gap of 1-2 mm so that the liquid metal penetrates deeper. If the plate thickness is more than 5 mm, cutting the edges at an angle of 45 degrees is necessary. Then the first seam (called the root) is laid without additional movements. And the subsequent ones are needed to fill the width and require transverse oscillatory manipulations. These movements could be:
- crescent;
- in a round, triangular spiral;
- zigzag.
Ideally, place the part at a slight angle so that liquid slag does not flow into the weld pool. If this is not possible, periodically make a sharp movement with the tip of the electrode to the side, throwing away the slag. Otherwise, lack of penetration will occur.
Which polarity to choose when welding metal with electrodes
The inverter for manual arc welding produces direct current. If you look at the front panel of the device, you will see that there are two connectors for connecting welding cables marked + and -.
Straight polarity : a “clothespin” is connected to the plus of the device, and a holder is connected to the minus.
Reverse polarity : the electrode holder is connected to the plus of the device, and the “clothespin” clamp is connected to the minus.
Which polarity should I choose? Many copies have been broken about this issue. If you open educational materials on welding and ask on the Internet, you can often hear the opinion that with “straight polarity” the metal being welded is better heated and melted .
Practice refutes this.
When welding, more heat is generated at the contact with the plus, therefore, in reverse polarity , the holder is connected to the plus, the penetration is always deeper . As a result, it is better to weld metal with thick walls using reverse polarity. This is a profile pipe, plates, corner with a thickness of 4-5 mm. Conversely, with direct polarity it is necessary to weld thin metal, no more than 1.5-2 mm thick, in order to avoid melting of the walls and the appearance of holes.
You can verify the veracity of this statement in practice. Take a welding inverter, set the welding current to 100 A. Connect the electrode holder and ground to the connectors of the device and cut the metal - a plate 4-5 mm thick, an angle or fitting, first in direct and then in reverse polarity, without changing the current strength and electrode with a diameter of 3 mm. You will see that metal cutting is faster with reverse polarity.
Criteria for selecting equipment and materials
Before starting any training, it is necessary to equip a home craftsman welding station. First of all, this concerns welding machines and electrodes, and then move on to the basics.
To carry out one-time work, you can rent a welding machine from specialized companies, but if there is a lot of work to be done, the best solution would be to purchase a reliable unit with a sufficient level of power.
You can weld with gas, but this is a more expensive method. For various purposes, the industry produces the following types of equipment:
- welding machine (transformer), designed to convert alternating currents into high-power welding current. Cheap welding machines can overheat greatly even under light loads, and they produce uneven welding current with large differences;
- Rectifiers convert alternating current from the network into direct current. These are the most productive devices with good characteristics, but they cost an order of magnitude more;
- Modern inverters are capable of converting alternating current into direct current; they are distinguished by high performance characteristics with small dimensions and weight. Today this is the most affordable, reliable type of welding equipment; many welders use them. This is the best option for beginners, where you can practice the basics of working with electrodes.
Beginners need to know that electrodes are used for electric arc welding.
Information about electrodes refers to the basics of training. The success of welding depends on the quality of the electrode and a suitable core composition. The product is quite simple in design. This is a steel wire made of various materials and alloys, with a special coating applied to it.
The coating prevents unwanted gases from entering the weld pool. For household use, electrodes with a core thickness of 3 mm are most suitable. Manual welding of very thin sheet metal is carried out using electrodes with a cross section of 2 mm.
Selecting a welding machine
In order to weld reinforcement for concrete, build a metal fence, or repair a burst pipe, you will definitely need an electric welding machine. Which welding to choose for home needs?
The main properties of a home welding machine
A home welding machine should be easy to use and safe. Modern welding equipment is small in size and weight compared to Soviet models. Welding machines are easy to transport to the place where welding needs to be done.
Before purchasing, you should decide for what purposes the welding equipment will be used. If the machine is needed for welding plastic pipes, then there is no point in spending money on equipment designed for welding or cutting metal.
To work with welding equipment, a constant, stable voltage is required. However, some models allow you to work with voltages that deviate from the norm by 15%.
Organization of the workplace and reliable equipment for the welder
When welding with electrodes, strong infrared radiation occurs. To protect your eyes and skin, you must use a special welding mask and protective clothing made of thick material.
It is better to buy a welding helmet with chameleon glass, with the ability to adjust the degree of darkening of the glass. You need to wear split leather gloves or mittens on your hands. Protective clothing should be used regardless of whether you are a beginner welder or an expert.
The welding site must be fenced with protective screens to prevent damage to the eyes of others, especially at home. Welding shoes should not be nailed.
In such shoes, the welder will constantly dance even with slight dampness in the air. Before welding, be sure to ensure that your work area is properly grounded.
Having completed the preparatory work, you can begin learning welding and learning the basics.
What do you need to buy to start welding?
This question is answered in the article - Tools and accessories for manual arc welding: a basic set. In short, to start welding with an inverter at home, you will need:
- Electrodes.
- Welder mask.
- Gaiters or protective gloves.
- Protective trigger, trousers and closed shoes.
- Welder's hammer and brush for removing slag.
A specialist talks about choosing a mask for metal welding in this video.
The optimal choice for a novice welder is a mask with a “chameleon” type filter.
Its invaluable advantage, compared to a conventional protective shield with tinted glass, is that the welder can see the parts being welded. He does not need to raise and lower the mask, because... “Chameleon” automatically darkens when a welding arc appears and reliably protects the eyes.
When the welding process stops, the glass is automatically cleared. This makes the job easier. A beginner in welding will not pick up the so-called. “bunnies” from a bright arc flash if the mask with ordinary glass is not lowered in time.
Safety precautions + possible defects
The welding process must not only be correct, but also safe. Losing your eyesight or getting a major burn are some of the many dangers that await a person who decides to take the path of a welder in the Russian Federation.
Precautionary measures:
- inspection of instruments for mechanical damage;
- grounding;
- regularly checking the connection between the workpiece and the contact;
- high-quality cable insulation;
- humidity not more than 75%;
- use of masks, gloves and other personal protective equipment;
- presence of a fire extinguisher near the workplace.
Now about the defects. For a novice welder, punctures during training are par for the course. Knowing the reasons for certain distortions, a person will be able to prevent the occurrence of such situations, therefore, the risk of being in a disadvantageous position is reduced significantly.
An ideal seam is neat in appearance, with the same thickness and height along its entire length. If there are jambs, in 80% of cases they will be visible immediately. Let's take a closer look at the most common defects.
| Defect | Cause |
| Lack of penetration | Occurs when the rod moves at high speed along the seam, or due to incorrect voltage calibration in the circuit. |
| Undercut | Groove along the seam. Occurs due to the electric arc being too long. Correction during the welding process requires adjustment of the amperage. |
| Burn-through | Holes in the welded surface at the seam site. |
| Porosity | When a draft in the room blows away a gas cloud that protects the bath from external influences. |
Sometimes transverse/longitudinal cracks may appear, but here the defect indirectly affects the welder, because the material may simply not withstand the temperature conditions. For each type of metal, it is necessary to select specific operating conditions. Even an experienced welder cannot insure himself against failures in this regard.
Basic mistakes
Let's look at the main mistakes that beginners make when welding RDS:
- Rush. There is no need to rush to move the electrode, the metal must melt, so get used to slow, calm movements.
- Inability to distinguish slag from metal. Often, beginners think that they have welded the joint, but after knocking off the slag, there is a lot of lack of welding in it. The fact is that when welding, it seems that the joint is filled with liquid metal - in fact it is slag. Liquid metal looks white through a filter, and slag looks red.
- Trembling hand. A hand support will help to achieve a constant gap between the tip of the electrode and the workpiece. Never hold your hand suspended, otherwise the electrode will stick. You can rest your hand on the table or knee.
- Do not immediately beat off the slag. (although I really want to check the quality of the connection). Let it cool a little. This way you will not damage the seam, and flying hot slag that gets on your skin will not cause a burn.
Difference between AC and DC welding
Understanding the differences between alternating and direct current, as well as the features of welding machines that produce them, let’s consider the difference in welding.
AC Welding
DC welding
The arc on alternating current burns less stably; random attenuation is possible with a slight change in the gap between the electrode and the product. There is a characteristic crackling sound. It is more difficult to manipulate the arc, sometimes it “walks”, and it is more difficult to set the shape of the seam.
When welding with alternating current, there is metal spattering, the arc “spits”. AC electrodes are consumed faster. During the execution of ceiling and vertical welds, the transfer of filler metal is complicated; some of it accumulates downwards under the influence of gravity.
But welding machines operating on alternating current are cheaper than rectifiers and inverters. They have the simplest design and internal components that can easily withstand harsh conditions at a construction site, garage, or workshop. There is practically nothing to break here - only the winding can burn out from overheating. If you do not overheat the transformer, it will serve for many years.
The devices are not afraid of dust, and the current strength is adjusted by moving the primary winding closer or further from the secondary. All elements are simple and reliable, the equipment has increased maintainability with low cost of components.
Welding with direct current is characterized by a stable arc, it is easier to weld a seam by controlling the scaliness, width and height of the bead. The arc does not crack, but rustles. Liquid metal splashes less, and the drop is better transferred to the product. Direct current is more convenient for welding not only in the lower position, but also in the vertical and ceiling positions.
When the incoming voltage “jumps,” DC machines only lose operating current, but the arc remains stable. The quality of the weld no longer depends 100% on the experience of the welder, but is ensured by the best characteristics of the welding current.
But inverters are more expensive than transformers. They have more complex internal equipment and expensive repairs. Inverter welding machines are sensitive to dust, shock, and shaking. When using on a construction site or in a workshop, you should be careful and regularly blow dust out of the internal circuits.
Let's sum it up
Having learned to work with welding equipment, it will be possible to solve many everyday problems that often arise when working in the country or in the garage. Beginners should pay special attention to the polarity of welding parts of different thicknesses with an inverter.
By understanding how to properly configure the equipment and choose an electrode, you will be able to obtain high-quality seams on any product. Be sure to pay attention to the forward and reverse polarity of connecting the welding inverter.
When welding thick parts, direct polarity is used when welding with an inverter, and for thin parts, reverse polarity is used.
Sources
- https://moiinstrumentu.ru/kak-varit-svarkoj.html
- https://WikiMetall.ru/spravochnik/kak-nauchitsja-varit-jelektrosvarkoj.html
- https://mrmetall.ru/kak-pravilno-varit-jelektrodami-nachinajushhim-jelektrosvarkoj/
- https://sovet-ingenera.com/santeh/svarka/elektrosvarka-dlya-nachinayushhix.html
- https://kak-sdelano.ru/instrumentyi/cvarka-invertorom-dlya-nachinayushhix
- https://instrumentiks.ru/sovety/svarka-invertorom
- https://tokar.guru/hochu-vse-znat/svarka-elektrodami-kak-pravilno-varit-nachinayuschim.html
- https://svaring.com/welding/teorija/azy-svarki-elektrodami
- https://www.svarbi.ru/articles/kak-varit-svarkoy-elektrodami-dlya-nachinayushchikh/
- https://tutsvarka.ru/vidy/svarka-invertorom-dlya-nachinayushhih