The functional responsibilities of any system administrator usually consist of a whole list of different items, and depending on the progress of technological progress, some of them disappear into oblivion, and new ones appear in more complex forms. But one thing has remained unchanged from the origins of computer networks to the present day - the maintenance, installation, testing and optimization of a structured cable network.
Particularly lucky administrators do not have to deal directly with installation: a self-respecting company will always provide this large-scale and responsible work to an integrator company. But in practice, the situation is rather the opposite - companies are trying to save money wherever possible and administrators often have to put aside the laptop and console and pick up a hammer drill and cable coil. Accordingly, putting the laid cable network into operation and testing the connections made also becomes the task of the administrator.
To resolve such issues, the administrator must be armed with instruments to monitor the physical condition of the cable and network connections. Depending on the needs and generosity of the employer, these can be very simple, medium or professional test instruments.
Unlike the system administrator at the dawn of the profession, who checked the cable conductors for breaks with a multimeter, placing a short-circuited connector at one end of the route and looking for this loop in the sockets, the modern administrator has a lot of equipment options available to him.
Let's consider options for cable network testing devices that should be in the arsenal of every network administrator.
How to change the password on an Asus router
If you have a Wi-Fi router from Asus, changing the password on it will be very easy. The main thing is to follow the step-by-step instructions exactly:
- Open any browser. You can even do this on your phone.
- Go to the address - 192.168.1.1.
- Enter admin as your login. The password is the same.
- A menu will now open. Go to the setting that is labeled as wireless network.
- In the SSID field, enter the name of your Wi-Fi.
- Where the authentication method is specified, you need to put WPA2-Personal. Today this method is considered the most secure.
- The new password should be entered into the field called WPA Pre-Shared Key.
That's all! All that remains is to click the “Apply” button. A similar method is also used to change the password on Wi-Fi routers Upvel and Tenda.
How to detect a short circuit
Step-by-step instructions on how to determine a short circuit with a multimeter:
When electrical devices and the network are turned off, you need to measure the circuit resistance in individual nodes. If possible, it is advisable to use a wiring diagram for the electrical supply of a house or apartment. If a lot of resistance is shown, then this section is working. And in places with a short circuit, the resistance will be 0. However, the device can also display a high resistance indicator, mainly if there is a large distance to the short circuit. For this option, it is advisable to use a megohmmeter;
- if there are no such devices, then you can use a test lamp with an independent current source. You can equip a regular flashlight with probes for this (the light bulb should work when the pins are connected to each other). By closing the required network cores one after another at the connections of the distribution boxes, a short circuit can be detected by a working lamp;
- remove the damaged cable. There is no need to perform spot installation of electrical wiring. Firstly, hidden wiring is located under the facing material, which means additional costs for installation work. Secondly, it is recommended to replace the entire damaged cable, since the short circuit may occur again. It is advisable to place the new cable behind the baseboard. Using a special box, connect it to an outlet.
How to ring electrical wiring
This process is mainly done using a multimeter. This device is quite inexpensive, so it is advisable to have it in your tool kit.
The easiest option for dialing is to perform it at the installation stage. How to do it correctly:
- check the wire for the appropriateness of the declared power. The cross-section of the wire will be equal to the total power of the electrical appliances that will be used in this network;
- check the cable insulation for integrity. This can be done visually;
- measure the insulation resistance with a megohmmeter. For an electrical circuit with a standard voltage of 220 V, the resistance should not exceed 0.5–1 MOhm;
- correctly check the network under maximum load. To do this, you need to turn on all the devices at once.
You can also ring the wiring using a socket. Move the range knob to the AC voltage measurement position. It is necessary to set the indicator to 750 V. The probes of the device are connected to the holes in the socket. The voltage should show 220 V. The maximum error is 10%. If it exceeds the permissible deviation, then it is necessary to use surge protectors to connect household appliances.
How to check circuit continuity
To test the integrity of electrical wiring, you must use a digital multimeter operating in resistance mode. When carrying out the test, you need to make a closed circuit, which consists of the device itself, two measuring “probes” and the wire being tested.
Attention! During operation, a small electric current is passed through the test area, and the device will recognize the indicator of its internal resistance. This option is suitable for those who do not have special electrical skills.
How to ring wires in a car
- Use the handle to set the device to voltage measurement mode;
- Connect the end of the device to the ground of the car or to the minus of the battery. A distinctive feature of the power supply pair in the machine will be that the negative wire is either very short or completely absent;
- The second probe touches the supply wire. It must be disconnected from the device clamp.
Computer socket and its types
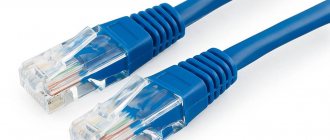
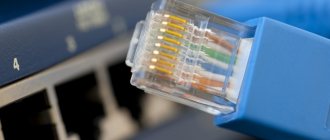
To connect computer equipment and any other peripheral equipment, use a computer socket of the RJ-45 standard. It complies with uniform communication norms and standards designed to automate most tasks.
The device includes a plastic case, inside of which one to four connectors are placed.
To organize a home network, devices equipped with one or two connectors are most often used. In devices with two connectors, the first is intended for connection to the data cable going to the computer, and the second is for connecting to the punch panel.
The cable transmitting information, called “twisted pair,” is simply inserted into the dedicated module with a contact. Through another twisted pair, information goes to the network.
Externally, the RJ45 computer connector is similar to the telephone analogue of the RJ11. But the main difference between the devices is the number of contacts. Telephone models have 4 contacts, and information models have 8 contacts. For this reason, although an RJ45 computer socket can be used as a telephone socket, it will no longer be possible to connect computer equipment to the RJ11 socket.
The sequence of work for installing most types of computer sockets is typical. You need to perform a number of almost similar steps:
Let's disassemble the device. Structurally, a computer socket is not much different from standard electrical installation equipment; it includes a mounting plate, a mechanism and a front part.
We connect the twisted pair cable to the computer outlet according to the diagram indicated on the device case.
Before connecting, strip 0.5 cm of insulation from the wires.
Having installed the edge of the wire, stripped of insulation, in its intended place, we secure it with a spring device.
We cover the terminal with the connected twisted pair cable with a metal cover, which is used as additional protection for the connections.
Let's fix the body of the Internet socket to the wall using fasteners that match the wall material.
We fix the container with the Internet socket mechanism in the housing by tightening the screws into the complementary holes.
We fix the part of the front panel that hides the socket terminal and serves as a guide for the plug.
We check the functionality of the power outlet, test the quality of the connection and signal.
Tester is an excellent way to check
Using a tester is the best way to find out if there are cable breaks. Before starting the test, you should inspect the cable along its entire length, and especially pay attention to the quality of the crimp on the plug. If the crimp is bad, there will be problems with the contact of some wires. They can also be overlapped in a fixed position. This way they won't close themselves off. If a breakdown cannot be detected at first glance, then you can use a tester that will provide a quality check.
Important! Modern testers have great functionality and are easy to use thanks to their displays. They allow you to ring the cable and accurately determine the location of the break and short circuit. We can recommend the Tester MicroScanner Pro model.
This is one of the most popular devices on the market because it has many features, including:
- determining the degree of correctness of the wiring;
- determining the location of the breakdown;
- determination of the type of failure;
- determining the distance to the breakdown site;
- wire tracing product.
Such a device is good, but only if you have a multimeter or a regular pointer tester at hand. They will help you measure the resistance in the circuit, voltage and type of current. A multimeter may well be enough to analyze a twisted pair cable. To start the analysis, you need to turn on the resistance mode and bring the ends of the cable to one point. If this happens, then further verification is carried out in the following order:
- checking the integrity of all cable cores separately;
- testing each cable by color;
- checking for short circuits with adjacent conductors;
It often happens that it is impossible to make ends meet. Then the connector is either cut, or the wires at one end are stripped and connected to each other. After this, the pairs at the other end are probed with a multimeter.
About the swing strength and waveform of twisted pair
A question that worries many. It will be described in more detail below.
Do-it-yourself check of network equipment for functionality: router and modem
The first thing to do is an oscillogram of the information signal. After analyzing it, we can conclude:
- The presence in the network of Rx and Tx type signals of the same shape and a swing of 2 Volts;
- That one pair transmits a signal and the other receives it;
- The fact is that if any one falls out of the connector, the signal will stop transmitting;
- The signal shape is round;
- The signal has distance restrictions between its various points, which does not exceed 100 meters.
Important! A two-volt swing does not pose a risk to human health or equipment operation. You can check a twisted pair cable without disconnecting from the network or turning off the equipment in the same way as a telephone cable.
Testing multi-core cables for the purpose of marking them
When marking multi-core cables, you can use the methods described above, but there are ways to significantly simplify this process.
Method 1
: the use of special transformers that have several secondary winding taps. The connection diagram for such a device is shown in the figure.
As can be seen from the figure, the primary winding of such a transformer is connected to the power supply network, one end of the secondary winding is connected to the protective shield of the cable, and the remaining terminals are connected to its conductors. To mark the wires, it is necessary to measure the voltage between the screen and each wire.
Method 2
: Using a block of resistors with different values connected to the cable wires on one side, as shown in the figure.
To identify the cable, it is enough to measure the resistance between it and the screen. If you want to make such a device with your own hands, then you should select resistors in increments of at least 1 kOhm to reduce the influence of wire resistance. Also, do not forget that the value of the resistors has a certain error, so first measure them with an ohmmeter.
When checking a multi-core telephone cable, installers often use a dialing headset, for example TMG 1. Actually, these are two telephone handsets, one of which is connected to a 4.5 V battery. Such a simple device allows you not only to check the cable, but also to coordinate your actions during installation and testing.
Checking with a dial multimeter
This is almost the easiest way to ring a cable, since such a device is found in almost every home. To check, take green and orange pairs of veins. The procedure is as follows:
- switch the device to search for resistance;
- touch the orange veins with a chisel;
- the resistance should be set at several ohms;
- touch the green veins and carry out a similar check;
- touch the orange and green veins and get a resistance value of 100 Ohms and above.
If the measurement was successful and showed the same numbers, then this indicates the excellent condition of the wires. If pairs do not ring through, it is necessary to replace them with unused ones, for example, brown or blue.
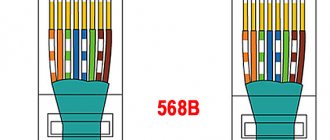
Features of RJ 45 cable pinout
Connecting an RJ-45 socket should not cause any inconvenience. To make things easier, each socket is color coded to match T568A or T568B standards. This information may be marked with letters corresponding to standard A or B.
It does not matter which standard is used in this case, the main thing is that all local network connections are made in accordance with the same standard. The T568B standard has become more widespread, but this is not always the case.
In order to determine which standard the provider uses, you need to find out what pinout is on the cable entering the room.
Another feature is the use of straight and cross pinouts depending on the type of devices being connected.
Direct is used to establish communication between consumer devices and the router. Cross-links devices with similar functionality (PC-to-PC, router-to-router).
About connecting a PC to an active network using twisted pair cable
What are the differences between 3G and 4G networks: features, advantages and disadvantages
To carry out a quality check of the Internet cable, you need to understand the elementary circuit of connecting a twisted pair of a personal computer to another device. You can see the diagram in the picture below.
Of greatest interest is the diagram showing the diagram of the card or hub to which the PC is connected. Most often it is connected via an RJ-45 connector. Each twisted pair is connected to the transformer symmetrically. This may mean that the transformer has a winding and its middle. Inside it there is a tap, which, in turn, is connected to a common conductor using a resistor and capacitor. This ensures that there is no interference in the cable and a clear, unchanging signal. Another advantage of such a transformer is the protection of cables from tangling and short circuiting.
Checking in the absence of testers
A multimeter and tester may not be at hand. In this case, you can use the manual verification method. To do this, you need to cut off pieces up to 15 cm long from each end of the cable. Next, you should remove the winding by 5 cm. And expose the cores by a couple of cm.
After this, prepare a container with water, which should be made of glass or plastic. Ordinary table salt weighing 1/4 of the weight of water is added to the liquid and mixed until completely dissolved. The cable cores are conductors and their contact must be avoided.
The other side of the cable section must be connected to a power source with a voltage of more than 3 Volts. A regular battery, a smartphone battery, and other safe sources may also work.
After applying voltage, you should monitor the wires in the water. The negative conductor should be covered with white bubbles, and the positive conductor should be covered with yellowish-green ones. If everything is so, then the twisted pair is in good condition and no short circuit has occurred. If there was a short circuit, then bubbles will come from the other vein.
Computer socket and its types
To connect computer equipment and any other peripheral equipment, use a computer socket of the RJ-45 standard. It complies with uniform communication norms and standards designed to automate most tasks.
The device includes a plastic case, inside of which one to four connectors are placed.
A computer socket is a device whose main function is to transfer connections from the computer’s network card to cable networks
To organize a home network, devices equipped with one or two connectors are most often used. In devices with two connectors, the first is intended for connection to the data cable going to the computer, and the second is for connecting to the punch panel.
The cable transmitting information, called “twisted pair,” is simply inserted into the dedicated module with a contact. Through another twisted pair, information goes to the network.
Telephone modules of the RJ11 standard are equipped with two-pair connectors with four contacts, and telecommunication devices of the RJ45 type are equipped with 8 contacts
Externally, the RJ45 computer connector is similar to the telephone analogue of the RJ11. But the main difference between the devices is the number of contacts. Telephone models have 4 contacts, and information models have 8 contacts. For this reason, although an RJ45 computer socket can be used as a telephone socket, it will no longer be possible to connect computer equipment to the RJ11 socket.
The sequence of work for installing most types of computer sockets is typical. You need to perform a number of almost similar steps:
Let's disassemble the device. Structurally, a computer socket is not much different from standard electrical installation equipment; it includes a mounting plate, a mechanism and a front part.
We connect the twisted pair cable to the computer outlet according to the diagram indicated on the device case.
Before connecting, strip 0.5 cm of insulation from the wires.
Having installed the edge of the wire, stripped of insulation, in its intended place, we secure it with a spring device.
We cover the terminal with the connected twisted pair cable with a metal cover, which is used as additional protection for the connections.
Let's fix the body of the Internet socket to the wall using fasteners that match the wall material.
We fix the container with the Internet socket mechanism in the housing by tightening the screws into the complementary holes.
We fix the part of the front panel that hides the socket terminal and serves as a guide for the plug.
We check the functionality of the power outlet, test the quality of the connection and signal.
Methods
Testing methods depend on the purpose for which it is performed. To check the integrity of the cable for a break or electrical connection between its wires (short circuit), the continuity test can be done with a tester based on a battery and a light bulb, or you can use a multimeter for this purpose. The latter is preferable.
Despite the fact that the price of a multimeter is higher than a primitive device, we recommend buying it; this device will always be useful in the household.
To check the cable, the multimeter must be turned on in the appropriate mode (diode or buzzer image).
The testing methodology is as follows:
When checking a wire for a break, the tester is connected to its ends as shown in the figure. If the cable is intact, the light will glow (when testing with a multimeter, a characteristic sound signal will be heard).
Explanations for the picture:
- A – electrical cable;
- B – cable cores;
- C – power source (battery);
- D – light bulb.
If the cable has already been laid, then on one side it is necessary to connect the wires together and ring the wires at the other end;
when checking the presence of an electrical connection between the cable cores, the tester probes are connected to different wires. Unlike the previous example, there is no need to twist the wires on the other side. If there is no short circuit between the wires, the light will not light (when testing with a multimeter, no beep will sound).
How to check the break of an Internet cable and the integrity of its insulation at home
If all methods for determining the cause of the failure fail, then most likely the cable has suffered a break or short circuit. To find a problem area, it is not necessary to inspect the cable along its entire length, but if it is not large, then this can be done. If the twisted pair is not completely broken, it is impossible to find the break inside with your eyes. Instruments and folk remedies for detecting breaks and short circuits come to the rescue. These include professional testers, simple multimeters, and testing methods using salted water or potatoes.
Finding the break point
After a break in the electrical wiring has been discovered, it is necessary to localize the place where it happened. For dialing in this case, you can use a tone generator, for example, the Cable Tracker MS6812R or TGP 42. Such devices allow you to determine the location of the break with centimeter accuracy, as well as determine the route of hidden wiring; in addition, the devices have other useful functions.
Devices of this type include an audio signal generator and a sensor attached to an earphone or speaker. When the sensor approaches the place where the UTP cable pairs or electrical wiring wires are broken, the tone of the sound signal changes. When a tone test is performed, the wiring must be de-energized before connecting the sound generator, otherwise the device will be damaged.
Note that with the help of this device you can test both power and low-current cables, for example, check the integrity of twisted pair cables, radio wiring or communication lines. Unfortunately, such devices will not allow you to determine the correct connection; special equipment is used for this purpose - cable testers.