Video description
This video talks about the useful functions of simple probes and their disadvantages:
It is permissible to work only with a working tool. This doesn't just apply to batteries. It is important that there is no damage to the case. For safe use, experts recommend discarding the insulating tape and replacing the screwdriver with a new one.
As for the network, it needs to be de-energized. Even after a power outage, exposed areas of wiring can only be touched with a testing tool. Moisture in any form must be excluded to eliminate the risk of electric shock.
When checking the electrical wiring, do not touch the metal tip. A voltage with parameters that are characteristic of the network under study passes through it. The body of the pen is made of plastic that can protect a person from electric shock. Otherwise, the manufacturer writes in the instructions how to use the indicator screwdriver. Let's take a closer look at these recommendations.
Checking the serviceability of the tool
In addition to identifying external damage, you need to know how to check the indicator screwdriver for functionality. To do this, just insert the tip into each socket of a known working socket. A working device turns on the indication during contact with the phase.
How to operate different devices
A simple device needs to be applied with a tip to one of the conductors. If there is a contact plate, then you need to touch it with your finger. This is where the work ends, there are no other instructions.
How to use an indicator screwdriver with an LED - the rules are similar to the simplest tool for a contact sample. Only the contact plate is touched to check the serviceability of the tool.
Non-contact testers do not provide for closing the internal circuit. Here the indication is triggered at a distance from the network if there is voltage in a specific area. However, the diode can also light up at an open circuit, which is important to consider during testing. But you can work with low-voltage systems.
Universal testers are a little more complicated. There is a contact plate and a light indication that works when the internal circuit is closed. In addition, there may be a built-in toggle switch for setting one or another operating mode. The marking implies the following:
- O. _ Network testing is performed using the principle of a simple screwdriver with a contact pad.
- L. _ The operating principle is identical to a contactless battery-powered device.
- H. _ High sensitivity mode. You can work with a low response threshold, which helps detect hidden wiring.
There are a few things worth noting. When operating a battery-powered contactless screwdriver, the working part is the so-called heel. This is the end part of the handle. It is carried out over the area under study. If the diode light comes on, there is a phase conductor here.
Connection via adapter/charging
Most chargers or adapters for small appliances provide 12 volts. But you also need to select the current that this device produces. If you have a passport for the radio or a nameplate on it, look at the exact data there.
The car radio requires 12 V and 5-6 A to operate.
Most chargers or adapters for small appliances provide 12 volts. But you also need to select the current that this device produces. If you have a passport for the radio or a nameplate on it, look at the exact data there.
If there is nowhere to get the data, you can focus on the “average”. Typically, a car radio in normal operating mode consumes 5 A. At maximum load, perhaps, the consumption is 10 A. But with such a connection, you cannot squeeze the maximum out of it. So, we are looking for a network adapter or charger that produces 12 V and 5–6 A.
If you find an adapter or charger with suitable parameters, after five to ten minutes the car radio will work from the 220 network
Most of the procedure for connecting a car radio at home is outlined above. We will describe only the immediate actions.
If you find an adapter or charger with suitable parameters, after five to ten minutes the car radio will work from the 220 network
- Cut off the plug. The part that we insert into the equipment from the charger/adapter/adapter/power supply.
- We separate the conductors, being careful not to damage the insulation.
- Use a multimeter to determine plus and minus. You can often find a central wire and braid in the cable. Everything here is just a braid - this is a minus.
- We connect them to the power inputs of the car radio.
- We plug in 220 volts and check how it works.
If you don’t want to cut off the plug, you can simply strip the wires at some distance and draw conclusions. But after checking it is better to insulate the connections.
Another option is not to cut or clean anything. You can simply connect the wires to the plug. The “+” wire is stuck into the central hole, and the minus is the external contact.
For home network
If you decide to make a test lamp to check the wiring and the presence of voltage in the house for a household electrical network, then all you need is:
- 220 V light bulb.
- Electric cartridge.
- Two single-core copper wires, 50 cm long each.
- Probes for ease of use of the control.
- Protective cover for light bulb.
So, all you need to do is connect the wires to the socket and screw the lamp into it. As you already understood, a homemade 220 Volt control light has a fairly simple design, which allows even an inexperienced electrician to assemble it with his own hands.
What kind of lighting do you prefer?
Built-in Chandelier
Photo examples of several homemade options from a light bulb and two wires can be viewed below:
In addition, we recommend watching a video master class on assembling an electrician’s warning lamp:
Expert opinion
Viktor Pavlovich Strebizh, lighting and electrical expert
Any questions ask me, I will help!
This indicator consists of two insulated wires with probes and a housing with a built-in LED or neon indicator. If there is something you don’t understand, write to me!
Indicating screwdriver with LED – greater functionality
The indicator screwdriver, equipped with an LED, has a lot in common with the model described above. Their operating principle is the same. But there is still a difference - LED probes are suitable for working with electrical networks in which the voltage is significantly less than 60 V.
Another factor that distinguishes an LED indicator from a regular one is the presence of its own, autonomous power source - batteries. They are also distinguished by the presence of a transistor, most often bipolar.
Therefore, this type of indicator screwdriver can already be called multifunctional. With its help, you can not only check the presence or absence of a phase in a contact or non-contact way, but also check the integrity of circuits - fuses, wires and cables.
The index consists of two working parts. The first one looks like a flathead screwdriver. It is used when working with direct contact with live elements.
The second part is suitable if it is necessary to determine the presence of voltage without contact. When used with the first part, it also allows you to determine the integrity of the network
The insulated handle made of transparent material contains an LED, which indicates the presence of voltage in the network.
How to do a test: necessary materials
You can check the car yourself or contact the nearest service center. You can do it yourself only with the help of a homemade control. There are two types: for home and car, they differ significantly from each other. If a 220 volt control is suitable for a home, then only 12V is suitable for a car.
The control system for home and car performs the same functions, namely, it detects voltage in the electrical network and some malfunctions of one or another element.
These two types of homemade ones are assembled almost identically, with one difference - the light source. For home testing, a regular 220V lamp is suitable, and a car tester uses a low-power lamp. A diagram is also drawn up that will make it easier to assemble the intended device.
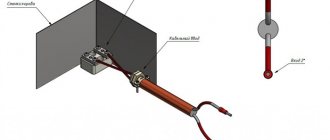
For home control, you also need an electric cartridge, but the wires must be 50 cm long. To take measurements inside the car, you need wires of at least 2 m. For the body of the device, you can purchase a regular cigarette lighter, which can be found in any auto store, but the dipstick can be replaced with a regular self-tapping screw. This device is very easy to use.
Power Supply Overview
The best option is to connect the LED to 12 volts through a current stabilizer. But some manufacturers save on this element and produce current sources without stabilizing it.
The most common transformerless power supplies are equipped with a quenching capacitor and an output with a current-setting resistor. This circuit is not protected from power surges in the network, but due to its low cost and compact design, it is used in many devices, including LED light sources.
When using a battery to supply power to the LED, it is enough to add a limiting resistor to the circuit with the correct power and resistance. The on-board network of cars also has 12 volts in most cases, but its voltage surges are quite significant under different operating modes. Therefore, to connect the LED to power from the automotive electrical system, a stabilizer (driver) is required.
Sometimes you can find a power supply without a stabilizer with a transformer. The following elements are connected in series:
- transformer;
- diode bridge for current rectification;
- capacitive filter (regular capacitor).
Any surge in the power supply with such a power supply will be transmitted to the LEDs, and this will affect their performance. It is justified to use such power supplies in cases where the network has stable parameters.
For auto
If you want to make your own control for a 12 Volt car, we recommend using the following scheme:
You can see a 12V auto electrician tool in the following photo examples:
In addition, we recommend watching a video in which a specialist demonstrates several of the most popular types of indicator lamps for cars (12 and even 24 V), which you can make with your own hands:
That's all I wanted to tell you about how to make a control panel for 12 and 220 Volts with your own hands! We hope the diagram was clear to you, because... It’s quite easy to assemble the first version of a homemade product at home!
Review of the best devices for cars DIY diode monitoring Like 0) Dislike 0)
Expert opinion
Viktor Pavlovich Strebizh, lighting and electrical expert
Any questions ask me, I will help!
Or it is also called a control; it is an electrical device that is designed to check the voltage of electricity and to identify other faults. If there is something you don’t understand, write to me!
Detailed analysis
The circuit contains a stabilizer that powers the A1 chip. It consists of a chain: R3-VD1-C3, while any similar device with a stabilization indicator of 8-10 volts can be used as a zener diode (VD1).
Please note that capacitors C4 and C5 are installed in parallel. If you do not find them with the same capacity as shown in the diagram, then you can replace them with similar ones (preferably imported) with a capacity of 4700 uF. Capacitor C6 is an element that suppresses high-frequency pulses at the output
It is best to use the K 73-17 brand of domestic production or a similar foreign version for this purpose
Capacitor C6 is an element that suppresses high-frequency pulses at the output. It is best to use the K 73-17 brand of domestic production or a similar foreign one for this purpose.
And one last recommendation or nuance. Since a 12-volt network with a consumption of 400 W will generate a current of 40 A, it will be necessary to calculate the cross-section of the wires used. This is especially true for the cable connecting the battery and the converter. Please note that the wire length should be kept to a minimum.
As you can see, making a converter from 12 volts to 220V with your own hands is not very difficult. The circuit is simple, it minimizes the number of parts, which reduces the cost of the device as a whole. Plus its work is more efficient.
Why is control dangerous?
An incandescent lamp is an electrical product that requires careful handling. Therefore, it is installed in lamps that are permanently attached to building structures or have a stable base, for example, in a tabletop version.
The control is portable and easily damaged. She can:
- explode from increased tension;
- slip out of the hands of an electrician, fall and break (often while connected);
- make a short circuit;
- cause a person to be exposed to electric current.
Experienced electricians have tried to take these risks into account and adopted various technical tricks to increase their own safety. But they are all prohibited by modern rules.
Possibility of explosion
Technical background
When connected to voltage, the resistance of the filament changes according to a nonlinear law. At the initial moment, transient processes occur briefly, and then the nominal operating mode is established.
This is explained by the fact that tungsten in a cold and heated state has different electrical resistance. Let's consider this using the example of a popular 60-watt light bulb. It consumes a current of 0.27 amperes, and its filament has a resistance of 815 ohms.
If you measure its resistance in a cold state, the ohmmeter will show about 59 Ohms. The difference is almost 14 times. This property of tungsten eliminates the need for complex ballast control equipment for the lamp, simplifies the design, but requires consideration during operation.
When the voltage exceeds a linear value of 380, the thread most often burns out, but in a worn-out structure it can explode. There are many examples of such damage. They arise where apartment owners save on protection such as voltage control relays.
Human factor
Electricians who use controls at enterprises worked not only on 220-volt networks, but also on 36-volt networks, which are used to illuminate hazardous areas.
The design of the socket and the shape of the bulbs are interchangeable: when working in control, the bulbs were simply twisted to the appropriate voltage. If, when changing workplaces in a 220-volt network, they forgot about this, then the flask exploded. And for some reason small fragments fly straight into your eyes.
Mechanical damage
The glass of the flask is fragile and breaks easily, especially in a portable design. If a stationary lamp has a lamp screwed in and secured, then the control is usually held in the hands. She might slip out.
And a person does not always follow safety rules when working with a tool; he can slip and drop it from his hands or fall with it and cut himself on the glass.
A particular danger is falling with a lamp to which voltage is applied. The filament will break, and the electrodes for its attachment may short-circuit through a random conductive object or the human body. A short circuit immediately occurs with all aggravating circumstances.
Requirements for lighting fixtures in baths and saunas
When the question arises about purchasing lamps for baths, you should be guided by the following characteristics:
- resistance to moisture and high degree of security (IP from 54);
- resistance to high temperatures and temperature changes (heat resistance up to 150 0, and if ceiling lighting, then up to 300 0);
- good lighting abilities;
- possibility of adjusting the degree of illumination.
Some lamp options also allow you to achieve interesting decorative effects by changing the color of the lighting and its various programs (blinking, gradual fading and switching on, etc.). This makes the lamps in the steam room a wonderful decorative element. Especially if they have an attractive design.
How to do a car electrician inspection yourself
Hello DIY auto repair enthusiasts. Today I will tell you how to do an auto electrician inspection with your own hands. Its circuit is very simple and very effective in the work of an auto electrician.
I won’t bother you with what calculations need to be used to simulate an auto electrician’s inspection, if only a little.
I’ll just try to explain clearly how to do the inspection quickly and correctly, and what parts you will need.
So, the inspection of an auto electrician should be practical and as efficient as possible.
In fact, the fastest way to get the control in your hands is to buy it at the nearest store.
But don’t forget that you can’t buy such a test from an auto electrician anywhere.
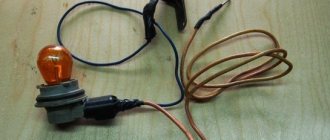
In our case, the automobile control consists of the following parts:
- LED (we will use red); - 800 ohm resistor (resistance); - thin copper wire about 20 cm; - a carnation (the most ordinary thin carnation); — a ballpoint pen (more precisely, the body of a ballpoint pen); - small crocodile; - stranded thin copper wire.
By combining all this into one with the help of a soldering iron, do-it-yourself auto electrician testing will be ready.
So, schematically, our auto electrician inspection will look like this:
And all this art must be beautifully and neatly packaged in the body of a ballpoint pen.
DIY 12 volt LED control is ready.
But the significant advantage of this control is that it is actually not only 12 volts, but much more.
It successfully measures the voltage of cars at 24 V and equipment at 36 V, and even more.
Resistor resistance calculation
To lower the voltage on the LED, a resistor is connected in series in front of it.
The main task of an electrician or amateur will be to select the correct resistance.
This is not particularly difficult. The main thing is to know the electrical parameters of the LED light bulb, remember Ohm's law and determine the current power.
R=Uon resistor/ILED
ILED is the permissible current for the LED. It must be indicated in the characteristics of the device along with the direct voltage drop. The current passing through the circuit must not exceed the permissible value. This may damage the LED device.
Often ready-to-use LED devices are labeled with power (W) and voltage or current. But knowing two of these characteristics, you can always find the third. The simplest lighting fixtures consume power of about 0.06 W.
When connected in series, the total voltage of the power source U is the sum of Unres. and U on the LED. Then U on res.=U-U on LED
Suppose you need to connect an LED light bulb with a forward voltage of 3 volts and a current of 20 mA to a 12 volt power source. We get:
R=(12-3)/0.02=450 Ohm.
Usually, resistance is taken with a reserve. To do this, the current is multiplied by a factor of 0.75. This is equivalent to multiplying the resistance by 1.33.
Therefore, it is necessary to take a resistance of 450 * 1.33 = 598.5 = 0.6 kOhm or a little more.
Necessary tools: do-it-yourself auto electrician inspection
Automotive wiring is a very delicate matter. It needs to be constantly looked after and checked for serviceability of basic electrical appliances. To check the electrical system, the car must have special devices that can be used to detect a fault in the network.
Malfunctions occur due to poor-quality contacts, which may be incorrectly connected or subject to wear and chafing. Then they are simply replaced with new ones or insulated with tape.
Due to a large amount of dirt, electrical equipment can also become unusable. An indicator screwdriver or a car light bulb will help identify the malfunction. Also, at the time of a breakdown, the necessary tools and materials must be in the car.
Tools that should always be in the car:
- Wires;
- Terminals;
- Indicator or control;
- Tester;
- Plastic ties;
- Insulating tape;
- Nippers, scissors;
- Screwdrivers, various wrenches, pliers;
- Fuse set;
- Voltage transformer.
Also, in case of various wiring breaks, you will need a soldering iron. It is better to solder bad contacts than to twist them. It is recommended to solder only those wires that are not subject to much vibration and they should be located straight. You can secure the soldered area with electrical tape.
For auto
An automobile tester, unlike a household one, performs measuring operations in DC circuits with a supply voltage of 12 V. Therefore, you cannot use a 220 V tester as an automobile probe. But the manufacturing principle will be identical, although it is very convenient to use LED controls instead of light bulbs to diagnose a car.
Due to the technical features of the car's electrical wiring, testing at 12 V, performed according to the principle described above, does not provide complete information about the state of affairs in the circuit. Because of this, auto electrician control can be equipped with the following functional additions:
Such a circuit, in addition to monitoring the state of the circuits, allows you to determine the plus or minus at the terminals and the signal intensity. Thanks to the multi-polarity of the LEDs, one of them will light up when touching the positive terminal, and the second will signal when contacting the negative terminal.
To implement such autotest control you will need:
- Connecting wires
are selected according to your needs, but professional auto electricians recommend making the length at least 2 m, since the probe has to be installed in hard-to-reach places; - The probes
can be plugs or alligators; for one-time use, you can simply strip the edges of the wires from insulation and do without probes; - The socket for the light bulb and the light bulb itself are 12V
, if the lighting device has a different connection principle, a socket of the appropriate type is installed or the wires are soldered to the terminals of the lamp (LED); - Button
– designed for switching in the control circuit, selected according to the value of the switched current; - Two LEDs
- in this example, multi-colored models are used (red for signaling the positive terminal and blue for the negative); - Housing
– designed to accommodate all the parts and install indicator lights in a visible place; a marker, felt-tip pen or plastic tube of glue can be used as a housing.
The simplest 12V control to indicate the circuit
To make such a device, you will need a disposable syringe, a 12 V light bulb (you can replace it with an LED), wire, rubber band, utility knife, and pliers.
The tester is ready, you can use it to find a circuit in a car's wiring or check the serviceability of individual elements.
Polarity tester
This is a more complex option, for such control you will need two LEDs, you can use smart LEDs (take different colors for convenience), a housing (in this case, use a non-working indicator screwdriver), a soldering iron, and a 1000 Ohm resistor. The control manufacturing process consists of the following stages:
The tester is ready, now when you touch the positive contact, one LED will light up, and when you touch the negative contact, the second one will light up. But remember, the operating rating of such a control is not suitable for 220V household networks - it is determined by the operating rating of the light elements.
Expert opinion
Viktor Pavlovich Strebizh, lighting and electrical expert
Any questions ask me, I will help!
In addition, we recommend watching a video in which a specialist demonstrates several of the most popular types of 12 and even 24 V indicator lamps for cars, which you can make with your own hands. If there is something you don’t understand, write to me!
Features of the probe and its operating principle
The continuity probe is structurally a plastic capsule, inside of which a resistor with a high resistance is placed. A metal rod extends from the plastic base, the end of which is used for direct contact with the contacts of electrical equipment. The device shows the presence of voltage; green and red LED lights located on the plastic case act as indicators. The green LED indicates low circuit resistance, the red LED indicates the presence of voltage.
A car test probe, which is essentially a voltmeter, is indispensable when identifying faults in a car's electrical equipment, as well as when installing new electrical equipment on a vehicle.
The diagnostic device makes it possible to determine the integrity of an electrical circuit or a separate section of it, identify locations of broken connections, unreliable contacts, the location of failed parts, as well as identify a number of other damages. To carry out a quick check of current-carrying equipment, the use of a continuity probe is the most rational and expedient solution.
Do-it-yourself auto electrical repairs
Auto electrics is not a difficult matter at all, you just need to understand a little about electricity and be able to recognize faults. They must be eliminated in time so that the car can move unhindered.
A common problem with a car's electrical system is faulty fuses. If the fuse fails, it must be replaced with a new one. The duplicate must be exactly the same denomination as the new one.
You can also fix some other simple breakdowns yourself. If you cannot cope with more complex problems, then it will be easier to seek help from the nearest auto repair shop, where specialists will diagnose and identify all breakdowns. Afterwards they will make a quality repair.
If there is a burning smell in the car interior, it means that there is a short circuit or fire in the electrical wiring. You cannot move in this state; you must stop and open the hood. After this, disconnect the terminals from the battery and call a tow truck, which will take you to a car service center.
Useful tips Connection diagrams Principles of operation of devices Main concepts Meters from Energomer Precautions Incandescent lamps Video instructions for the master Testing with a multimeter
"Control" for cars. Why a voltmeter will never replace it.
We will not consider all these reasons, since we mean that everything was and is in good order, and the problem with the lamp arose precisely after replacing the standard voltage regulator with any other new one, in our case with a three-level voltage regulator. Moreover, if you increase the engine speed, then the control The battery charge lamp immediately goes out, meaning the generator is charging. Since, in principle, this malfunction is not officially a malfunction, you don’t have to do anything; if you accelerate and the warning light goes out, then everything is in order. You can go and not bother.
Yangzhou Pengying Imp.