Any phone battery has 3 contacts. Plus and minus are marked on the battery case. Usually these are the two extreme contacts. Next, you need to determine where the plus and minus of charging are. If there are no instruments at all, then you need to pour water into a glass and lower the wires into it. Small bubbles will begin to separate from the negative wire. Now we connect the charging minus to the battery minus, and the plus to the plus. If the battery is completely dead, it will take one and a half to two hours to fully charge.
The most difficult thing in this matter is to find where + and where - on the charger wires.
The wires are not marked, this makes no sense, because there is a connector at the end.
We “walk” along the wires with a sharp knife, disconnect the wires and clean them.
In front of us are two wires, which is not clear.
Take raw potatoes (this is of course primitive, but it works; if you have a tester, it’s better to use it).
We stick our bare wires into the potatoes, wait about five minutes, in the area of the positive wire the potatoes will turn a little green (a greenish spot).
We immediately mark this wire (this is important if we continue to use this charger).
You can use water instead of potatoes.
With a phone battery, everything is simpler; there are plus and minus markings.
It is convenient to secure the wires to the phone battery with tape.
In general, that’s all, we plug the charger into the outlet and charge the phone (its battery, more precisely).
It’s even better to buy a new charger, or use only the “original” one with a problem in the connector area.
You can make a universal charger from any charger by simply cutting off the connector and leaving two wires - plus and minus.
Next, you need to determine which wire has a negative charge and which has a positive charge. Of course, this is best done with the help of control and measuring instruments, but it can also be done using traditional methods when dealing with chemical and physical phenomena. The most affordable and fastest ways are a glass of salt water or raw potatoes. We lower the wires with a glass of water and from the wire where the bubbles will come from there will be a negative charge (minus). With potatoes it’s different, you need to plug in the wires and where there is green discharge around the wire - this is a positive charge (plus).
Next, find on the battery (it’s better to take it out of the phone), where the plus and minus are, they are always labeled there.
All that remains is to press the bare ends of the wires to the battery terminals and press them with something.
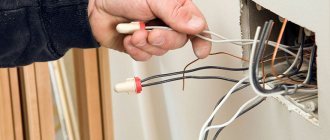
To be honest, such situations do not happen often. More often than not, the charger itself was covered, but the connector remained intact. But if such a misfortune does happen and you lose the connector, then don’t be upset. From my own experience, everything is simple here. As they say, you only need a knife. Strip the ends of the wires and connect them to the battery of the phone. It should be noted that, as in other devices operating with direct current, plus this is the red wire.
This is what it looks like in the picture.
Of course, the voltage in this case is small, but it is better to avoid a short circuit.
And of course, after you connect the wires to the battery, you need to put it on the phone.
If there is a charger, for example, with a broken plug, then you need to first compare the characteristics of the charger and the battery so that the voltage matches - a slight deviation of +/- is allowed .
Next, you need to determine where the charging is + and where -.
As previous answers suggested, this can be done with a tester or even with a glass of water or cut potatoes.
With the battery it’s becoming clearer there are markings on it.
Next, we attach the wires using clothespins or any other clamping device to the battery and plug in the charger.
Advice on charging in this way: do not charge for more than 30 minutes, it’s better not to recharge than to fail or, better yet, explode!
You need to use a Chinese exercise - a frog. The battery is removed from the phone and connected to the charger directly. Polarity is not important to her. You need to watch the indicators to make sure they are flashing. The frog chargers themselves are cheap, but because they’re lying around. You need to find it from a good seller. And you may have to change it. And charging lithium batteries without special charging is dangerous: they can explode.
Unfortunately, there is no information in the question whether this is a native charger, or an “adapted” one, that is, the first one that was at hand. The best thing to do is to have a multimeter nearby. With the device (if you know how to use it), you are guaranteed not to damage either the charger or the phone battery.
If the plug does not fit, or it is not there at all, it is better, of course, to identify the charger wiring, where is “+” and where is “-”, ringing for sure. At the same time, you need to check the output voltage of the charger. It must match the one with which the phone should be charged. But this can be done without a multimeter (tester) with some care in carefully following our instructions.
What's the plus and what's the minus?
Most often, in batteries, the red wire indicates positive, the black wire indicates negative, and there are no problems when working with electricity. However, today many countries use their own color designations or abandon them altogether, leaving the wires uniformly white.
Interesting materials:
What is the temperature at night in the desert? What body temperature causes death? What is the temperature of the Earth's inner core? What is the accuracy of a polygraph? What is the thickness of the wall in Khrushchev? What herb reduces cravings for alcohol? What is the cost of receiving aluminum? Which metro line is Chertanovskaya? Which veterans metro line? What kind of charger is needed for iPhone 12 Pro Max?
Ways to charge your phone battery
When deciding how to charge a phone battery, you should pay attention to special devices.
Universal charger for mobile phone batteries
Using a frog device is the most effective way to charge your battery without a phone.
The device is suitable for people using spare batteries for a smartphone or tablet. The device consists of a battery holder, two contacts in the form of sliders, indicators, and a housing with a plug. More expensive models are equipped with a display. Using the charger is easy. To restore battery charge, perform the following steps:
Universal charger for charging phone batteries.
- Determine the positive and negative contacts of the battery. Most often they are marked accordingly. The middle contact is not used for charging; it is considered the output of the temperature sensor.
- The charger sliders are moved apart to the distance required to install the battery. The battery contacts must match the contacts of the device.
- Pull back the clamps and install the battery. The battery is inserted all the way so that the sliders touch the contacts. At this time, the indicators light up to confirm that the installation is correct.
- The device is connected to the electrical network. The charging process cannot be controlled. The device notifies you of the completion of the process with a sound indication. The meanings of the indicators can be found in the operating instructions.
Charging the battery directly from the adapter
To charge the battery, a power adapter for your phone, tablet or router is suitable. You need to try to find a device with 5 V and 2 A. If such an adapter is not available, use a laptop power supply with a voltage of 9-20 V and a current of 4-5 A. A resistor of the required value is included in the electrical circuit. There are 2 ways to charge using an adapter:
Charging the battery without a standard charger.
- Using the original device. In this case, the positive wire is inserted into the adapter plug, the negative wire is fixed to the shell. The reverse ends of the cables are connected to the battery contacts and secured with electrical tape or plastic clamps.
- Using a laptop power adapter. A tuning resistor is introduced into the circuit, capable of changing the current strength. You can calculate the resistance and use a simple part. The charging current is set at 1.5 A. To calculate the resistance, you need to divide the voltage output by the adapter by the required current. If using a 12V device, an 8 ohm resistor will be required.
The assembled device is connected to the mains and the procedure begins.
Phone batteries are equipped with controllers that prevent overcharging. When charging, the user only needs to monitor the temperature. If the case overheats, the device is turned off. If you have a multimeter, periodically measure the voltage at the battery terminals. If the obtained value exceeds 3.8 V, the procedure is stopped.
Tuesday, March 15, 2011
Charging a car battery is easy!
In the first case, the battery cannot be helped and it’s time to replace it with a new one. For the rest, a car charger will help, which can be purchased at any auto store. Usually it looks something like this:
Preparing to charge
- Connect the red charging clamp to the positive terminal of the battery (+).
- Connect the black charging clamp to the negative (-) terminal of the battery.
Note: If you have a so-called serviceable battery, then before charging you need to check that the electrolyte level covers the battery plates. If they are open, you need to add distilled (not from the tap) water until they are closed by 5-10 mm.
How to correctly determine the polarity on wires in a car
If the voltage on the car is checked, the course is set to search for a constant one. 20W is the correct setting if you are testing the battery. Therefore, you need to adjust the dial to the desired range/setting and connect the probes to whatever component you want to get a reading for.
You may be interested in this Features of contact resistance
How to check a headlight with a multimeter
Multimeter
To check the headlight wiring, you need to find the ground wire. There are 2-4 wires coming from the connector that connects to the light bulb. Where there are two or three wires, only one of them is ground, while four-wire connectors will have two grounds.
To test the wires on the headlight, you need to set the multimeter to resistance. You can place one of the probes on the ground and the other on the negative pole of the car battery.
Note! If continuity is not read, then there is a problem with the ground wire, meaning it needs to be replaced.
How to Test a Car's Ground Wire Using a Multimeter
To test ground wires, start by measuring resistance. Test along the wiring to check the reading is 5 ohms or less. If it exceeds, you will need to check the wire further. You need to switch the multimeter to constant voltage and turn on any electrical part that is having problems. It's worth double-checking the wire to make sure the reading doesn't exceed 0.05V. If it does, you'll need to use a different ground location or use a tie strap.
How to Check if a Fuse Has Blown Using a Multimeter
Troubleshooting a fuse using a multimeter is extremely easy. You need to set the multimeter to the lowest ohm setting and place the probes on both sides of the fuse covers. Fuses do not have polarity, so the contacts used will not show values.
Circuit breakers
Note! If the resistance value is very low, then the fuse is working perfectly. If the resistance value does not change after connecting the contacts, the fuse has blown.
You can also test the fuse using a test light. You need to turn on the key and touch both sides of the fuse with the tip of the test light. If it lights up, the fuse is good. If it does not light up, the fuse needs to be replaced.
How to use a multimeter from a car battery
If you're having trouble starting your car, one of the most common reasons is a weak battery. This is something that can be easily checked using a multimeter, which will also give an accurate idea of how much charge the battery actually has left. Testing your car battery first is a great way to rule out a likely cult for many electrical problems.
When testing a car battery, you need to check the voltage by setting the multimeter to 20 V DC. It is necessary to connect contacts to both terminals of the battery that match the color. It is better to turn on the headlights to get accurate information regarding the charge.
Important! The headlights must be turned on when the engine is stalled.
In most cases the reading will be somewhere between 11.8 V and 12.6 V. The higher the voltage reading, the more charge there is in the battery. A reading of 12.5V means the battery is almost fully charged, while a reading of 11.9V means the battery should be replaced soon.
You might be interested in how many lumens are in a 100 watt lamp
Checking the charger
Electronic devices use adapters to convert alternating current supplied from wall outlets to direct current. Once converted to direct current, current flows in one direction, hence the term direct current.
What color is the positive wire on the charger?
Note! One wire is positive, which conducts current to the device, and the other is negative, which completes the circuit. The direction of flow is called polarity and is marked on chargers using a diagram. If there is no diagram on the charger, it is worth checking the polarity.
The color polarity of the charger wires does not matter.
To determine if the charger is fit for use, do the following:
- Connect the charger to a power outlet.
- Turn on the multimeter and set the settings to DC voltage. Most multimeters indicate this setting as VDC.
- Insert the red positive contact into the hole in the charger tip.
- Touch the black negative terminal and the outer metal part of the charger tip.
- Monitor the multimeter readings. You may see a positive or negative number indicating the DC output voltage of the charger. If the number is positive, then the polarity on the inside of the charger tip is positive. If the number is negative, then the polarity inside is negative.
How to determine ground, zero and phase on wires if there are no markings
It is more difficult to determine in practice than in theory. Not all manufacturers comply with the standards. Therefore, when laying a two-phase 220 V network with grounding, you have to use a VVG cable with blue, brown and red colors. Combinations may be different, but without complying with regulatory requirements.
For your information. In old wiring from “Soviet times” there is no color marking. Identical white (gray) shells do not allow the purpose and correspondence of the lines to be known by simple visual inspection.
To avoid problems, it is recommended to carry out installation work using the same type of cable products. When color coding is not available, it should be created at the joints using insulating tape or heat shrink tubing. The latter option is preferable, as it is designed to maintain integrity for a long time.
Below are methods for determining phase and neutral wires with the advantages and disadvantages of each option. In any case, first clarify the network parameters. In old houses, for example, a two-wire connection scheme with a single working and grounding conductor is often used.
The figure shows a modern network with separate grounding and working zero connections. It is possible to connect three and single-phase loads.
Determining the phase using an indicator screwdriver
Touching the tip of such a device to the phase wire closes the current circuit. This is accompanied by the warning lamp or LED lighting up. A built-in resistor limits the current to a safe level.
Advantages of the indicator:
- minimum cost;
- compactness;
- reliability;
- durability;
- autonomy;
- good protection from adverse external influences.
The disadvantage is the limited measurement accuracy. Under certain conditions, false positives cannot be ruled out.
Determination of ground, zero and phase using a test lamp
To reproduce this technology, you need to prepare a simple design. An incandescent lamp designed for the appropriate mains voltage is screwed into a standard socket. Connect wires of sufficient length to perform work operations in a specific location.
Next, connect one of the wires to the known zero line. Others sequentially check other cable cores. Lighting of the lamp indicates the presence of a phase.
Using a measuring device
When checking a 220 V household network, you do not need to know how to determine the polarity. The power supply is organized using alternating current, so set the multimeter switch to the appropriate position. Touching the phase-zero (phase-ground) wires with the probes is accompanied by an indication of the corresponding voltage (≈220 V). The potential difference between the neutral conductor and ground is minimal.
For your information. When checking an old two-wire circuit, one of the probes touches the reinforcement in a concrete slab, a radiator of a heating system, or another grounded element of a building structure.
When switching to constant voltage, the multimeter will show where the plus and minus are. In the absence of reliable information about the electrical parameters in the circuit, they begin with the maximum measurement range with a sequential transition to smaller values with insufficient accuracy.
Such a “device” is useful for testing DC circuits in the absence of specialized measuring instruments. Bubbles near the negative wire are the release of hydrogen during the electrolysis reaction. The area near the plus will take on a greenish tint after a few minutes.
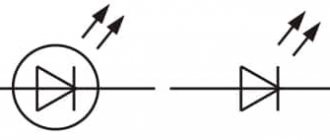
Using LED
You can create a control device with your own hands by analogy with an indicator screwdriver. Instead of a light bulb, install AL 307 or another LED with similar characteristics. A 100-120 kOhm resistor with a power of 1-2 W is added in series to the circuit.
Which wire is plus, blue or brown?
phase wire color brown, black, green, yellow, orange, gray, white, pink, turquoise, red; the neutral working wire should be blue (N); the combined neutral working and protective conductor (PEN) should be blue and have yellow-green stripes at the ends.
Interesting materials:
How is identity verification done? How does a purchase on Wildberries work? How does the eyebrow correction procedure take place? How does the process of photosynthesis occur in brief? How does the process of glycolysis occur? How does reproduction occur in higher plants? How does rigor mortis occur? How do you conceive twins? How to get to Sokolniki Park? How to get training at Tinkoff Investments?
Wire Classification Options
The typical cable name contains letters and numbers. By decoding these symbols you can find out the main characteristics of products in this category:
Example of decoding (AVBbv-ng):
- A – the core is made of aluminum (copper is not marked);
- B – insulating shells are made of PVC;
- BB – protection against mechanical damage, made of steel tape without a damping gasket;
- ng – components that prevent combustion have been added to the polymer shell.