Dimmer is a device for regulating voltage. In the everyday sense, it is used to adjust the light in a room, room, or a separate part of the apartment. Thanks to a dimmer, you can not only save on lighting, but also create an interesting lighting design for your apartment. Sophisticated electronic dimmers allow you to change the intensity of the light, turn it on and off automatically, and control the lighting from a remote control or using a sound signal.
After choosing the appropriate type of dimmer taking into account the operating network voltage, you need to select its characteristics correctly. The main indicator is the power for which this dimmer should be designed. This value is determined by the power consumption of the lighting system plus a certain reserve that will help the dimmer reliably work out its life.
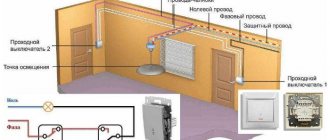
Below we consider various schemes for connecting a dimmer to a room lighting system powered by a 220 V electrical network.
What is the reason for the use of these devices?
Legrand dimmers are successfully used by designers. These devices help them create exclusive and unusual interiors. Legrand dimmers will make it possible to select the desired brightness to illuminate various parts of the interior and make any corner of the room unusual and beautiful.
For example, when visiting guests, using a dimmer, you can use the full lighting power. To relax in a calm and relaxing environment, you can dim the lights, make it pleasant and comfortable.
In addition, such dimmers allow not only to create a comfortable lighting environment in the house, but to extend the life of the lamps and significantly save energy consumption, since lighting can be produced at low voltage. Experts, based on experiments, have proven that the use of Legrand dimmers can reduce electricity costs by up to 60%. At the same time, devices working with halogen lighting and incandescent lamps make it possible to increase the service life of the light sources used by up to 20 times.
What series of Legrand dimmers are offered to consumers?
Legrand Valena . Type: rotary, push-button Power: 300W, 400W, 600W, 1000W Colors: white, ivory, aluminum Price from 1519 rubles.
Legrand Celiane . Type: push-button, touch Power: 300W, 400W, 600W Colors: white, ivory, titanium, graphite Price from 2790 rubles.
Legrand Galea Life . Type: push-button, rotary Power: 400W, 600W, 1000W Colors: white, aluminum, mother-of-pearl, dark bronze, titanium Price from 1697 rubles.
Legrand Cariva . Type: push-button, rotary Power: 300W, 500W Colors: white, ivory Price from 1329 rubles.
Legrand Mosaic . Type: push-button Power: 400W, 1000W Colors: white, aluminum Price from 1990 rubles.
What types of Legrand dimmers exist?
According to their management, they can be:
- rotary. This dimmer is controlled by rotating the rotating element. Such devices are present in the Valena, Cariva and Galea Life series.
- push-button They are adjustable at the touch of a button. These products are available in the Celiane, Valena, Mosaic, Galea Life, and Cariva series.
- sensory. The luminous flux is adjusted by lightly touching a certain sector of the key. Such devices can be equipped with an IR receiver that operates with a remote control. They are often used in walk-through areas. Such dimmers exist in the Celiane series.
They can also be divided according to the type and power of the light sources used:
- for incandescent and halogen lamps (voltage not less than 20 V). The brightness of their light is adjusted according to the applied voltage;
- for halogen (low voltage) lamps. They are powered through a transformer. This is valid for lamps that are designed for a certain voltage (from 12 to 24 V). The transformer, in this case, makes it possible to convert it to the desired value. It is necessary that the transformer be electronic, then it is perfectly regulated and can carry out the so-called “soft switching on” of the voltage;
- for fluorescent lamps. In this case, an LED dimmer is used. For its high-quality functioning, a choke is required in the design. This device can also adjust the light intensity.
Therefore, when purchasing dimmers, you need to understand what type of lamps they will be used for. To correctly select a dimmer, for example, for energy-saving types of lamps, you need to calculate the total power so that it can withstand the load.
Application requirements
It should be noted right away that the simplest dimmers that are used at home can only be used to control incandescent and halogen lamps. If they are connected to LED strips and fluorescent light bulbs, both devices will fail in a short period of time. This is why it is necessary to choose dimmers based on which light bulbs they will control.
The remaining requirements when connecting a dimmer are as follows:
- The minimum power of the lamp to which the connection will be made should not be lower than 40 W. If you ignore this point, the service life of the regulator will be noticeably reduced.
- It is not recommended to install the dimmer in a room where the temperature is above 25°C. Overheating the device will negatively affect its operation.
- The phase conductor must be broken, which is connected to the connector marked L. Connecting the zero is strictly prohibited, just like when connecting a standard light switch.
- To adjust the glow of fluorescent lamps, choose products with the appropriate designation, which indicates that the lamp can be used for dimming.
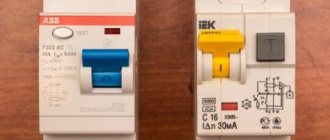
- If you decide to use a dimmer together with LED lamps and strips, you need to buy a device of a special design that can work with such a light source. Leading manufacturers: Schneider, Legrand, ABB and Viko have such models in their range, but their cost is much higher.
- The power of the dimmer must exceed the total power of the lamps it will serve. For example, if you decide to use 3 100-watt light bulbs, the power of the device should be selected with a margin of at least 500 watts. If the total power of the luminaires is more than 1 kW, in this case you need to additionally connect an amplifier, with which it is possible to service a lighting system with a power of up to 1.8 kW.
- It is prohibited to simultaneously connect capacitive and inductive loads to the dimmer.
These are all the requirements that you must adhere to in order to correctly connect the dimmer with your own hands!
What options for using Legrand dimmers exist?
- Single . Such a dimmer can “work” with one lamp or be used for several light sources that are combined into one group. For example, according to the appropriate settings from the remote control, the selected group of lamps begins to change the lighting brightness mode. Dimmers that control the centers can combine from 2 to 6 zones into one circuit. Such a dimmer with one remote control can produce light zoning for an entire home (apartment or house).
- Group . Effective accent lighting is created against the background of the main lighting in the interior. This way you can highlight that detail of the room that is worthy of attention. For example, you can highlight a painting or a chic vase of flowers with soft lighting, or, conversely, brightly illuminate a group of furniture, which will make it possible to present the decor more beautifully and advantageously.
Which Legrand dimmer should you choose: rotary or push-button?
These types of dimmers are the easiest to operate and therefore very popular. Many consumers are wondering which one to choose.
If you do not need to change the lighting level every time you turn on the light, then the best option is push-button devices. They remember the user’s settings (thanks to the microcontroller) and “start” from the light level he sets. Also, push-button dimmers, for example, in the Valena and Mosaic series, are sometimes equipped with 2 keys, the first performs the “off-on” function, the second controls the brightness level.
Rotary dimmers are the simplest type of such devices. The brightness of the lighting from zero to 100% is adjusted by adjusting a specialized handle (example: Cariva, Galea Life series). They do not have microcontrollers and therefore have a lower cost. Such devices are suitable for any type of room where the user does not need one level of light and regularly sets the desired option by simply turning the handle.
How are Legrand dimmers connected?
This procedure is quite simple. Like regular switches, dimmers are installed in a specialized box (installation box). The only important condition for a safe and competent connection is the need to connect the terminals to the load and phase. Connecting a dimmer does not require the use of any special parts, but involves the use of triacs regardless of the load power. In this case, the voltage must be at least 400 V, since in the network its instantaneous value can be 350 V.
Dimmer is a device for regulating voltage. In the everyday sense, it is used to adjust the light in a room, room, or a separate part of the apartment. Thanks to a dimmer, you can not only save on lighting, but also create an interesting lighting design for your apartment. Sophisticated electronic dimmers allow you to change the intensity of the light, turn it on and off automatically, and control the lighting from a remote control or using a sound signal.
What it is
Dimmers are devices that are used to reduce the brightness of light. By changing the voltage signal supplied to the lamp, you can reduce the intensity of the light flux. Dimmer is related to various electrical devices, but most often this concept is used as an addition to lighting devices. More specialized equipment is needed to dim fluorescent fumes, mercury fumes, and control other chemical processes.
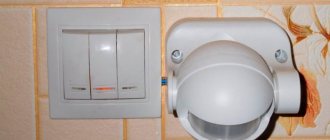
Photo - push dimmer
These devices are used both in everyday life and for lighting large industrial facilities. Small household dimmers, for example, Legrand (LeGrand), Schneider Electric (Schneider), Triac, Blackmar, ABB can be equipped with remote control (radio-controlled device). Modern professional home dimmers are controlled by a DMX or DALI digital control system.
Photo - LED strip and dimmer
Previously, for energy-saving lamps, fluorescent and halogen, even mechanical dimmers were used, which made it possible to slightly dim or, conversely, increase the luminous flux. This is quite convenient, because you can control the lighting system. The dimmer circuit on a triac allows you to extend the life of the lamps, due to the fact that the touch switch changes the light pattern, depending on natural light or individual settings.
Schematic diagram of dimmer connection
The dimmer wiring diagram is similar to the switch wiring diagram. The dimmer, like the switch, is installed in series with the load. Moreover, this device can be placed in the same place where a regular switch was located. Before connecting a dimmer instead of a switch, you must turn off the mains power, disconnect the power wires from the switch terminals and install a dimmer in its place, since its installation dimensions correspond to the dimensions of the switch.
When connecting the dimmer to the electrical network, it must be taken into account that it must be connected to the gap of the phase wire designated by the letter L, but not the neutral wire marked N.
What is a dimmer for and how to connect it
Today, many people prefer to install a dimmer instead of a boring standard switch. Devices of this type are different. They have both positive “traits” and negative ones. But before purchasing a dimmer, you will need to understand what it is. After all, few people like to throw their money away.
The dimmer is shown in the photo
What it is?
The term dimmer is understood as a control device that, due to its functionality, allows you to control the supply of light or, for example, sound. With the help of this element, it will be possible to add more light if a person starts reading a book, and also, on the contrary, make it quieter if the baby goes to bed. The principle of its operation comes down to the fact that flows can be regulated due to the output voltage.
All dimmers can be divided into the following types:
- Sensory. In this case, you can control the element with a light touch on the touch panel.
- Keyboards. You can turn on the device by pressing a key. You can adjust the lighting supply by holding the key element for more than a few seconds.
- Rotary. In this case, to adjust the light flow, you simply need to turn the knob in one direction or the other.
- Turn-push. Such dimmers allow you to remember the light supply levels and turn on by pressing the handle.
For example, very often this type of regulator is used in radio tape recorders that are installed in vehicles. It serves as a regulator of the light signal level. They are also attached to lighting fixtures and radios. Moreover, it should be noted that low-power or LED lamps are often used with a dimmer.
It is also worth noting that, unlike previously used regulators, the dimmer consumes absolutely no electrical energy. This helps to significantly reduce its costs. But sometimes a person may encounter the fact that the direct regulator begins to hum. There are several reasons for this, and the most common are voltage drops in the system and overheating. Prolonged operation of a device equipped with a dimmer can lead to losses and overheating.
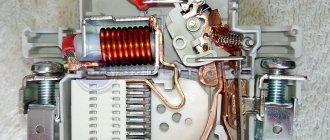
Device
To disassemble a dimmer to detect an actual breakdown, you need to understand its circuit diagram and know what exactly this regulating device consists of.
The diagram shows how the dimmer works
In fact, the dimmer device is incredibly simple. It may vary slightly depending on the brand and manufacturer. Moreover, the difference lies in the quality of components and type of assembly.
The actual dimmer device in the diagram
To disassemble the regulator, you “need” to go to the box in which it was stored. This is where the equipment diagram should be located. To connect, the dimmer is initially disassembled. Pull the button towards you, and then open the lid of the device.
How to connect?
Dimmer connection diagrams
To correctly connect the control device, you must adhere to the following tips:
- It should be mounted in the place where the mounting box was previously. It will replace the switch.
- This type of regulator is installed in a phase wire break. This suggests that after passing into the distribution box, the phase current will go to the dimmer itself, after which it will return to the box. And again to the lighting fixture.
- Experts say that the zero-type conductor must go from the distribution box to the lighting fixture.
This connection option is the most correct. Moreover, it should be noted that you should first use special schemes.
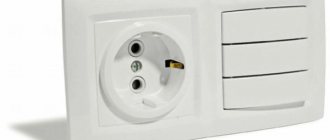
In addition to embedding a dimmer instead of a switch, it can be installed on a cord and in close proximity to an outlet.
Another option for connecting a dimmer in the diagram
Attention! Currently, dimmers are used to regulate the supply of light to halogen and incandescent lamps. They are also suitable for lamps with a low-voltage characteristic (40-500V).
Connection diagrams
The picture shows a dimmer
- Legrand dimmer - this type of drawing can be found in the box that comes with Legrand dimmers.
Legrand dimmer connection diagram
Connection diagram for dimmer with switch
Triac dimmer circuit
Connection diagram for pass-through dimmer
Schneider dimmer in the picture
Video
Watch the video on how to choose a dimmer:
Once upon a time, in distant childhood, everyone used garlands with great pleasure. Especially for this purpose, the most common variable resistance was used, which is designed for use in a circuit diagram operating from a 220V current source. But this device was enough to adjust the light. Here it is important to choose a resistor and then half the battle is done. All that remains is to place it in the case. But this trick is not possible with modern light bulbs; you will have to use one of the options proposed above.
Connection diagram for dimmer with switch
More convenient, especially for the bedroom, is the circuit for switching the dimmer in series with a regular switch. In this case, it is better to install the dimmer near the bed so that it is convenient to control the light intensity without getting out of bed.
You can find out how to turn on chandelier lamps in groups with a single switch with several keys here.
A regular switch is installed near the door of the room. It is needed to turn the light on and off when entering or leaving the bedroom.
Alternative devices on controllers and with remote control
Touch devices with a controller or remote control are more expensive, functional and intelligent types of dimmers.
For independent dimming of lamps from several points, you can use not mechanical, but sensory dimmers. Such devices are synchronized with each other thanks to electronic components and controllers, which allows you to control each device independently of the other.
You can install a touch dimmer and connect adjustment buttons to it where required. This option does not have the disadvantage of simple circuits with a switch. The buttons of the touch device can work as simple switches and adjust the lighting.
The disadvantages of such devices are their high price, complexity of installation - they must be installed by qualified specialists, as well as a small choice of design.
Remote devices are an excellent option for regulating lighting from anywhere in the apartment. Such devices can be divided into two types:
- Using a radio transmitter in their work;
- Using infrared radiation.
We bring to your attention video instructions on how to properly connect a dimmer:
They can also be combined with conventional wired switches. They perform all the same tasks as others - they control the switching on and off of lamps and the brightness of lighting, remote control is just another useful function of a dimmer.
The problem of regulating lighting power from several places is quite solvable, although each method has some disadvantages.
A simpler option for controlling a lamp is to install a dimmer and switch. This scheme is more economical and does not require large investments. A more expensive but comfortable solution to the problem is the use of intelligent systems based on controllers or using remote control.
Once you have decided on the brand and type of dimmer to adjust the lighting, you need to connect it somehow.
In addition to simple models, where there are only two input-output terminals, you should not forget about other nuances. Therefore, let's look step by step from A to Z at the main circuits for connecting a dimmer to a lighting network that you may encounter.
On the one hand, such a regulator can be turned on to control one or several lamps as a single electrical point
It doesn’t matter whether it’s a touch dimmer or a rotary-push one
Or you can use a pass-through dimmer and control the light from different places in your apartment or house.
But in general, before connecting any lamp in the apartment, it would not hurt to find out whether it can be dimmed at all. After all, there are many problems with this matter, especially with LED lamps.
When it comes to ordinary incandescent or halogen lamps, there is no need to rack your brains.
Switching on the dimmer with pass-through switches
The principle of operation is that switches allow you to turn on the light when entering a room and turn off the light on the other side of the corridor or staircase. The connection diagram for a pass-through dimmer has its own characteristics. It must be taken into account that the device cannot be switched on between two pass-through switches where two electrical lines are laid. It is better to include it in the phase wire between the switch and the load. Another feature of this circuit is that if the dimmer is in the off state, the pass-through switches will not work.
wiring diagram for Legrand pass-through, Legrand Valena and switch in one housing
A dimmer (adjustable switch) is a rheostat-type device that allows you to smoothly change the current and voltage in the range from 0 to 220V Making the design of your apartment not only attractive, but practical and comfortable is the main task of any owner. And various electronic devices today are designed to contribute in every possible way to the realization of these goals. One of the devices that combines an interesting design solution and practicality is a dimmer or dimmer. What advantages does this device have and how to connect it - read below.
Why do you need a pass-through dimmer: the principle of operation of the dimmer
A dimmer is a device that is used to change the brightness of incandescent, halogen, LED and fluorescent lamps, and some types of energy-saving lamps. The operating principle of the dimmer is based on the action of a rheostat. So, when the position of the rheostat lever changes, the amount of resistance in the circuit changes. Consequently, the brightness of the lamp also changes. At the same time, increasing brightness does not require increasing the current load.
The design of the switch with a brightness control is quite simple - it is a smooth adjustment of the switch resistance
The process of adjusting the brightness of lighting occurs through the rational use of electricity.
That is why a dimmer can significantly save energy consumption. Thus, it has been experimentally proven that the device can reduce energy consumption by half! What can the device be used for?
So, you can use a dimmer if necessary:
- Illuminate the corridor with the stairs at night;
- Leave soft light (which will not interfere with rest) for household members returning home late;
- Reduce the brightness of lighting when watching television programs;
- Create a more intimate environment.
A pass-through dimmer is necessary if you need to control the brightness of the lighting from different points. Its installation may be necessary in long corridors, in which the switch is usually installed only at one end.
Pass-through dimmer: connection diagram, variations
Modern light controllers consist of symmetrical semiconductors - thyristors and triacs. Such semiconductors allow current to pass in both directions. At the same time, smooth regulation of the voltage supplied to the lamp is ensured by “phase cut-off”.
To connect a dimmer, just follow a few simple steps. The main thing is to connect it to the network correctly
A simple rotary dimmer has two terminals, and the lighting power supply circuit is switched on open, like a regular switch.
In this case, from the distribution box the phase goes to the dimmer, and the zero and grounding go to the lamp. This is the fastest and simplest regulator connection diagram. This way you can connect any rotary dimmer (for example, Verkel). But what if you need to install a pass-through switch in your home?
There are several schemes for connecting a pass-through dimmer:
- Consistent. To implement this scheme, it is necessary to install two dimmers on one light source. In this case, as in the standard circuit, zero should go from the distribution box to the lighting devices, and the phase wire should go to the break, to one dimmer. In addition, the two dimmers must be connected to each other by a phase jumper. For lighting fixtures, the phase must come from the second dimmer. This connection will be convenient in large rooms and corridors.
- Parallel. For such a circuit you will also need to connect two dimmers. In this case, the devices will play the role of switches and be dependent on each other. The main inconvenience of such a connection is that when one dimmer operates 100%, it will be impossible to control the brightness of the lighting using the second.
Lighting control from different points in the room
To provide this lighting control option, 2 schemes can be considered.
Installation diagram with two dimmers
When you need to regulate lighting from two different points, you can use a circuit with two dimmers. In this case, the first and second terminals of the dimmers are connected to each other.
The phase wire is connected to the remaining third terminal of one of the dimmers, and from the third terminal of the second device the wire goes to the load. Thus, three wires come out of the junction box of each dimmer.
How to properly connect a high quality dimmer
To ensure the adjustment of room illumination from different points, it is possible to use imported high-quality push-button dimmers, for example, the Legrand Valena type produced by the French company Legrand. A special feature of this device is that the purchase package includes additional adjustment buttons that can be installed at different ends of the illuminated room. In this case, the distance from the dimmer to the farthest remote button is limited to 50 meters.
There are detailed instructions for installing spotlights in drywall, and this article will help you on how to make the right choice of LED lamps for home lighting.
The circuit diagram for switching on a dimmer with remote adjustment buttons is as follows. The phase wire approaches the dimmer terminal No. 1 and the first terminals of the remote buttons. From the second terminals of the remote buttons, the wire goes to terminal B of the dimmer. The load is connected to terminal No. 2 of the dimmer and neutral wire N.
Of course, you have to overpay significantly for the capabilities of such a branded device. Thus, a Legrand Valena dimmer, designed for 600 W, costs 2,486 rubles, while the domestic AGAT-K-200 costs about 500 rubles.
So, before you install a dimmer with your own hands, you need to remember just a few rules:
- Although there are various options for connecting dimmers, their circuits are quite simple - they are installed in series with the power source in the phase wire of the power network.
- To adjust the lighting from different points in the room, you can use a circuit with one high-quality, expensive dimmer with additional remote buttons.
Video: how to connect a dimmer - a specific example
Dimmers or dimmers are used to smoothly adjust the brightness level of artificial lighting, and they also have almost all the ability to turn on/off. In this article we will talk about models and their connection diagrams, suitable only for lamps and chandeliers with halogen or incandescent lamps.
Attention! Dimmers of conventional design are not capable of regulating LED or fluorescent energy-saving lamps. Don’t even think about installing them , because all you will achieve is a tenfold reduction in the service life of these types of lamps. But if you wish, using special energy-saving lamps and dimmers you can adjust their brightness. Read more about this in our next article.
Today, many different models of dimmers for incandescent and halogen lamps are sold. Some of them have additional lighting control capabilities:
- With the function of setting a program for switching on, switching off times, etc.
- Connection and control using the smart home system.
- Smooth lamp shutdown.
- Remote control using a remote control.
- Control by voice, clap, etc.
I recommend that before purchasing, you decide which functions you need, and you shouldn’t overpay for the extra ones. And it is especially necessary before starting electrical installation work to determine how and from what places you want to control the lighting in your room. Based on this, it will then be necessary to lay electrical cables to implement your planned scheme.
Installation and connection of the lighting controller (Dimmer)
Installation, installation and connection of a lighting controller, light dimmer for a chandelier, ceiling or hanging lamp in St. Petersburg (St. Petersburg). Moving, replacing and repairing a dimmer unit in an apartment (room, kitchen) is inexpensive. Call a specialist to your home in St. Petersburg, visit a specialist to the suburbs, Leningrad region. Electrical installation work in a private house or country house.
Grilling walls, ceilings, floors for wiring for a dimmer . Electrical installation in a brick, wooden house (timber, log, frame), apartment with concrete walls, foam block, foam concrete. Drilling. sawing, drilling holes (sockets) for a light regulator - dimmer . Installation of socket boxes for a lighting controller (dimmer). Installation of a dimmer for heated floors (temperature regulator), built-in acoustic system (smart home). Urgent complex electrical installation work, electrician services.
Installation and connection of a dimmer - price, cost
The cost of installing and connecting a light controller, lighting (dimmer) for a lamp, chandelier depends on the type of dimmer and can range from 1000 rubles. Replacing and repairing the dimmer unit will cost from 1,500 rubles for the service of a master electrician.
Call an electrician to replace the dimmer , change the old one, install and connect a new dimmer , dimmer unit in St. Petersburg (St. Petersburg). Installing a dimmer for a chandelier in a room, bathroom, toilet, corridor, hallway, kitchen. Repair of the light controller, replacement of the light controller (dimmer). Low prices. Guarantee.
Russian electricians from St. Petersburg
Price for work - from 800 rubles
Dimmer connection diagram for a chandelier, lamp
The connection diagram for a light controller (dimmer) for a chandelier is quite simple; to begin with, just dismantle the old switch. The place it occupied is quite suitable for installing a dimmer. The device itself is similar in appearance to an ordinary standard switch, only on the front surface instead of keys there is a washer-regulator installed.
To install and connect the dimmer , you need to stock up on a set of screwdrivers, and also have a tester, or a tester screwdriver, and electrical tape. The connection diagram is indicated on the package; in principle, there are only two wires - phase and neutral. The dimmer is connected like a simple switch; there may also be a ground wire. For installation, you do not need to change the existing wiring, just if you connected an old chandelier with a large number of wires, then some of them will not be used.
Dimmer connection diagram for LED strip
Installation and connection of a lighting controller - dimmer , its replacement can be carried out by anyone with the slightest knowledge of electrics, the main thing is to do it, making sure that the voltage is turned off, and no one will be able to turn it on without you.
Dimmer connection diagrams.
Next, we will look at various schemes for organizing lighting control in a room in your house or apartment. Starting from the simplest to the most complex, allowing you to regulate and control the inclusion of halogen or incandescent lamps from different places in your room.
In principle, almost any man can do all this with his own hands. The main thing is to always turn off the voltage from the electrical wiring section of the house or apartment where you will be working. And make sure there is no phase using an indicator screwdriver.
Schematic diagram of connecting a dimmer.
Let's start with the most common and simple circuit, consisting of one dimmer and one or more lamps connected to it in series. Just remember that the dimmer is placed only in the gap of the phase wire (indicated by L), and not in the neutral wire (N).
To connect, you need to connect the electrical wire coming from the junction box to terminal “ L with an up arrow”, and the second wire to the designation “
Connecting a dimmer - 100 photos of installation work and descriptions of modern models
Purpose of the device
A dimmer is a device that, in domestic conditions, allows you to regulate the brightness of light bulbs or the temperature of heating devices. Their use is considered most effective when adjusting the glow of conventional incandescent lamps.
Thanks to their action, the supplied voltage can vary from 0% to 100%. This allows you to extend the life of the lamps. But they are not used with transformer or pulse type power supplies, as this will lead to damage to the devices.
Connecting a dimmer, for example legrand, allows you to effectively control the brightness. However, many devices are equipped with additional options:
- timer-scheduled lights off;
- the ability to automatically turn on/off lamps without human intervention or presence;
- clap or voice control;
- regulation of light flux at a distance;
- choosing the optimal lighting mode;
- connection to “smart” systems.
Types of devices
The composition and quality of the element base affects the characteristics of dimmers. Depending on this parameter, there are:
Rheostatic - a cheap option with low efficiency, high heating levels and the need for a cooling system. These are ineffective home products that have been discontinued.
Electronic ones using triacs, transistors and thyristors are an inexpensive option, which, however, interferes with the operation of sensitive devices.
Autotransformer ones are expensive and high-quality analogues. But at the same time they are quite massive.
It is important to focus not so much on the type of dimmer, but on the permissible load and characteristics of the lamps that can be connected to it.
Depending on the installation method, there are:
- modular, which are placed in the panel and can be used with incandescent and halogen lamps in the presence of a step-down transformer;
- designs on a cord for regulating light from lighting fixtures with incandescent bulbs;
- mounted in an installation cell and allowing the connection of additional LED and halogen lamps
- monoblock - placed instead of a switch or in a similar box.
Monoblocks have different ways of controlling flow. These can be rotary, push, turn-push and touch models. They are connected to a phase-type circuit break, as shown in the photo of connecting the dimmer. Compatibility with lamp types may vary and is indicated on the device housing.
Connection options
Before installing the device, you need to decide on the most suitable wiring arrangement. Nowadays the use of a candy bar is popular. You can use the dimmer as an independent control element or in conjunction with a regular switch:
The standard dimmer connection diagram assumes that it is placed on a phase break. Zero and grounding are carried out directly to the lighting fixture.
Use in conjunction with a switch placed at the front door for standard circuit making/breaking. But the dimmer is mounted in a convenient place, for example, near the bed in the bedroom or at the desk in the office. Schematically, first a switch is placed in the phase break, and only after it - a dimmer.
Double control is ensured by installing two dimmers in different places in the room if it is too spacious. The devices should be connected using jumpers. You can also use one dimmer, but with several pass-through switches.
Connecting LED lamps and strips. The dimmer is connected to the phase wire, but its output is sent to the controller, to which zero is supplied. Wires go from the controller to the lamp.
Installation features
If you have a pre-prepared groove and connected wiring, the connection is not difficult. It is similar to installing a conventional switch. First you need to turn off the electricity in the apartment. Then the mounting box is attached. The cores of the corresponding wiring are connected to the corresponding terminals, and the housing is inserted into the cell.
To secure the clamps, you need to unscrew the clamping screws on the side. Then the decorative edging is installed, the nut is tightened and the wheel is installed.
What everyone needs to know about dimmers:
- Many people mistakenly believe that dimmers save energy. At the lowest rage level, savings are no more than 15 percent . The rest is dissipated by the dimmer.
- Due to the possibility of overheating, dimmers should not be used at ambient temperatures above 27 degrees .
- The minimum connected load must be at least 40 watts . Otherwise, the service life will be significantly reduced.
- Use dimmers only for their intended purpose and to regulate the types of devices specified in the technical data sheet.
I don’t quite understand the diagram for connecting two dimers to one device, that is, each dimer, regardless of the settings of the other dimer, will easily adjust the brightness both in one direction and in the other?
That's right - you can adjust the brightness from 2 places.
I think that scheme No. 2 is less convenient in the bedroom than scheme No. 4, in which the role of a pass-through switch is played by a dimmer - that is, the dimmer both adjusts the brightness and turns the light off/on, the first switch remains a regular pass-through switch, the second is absent. Question: what kind of dimmer should be used in this case and is there such a dimmer at all?
The dimmer cannot be pass-through. The essence of scheme No. 4 is that the switching is controlled by pass-through switches from different places. And the dimmer is only for adjusting the brightness level of the lighting.
There are “smart” dimmers that perform both the dimmer function and the role of the right switch (circuit No. 4) simultaneously. I found the following dimmer for myself: Legrand Valena 774162 Dimmer 4-key 400W. It has a pass-through connection option. In this case, the role of the left switch will be played by a button or a regular switch, and a separate right switch in circuit No. 4 will not be required. I think such a dimmer can be called a pass-through dimmer.
Quote from diagram No. 4: “The brightness level allows you to set the dimmer, but if you put it in the off position, the lamps will not respond to switching with pass-through switches.” If you install a cross switch instead of the second pass-through switch, then at any position of the dimmer switch the pass-through switches will be switchable!
Yes, Ivan, you are right, but this is the topic of another article. Not everyone can turn on pass-through switches, but you are talking about cross switches. And the article talked about the fact that the old and new wiring are not installed. And in your version, you need to immediately think through this option.
I've been struggling with information about dimers for two days now. The fact is that 220V LED bulbs have appeared on sale. with brightness adjustment. But the literature on the choice of dimers is extremely scarce and contradictory. Some necessarily insist on dimers with a zero point (?). Others are inclined only to use a dimer on triacs. But will an ordinary store-bought one work? My main light in the chandelier is 220V. (22 cartridges) and for decoration a bunch of LEDs were inserted. Previously, all this horror was controlled from a remote control via radio. Now it can no longer be controlled (something died inside the chandelier) So I want to have 22 LED lamps with a total power of 250 watts and powered by a voltage of 220 V. connect so that smooth adjustment is possible via radio. In addition, the LEDs must be independently regulated (apparently powered by a constant voltage of 12-20V.) You see, such a squiggle. Help me choose a diagram or link to a specific device.
What is good about a dimmer with a zero, so-called point, is that it is more stable in operation. But now is another moment. You have a chandelier in which the radio signal and switching control unit has burned out. Therefore, you can only replace this block and everything will work again. Most of the dimmers on the market are produced with a triac, in order for it to work stably, it needs a minimum power of controlled light (40 or 60 watts), then it will work stably. Dimmers without a zero point are based on a thyristor. Both options must be provided for controlling LED lamps. But it is best to find out which type is suitable from the manufacturer through the feedback form. But all this means that the bunch of LEDs that you have actually work through a transformer (called a driver), the voltage on which can be different. Therefore, apparently you will need to draw a separate line on them, or pick up a soldering iron. Therefore my recommendation would be this. Disassemble the lamp, see what exactly burned out in it: the control unit or (if any) voltage transformers, if there were 12 volt halogen lamps. If you still want LED lighting, then we will proceed from reality - 250 watts, this is most likely in terms of incandescent lamps, because if you take 22 bulbs of 11 watts each, it will be too grotesque, and if you also turn them on, then you will get illumination equal to 2200 watts of incandescent light bulbs. Therefore you are talking about 25 watts of real power. This means that in this case, only a dimmer with a zero point will suit you, which you will most likely have to order, because this is rare and plus you have to connect the neutral wire to it separately. Such a dimmer is connected via three wires (phase, outgoing wire to the chandelier and zero).
Types and their operating principle
An automatic dimmer works on the principle of dissipating the voltage that is supplied to the lamp. This principle of operation allows only part of the voltage to go to the table lamp or sconce, the rest of the current remains in the dimmer. The brightness of a lamp is determined by the power transmitted to it. The work occurs according to the law of direct proportionality: the higher the voltage, the brighter the lamp shines.
Photo - professional dimmer
Mains power consists of alternating current that flows in one direction and then in the other, along the cable, at a rate of 50 or 60 cycles per second (this is the frequency measured in Hertz). The value of 50 or 60 Hz depends on the type of energy carrier and the resolution of the local electrical circuit. A network dimmer is capable of changing the direction of electric current at the zero point, moreover, if the signal is at the zero crossing point, then the current does not flow in any direction. At this point, the triac regulator can either turn the lamp on or off. The main feature is that the device allows you to turn on, turn off and change the brightness without flickering the lamp. This turning on and off of the power supply occurs every time half a phase is reached or 100 - 120 times per second.
Photo - rotary dimmer
Typically, light dimmers are made using a triac or thyristor as the dimmer control part (Lizard, Arduino, Viko, Unica). These are semiconductor components of electrical circuits. A thyristor-based device operates only in one direction, i.e., during one cycle it can either increase or decrease the brightness; accordingly, at least two such controllers are needed for the system to operate. A triac is a bidirectional semiconductor, and therefore one such dimmer can be used for different phase sections.
Photo - wall touch dimmer
An electrical circuit with a timer allows you to determine the period of time in which the switching occurs. The operating state continues until the next zero crossing point, at which point the lighting automatically turns off. This electronic half-cycle is characterized by twilight, after which the regulator begins to operate in the opposite direction. The small load capacitance filters harsh signal, resulting in soft and smooth light output.
Some dimmers operate in a microcontroller with analog light output. They are called digital. Their feature is greater reliability, quiet operation and complete independence.
The dimmer can be:
- overhead,
- checkpoint,
- programmable (digital),
- two-channel
- multichannel.
Let's look at the features of each of them:
- A surface-mounted dimmer is usually produced with an additional rheostat. It is most often used for RGD LED strip;
- The walk-through is used for large rooms or lighting control over a large area. Let's say, if you have a large corridor or need to change the brightness of the lighting on the street;
- Two-channel and multi-channel dimmers differ from each other in the number of lamps and modes that can be controlled;
- There are also rotary (ABB), touch (Makel - Makel, Anam, Arduino, Sapphire) and push controls, a dimmer floor lamp, a model with a remote control, etc. They, accordingly, differ from each other in their operating options. Some need to be turned to the side, while others need to be twisted or pressed.
Photo - diagram of an eight-channel dimmer
Video: a simple diagram of how a dimmer works