- home
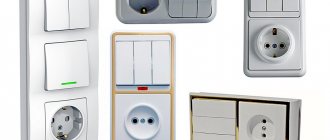
- Switches and sockets
Our site has previously described how to connect a pass-through switch in general, but here we will describe the features of how this procedure is carried out specifically with Lezard switches.
The Lezard trademark belongs to the Turkish company Dernek GROUP, which has factories in Russia.
Since its inception in 2007, this brand has established itself on the Russian market on the positive side thanks to the high quality of its products, an individual approach to the client, and timely response to market needs. Lezard is not only switches and sockets, but also various accessories, boxes for automatic machines, heaters, energy-saving lamps, lamps, chokes, cable ducts and much more.
The company is constantly expanding its own product range and this is good news.
Thanks to the use of the latest technologies, as well as the use of high-quality raw materials and highly qualified specialists, products produced under the Lezard brand are distinguished by excellent quality, durability and pleasant design.
Combined with a more than reasonable price, this gives a simply amazing effect.
Lezard walk-through switches are a high-quality product that adds a little more comfort, coziness and reliability to your home.
How to connect?
Terminals for connecting a three-gang switch
In fact, the indicated device looks like this from the back: Here you can see that it is drawn on the body where the phase fits and where the wires coming from the lamps need to be connected.
You need to connect a three-key switch in such a way that with different combinations you get a different effect from the lighting. For example, if you connect a chandelier with three lamps in such a way that one lamp lights up from one key, two from the second, and an additional lighting source, for example, a wall sconce, lights up from the third, then you will get 7 different lighting combinations for your room
Switch with socket in one housing
Separately, it is worth dwelling on such a point as connecting a three-key release with a socket in one housing.
In the case of such a connection, you significantly save your time on installation, because In this case, the wires are concentrated in one place.
Connecting a switch with a socket
The connection diagram itself differs slightly from the one given above.
As can be seen from Fig. 2, it is distinguished by the presence of an additional neutral wire, which comes from the junction box and goes directly to the outlet.
Such designs are often used where sockets are used infrequently, for example in the bathroom.
The use of a three-key switch combined with a socket in one housing is also justified in cases where there is open wiring.
In general, switches and sockets are usually located at different levels and their use in one place is convenient only in special cases.
The switch is usually placed on the wall at a height of 80-90 cm, while sockets are usually located directly above the baseboard.
How to choose the right one
When choosing a three-key switch, you should pay attention to the following details:
- There should be no burrs on the outside of such a three-key product, indicating that the product is defective
- The keys should operate easily and without jamming
- When turning on and off, clicks should be clearly audible, identical for all three keys
- On the back of the device there should be a diagram of its connection to the network.
- The terminals must be free of burrs and work properly
- It is advisable to choose devices with plug-in terminals - they facilitate installation and provide reliable and durable contact
Helpful advice: the use of the release in question in the same block with the socket is justified, in most cases, only when equipped with open wiring, because According to electrical safety rules, sockets and switches cannot be located below 1.5 m from the floor. Therefore, when choosing the location of such a unit, it is worth taking into account all the nuances of its use, so that it is convenient to turn on/off the light and use the socket.
https://youtube.com/watch?v=SeButfrGrpA
Lezard sockets and switches: connection instructions and reviews
The amount of electricity consumed by various types of household appliances, among other things, depends, of course, on the quality of sockets and switches installed in the house. Specialized stores today sell similar products of various brands. For example, Lezard sockets and switches are quite popular among consumers.
Manufacturer
Switches and sockets of the Lezard brand are produced by the Turkish company Dernek GROUP. This company was founded in 1970. Initially it specialized in the production of a wide variety of consumer goods. The products of this company began arriving on the Russian market in 1995. In 2003, the management of Dernek GROUP decided to completely refocus on the production of electrical devices. In 2007, goods produced by Dernek GROUP factories began to be supplied to the market directly under the Lezard brand.
Types of sockets and switches
The Dernek GROUP company produces similar products of various designs. If you wish, today you can purchase, for example:
- double sockets 710-0800-127;
- regular sockets 710-0800-122.
Lezard switches are available on the market as single-, three-, or two-button. Some of them are ordinary, others are passable. Lezard switches, among other things, can be supplemented with backlighting, red or green. Also, if desired, today you can purchase extension cords of this brand in specialized stores.
Switch series
There are several lines of Lezard brand sockets and switches on the market. The most popular among consumers are the Nata series devices in a case stylized as wood, stone or metal. Mira switches with a durable polycarbonate coating also earned very good reviews from consumers. In addition, there are products on the market today from this manufacturer of the Deriy series, which are characterized by increased safety.
Pass-through switches
The Turkish company Dernek GROUP, as already mentioned, supplies products of this type to the Russian market. Pass-through switches are used to control not one device, as usual, but two at once. Such Lezard devices are very popular mainly among owners of large cottages. These products are essentially switches that switch one contact to another.
Instructions for connecting a pass-through model
Almost all devices of the Dernek GROUP company sold on the domestic market have a simple design. It is not difficult to connect the products supplied by this company to a household network. The installation technology for conventional switches of this brand is absolutely the same as for similar products from any other manufacturer. The wires from the socket are connected to the device outputs according to the diagram provided by the factory. Using the usual method, the “Lezard” switch with backlight is also installed. Installation is carried out without performing any additional actions, since the indicator is included in its circuit in a special way.
With pass-through devices of this brand, which have a more complex design, some home craftsmen may encounter certain difficulties in terms of installation. Therefore, next we will consider in more detail what instructions exist for installing just such models. Mount the Lezard pass-through switch as follows:
- The circuit of both lamps is closed using an incandescent light bulb.
- The three wires of the first socket box are twisted together. In the second socket, a phase or zero is then found.
- Unwind the wires in the first box and short them together in the second socket. Also find phase or zero.
After the phase and zero (located in different boxes) have been found, strip the ends of the wires and flatten them. Next, proceed to the installation of switches. Perform this procedure as follows:
- They turn over the two-key Lezard switch and study the diagram drawn on the back panel.
- In most cases, a zero is connected to the third output of one of the switches, and a phase is connected to the second.
- The other two wires in both devices are connected to outputs with the same serial number. In this case, you should be guided by the color of the insulator.
How to connect sockets: features
This is how the Lezard, a double switch, is mounted. How to connect an outlet from this manufacturer?
Like switches, these Lezard devices have a diagram on the bottom of the body. When installing, you just need to focus on it. But there is one feature in the installation procedure for Lezard sockets. Models that come in red packaging are mounted in the usual way. Devices sold in orange include the apartment network, taking into account the fact that terminals 2 and 3 are reversed. Based on the diagram presented by the manufacturer, this should be kept in mind. The last one on the panel is a standard one, designed for the normal position of the outputs.
Assembling the extension
Connecting the Lezard switch (as well as the socket) is a fairly simple procedure. The same can be said about assembling extension cords of this brand and connecting the power wire to the blocks, which is done in just a couple of steps. Special screw fastenings are provided at the extension cord outputs.
Connecting the wire thus takes the consumer no more than a few minutes. However, on sale today, unfortunately, there are pads from this manufacturer with minor defects. There are no screw fasteners on these Lezard extension cords. Therefore, to connect the wire, those consumers who are unlucky with their purchase have to use a soldering iron. Many customers who do not want to tinker with such a tool even have to throw away the block and purchase a new one from a different manufacturer in the store.
Lezard switches: consumer opinion
Reviews about devices from this manufacturer, as already mentioned, are relatively good online. The advantages of products supplied to the market by Dernek GROUP include, first of all, its wide range. The advantages of the Lezard brand sockets and switches themselves are:
- stylish appearance;
- reliability and long service life.
In terms of build quality, most home craftsmen compare the products of this company to similar products made in China.
The disadvantages of devices from this manufacturer include, first of all, the fact that rather thin plastic is often used to assemble their cases. Equipment of this brand must be handled carefully during installation and operation.
Another disadvantage of Lezard sockets is that the contacts in them are secured with screws. The wire in such structures can, unfortunately, be pinched literally to the point of breaking off. Some batches of products supplied by Dernek GROUP may sometimes contain non-working defects.
Cost of sockets and switches
Consumers also consider the advantages of the products of the Turkish company Dernek GROUP to be their relatively low cost. The price for Lezard switches is usually about 100-150 rubles. Walk-through models cost about 200-250 rubles. Sockets of this brand are sold in specialized stores for 100-150 rubles, depending on the design and type of case.
Design
There are no special differences in the design of these switches. The principle of operation is the same as for two- or one-key ones.
Let's consider the main elements of the switching device.
Keys and frame, so-called protective elements. For their manufacture, special heat-resistant plastic is used. The keys directly turn the switch on and off.
The operating mechanism, or actuator, that operates the keys. The frame is connected to the working mechanism with special latches or screws. This entire assembled structure is mounted in an installation box and fixed in it with special spacers.
The connected three-key device must have four contacts - one to connect the power supply wire, three more will connect the switch to the lighting elements. The material for contacts is usually copper; the size varies depending on the cross-section of the wire and the connected load.
The use of this type of switches is more intensive than others, so their average service life is from 8 to 10 years. There can be two main reasons why a device may fail:
- Mechanical - fastening elements are damaged, the housing is destroyed.
- Electrical - damage to contacts.
If there is a breakdown, do not try to replace any components in a three-key switch; the device should be replaced completely. It would be better if this is done by a professional electrician in compliance with all safety rules. Although, if you are well acquainted with electrical engineering, have skills in working with power tools, and understand what “phase” and “zero” are, it will not be difficult for you to do this yourself.
How to connect a switch with two keys
Before installation, you should carefully familiarize yourself with the location of the switch contacts. Sometimes you can find a switch contact diagram on the back of switches, which shows the normally open contacts in the off position and the common terminal.
A double switch has three contacts - a common input and two separate outputs. A phase from the distribution box is connected to the input, and two outputs control the switching on of groups of chandelier lamps or other light sources. As a rule, the switch should be mounted so that the common contact is located at the bottom.
If there is no diagram on the back of the switch, then the contacts are determined as follows: the input contact is on one side of the switch, and the two terminals to which the lighting devices are connected are on the other side.
Accordingly, the two-key switch has three terminals for connecting wires - one on the input contact, and one on each of the two output contacts.
So, we figured out how the switch works. Now you need to prepare your workplace, tools and materials. We must not forget that the most important thing when performing any work related to electricity is safety.
Each of the keys of a two-key switch can be set to one of two positions, turning the electrical appliance on or off. Each group can have a different number of light bulbs - it can be either one or ten or more lamps. But a two-key switch can only control two groups of lamps.
First you need to check the wires, that is, test which one is phase. Using an indicator screwdriver it is not difficult to do this: upon contact with a phase in the screwdriver, the signal LED will light up.
Mark the wire so that when performing further operations you do not confuse it with the neutral one. Before you begin installing the switch, you must secure your work area.
If we are talking about a chandelier, you should turn off the power to the wires coming out of the ceiling. When the type of wires has been determined and marked, you can turn off the power (to do this, use the appropriate circuit breaker in the panel) and begin work on installing a double switch.
Decide in advance and ensure that you have connecting material for the wires.
- Typically used:
- self-clamping terminals;
- screw terminals;
- caps or electrical tape for hand-twisted wires.
The most convenient and reliable way is fixation with self-clamping terminals. Screw clamps can weaken over time, and electrical tape tends to lose elasticity and dry out. Because of this, the reliability of the connection may weaken significantly over time.
Self-clamping terminals provide a reliable, strong connection. To correctly connect the switch to the light bulb, you must carefully study the step-by-step instructions on how to do this. After this, you can not only carry out the installation according to the diagram, but also identify possible malfunctions. When providing electrical installations indoors, the question often arises of how to lay the cable using a corrugated pipe.
- To perform all operations accurately, you must have the following tools:
- 2 screwdrivers – flat and Phillips;
- assembly or stationery knife or other device for stripping insulation;
- pliers or side cutters;
- construction level.
https://youtube.com/watch?v=RWI_-tMXtDA
Required materials and tools
Regardless of which of the two types of pass-through switches (single-key or two-key) you will connect, you will need the following tools and materials:
- Cable - in this case it is better to use a three-core cable, and use the wire that is intended for grounding to connect two Lezard pass-through switches
- Terminal blocks - it is better to use end ones, because they significantly save time spent on wiring
- The pass-through switches themselves
- Wire stripper
- Socket boxes for placing switch housings
- Pliers or round nose pliers to give the wires the required shape for connection
- Screwdriver for fixing in the socket of the switch housing
Of course, this is an incomplete list. It all depends on what stage the electrical work is currently at.
If you are going to carry out hidden wiring with existing plaster, then you will also need a wall chaser, putty, and cable fastenings.
Don’t even try to assemble a circuit of pass-through switches inside the socket box - you shouldn’t do that. This is inconvenient both from the point of view of installation and from the point of view of subsequent possible repairs.
All work on connecting pass-through switches must be carried out exclusively in the distribution box.
Helpful advice: in order not to confuse the wires, use special stickers on them. In the future, these stickers will help you easily determine which wire goes where.
You should also not try to use twisted wire connections - this is a sign of bad taste. Firstly, the contact is completely unreliable, secondly, there is a high probability of a short circuit due to the use of poor quality or insufficient quantity of electrical tape, thirdly, the twisting takes up a lot of space even in the junction box.
Design and principle of operation of a pass-through switch
Before understanding the connection procedure, it is worth knowing the operating principle of the pass-through switch. In this case, the installation can be done on your own without much difficulty.
Externally, a pass-through switch is practically indistinguishable from an ordinary one. However, their functionality is very different. The design of a conventional breaker requires the presence of two places for connecting wires. The first is used to connect a contact at the input, the second - at the output. Inside the device there is a movable element that is used to open or close contacts when a key is pressed.
A regular switch can only operate in two positions:
- “On”, in which the electrical circuit is completed and voltage is supplied to the lighting fixtures connected to the device. The lamps begin to shine;
- “Disabled”, which opens the electrical circuit. The lamps go out.
An ordinary switch only closes and opens a circuit.
Installing two ordinary switches in different places in the room will not allow you to control the lamp from two places at once. This is the main problem.
A distinctive feature of the pass-through switch device is the presence of three contacts, of which two are located at the output and one at the input. A switch-type element located inside the device closes one of two circuits. There is no provision for an intermediate position in this case. As a result, there is always a closed circuit between the input and one of the two outputs.
A pass-through switch allows you to close one of two circuits
Assembling the extension
Connecting the Lezard switch (as well as the socket) is a fairly simple procedure. The same can be said about assembling extension cords of this brand and connecting the power wire to the blocks, which is done in just a couple of steps. Special screw fastenings are provided at the extension cord outputs.
Connecting the wire thus takes the consumer no more than a few minutes. However, on sale today, unfortunately, there are pads from this manufacturer with minor defects. There are no screw fasteners on these Lezard extension cords. Therefore, to connect the wire, those consumers who are unlucky with their purchase have to use a soldering iron. Many customers who do not want to tinker with such a tool even have to throw away the block and purchase a new one from a different manufacturer in the store.
Review of pass-through switch manufacturers: popular models
Before you buy a pass-through switch, you should get acquainted with the leading manufacturers who produce the highest quality products. In this case, it will be much easier to navigate the assortment offered by specialized stores. Some of the most popular brands include:
- Legrand;
- Schneider Electric;
- ABB;
- Viko;
- Lezard.
Products manufactured under the listed trademarks are distinguished by high build quality and long service life. With comparable technical characteristics, the price of pass-through switches can vary over a wide range. We offer you to get acquainted with the average prices so that you can make a choice much easier during the purchasing process.
Legrand: cost of the most popular models
When choosing a Legrand pass-through switch, you should clearly understand for what purpose the specific product is being purchased, and what connection diagram should be implemented. In the manufacturer's catalog you can find single- and multi-key models of different colors and sizes. We invite you to get acquainted with the average prices for Legrand pass-through switches:
| Photo | Model | Number of keys | Average cost, rubles |
| Legrand Celiane | 1 | 300 | |
| Legrand 774308 Valena | 2 | 380 | |
| Legrand Kaptika | 1 | 180 | |
| Legrand Etika | 2 | 200 | |
| Legrand Quteo | 2 | 120 |
Schneider Electric: cost of the most popular models
The well-known Schneider Electric brand produces high-quality products with a stylish modern design. Such devices can harmoniously fit into any interior. The availability of products in various colors will allow you to choose a model with a suitable design for any room. Check out the average prices for the most popular models:
| Photo | Model | Number of keys | Average cost, rubles |
| Schneider Electric Unica | 2 | 500 | |
| Schneider Electric Unica | 1 | 610 | |
| Schneider Electric Study | 1 | 230 | |
| Schneider Electric Sedna | 1 | 280 | |
| Schneider Electric Sedna | 2 | 500 | |
| Schneider Electric Glossa | 1 | 110 |
ABB: cost of the most popular models
High-quality materials are used to manufacture ABB switches. Such products are distinguished by high build quality and stylish design. Regardless of the chosen stylistic design of the room, you can always choose the most suitable option for a particular interior. In the manufacturer’s collection you can find a suitable option for a classic interior and one decorated in high-tech style. We offer you to get acquainted with the average prices for the most popular models:
| Photo | Model | Number of keys | Average cost, rubles |
| ABB Basic 55 | 1 | 310 | |
| ABB Zenit | 1 | 200 | |
| ABB STYLO | 1 | 570 | |
| ABB TACTO | 1 | 930 | |
| ABB TACTO | 2 | 1180 |
Viko: cost of the most popular models
Electrical products manufactured under the Viko trademark are presented in a fairly wide range. Thanks to this, you can choose the appropriate option for a room of any purpose and size. Among the models offered, you can find a suitable option in terms of cost and design. Average prices are presented in the table:
| Photo | Model | Number of keys | Average cost, rubles |
| Viko Carmen | 1 | 190 | |
| Viko Karre | 1 | 180 | |
| Viko Vera | 1 | 290 | |
| Viko Vera | 2 | 220 | |
| Viko Karre | 2 | 180 | |
| Viko Palmiye | 1 | 170 |
Lezard: cost of the most popular models
The manufacturer offers a wide range of products, among which you can always choose a switch with a suitable stylistic design and a suitable color. Thanks to this, you can purchase a pass-through switch that can harmoniously fit into the interior of an apartment decorated in a certain color scheme. The cost of the product depends on the color design. We suggest comparing the cost of products that have the same design, but different colors:
| Photo | Model | Number of keys | Average cost, rubles |
| Lezard Mira white | 1 | 200 | |
| Lezard Mira alder | 1 | 330 | |
| Lezard Nata cream | 1 | 180 | |
| Lezard Nata white | 1 | 150 | |
| Lezard Mira alder | 2 | 270 |
How to properly connect a triple switch
Before connecting the three-key switch, be sure to de-energize the network by turning off the machines near the meter. If there is public access to the switches, put a note on it about installation work.
For work you will need:
- flat or figured screwdriver;
- pliers;
- knife or stripper (for greater convenience);
- insulating tape;
- indicator screwdriver;
- WAGO terminal blocks or others.
First you need to disassemble the three-pin switch to get to its terminals. This is done easily: pry the keys themselves with something thin, and then remove the frame. Now let's take a closer look at connecting the triple switch. There should be four wires going to it. This can be a four-core cable, one core of which will be a phase. Although it is more common to see a single-core wire coming out of the wall - a phase - and a three-core wire nearby - for lighting devices. You can determine the phase using an indicator screwdriver.
Connection is done in just three steps:
- We connect the neutral wires of all consumers (luminaires) with the neutral supply. In the diagram of the figure they are indicated in blue. To connect the wires, it is convenient and practical to use WAGO terminal blocks, although you can get by with any other or simple twisting, only then do not forget to insulate the connection.
- We connect the phase of the supply wire (brown) with the common wire of the light switch (white).
- We connect together all the phase wires from the switch and lamps. For a better understanding, we have assembled the entire circuit according to color coding (green with green, etc.).
Note! Only the phase wire should go to the input of the three-key switch! If zero is interrupted, the light bulbs will also work, but then the electrical wiring will remain energized when in the off position. This means that even when replacing the lamp there will always be a risk of electric shock
The wires in the switch are secured with clamping screws. No more than 5-10 mm of insulation is removed from the cable so that there are no exposed wires. If the wire is stranded, use special NShVI lugs so that it does not break off when tightening the screws.
That's all. As a result, our connection diagram for a three-key switch has been assembled. All that remains is to mount it into the socket box, open it with screws and install the lining with the keys in place.
By the way, the version of a multi-pole switch with a socket has almost the same circuit. The only difference is that a separate neutral wire is supplied to the socket, and the phase is common. It can be connected either by parallel cables (separately to the socket and separately to the switch), or by one cable (by a jumper from the socket output to the common contact of the switch). The figure below shows the second connection diagram.
Triple switch connection diagram
Note! Surface mounted switches are produced for installation on fragile walls or wooden surfaces. They are also suitable for temporary occasions.
Comments:
Sergey
I use this circuit on my stairs to turn off the lights when you walk along them. Very comfortably. Thank you for the article.
Vyacheslav
As for me, pass-through switches have outlived their usefulness. A motion sensor is very inexpensive, and its installation is much simpler, so the technology is outdated
Denis
Vyacheslav, just imagine, you installed a pass-through switch in the bedroom to turn off the overhead light after you went to bed. What will you replace it with? Motion sensor? So that at night, when you turn around, you have illumination throughout your bedroom?
Stas
In corridors and stairwells, the pass-through switch can easily be replaced with a motion sensor, but in other cases it’s unlikely. In fairness, it is worth noting that there are actually not that many such cases.
Slavon
I wouldn't use Lezard - it's an unreliable Chinese knock off. But connecting it is a whole story of songs and dances with a tambourine. In the end you will change it to Legrand or ABB anyway
Albert
For the first time today I encountered Lezard's 2-key passed pass. After 2.5 hours I still haven’t connected it. Everything works without a switch. With them - no!!!
Anatoly
The most important thing in China, everything is through…. In paired pass-through switches, the switching diagram on the reverse side does not correspond to reality. Common pin 2 works with pins 1 and 4, 5 with pins 3 and 6. Pin numbering from the specified switching diagram
Timofey
Anatoly! Thanks a lot! I racked my brains assembling switches. Well done Chinese...as usual)
Ilya
It's a hat, not a switch)
Alexei
And if you use a dialer, then you can solve any puzzle from the Chinese.
Alexander
I also recently encountered the connection of a double pass-through, plus two intermediate switches (cross) lezard! ... I’ll tell you it was still those dances with a tambourine, because: the diagram on the switch itself does not correspond to reality!!! The diagram found on the Internet (precisely Lezard) is not entirely correct, that is, they work, but inserting two intermediate (crossover) switches into the middle did not work due to several wires being mixed up, and so only after checking all the contacts it became clear how and where to connect what and why it didn’t work before: we take two three-core cables (core color: F, S, K) in the distribution box, cut both “W” wires and connect one pair together and connect to it a phase that will go to one of the switches and connect We connect them to the middle contacts “2 and 5”, connect the other two “F” wires in the distribution box separately, connect them to one and the second lamp, and connect the other ends to the second switch to contacts “2 and 5”, respectively! Next, it is very important to connect the pair “c” and “k” from one cable to the contacts: “1 and 4” and “1 and 4” and the other pair “c” and “k” to the contacts: “3 and 6” and “3 and 6" (so that contacts: "3 and 1" are "k" and contacts "4 and 6" are "c" and so the connection on the back of the switch looks like this: bottom: 1-k, 2-g, 3-k, top: 4-s, 5-g, 6-s (important: 3 and 6 common cable and 4-1 common cable) now everything works and you can connect two intermediate (cross) switches (between pass-through) by pre-installing cable (between the walk-throughs) in a loop (in transit, not cut!!!) in the undercut and like this: we take it, strip the wire and see three wires: g, s, k. “g” is left uncut, but “s” and “k” are cut and connect to the intermediate (cross) switch to the contacts: “1-4” - “c” and “3-6” - “k”, where contacts 1-3 (“s-k”) are the input, and 4-6 (“s-k”) this is the way out!!! We do the same with the second cable and the second intermediate (cross) switch!!! ...with such a sawn-off shotgun I was able to install two double pass-throughs and four intermediate (cross) switches from Lezard!!!
Leave a comment Cancel reply
Related Posts
Installing the socket in the bathroom correctly
Height and placement of sockets in the kitchen of a modern apartment Making holes for sockets in concrete and tiles yourself Connecting a double socket into one socket box
What is a pass-through switch?
If you do not go into thorough and detailed descriptions of the device itself, based on its technical structure and the physical essence of the processes occurring in it, then a simplified description can be reduced to one thing - a walk-through switch is the same room switch, only with additional contacts.
For example, an apartment has one common light source. In the usual understanding of the average person, it is controlled by a switch located at the door to the room. This is a common scheme. It turns out that in order to turn off the light in the room, you need to constantly approach it. But if you are already in bed, then to do this you need to get up, which is not entirely convenient, although familiar. To avoid this, people place additional light sources near the sleeping place, which are turned on instead of general lighting. But it is possible to arrange everything so that general lighting can be turned off from several different places. And all this is quite feasible thanks to pass-through switches, which are also called redundant switches.
Types of blocks
Before you study information on how to connect an outlet with a switch, you need to know that when choosing, they pay attention not only to the design of the product - its color, shape. Before purchasing, you need to evaluate the technical parameters and the capabilities of the electrical network
The last point is especially important for apartments in old housing stock, where electrical wiring is often in critical condition. The next question is the functionality of the product. When choosing a particular unit, be sure to take into account which devices will be connected to the outlet and what their power is.
Before purchasing, they decide how many devices will be connected to the network in a particular room. When work is planned in wet rooms, the unit must be equipped with special protective curtains or covers.
Types of combined devices
Nowadays it is easy to find products with various combinations in stores. One device may contain sockets (1-2) and several switches with one/two/three or even four keys. Just like regular blocks, combined structures can be internal or external. The latter look too cumbersome, but they are the only option if there is simply no possibility of making hidden wiring.
Despite the relatively wide range, several types of designs remain the most popular.
- Block with socket and one switch. These simple designs are usually used for garages, basements and other small outbuildings. This minimum will allow you to turn on the lighting and take advantage of the benefits of civilization - heat up the electric kettle, turn on the radio or fan. Connecting a tool is an option for skilled owners.
- Device with two keys. This type of paired blocks is optimal for corridors and combined bathrooms, since it already makes it possible to get a minimum set of amenities - turn on electricity in the hallway, bathroom, connect a mobile phone charger, a vacuum cleaner, a hairdryer or any tool to the network.
- A block with three switches is suitable for small apartments with separate bathrooms/toilet rooms. In this case, a block would also be the most logical solution.
In other rooms (living room, children's room, bedroom), the presence of such structures is unlikely to be advisable, but installation in any room is still not prohibited. Blocks with several keys will help you connect multi-lane lighting devices, and an additional socket will never be superfluous. If electrical appliances are not “going to” work from such an outlet all the time, then the option is well worth considering.
No. 3. Important technical parameters of the socket
It is better to entrust the installation of sockets and switches to professionals if there is even the slightest doubt in your own abilities. On the other hand, whoever undertakes the installation of such equipment needs to know the basic technical parameters.
Grounding
Sockets can be with or without grounding. The choice depends on whether there is a grounding conductor in the apartment wiring:
- A socket without grounding is usually marked 2K, where K is a contact and the number is the number of contacts. Such sockets are used when grounding is not provided or is not necessary;
- A socket without grounding is marked 2K+Z; it is externally distinguished by the presence of two metal strips in the socket with contacts. This is an option for homes that use a three-wire network.
It is worth noting that wiring without grounding is becoming less and less common today; it remains only in old houses.
Ratings
Type and strength, voltage, frequency of the network are the most important parameters when choosing an outlet. Our networks use alternating voltage 220 V and a frequency of 50 Hz; in other countries these parameters are slightly different. It is better to choose the rated current depending on the planned load on a given outlet. For domestic conditions, it is better to take products with a voltage of 250 V and a rated current of 10 A, for connecting a washing machine, electric stove - 16 A. Experts recommend using the ratio 4 A - 0.88 kW when choosing.
When choosing an outlet and calculating their total number in the apartment, you should take into account the number of kilowatts that are allocated to your apartment. If powerful equipment is connected to all outlets at the same time, the cable may overheat, and this risks causing a fire. That is why electricians advise calculating the power of the electrical network before installing new equipment and new sockets. Such a calculation is carried out by a specialist - it is better not to waste money on this.
Screw and screwless connection
Without going into the nuances of installing the socket, we note that special screws are used to secure the core in the socket box. They are screwed into a plate that clamps the contact. If the contact becomes loose over time, you can carefully tighten the screw.
There are sockets with quick-release contacts, i.e. without screws. Instead of a traditional clamp, fixation here is carried out thanks to a special hole that can narrow and expand when a key is pressed. Manufacturers of such products promise that such a system does not need regular maintenance, and the mechanism is capable of independently and reliably pressing the contact. In reality, this does not always turn out to be the case, and to restore contact you will have to perform a much more complex procedure than simply tightening the screw.
In addition, experts advise choosing sockets where the plug connectors are equipped with springs - they allow the plug to be fixed more firmly. If you plan to connect several sockets with a cable, then there should be an additional pair of contacts, which will simplify the installation process and increase the security of the connection.
Types of connectors
In different countries of the world, they use sockets in which the connectors are arranged differently. Accordingly, electrical appliances also have a plug of a certain shape, hence the problem of adapters. We will not go into the various options and geography of their use (this is clearly shown in the picture), but we note that we use type C (without grounding) and F (with grounding) sockets.
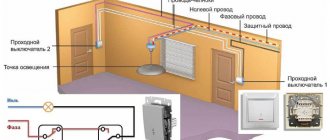
Installation features
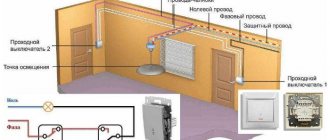
When installing such switches, not two, but three wires should be connected, because one wire goes directly from the network to the lamp, and the other two connect pass-through switches. This is clearly visible in the diagram.
To avoid getting tangled in wires, try to use the same colors. For example, a cable typically uses three wires: brown, blue and blue-green
Brown - connect the phase wire to the input of the first switch and the output of the second Blue - connect directly to the lighting fixture - this is the “neutral” wire Yellow-green - usually used for grounding, but because The lighting does not require grounding; it can be safely used at the junction of two Lezard pass-through switches.
Use this diagram for all the switches in the house and you will never get confused.
In addition to the described option, two-key pass-through switches are also produced under the Lezard brand.
The principle of their use is the same. It’s just that instead of one light source, you can connect two to this switch.
On the “other side” there can be either a single-key or a two-key “receiver”.
Using a two-key pass-through switch can significantly save not only money on the purchase of another separate device, but also the time and cost of its installation, because the necessary electrical circuit is already placed in one compact housing.
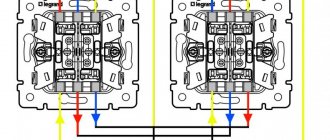
Below is a drawing that demonstrates how to connect Lezard two-key pass-through switches.
Two-key switch. Connection diagram
Where are they used?
If there are places in your house such as a long corridor, a staircase, or other areas where you need to turn the lighting on and off from different places, then a pass-through switch is something you simply cannot do without.
The question of walking down a dark corridor or turning on the light, but then going back to turn it off will no longer be in front of you thanks to the use of the Lezard pass-through switch.
In fact, it's not even a switch, but a switch. Look at the diagram in Fig. 1
Fig. 1 operating principle of two pass-through switches
Here you can see that the pass-through switch does not simply disconnect the network, but switches the voltage from one circuit to another.
Thanks to the use of a circuit of two Lezard pass-through switches, we are able to turn on/off the light from any point.
A wall-mounted Lezard pass-through switch is practically no different from a regular one. Except that there is no on/off position on it.
Connection diagram for two-button switch
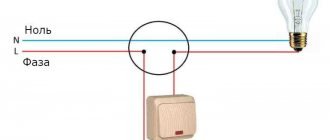
First, let's look at a detailed connection diagram for a two-key switch in order to understand in detail the operation of this device:
In order for an electrical device (including a simple lighting lamp) to work, a phase (L)
and
zero (N)
. The essence of the switch is to close/open the line through which the phase is supplied to the lighting fixtures. That is, zero always approaches the light bulb, but phase only when the switch is on and, accordingly, the circuit is closed.
In the diagram we see that the phase enters the switch along the brown cable core, and leaves through the yellow and blue ones, respectively.
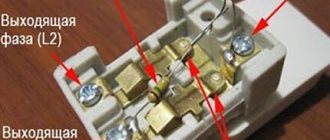
Also, to understand the connection process, you need to study the cable connections in the junction box; they are indicated in the diagram as C1, C2, C3, C4:
C1
— through this connection, the zero from the input cable goes to the groups of lamps: Blue core of the input cable VVG 2x2.5 + Blue wires of the VVG 2x1.5 cables going to groups of lamps No. 1 and No. 2;
C2
— through this connection, the phase goes to the switch: Red core of the VVG 2x2.5 input cable + Brown core of the VVG 3x1.5 cable going to the switch;
C3
— through this connection, the phase goes to group of lamps No. 1: Blue core of the VVG 3x1.5 cable going to the switch + Brown core of the VVG 2x1.5 cable going to the group of lamps No. 1;
C4
— through this connection, the phase goes to group of lamps No. 2: Yellow core of VVG 3x1.5 cable going to the switch + Brown core of VVG 2x1.5 cable going to group of lamps No. 2.
One switch for two lamps
As already mentioned, the devices control two groups of lamps, which means you can install the bathroom and corridor on a two-key switch. To do this, we bring the wires from both lamps to the wires and the location of the switch, combine each of them into separate groups, connect them with terminals and attach them to the switch. For large rooms, we recommend reading the article on how to connect a pass-through two-key switch.
Installing a light switch for two rooms is done in the same way.
Installation tips:
- combine groups thoughtfully (for example, kitchen-toilet, corridor-bath, living room-room, etc.) then there will be no cable overuse;
- install switches within easy reach: not behind a chair or cabinet;
- a more powerful switch must be connected to the lamp and fan, taking into account that in addition to the main cables, there is a wire responsible for powering the fan itself;
- We recommend using switches with simon indication;
- in order to connect the device correctly, you must look at the wiring layout, especially when connecting to two power sources;
- If you have not had such experience before, we recommend that you first watch a video of how to install the switch.
How to connect a three-key switch with your own hands
Connecting a three-circuit device is extremely simple. To do this correctly, you need to follow many step-by-step steps. The entire connection process is divided into stages:
- connecting the cable to the three-key player;
- connection of wires in the box;
- checking the correct connection and eliminating errors.
Before carrying out the process, it is advisable to study the connection diagram. This measure will help minimize possible mistakes.
Triple switch connection diagram
There are several conductors in the box. Each performs its own function:
- The cable with 3 cores is located in the circuit breaker present in the switchboard.
- A four-wire wire runs down to a three-key switch connected to the bottom.
- The connection diagram for a triple switch for 3 lamps involves connection with a 4- or 5-core VVGnG-Ls wire. Its cross section is 1.5–2 mm. A chandelier with 6 or 9 bulbs requires the same connection.
- With 3 different lamps, you need to pull 3 different three-core cables. This method is common.
Now the number of requests for “triple switch with socket diagram” on the network has increased. It is easy to find detailed connection algorithms with photographs or drawings there.
Useful video on the topic:
Connecting wires to the switch
Often the device is installed in a block with an outlet. People are wondering how to connect a three-key switch. You need to take several sequential steps:
- You will need a copper wire with a cross section of 2.5 mm². Direct the cable from the common shield. When it goes from the box to the switch, it is an error.
- Run copper wire 5*2.5 mm² down the groove. Then it will be near the switch and socket box. Connect the common wire to the contact. This is due to the more powerful load on the sockets. It is not so pronounced on lamps.
- Using a jumper, connect the phase to the upper terminal of the device. Direct the zero to contact 2. Place the remaining conductors under the lower contacts.
The cable in the box is connected using the method described above. The difference lies in the connection of the auxiliary neutral core to the central point.
Manufacturer
Switches and sockets of the Lezard brand are produced by the Turkish company Dernek GROUP. This company was founded in 1970. Initially it specialized in the production of a wide variety of consumer goods. The products of this company began arriving on the Russian market in 1995. In 2003, the management of Dernek GROUP decided to completely refocus on the production of electrical devices. In 2007, goods produced by Dernek GROUP factories began to be supplied to the market directly under the Lezard brand.